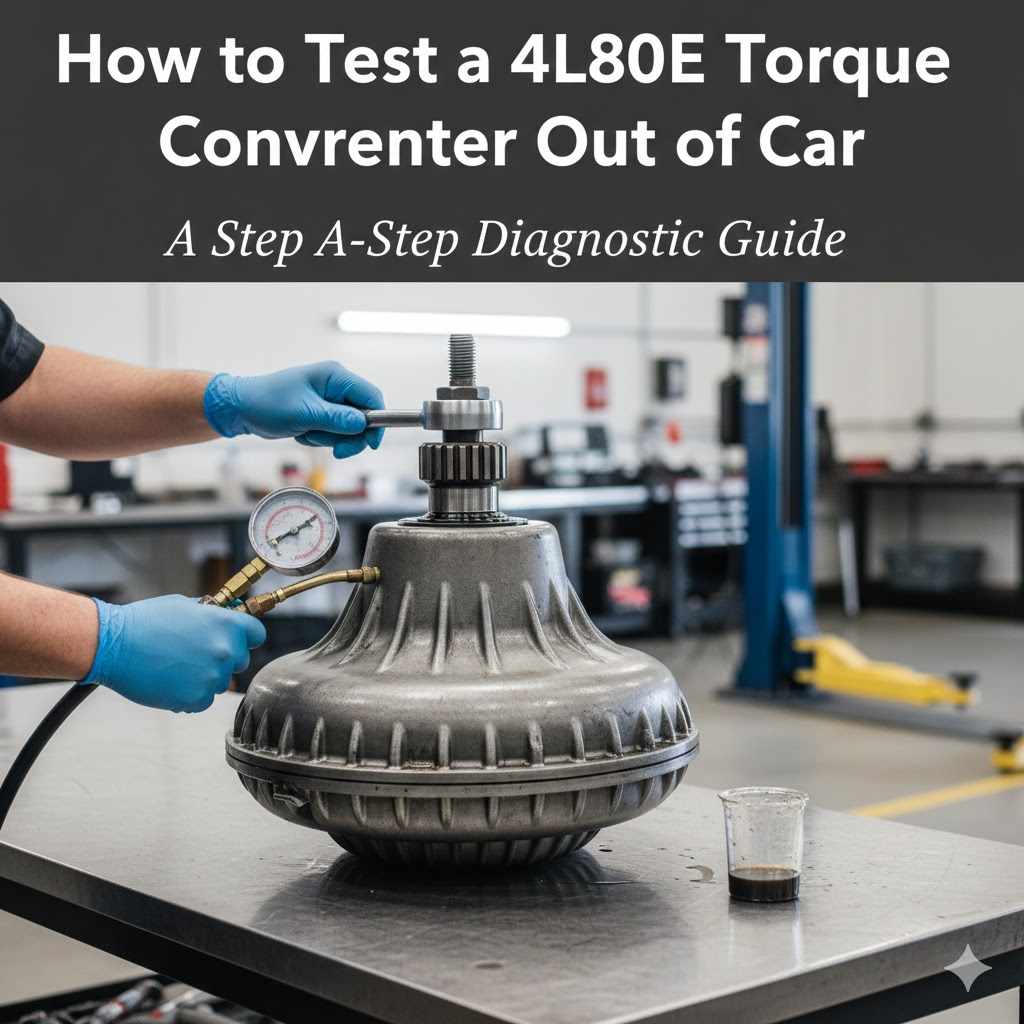
How to Test a 4L80E Torque Converter Out of Car
Testing a 4L80E torque converter when it’s not in the car can seem tricky, especially if you’re new to working on transmissions. You might wonder if it’s even possible to check if it’s good or bad without installing it. Don’t worry, it’s totally doable!
This guide breaks down exactly how to do it, step by step, making it simple. We’ll show you what to look for and how to tell if your torque converter is ready for action or needs replacing.
Why Test a 4L80E Torque Converter Out of the Vehicle
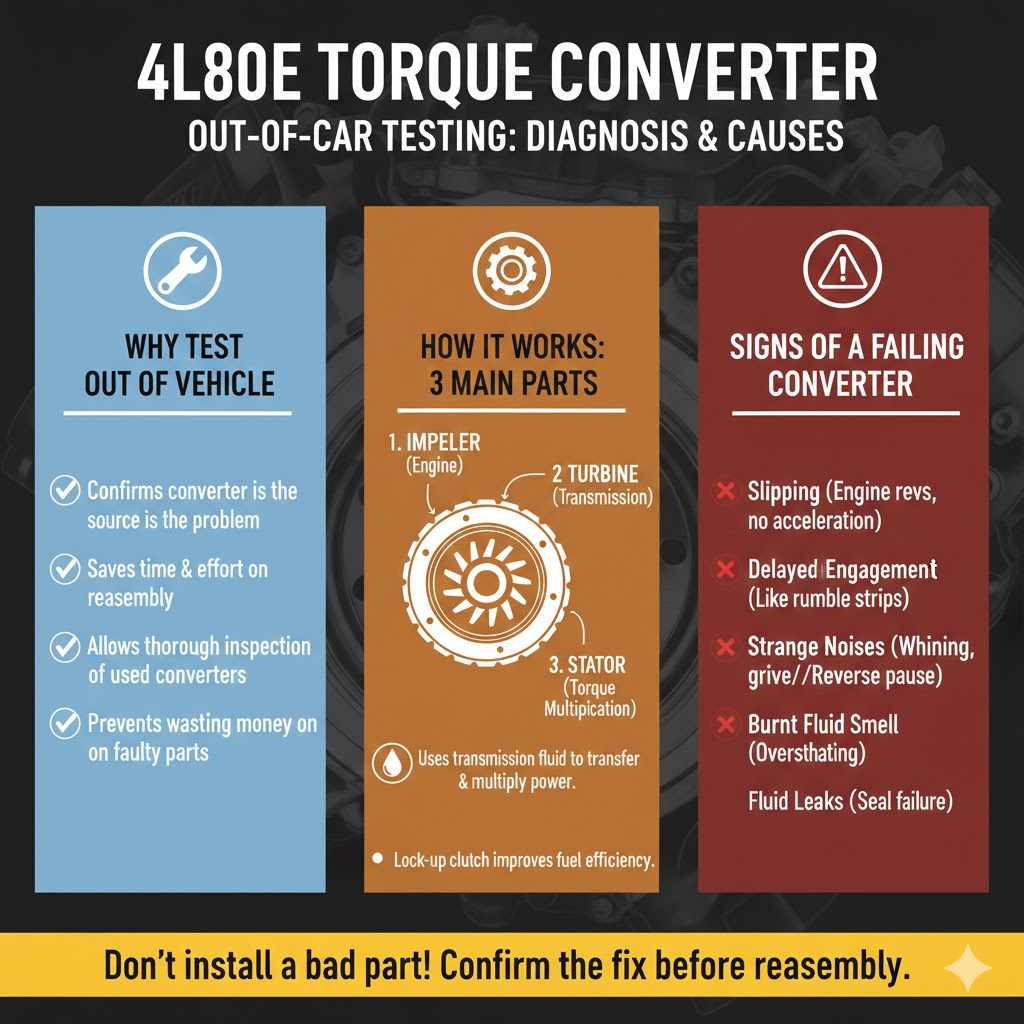
Testing a 4L80E torque converter outside of the vehicle is a smart move for several reasons. It helps you confirm the converter is the source of a transmission problem before you put it back in. This saves time and effort.
You can also use this method to check a used converter before buying it. It allows for a thorough inspection without the pressure of a vehicle reassembly. Understanding how a torque converter works is key to diagnosing issues effectively.
This process ensures you’re not wasting money or labor on a faulty part.
Understanding Torque Converter Function
A torque converter is like an automatic transmission’s clutch. It connects the engine to the transmission. It uses transmission fluid to transfer power.
It has three main parts: the impeller, the turbine, and the stator. The impeller is connected to the engine’s crankshaft. It spins and pushes transmission fluid.
This fluid then hits the turbine, which is connected to the transmission’s input shaft. The turbine starts to spin, sending power to the transmission. The stator sits between the impeller and turbine.
It redirects fluid flow to multiply torque. This multiplication is most noticeable at low speeds or when accelerating from a stop. It helps the vehicle move from a standstill more easily.
Without a functioning torque converter, your vehicle won’t move as it should.
The fluid inside the converter plays a vital role. It acts as the medium for power transfer. As the engine speed increases, the impeller spins faster.
This forces more fluid into the turbine. The turbine then spins at a speed closer to the impeller’s speed. This is when the converter starts to lock up.
A lock-up torque converter has a clutch that engages at higher speeds. This creates a direct mechanical link between the engine and transmission. It improves fuel efficiency by eliminating slippage.
When the torque converter is working correctly, you get smooth acceleration and good fuel economy. Problems arise when there’s internal damage, fluid leaks, or issues with the lock-up mechanism.
Common issues that might lead you to test your torque converter include slipping, shuddering, delayed engagement, or strange noises. If your transmission feels like it’s not grabbing gears properly, or if you notice a significant loss of power, the torque converter could be the culprit. It’s also a good idea to test it if you’ve experienced overheating in the transmission.
The heat can damage the internal components of the torque converter. By learning how to test a 4L80E torque converter out of car, you can catch these problems early.
Identifying Signs of a Failing Torque Converter
Several signs point to a torque converter that might be going bad. One common symptom is slipping. This feels like the engine is revving up, but the vehicle isn’t accelerating as it should.
It’s like the transmission is in neutral, even though it’s in gear. You might also experience a shudder or vibration, especially when cruising at a steady speed. This often happens when the lock-up clutch is trying to engage but isn’t doing so smoothly.
This can feel like driving over rumble strips.
Delayed engagement is another clue. When you shift from park into drive or reverse, there might be a noticeable pause before the transmission engages. This can be very concerning.
Strange noises are also a red flag. Whining, grinding, or rattling sounds coming from the front of the transmission could indicate internal damage. If your transmission fluid smells burnt, it’s a strong indicator of overheating.
This can be caused by a failing torque converter. These symptoms are why learning how to test a 4L80E torque converter out of car is so valuable.
A fluid leak from the torque converter housing can also be an issue. This typically means a seal has failed. Low fluid levels can lead to all sorts of transmission problems, including those related to the torque converter.
Keep an eye on your transmission fluid level and condition. Dark or gritty fluid often means there’s internal wear happening. Some of these issues are easy to spot, but others require a more hands-on approach to confirm.
That’s where out-of-car testing comes in handy.
Tools and Preparation for Torque Converter Testing
Before you begin testing your 4L80E torque converter, gather the necessary tools. You’ll need a way to physically remove the torque converter from the transmission and vehicle. This usually involves removing the transmission.
Once it’s out, you’ll need some basic hand tools like wrenches and sockets. For testing, you might need a drill, a pressure gauge, and a fluid source. Safety is paramount, so have safety glasses and gloves ready.
A clean work area is also important to prevent dirt from getting into the converter.
Essential Tools and Safety Gear
To start, you’ll need a good set of metric sockets and wrenches, as many bolts on a 4L80E transmission are metric. A torque wrench is also crucial for reassembly if you plan to put the transmission back. For the out-of-car testing, a cordless drill or a hand crank can be used to spin the converter.
You’ll need a way to hold the converter steady while you spin it. A vise or a special torque converter holding fixture works well for this. Ensure you have enough clean transmission fluid of the correct type for your 4L80E to fill the converter for certain tests.
Safety gear is non-negotiable. Always wear safety glasses to protect your eyes from any unexpected fluid spray or debris. Gloves will keep your hands clean and provide a better grip.
If you’re working under a vehicle, ensure it’s properly supported on jack stands. Never rely solely on a jack. Have a fire extinguisher nearby, especially when dealing with fluids.
Working safely ensures you can focus on the task at hand and avoid injuries. This makes the process of learning how to test a 4L80E torque converter out of car a lot less stressful.
Preparing the Work Area and Converter
Find a clean, well-lit area to work. A workbench or a sturdy table is ideal for handling the torque converter. Make sure the surface is level.
It’s important to keep the area free from dirt, dust, and debris. Contaminants can easily get into the torque converter, causing internal damage and ruining your test. If the converter is still attached to the transmission, you’ll need to detach it carefully.
This usually involves unbolting it from the flexplate. Sometimes, it can be a bit tight to get to all the bolts.
Once the converter is free from the transmission, drain any residual fluid. You can do this by tipping it over gently. It’s a good idea to place it in a drain pan first.
After draining, you can clean the exterior of the converter with a degreaser and a rag. This will make it easier to inspect for external damage. The goal is to have a clean converter ready for detailed inspection and testing.
This preparation sets you up for a successful diagnostic session.
Visual Inspection Techniques
A visual inspection is the first step in how to test a 4L80E torque converter out of car. You’re looking for obvious signs of damage or wear. This is a quick but important check that can often reveal major problems.
Pay attention to the exterior housing and the mounting studs. Even minor issues here can indicate larger internal problems.
Checking the Converter Housing and Stator
Start by examining the outer shell of the torque converter. Look for any dents, cracks, or signs of impact. A significant dent could mean it hit something, potentially damaging internal components.
Check the welds around the housing for any signs of leakage or cracks. You’ll want to look closely at the area where the converter bolts to the flexplate. The mounting studs should be straight and securely attached.
If any studs are bent, cracked, or missing, the converter is likely damaged.
Next, inspect the front seal. This seal prevents transmission fluid from leaking out. If it looks damaged, cracked, or worn, it will need to be
Inspecting the Mounting Bolts and Pilot
The mounting bolts, also known as studs, are critical. They connect the torque converter to the engine’s flexplate. Ensure all studs are present, straight, and firmly attached.
Wobbly or loose studs indicate damage to the converter hub or internal failure. You can try gently wiggling each stud. There should be no excessive movement.
Any play here suggests wear or damage.
The pilot is the part of the torque converter that inserts into the crankshaft of the engine. Check the pilot for any damage, such as bent splines or wear. A damaged pilot can cause the converter to sit incorrectly, leading to engine or transmission problems.
The pilot should be smooth and free of debris. It’s designed to provide a precise fit and alignment. A damaged pilot can cause vibrations and other issues.
Mechanical Testing Methods
Once the visual inspection is complete, it’s time for mechanical testing. These methods involve physically manipulating the converter to check its internal function. They can reveal problems that aren’t visible from the outside.
These tests require some basic tools and a bit of hands-on effort, making them an essential part of how to test a 4L80E torque converter out of car.
The Spin Test for Bearing Play
This is a simple test to check for excessive bearing wear. Hold the torque converter firmly. Try to rotate the cover (the part that bolts to the flexplate) in one direction while holding the turbine (the part that connects to the transmission input shaft) stationary.
Then, do the opposite. There should be a smooth, consistent rotation with minimal resistance. You might feel a slight drag, which is normal due to the fluid inside.
However, you should not feel any grinding, clicking, or excessive looseness. If you feel any of these sensations, it suggests internal bearing damage or wear.
A healthy torque converter will spin freely and smoothly. Any rough feeling or significant play indicates that internal parts are worn. This wear can lead to inefficient power transfer and potential failure.
Imagine trying to spin a rusty bearing versus a clean, well-lubricated one. The difference in feel is what you’re looking for. This test is particularly effective at identifying issues with the pump or stator bearings.
It’s a quick way to rule out major internal damage.
Checking for Internal Damage by Rotation
This test involves manually spinning the turbine. You want to see if it spins freely in relation to the cover. Try to spin the turbine by hand.
It should rotate smoothly and without much resistance. You will feel some resistance from the fluid, but it shouldn’t be difficult to turn. If the turbine feels tight, binds up, or makes grinding noises, there’s likely internal damage.
This could be from worn bearings, damaged fins on the turbine or impeller, or a stuck stator.
Next, hold the turbine stationary and try to rotate the cover. Again, it should spin relatively freely with some resistance from the fluid. If it’s very hard to turn or makes noise, it’s a sign of internal problems.
This might be an issue with the impeller or the pump components within the converter. The goal is to identify any binding, excessive play, or unusual noises during these rotations. This part of how to test a 4L80E torque converter out of car helps reveal hidden wear and tear.
A common failure is when the internal components of the torque converter break apart. This can cause metal shavings to float in the transmission fluid, leading to widespread damage. If you hear any rattling or loose pieces moving around inside when you shake the converter, it’s a definite sign of failure.
Don’t ignore these sounds. They are clear indicators that the converter needs replacement.
Fluid and Pressure Testing
Beyond visual and mechanical checks, fluid and pressure testing offers more definitive results. These tests simulate the operating conditions within the transmission, albeit in a simplified way. They help to confirm if the torque converter is holding pressure and transferring fluid effectively.
These are more advanced steps in how to test a 4L80E torque converter out of car but are very informative.
The Drill and Drain Test
This test helps assess the condition of the internal components, especially the impeller and turbine. You’ll need a drill with a small drill bit and a drain pan. Locate the drain plug on the torque converter.
If it doesn’t have one, you might need to drill a small hole (about 1/8 inch) in a non-critical area, usually on the outer edge of the cover, away from welds. After drilling, tip the converter over the drain pan and let any fluid drain out. Then, turn the converter to a different position and let it drain again.
Repeat this process multiple times.
The amount and appearance of the fluid are key. If you get a lot of dark, burnt-smelling fluid, it indicates overheating and internal wear. If you find metal shavings or debris in the fluid, the converter is definitely damaged internally.
A healthy converter will release mostly clean, reddish fluid. This test is surprisingly effective at revealing the internal health of the converter. It’s a straightforward way to get crucial diagnostic information without complex equipment.
Simulating Fluid Flow and Lock-Up
To simulate fluid flow and check the lock-up function (if applicable), you’ll need a way to apply pressure and rotation. This is more advanced and often requires specialized equipment. However, a basic simulation can be done with a drill and a source of pressurized fluid.
You can fill the converter partially with clean transmission fluid.
Then, using the drill, spin the impeller (cover) at a moderate speed. You should be able to feel fluid being pushed through to the turbine. If you have a way to measure fluid flow, do so.
For the lock-up, you would need to simulate the hydraulic pressure that engages the lock-up clutch. This is difficult to do precisely outside the vehicle. However, if the converter feels excessively loose or if the turbine spins too freely relative to the cover even when simulating lock-up, it might indicate a problem with the lock-up mechanism or its internal seals.
This part of how to test a 4L80E torque converter out of car is where you get a feel for how the converter behaves under simulated load. It’s about observing the fluid movement and the relative speeds of the internal components. If the fluid flow is weak, or if there’s excessive slippage even when you expect it to be minimal, it points to internal wear or a failing pump.
These tests require careful observation and a good understanding of what a healthy converter should feel like.
Interpreting the Test Results
Once you’ve performed the tests, it’s time to figure out what they mean. This is where you’ll decide if your 4L80E torque converter is good to go or if it needs to be replaced. The results from your visual inspection, mechanical tests, and any fluid checks will all contribute to your decision.
What Good and Bad Results Look Like
A torque converter that passes the tests will look clean on the outside, with no dents or cracks. The mounting studs will be straight and secure. When you spin it, it will rotate smoothly without any grinding, clicking, or excessive play.
The fluid that drains out will be relatively clean and reddish. There should be no metal shavings or debris. The pilot will be straight and undamaged.
Conversely, a bad torque converter might show visible damage like dents or cracks. Loose or bent mounting studs are a major red flag. Grinding, clicking, or rough rotation during the spin test indicates internal bearing or gear damage.
Dark, burnt fluid with metal shavings is a clear sign of internal failure and overheating. If the pilot is bent or damaged, it can also lead to problems. Any of these symptoms mean the torque converter should be replaced.
This interpretation is key to how to test a 4L80E torque converter out of car effectively.
Common Torque Converter Failure Modes
Several things can go wrong with a torque converter. Bearing failure is common. This leads to rough spinning and noise.
Stator damage, where the fins break or wear down, reduces torque multiplication. This results in poor acceleration. Seal leaks are also frequent, causing fluid loss and potential overheating.
Internal seal failure can affect the lock-up clutch, leading to shuddering or slipping.
Impeller or turbine fin damage can reduce fluid flow efficiency and cause slippage. Overheating can cause the internal components to warp or break apart. This often contaminates the transmission fluid.
If you’ve had an engine or transmission failure, it’s wise to check the torque converter. Metal debris from another component can damage the converter, or vice versa. Understanding these failure modes helps you recognize the signs during testing.
A blown internal seal can lead to poor hydraulic performance. This affects shift quality and can cause slippage. If the lock-up clutch itself is worn or damaged, you’ll experience shuddering or slipping, especially at highway speeds.
These failures are often gradual but can worsen quickly. Being able to perform these tests helps you pinpoint the problem before it causes more damage.
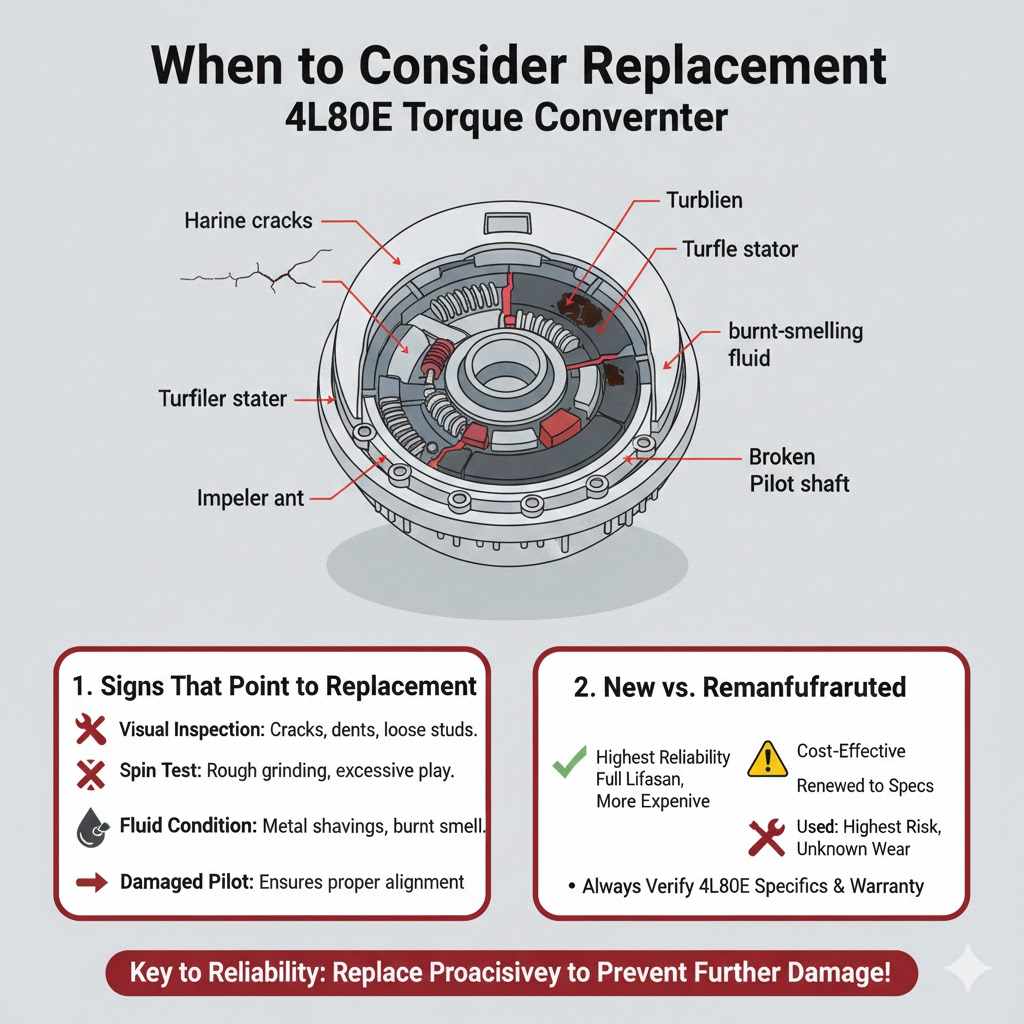
When to Consider Replacement
If your tests indicate any significant issues, replacement is usually the best course of action. Trying to repair a torque converter is often not cost-effective and may not yield reliable results. It’s generally more practical to buy a new or remanufactured unit.
Signs That Point to Replacement
If you found cracks, significant dents, or loose mounting studs during your visual inspection, replace it. Any rough grinding or excessive play during the spin test means it’s time for a new one. If the fluid drained is full of metal shavings or smells burnt, a new converter is necessary.
A damaged pilot also warrants replacement to ensure proper alignment. If you suspect internal lock-up issues or significant fluid leakage, it’s safer to replace the unit.
Remember that a faulty torque converter can lead to further damage to your transmission. Replacing it proactively can save you from more costly repairs down the line. When in doubt, it’s always better to err on the side of caution and replace the converter.
This ensures the reliability of your transmission system. Following the steps on how to test a 4L80E torque converter out of car is a great preventative measure.
New vs. Remanufactured Torque Converters
When you need to
Used torque converters from salvage yards are the cheapest option but carry the highest risk. They may have unknown wear or damage. It’s generally advisable to buy new or remanufactured for reliability.
Ensure the replacement converter is specifically for your 4L80E transmission model. Always check the warranty details before purchasing.
Frequently Asked Questions
Question: Can I test a torque converter without removing the transmission?
Answer: No, you cannot perform these tests safely and effectively without removing the transmission and the torque converter from the vehicle.
Question: How much transmission fluid do I need to fill the converter?
Answer: For most tests, you can fill the converter about halfway or two-thirds full with clean transmission fluid. Do not overfill it.
Question: What happens if I install a bad torque converter?
Answer: Installing a bad torque converter can cause slipping, shuddering, poor acceleration, and can damage your transmission, leading to more expensive repairs.
Question: How long does a torque converter usually last?
Answer: A properly functioning torque converter can last the lifetime of the vehicle, but they can fail prematurely due to various issues like overheating or contamination.
Question: What is the most common cause of torque converter failure?
Answer: Overheating, contamination from worn transmission parts, and fluid leaks are among the most common causes of torque converter failure.
Conclusion
Testing your 4L80E torque converter out of the car is a straightforward process. By following these visual and mechanical tests, you can confidently diagnose its condition. You’ll know if it’s time for a replacement.
This saves you time and money. A healthy torque converter is vital for your transmission’s performance and longevity.