97 Vette Shocks: The Critical Magnetic Delete Secret
Yes, when putting aftermarket shocks on a 97 Corvette with the F45 suspension, you must add a “magnetic delete” kit. This involves installing small electronic simulators where the old shocks plugged in. This simple step tricks the car’s computer, preventing a “Service Ride Control” warning and a speed limit of 80 MPH.
Owning a classic C5 Corvette is a dream for many. The power, the style, the history—it’s an amazing machine. But sometimes, even dream cars have little quirks that can turn into big headaches. One of the most common issues for 1997 Corvette owners is dealing with the original F45 suspension system. When those special shocks wear out, the replacement cost can be shocking itself.
You might think, “I’ll just swap them for standard, affordable shocks!” That’s a smart idea, but it comes with a catch. Your Corvette’s computer is very particular. If it can’t find its special shocks, it will throw a fit, lighting up your dashboard and limiting your speed. Don’t worry, though. There is a simple, brilliant secret to fix this. In this guide, I’ll walk you through everything, step-by-step. You’ll learn how to save a ton of money and keep your Corvette running smoothly.
What is F45 Suspension, Anyway?
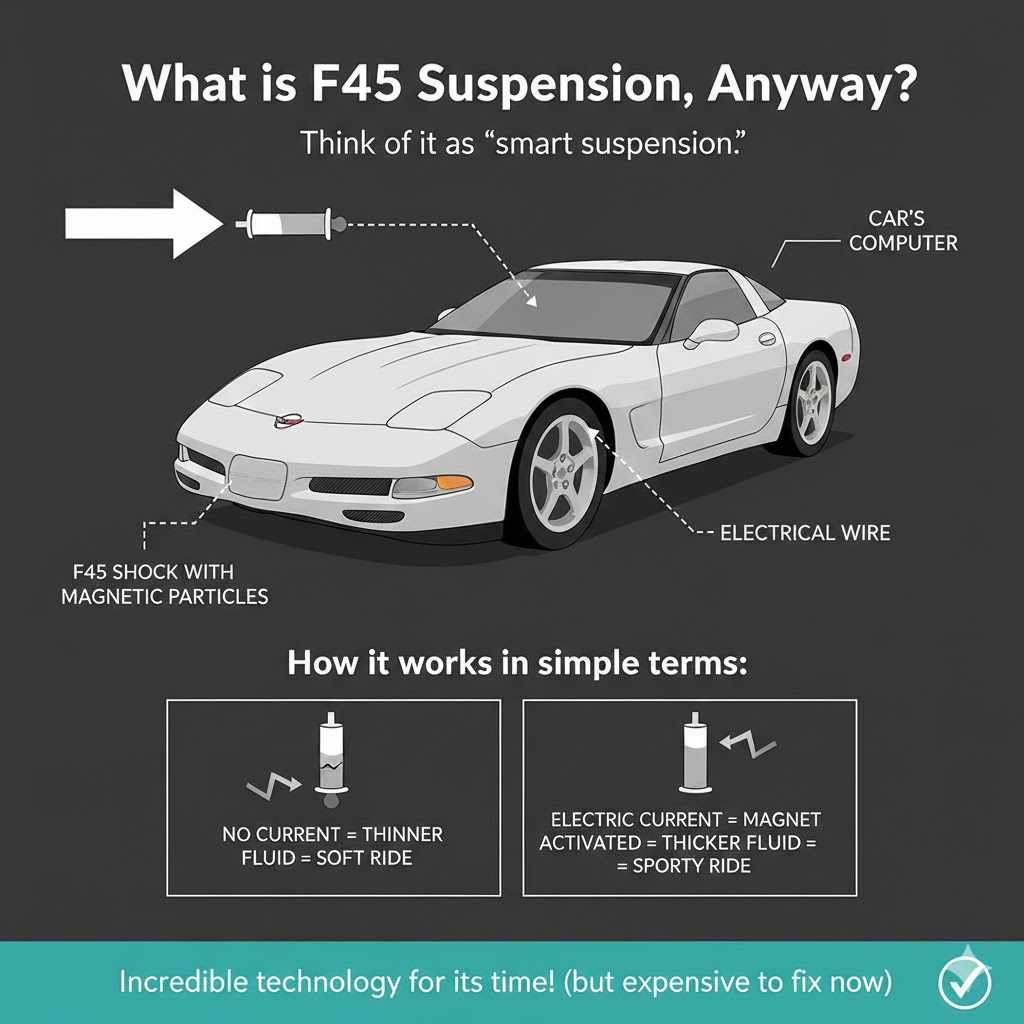
Before we dive into the fix, let’s quickly understand the problem. The 1997 Corvette could be ordered with an optional suspension system called the F45 Selective Real Time Damping system. Think of it as “smart suspension.”
Here’s how it works in simple terms:
- The shocks were filled with a special fluid containing tiny magnetic particles.
- The car’s computer could send an electric current to the shocks.
- This current would activate a magnet, making the fluid thicker or thinner almost instantly.
- Thicker fluid meant a stiffer, sportier ride. Thinner fluid meant a softer, more comfortable ride.
It was incredible technology for its time! The system could adjust the ride based on your speed and how you were driving. The problem is that now, decades later, these F45 shocks are old, often failing, and extremely expensive to replace with original parts. That’s why so many owners want to switch to high-quality, standard aftermarket shocks.
The “80 MPH Speed Limit” Problem: Why You Can’t Just Swap the Shocks
So, you bought a set of great new shocks and you’re ready to install them. You bolt everything in, lower the car, and start it up. Immediately, you see it: a “SERVICE RIDE CONTROL” message on your dashboard. You try to ignore it, but then you hit the highway and the car refuses to go faster than 80 miles per hour.
What happened? Your Corvette’s main computer, the ECU, is constantly checking in with all the car’s systems. It sent a signal to the F45 suspension controller, asking, “Hey, are my special shocks there?” When you installed the new standard shocks, you left the electronic connectors unplugged. The controller couldn’t find the shocks, so it sent a panic signal back to the main computer.
As a safety measure, the car’s computer then does two things:
- It displays the warning message to tell you something is wrong.
- It limits your top speed to prevent you from driving fast with a potential suspension failure.
This is where our secret solution comes in. We need a way to tell the computer that everything is okay, even though the original shocks are gone.
The Simple Fix: Understanding the “Magnetic Delete”
The “magnetic delete” is a simple but brilliant solution. It doesn’t involve complex computer programming or expensive tools. The “delete” is done using small electronic devices called shock simulators.
Think of it like this: The car’s computer is looking for a specific electronic signal from each shock. A shock simulator is a tiny device that perfectly mimics that signal. You simply plug this simulator into the wiring harness where the old shock used to be connected. The computer gets the “all clear” signal it was looking for and thinks the F45 shocks are still there, working perfectly.
As a result:
- The “SERVICE RIDE CONTROL” message disappears.
- The 80 MPH speed limit is removed.
- You can enjoy your new, affordable shocks without any electronic issues.
This process is easy, cheap, and lets you take back control over your car’s maintenance choices.
Choosing Your Delete Method: Simulators vs. Resistors
There are two main ways to perform the magnetic delete. For beginners, one method is clearly better than the other. Let’s compare them.
| Method | Description | Pros | Cons |
|---|---|---|---|
| Shock Simulators (Recommended) | These are small, pre-made electronic modules that plug directly into your car’s existing wiring harness. No cutting or splicing is needed. |
|
|
| Resistors | This method involves buying specific electronic resistors and wiring them into the shock harness yourself. |
|
|
For peace of mind and ease of installation, I always recommend using a pre-made shock simulator kit. It turns a potentially tricky electrical job into a simple 5-minute task.
Your Step-by-Step Guide to the Magnetic Delete & Shock Swap
Ready to get to work? This guide will walk you through the entire process. We’ll install the simulators and then swap the shocks. Remember to work slowly and safely.
Before You Begin: Safety First!
Your safety is the most important thing. Never work under a car that is only supported by a jack. Always follow proper safety procedures. For more information on vehicle safety, you can always consult resources like the National Highway Traffic Safety Administration (NHTSA) for general best practices.
- Work on a flat, level surface like a garage floor or level driveway.
- Place wheel chocks behind the rear wheels if you are lifting the front, and in front of the front wheels if you are lifting the rear.
- Disconnect the negative terminal of your car’s battery to prevent any electrical shorts.
- Always use jack stands to support the vehicle’s weight. Once the car is raised, give it a firm shake to ensure it is stable before you go underneath.
- Wear safety glasses to protect your eyes from dirt and debris.
Tools and Parts You’ll Need
Having the right tools makes any job easier. Here is what you’ll likely need:
- Floor Jack
- Four Jack Stands
- Wheel Chocks
- Lug Wrench or Impact Wrench
- Socket and Ratchet Set (Metric sizes)
- Wrenches (Metric sizes)
- Your new set of four aftermarket shocks
- Your F45 Magnetic Delete Kit (Shock Simulators)
- Zip Ties
- Penetrating Oil (like WD-40) for stubborn bolts
Step 1: Raise and Secure Your Corvette
Using your floor jack, lift the car at the manufacturer’s recommended jacking points. Place jack stands securely under the frame on all four corners. Slowly lower the car onto the stands. Make sure the car is stable and does not wobble before proceeding.
Step 2: Remove the Wheels
Using your lug wrench, remove the lug nuts and take off all four wheels. Set them aside safely. This will give you clear access to the shocks and suspension components.
Step 3: Locate the F45 Shock Connectors and Install the Simulators
This is the “secret” part of the job! Look at the top of each original F45 shock absorber. You will see a wire coming out of it that leads to a small plastic electrical connector. This is the connector that sends signals to the computer.
- Carefully unplug this connector. There might be a small plastic tab you need to press to release it.
- Take one of your new shock simulators from the magnetic delete kit. It will have a plug that perfectly matches the car’s wiring harness.
- Plug the simulator firmly into the harness connector you just unplugged. You should hear a faint “click” as it locks into place.
- The simulator will now be dangling. Use one or two zip ties to securely attach the simulator and its wire to a nearby solid part of the car’s frame or a sturdy wire loom. You want to make sure it won’t bounce around or get snagged on anything while you’re driving.
- Repeat this process for all four corners of the car.
That’s it! The electronic part of the job is done.
Step 4: Remove the Old F45 Shocks
Now you can remove the old shocks like you would on any other car. While designs can vary slightly, the process is generally the same:
- Top Mount: Locate the bolts holding the top of the shock to the car’s frame. For the front, you’ll access these from the engine bay. For the rear, they are accessed from the top of the wheel well. Remove these bolts.
- Bottom Mount: Locate the large bolt holding the bottom of the shock to the lower control arm. This bolt might be tight, so you may need a long wrench or a breaker bar for extra leverage. Spraying it with penetrating oil beforehand can help.
- Once all bolts are removed, the old shock should come right out.
Step 5: Install Your New Aftermarket Shocks
Installing the new shocks is just the reverse of removal. Follow the instructions that came with your new shocks, as mounting hardware can sometimes differ.
- Position the new shock in place.
- Loosely thread the top and bottom bolts by hand to make sure everything is aligned.
- Once everything is lined up, tighten the bolts to the torque specifications recommended by the shock manufacturer. Do not overtighten.
Step 6: Final Checks and Test Drive
With all four simulators and all four new shocks installed, it’s time to wrap up.
- Put the wheels back on and hand-tighten the lug nuts.
- Carefully lower the car off the jack stands.
- Once the car is on the ground, tighten the lug nuts completely in a star pattern to ensure the wheel is seated evenly.
- Reconnect the negative battery terminal.
- Start the car. Look at the dashboard—the “SERVICE RIDE CONTROL” message should be gone!
- Take the car for a gentle test drive around your neighborhood to make sure everything feels right. Listen for any unusual noises. Then, find a safe place to test it at higher speeds to confirm the 80 MPH limit is gone.
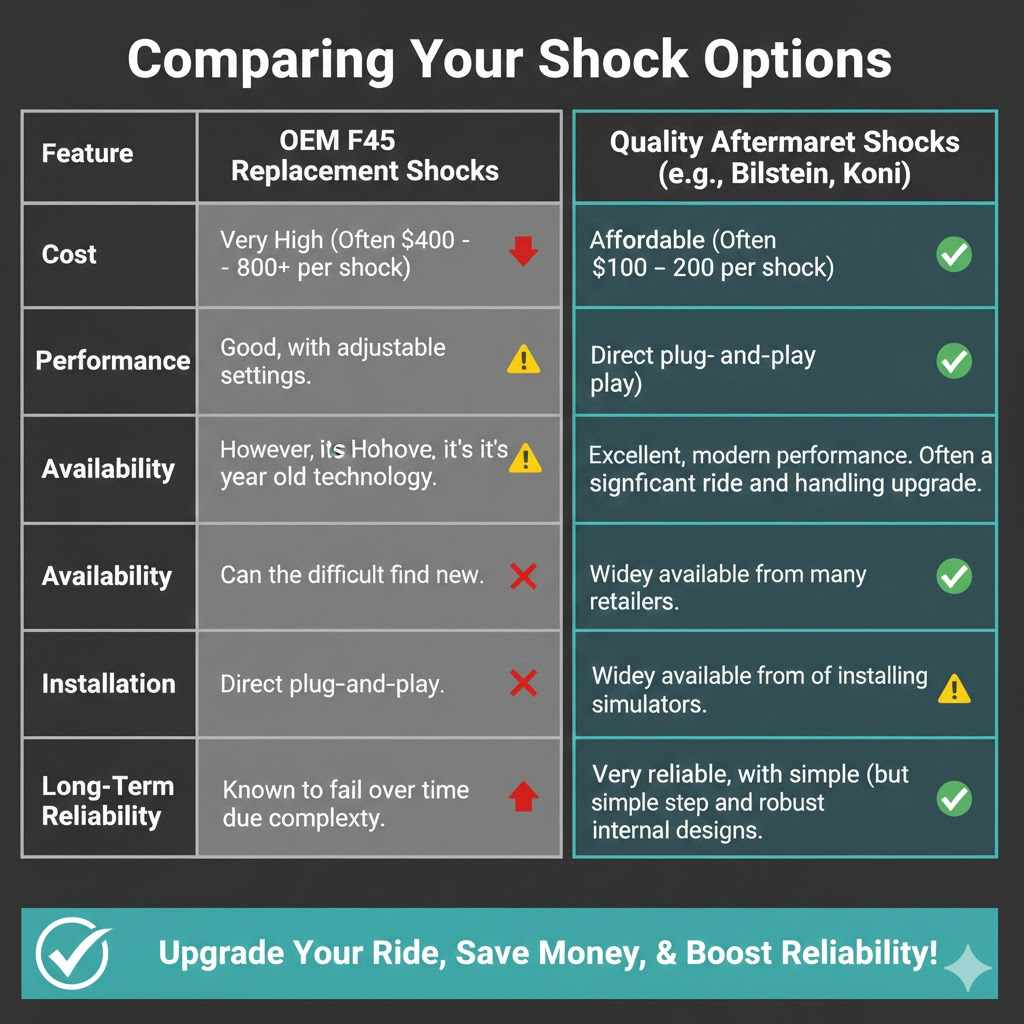
Comparing Your Shock Options
You might be wondering if it’s worth going through this process. Let’s look at a quick comparison to see how much you can benefit.
| Feature | OEM F45 Replacement Shocks | Quality Aftermarket Shocks (e.g., Bilstein, Koni) |
|---|---|---|
| Cost | Very High (Often $400 – $800+ per shock) | Affordable (Often $100 – $200 per shock) |
| Performance | Good, with adjustable settings. However, it’s 25+ year old technology. | Excellent, modern performance. Often a significant ride and handling upgrade. |
| Availability | Can be difficult to find new. | Widely available from many retailers. |
| Installation | Direct plug-and-play. | Requires the extra (but simple) step of installing simulators. |
| Long-Term Reliability | Known to fail over time due to complexity. | Very reliable, with simple and robust internal designs. |
Frequently Asked Questions (FAQ)
What happens if I don’t do the magnetic delete?
If you install standard shocks without the simulators, your dashboard will constantly show a “SERVICE RIDE CONTROL” warning message, and your car’s top speed will be electronically limited to 80 MPH as a safety feature.
Do I need to get my car’s computer reprogrammed?
No, and that’s the beauty of this solution! The shock simulators trick the computer, so no expensive or complicated reprogramming is necessary. It’s a simple hardware fix.
Can I use this guide for a newer Corvette?
This guide is specific to the C5 Corvette (1997-2004) with the F45 suspension. Newer Corvettes with Magnetic Ride Control (F55 system) have a different electronic system and require a different procedure or a specific “delete” kit designed for them.
How much money will I really save?
You can save a significant amount. A set of four new F45 shocks could cost over $2,000 in parts alone. A set of high-quality aftermarket shocks plus a simulator kit might cost between $500 and $900 total. You could easily save over $1,000, plus labor costs if you do it yourself.
What are the best aftermarket shocks for a C5 Corvette?
This depends on your driving style and budget. Bilstein B6 (HD) or B8 (Sport) shocks are extremely popular choices for their great balance of performance and comfort. Koni Sport (Yellow) shocks are also a fantastic, often adjustable, option. Do some research and read reviews to see what fits you best.
Is this project safe for a beginner to do?
Yes! If you are comfortable with basic mechanical tasks like changing a tire and using a socket set, you can absolutely do this. The key is to prioritize safety by using jack stands properly. Installing the simulators is as easy as plugging in a lamp.
Will this delete affect my car’s resale value?
For most buyers, having a well-maintained suspension with high-quality modern shocks is a positive. Since the F45 system is a known expensive failure point, many potential buyers see the conversion to reliable standard shocks as an upgrade. It’s wise to keep the old shocks and parts if a future owner wants to restore the car to its original factory condition.
Your Corvette, Your Control
Congratulations! By tackling this project, you’ve not only saved a huge amount of money but also taken control of your car’s health. You’ve replaced an outdated, expensive system with a reliable, modern one, and you’ve learned a valuable secret that many other Corvette owners wish they knew.
Car maintenance can seem intimidating, but projects like this prove that with a little guidance and a willingness to learn, you can handle more than you think. Now you can enjoy the ride in your ’97 Corvette with the peace of mind that comes from a job well done and a suspension that’s ready for the road ahead. Enjoy the drive!