How to Change Winter Tire With Emergency Jack
Changing a winter tire can seem tricky, especially if you’re new to it or only have an emergency jack. You might worry about doing it wrong or not having the right tools when you need them most. But don’t stress!
It’s actually a straightforward process when you know the steps. This guide will walk you through exactly how to change a winter tire with your emergency jack, making it simple and safe.
Learn How to Change Winter Tire With Emergency Jack
This section is all about getting you comfortable with the process of changing a winter tire using the emergency jack that often comes with your car. We’ll break down each step into easy-to-follow instructions. The goal is to empower you with the knowledge to handle this common roadside situation confidently, whether you’re dealing with a flat on a cold day or just want to be prepared.
We’ll cover the tools you’ll need and the sequence of actions to get the job done safely and efficiently.
Gather Your Essential Tools
Before you can even think about lifting your car, you need to make sure you have everything you need. Having the right items ready will make the entire tire-changing process much smoother and quicker. You don’t want to be halfway through and realize something is missing.
-
Owner’s ManualYour car’s owner’s manual is like a secret map just for your vehicle. It tells you exactly where to find things like the spare tire and the jack, and it often has specific instructions for your car model. For instance, some cars have a special place to store the jack and lug wrench, while others might have them under the trunk floor.
It also details the correct jacking points, which are vital for safety.
-
Spare TireThis is the tire you’ll be putting on your car. Make sure it’s in good condition and properly inflated. A flat spare is no good to anyone!
Check its pressure regularly, especially before winter hits, because cold weather can cause tires to lose air faster. A spare tire is usually smaller than your regular tires, often called a “donut” spare, and it’s meant for temporary use only to get you to a repair shop.
-
Lug WrenchThis is the tool that loosens and tightens the bolts, called lug nuts, that hold your wheel onto the car. They can be shaped like an ‘L’ or a cross. Make sure it fits the lug nuts on your car.
If you have special locking lug nuts, you’ll need a key or adapter for those, which should also be stored with your car’s tools.
-
Emergency JackThis is the device that lifts your car. Emergency jacks are usually compact and designed for quick use. They come in various types, like scissor jacks or bottle jacks.
It’s important to know how to operate your specific type of jack. Some crank up, while others might have a lever. Always ensure it’s rated to lift the weight of your vehicle.
Find a Safe Location
Safety is the most important thing when changing a tire. You absolutely must find a safe spot. Trying to change a tire on the side of a busy road is very dangerous.
Cars can whiz by, and you could get hurt. It’s much better to pull over somewhere safe and level.
-
Pull Over SafelyAs soon as you realize you have a flat tire, slow down. Look for a safe place to pull over. This means getting completely off the road, away from traffic.
A wide shoulder, a parking lot, or a quiet side street is ideal. Avoid soft ground or slopes, as these can make the jack unstable.
- Engage Parking BrakeOnce you’ve stopped in a safe spot, put your car in park and firmly engage the parking brake. This is a critical step to prevent your car from rolling while you’re working on it. You might even want to turn off the engine.
- Use Hazard LightsTurn on your hazard lights. This makes your car more visible to other drivers, especially if it’s dark or visibility is poor. It’s a simple step that greatly increases your safety.

Steps to Change Winter Tire With Emergency Jack
Now we’ll get into the actual process of swapping out that tire. We’re going to go through each step slowly and clearly so you can follow along easily. Even if you’ve never done this before, these instructions will guide you.
Loosen Lug Nuts
Before you lift the car, you need to loosen the lug nuts. These are the bolts holding the wheel on. If you try to do this after the tire is in the air, it will just spin, and you won’t be able to loosen them.
- Position Lug WrenchPlace the lug wrench onto one of the lug nuts. Make sure it’s seated firmly and squarely on the nut so it doesn’t slip.
-
Apply Force CounterclockwiseTurn the lug wrench counterclockwise. This means turning it to the left, like you’re unscrewing something. You might need to use a bit of force, possibly even your foot, to get them started.
Don’t remove the nuts completely yet; just loosen them about a half to a full turn.
-
Loosen in a Star PatternIt’s best to loosen the lug nuts in a star or crisscross pattern. This means you loosen one, then the one opposite it, then the next one, and so on. This helps to ensure even pressure and prevents the wheel from warping.
For a five-lug wheel, you would loosen one, skip one, loosen the next, and continue this pattern.
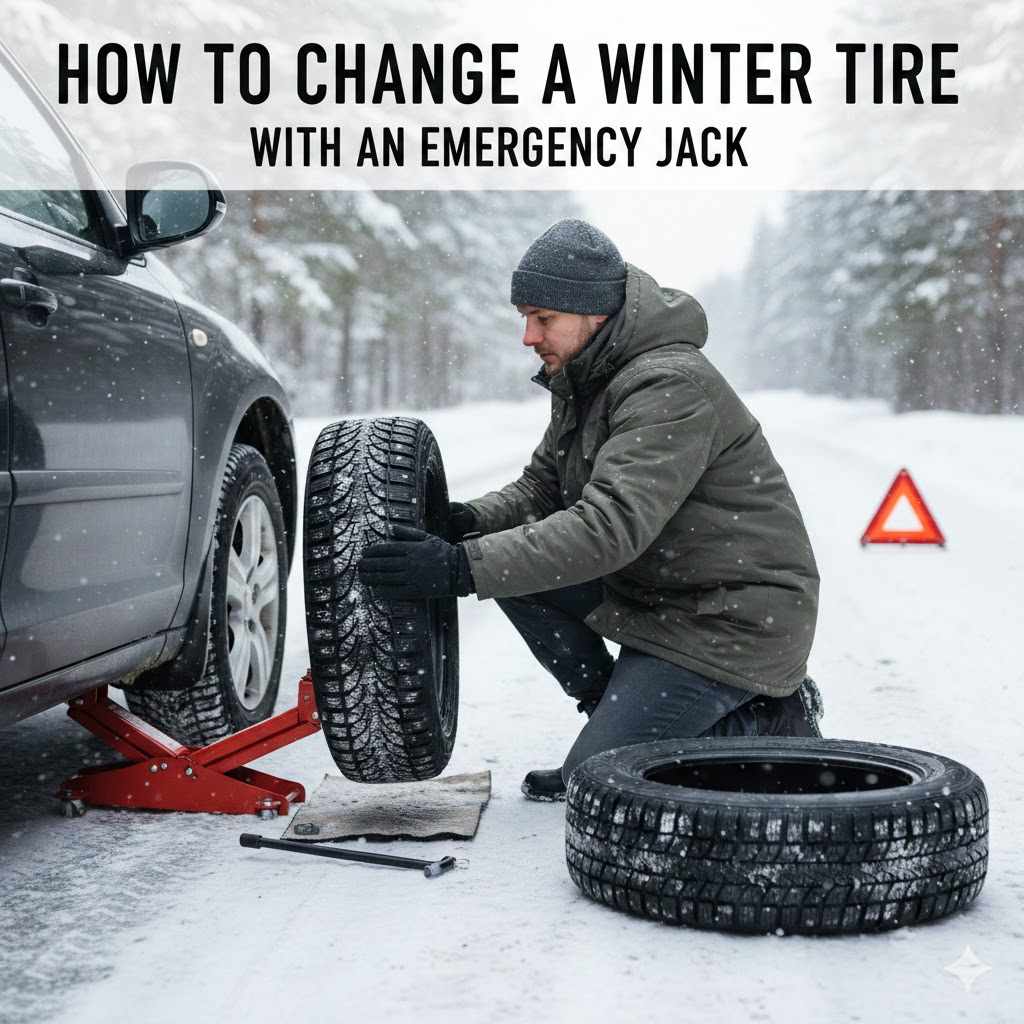
Position and Use the Emergency Jack
This is where the emergency jack comes into play. It’s crucial to use it correctly to keep yourself and your car safe. The car’s frame has specific strong points where the jack should be placed.
-
Locate Jacking PointConsult your owner’s manual to find the correct jacking point nearest to the flat tire. These points are usually reinforced parts of the car’s frame designed to bear the weight of the vehicle. Using the wrong spot can damage your car or cause the jack to slip.
It’s typically a sturdy metal ridge or a marked area.
- Place the JackPosition the emergency jack squarely under the designated jacking point. Make sure the base of the jack is on firm, level ground. If the ground is soft, you can place a sturdy piece of wood or a flat rock under the jack’s base for added stability.
-
Raise the VehicleBegin to operate the jack according to its design. If it’s a scissor jack, you’ll typically crank a handle. If it’s a bottle jack, you’ll pump a lever.
Lift the vehicle slowly and steadily. Keep an eye on the jack to ensure it remains stable and upright.
- Lift High EnoughRaise the car until the flat tire is completely off the ground, with enough clearance to remove it and install the inflated spare. You’ll want a few inches of space between the tire and the ground. Never put any part of your body under the car when it’s supported only by a jack.
Remove the Flat Tire
With the car safely lifted, you can now remove the flat tire. This step is usually quite simple once the car is elevated.
- Unscrew Lug Nuts FullyNow that the wheel is off the ground, finish unscrewing the lug nuts that you previously loosened. Keep them together in a safe place, like your pocket or a small container, so they don’t get lost in the dirt or gravel.
- Pull Tire OffGrip the flat tire firmly with both hands and pull it straight towards you. It might be a bit heavy. If it’s stuck, you can try giving it a gentle kick with your heel on the rubber part of the tire to dislodge it.
- Place Flat Tire Under VehicleFor an extra layer of safety, slide the flat tire under the car’s frame, near the jack. If, for some reason, the jack fails, the car will land on the old tire instead of directly on the ground, providing some protection.
Mount the Spare Tire
It’s time to put on the spare tire. This is the reverse of removing the flat.
- Align Spare TireLift the spare tire and align the holes in the wheel with the studs on the car’s hub. Push the spare tire onto the studs until it sits flush against the hub.
- Install Lug Nuts Hand TightPut the lug nuts back onto the studs and tighten them by hand as much as you can. Again, do this in a star pattern. This ensures the wheel is seated evenly.
Lower the Vehicle and Tighten Lug Nuts
Once the spare is on and the lug nuts are hand-tight, it’s time to get the car back on the ground and finish securing the wheel.
Final Checks
Before you drive away, a quick check is important.
- Stow EquipmentPut the flat tire, the jack, and the lug wrench back in their proper storage spots in your car. Make sure everything is secure so it doesn’t move around while you’re driving.
- Check Tire PressureIf possible, check the air pressure in the spare tire. Many spare tires require a higher pressure than regular tires. If you can’t check it right away, head to the nearest gas station with an air pump.
- Drive CautiouslyRemember that a spare tire, especially a temporary one, is not designed for long distances or high speeds. Drive cautiously and get your flat tire repaired or replaced as soon as you can.
When to Seek Professional Help
While knowing how to change a tire is a great skill, there are times when it’s best to call for assistance. Don’t hesitate to reach out if you’re unsure or in a difficult situation.
- Unsafe ConditionsIf you’re on a busy highway with no safe place to pull over, or if the weather is extremely bad (heavy rain, snow, or ice), it might be safer to call a tow truck or roadside assistance. Your safety is the top priority. Trying to change a tire in a dangerous environment can lead to accidents.
- Damaged EquipmentIf your jack is broken, if the lug nuts are stuck or stripped, or if you can’t seem to get the lug wrench to work, don’t force it. Damaged equipment can make the job impossible or even dangerous. A mechanic or roadside assistance service will have the right tools to handle these issues.
- Physical LimitationsIf you have any physical limitations that make it difficult to lift heavy tires or apply the necessary force to loosen lug nuts, it’s perfectly okay to ask for help. There’s no shame in needing assistance, and professionals are trained to handle these tasks efficiently.
- Unfamiliarity with VehicleEven with instructions, if you’re in an unfamiliar vehicle and can’t locate the jack points or spare tire easily, it’s wise to call for help. Some vehicles have unique designs that can be confusing. Your owner’s manual is your best friend here, but if it’s not enough, a quick call can save you a lot of trouble.
Tips for Winter Tire Changes
Winter brings its own set of challenges when changing a tire. The cold, snow, and ice can make things tougher. Here are some tips to help you manage.
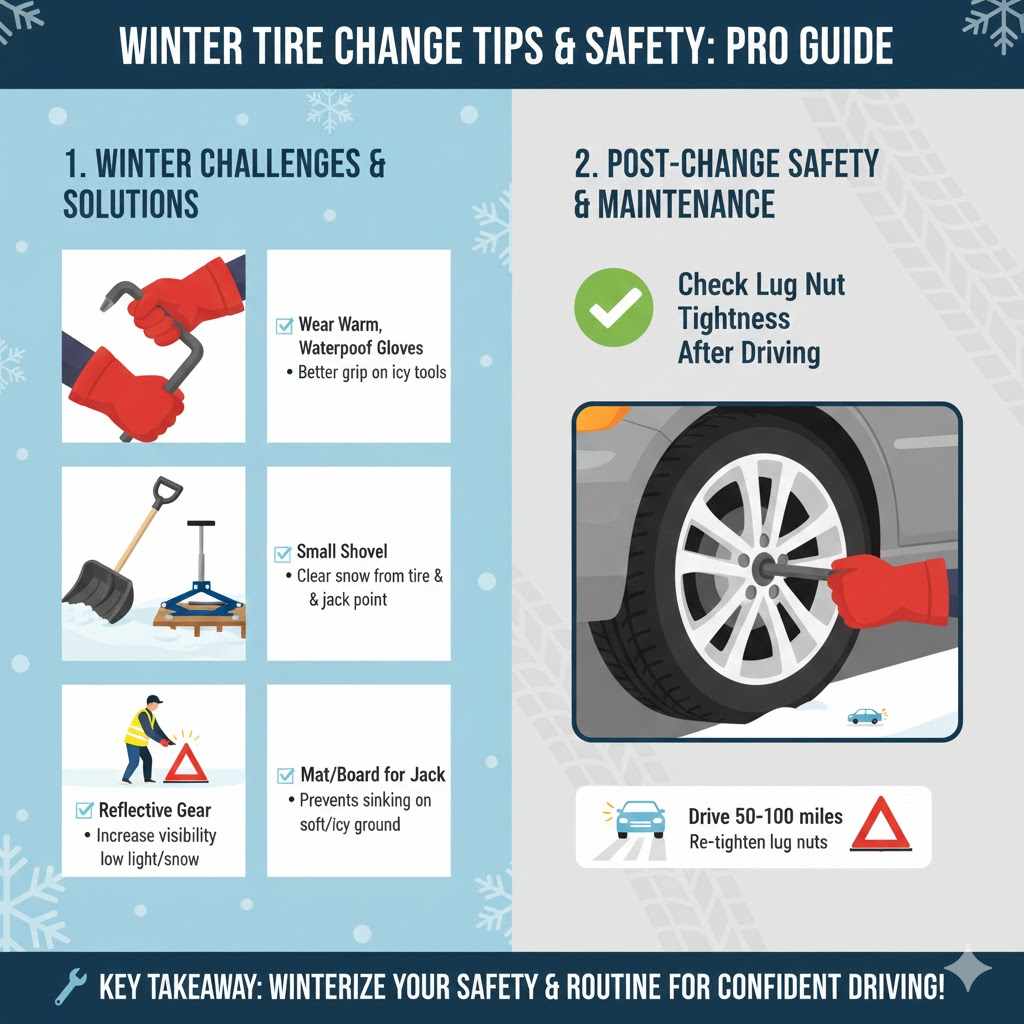
- Wear Warm, Waterproof GlovesYour hands will get cold and wet quickly when working outside in winter. Warm, waterproof gloves are essential. They’ll keep your hands from freezing and help you maintain a good grip on tools and lug nuts, even when they’re slick with ice or snow.
- Keep a Small Shovel HandyIf you’re in snow, the area around your tire might be covered. A small, collapsible shovel can be a lifesaver for clearing snow away from the tire, the jacking point, and the surrounding area so you can work safely.
- Use a Mat or Board for the JackSnow and ice can make the ground unstable for the jack. Always place a sturdy piece of wood, a car mat, or a flat rock under the jack’s base to prevent it from sinking into the soft ground or sliding on ice.
- Have Reflective GearVisibility is often reduced in winter, especially if it’s dark or snowing. Wear bright, reflective clothing if you have it. You can also place reflective triangles or flares behind your car to warn oncoming traffic.
- Check Lug Nut Tightness After DrivingAfter driving a short distance (about 50-100 miles) on your spare or newly installed tire, it’s a good idea to re-check the tightness of the lug nuts. They can sometimes loosen slightly as the wheel settles.
Frequently Asked Questions
Question: How often should I check my spare tire’s air pressure?
Answer: It’s a good practice to check your spare tire’s air pressure at least once a month, and before any long trips, especially during the winter months when temperatures fluctuate.
Question: Can I drive on a temporary spare tire for a long time?
Answer: No, temporary spare tires, often called “donuts,” are meant for short-term use only. They have speed and distance limitations, so you should get your regular tire repaired or replaced as soon as possible.
Question: What should I do if the lug nuts are too tight to loosen?
Answer: If the lug nuts are extremely difficult to loosen, you can try using your foot to apply more force to the lug wrench. If they still won’t budge, do not force them to the point of breaking. It’s best to call for roadside assistance.
Question: How do I know if I’m using the correct jacking point?
Answer: Your car’s owner’s manual will clearly show the designated jacking points, which are reinforced areas on the frame. If you can’t find it in the manual, look for a sturdy metal ridge or a marked spot on the car’s undercarriage near the wheel you need to change.
Question: Is it safe to change a tire in the rain?
Answer: Changing a tire in the rain can be done, but it is more challenging and potentially dangerous due to reduced visibility and slippery conditions. If you can find a safe, covered location or if the rain is very heavy, it is often safer to call for roadside assistance.
Wrap Up
You now know how to change a winter tire with your emergency jack. You’ve learned about the tools, found a safe spot, and followed the steps to swap your tire. Remember to always prioritize safety and get your regular tire fixed soon.
You’ve got this!