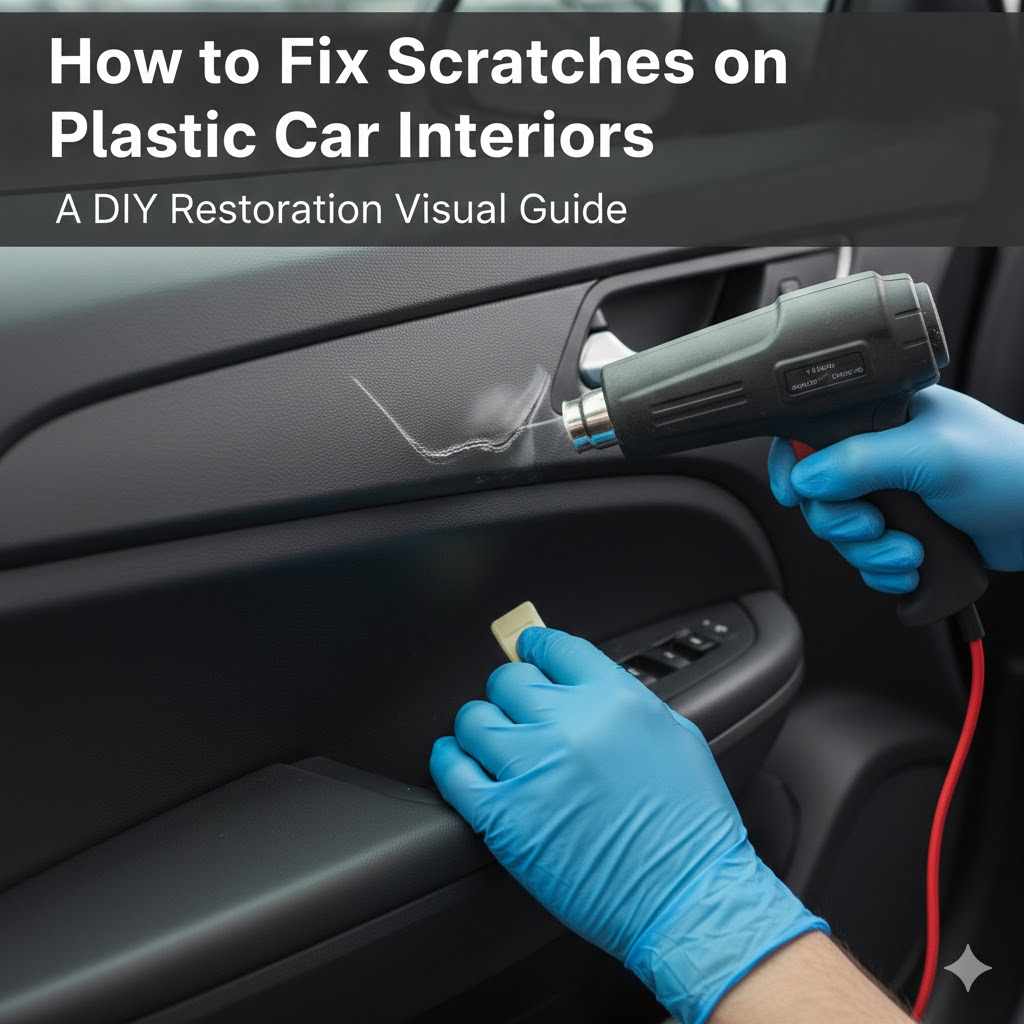
How to Fix Scratches on Plastic Car Interiors
It is super common to get small scratches on your car’s plastic interior. Think about keys, bags, or even just regular use can leave marks. For folks new to car care, figuring out how to repair a scratch on plastic car interior can seem tricky.
You might worry about making it worse or using the wrong stuff. But don’t worry! This guide will walk you through it step-by-step with easy methods that really work.
We will show you how to get those plastic parts looking good again without any fuss. Get ready to see those scratches disappear.
How to Repair a Scratch on Plastic Car Interior
This section covers the basics of fixing those annoying scratches that appear on the plastic parts inside your car. It’s something many car owners face, and it can be frustrating to see these marks detract from your car’s look. We’ll explore why these scratches happen, how to assess them, and the general approach to making them less visible.
Understanding the type of plastic and scratch is the first step to a successful repair. This part sets the stage for the detailed methods that follow.
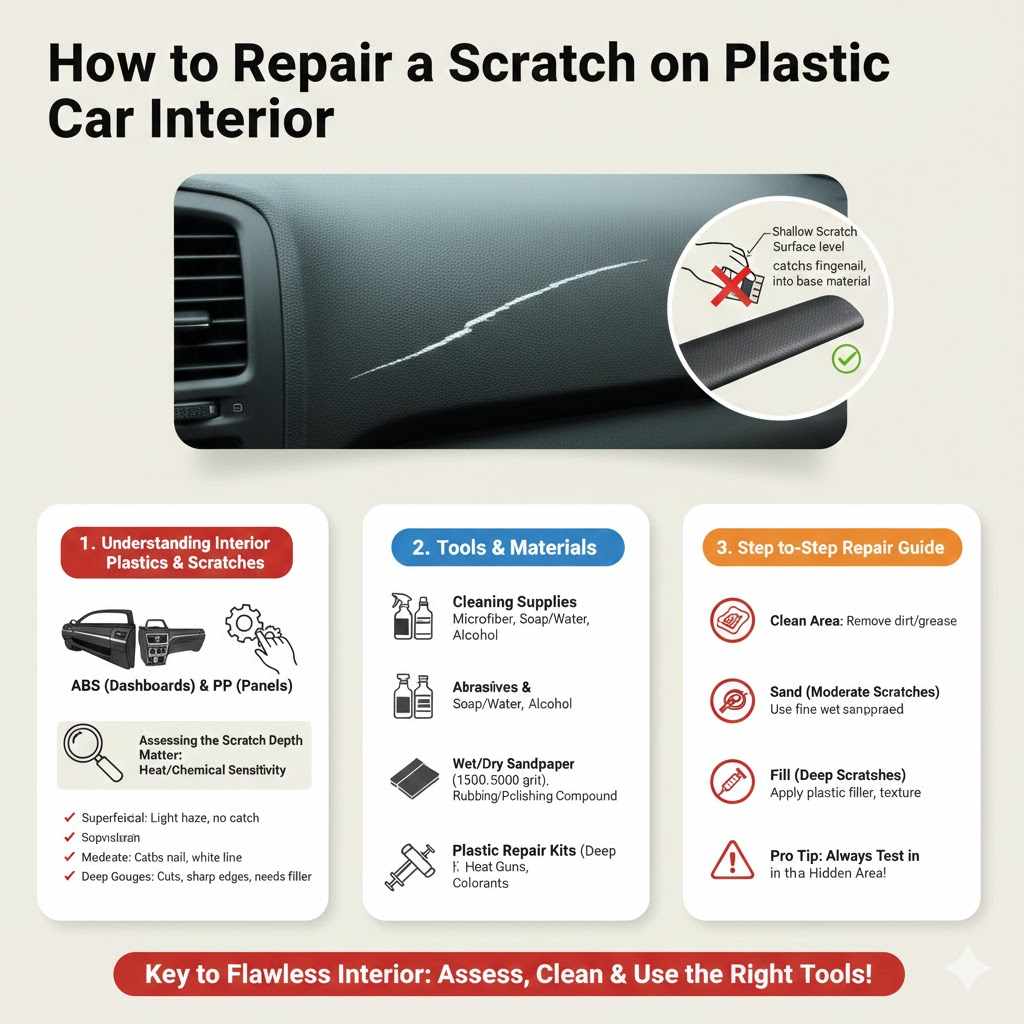
Understanding Plastic Car Interior Types
Not all plastic is the same, especially in cars. Knowing the type of plastic you’re dealing with helps choose the right repair method. Most car interiors use ABS (acrylonitrile butadiene styrene) or PP (polypropylene) plastics.
These are durable but can scratch. Sometimes, you might encounter PVC (polyvinyl chloride) or even softer polyurethane foams.
ABS is common for dashboards and door panels because it’s strong and can be molded easily. PP is often used for less visible parts or areas that need some flexibility. Each plastic has a different melting point and reacts differently to heat and chemicals.
This is important when we talk about using heat guns or specific repair compounds later on.
Why Different Plastics Matter for Repairs
Using the wrong product or technique on a specific plastic can cause more damage. For instance, applying too much heat to ABS could melt it unevenly, creating a worse problem. Some plastics are also more prone to discoloration when exposed to UV light or certain cleaning agents.
If you’re unsure about the plastic type, a good rule of thumb is to test any repair product or method in a hidden spot first. This could be the underside of a seat or a less visible area of the door panel. This simple step saves you from widespread damage.
Assessing the Scratch Depth
The depth of the scratch is the most important factor in deciding how to repair it. Shallow scratches, often called scuffs, only affect the very top layer of the plastic. Deep scratches go down further, sometimes into the underlying material.
You can test the depth by gently running your fingernail across the scratch. If your fingernail catches on the scratch, it’s likely a deeper one. If your fingernail glides over it smoothly, it’s probably a superficial mark.
Superficial Scratches
These are the easiest to fix. They look like light hazing or faint lines on the surface. They don’t have sharp edges and your fingernail won’t catch on them.
For these, gentle polishing compounds or even some specialized plastic cleaners can often buff them out. The goal here is to level the surface without removing too much material.
Moderate Scratches
These scratches are deeper. Your fingernail will catch on them. They might look like white lines or deeper gouges.
These will require a bit more effort.
You might need to use a plastic repair kit with fillers or a heat-based method to smooth them out. The idea is to fill the gap or gently melt the plastic edges together.
Deep Gouges
These are the most challenging. They are deep cuts that remove significant amounts of plastic. They can create sharp edges and are very noticeable.
For deep gouges, simple polishing won’t work. You’ll need to use fillers and potentially repaint or retexture the area to match the original finish. Sometimes, replacement of the part might be the best option if the damage is severe.
Tools and Materials for Scratch Repair
Having the right tools and materials makes the job much easier and more effective. For most plastic interior scratches, you won’t need highly specialized equipment. Common household items and readily available auto care products are often sufficient.
The specific items will depend on the scratch’s depth, but a good starting point includes cleaning supplies, different grades of sandpaper, polishing compounds, and potentially plastic repair fillers or heat-based tools.
Cleaning Supplies
Before you start any repair, cleaning the area is crucial. Dirt and grime can get into scratches and make them look worse. They can also interfere with repair materials.
- Microfiber cloths: These are soft and won’t scratch the plastic further. You’ll need a few for cleaning and buffing.
- Mild soap and water: For general cleaning, a bit of dish soap in warm water works well.
- Isopropyl alcohol: This is great for removing grease and residues without damaging most plastics. Use it sparingly.
- Interior plastic cleaner: Some specific cleaners are designed to gently clean car interiors.
Always test cleaning products on an inconspicuous area first to ensure they don’t cause discoloration or damage.
Abrasives and Polishing
For superficial to moderate scratches, abrasives are used to smooth the edges or level the surface. Polishing then brings back the shine.
- Wet/dry sandpaper: Start with a fine grit (e.g., 1500-2000) and move to very fine grits (e.g., 3000-5000). Always use sandpaper wet with water to reduce friction and prevent further scratching.
- Rubbing compound: A mild abrasive that can remove light scratches.
- Polishing compound: Finer than rubbing compound, this is used to restore shine and remove swirl marks.
- Plastic polish: Specifically designed for plastics, this can restore clarity and shine.
When sanding, use light pressure and work in small, controlled motions. The goal is to blend the scratched area with the surrounding surface.
Plastic Repair Kits and Fillers
For deeper scratches, you’ll need products that can fill the void. These kits are available at most auto parts stores.
- Plastic repair kits: These often contain a two-part epoxy or a special filler material. Some kits come with texturing tools to mimic the original surface.
- Plastic weld kits: These use heat to melt and fuse plastic. They require a bit more skill.
- Color-matching compounds: Some advanced kits include dyes or colorants to match the plastic’s original shade.
Follow the kit’s instructions carefully. Improper application can lead to a repair that is noticeable or doesn’t last.
Methods to Repair a Scratch on Plastic Car Interior
Now that we understand the types of scratches and what we need, let’s get into the actual methods. These techniques range from simple buffing for light marks to using fillers for deeper damage. Each method is designed to be accessible for DIYers, aiming to restore the appearance of your car’s interior plastic.
We’ll cover options that require minimal tools and those that might need a specific repair kit.
Method 1 Buffing and Polishing (For Light Scratches)
This is your first line of defense against minor scuffs and light scratches. The idea is to gently abrade the surface around the scratch and then polish it to a smooth finish. It’s like giving the plastic a mild exfoliation.
This method works best when the scratch is so shallow that your fingernail doesn’t catch on it. It can make faint lines disappear entirely or significantly reduce their visibility.
Step-by-Step Buffing Process
- Clean the area: Thoroughly clean the scratched plastic with a mild soap and water solution, then dry it with a clean microfiber cloth. For any greasy residue, use a small amount of isopropyl alcohol on a cloth.
- Apply rubbing compound: Put a small amount of rubbing compound onto a clean microfiber cloth. Gently rub the compound over the scratch using a circular motion. Work in small sections, applying light to moderate pressure.
- Wipe off excess: After a minute or two of rubbing, wipe away the excess compound with a clean part of the cloth. Inspect the scratch. You may need to repeat this step a few times.
- Move to polishing compound: If the scratch is still visible, use a finer polishing compound. Apply it in the same way you did the rubbing compound. This step refines the surface and removes any haziness left by the rubbing compound.
- Final buff: Once you’re satisfied with the result, use a clean, dry microfiber cloth to buff the area to a high shine. You can also use a specialized plastic polish for an extra gleam.
A real-life example involves a driver who accidentally scraped a plastic trim piece near the gear shift with their watch. It left a faint white line. By using a good quality rubbing compound followed by a plastic polish, they were able to make the scratch virtually disappear.
The key was working slowly and not pressing too hard.
When This Method Is Best
This technique is ideal for plastic surfaces that have light hazing, minor scuffs from everyday wear, or very faint scratches that haven’t penetrated the plastic’s surface layer.
If you can’t feel the scratch with your fingernail, this method has a high chance of success. It’s also a great way to refresh dull-looking plastic trim.
Method 2 Sanding and Polishing (For Light to Moderate Scratches)
When buffing isn’t enough, a controlled sanding process can level the surface more effectively. This method requires more care because you are removing plastic. The key is to use progressively finer grits of sandpaper.
This is suitable for scratches that are noticeable and where your fingernail can catch slightly. It’s about carefully abrading down the edges of the scratch until the surface is level.
Step-by-Step Sanding Process
- Clean the area: As always, start by cleaning the scratched area thoroughly.
- Wet sanding with fine grit: Use 1500-grit wet/dry sandpaper. Wet the sandpaper and the plastic surface with water. Gently sand the scratched area in a back-and-forth motion. Apply very light pressure. The goal is to smooth the edges of the scratch.
- Progress to finer grits: After sanding with 1500-grit, rinse the area and move to 2000-grit, then 2500-grit, and finally 3000-grit or even 5000-grit sandpaper. Always sand wet. With each finer grit, you are reducing the scratch marks left by the previous grit.
- Clean and inspect: After the finest grit sanding, clean the area again. The scratch should be significantly less visible, likely appearing as a uniformly frosted or hazy area.
- Polish to restore shine: Apply a rubbing compound followed by a polishing compound, just like in Method 1. Buff the area until the original shine is restored. You might need to use a plastic polish for the best finish.
A common scenario is a scratch on a glossy black plastic center console. This type of finish shows every mark. Using a progression of wet sandpaper from 2000 to 5000 grit, followed by a machine polisher with a fine-grit polish, can make these deep scratches nearly invisible.
Many detailers use this technique to bring older interiors back to life.
It’s important to use a sanding block or a soft backing pad when sanding to ensure even pressure. Irregular pressure can lead to an uneven finish.
Tips for Safe Sanding
- Always sand wet: This lubricates the sandpaper and plastic, reducing heat and preventing deeper scratches.
- Use light pressure: Let the sandpaper do the work. Too much pressure can cause more damage.
- Work in small areas: Focus on the immediate area around the scratch to avoid sanding unnecessary parts of the trim.
- Check progress often: Rinse and dry the area frequently to see how the scratch is responding.
Method 3 Using Plastic Repair Kits (For Moderate to Deep Scratches)
For scratches that are too deep to be effectively sanded and polished out, plastic repair kits are the next step. These kits typically involve filling the scratch with a special compound that hardens and can be sanded and blended.
These kits are designed to bridge the gap created by the scratch, making the surface level again. Some kits also offer color-matching options, which is helpful for textured or colored plastics.
Step-by-Step Repair Kit Process
- Prepare the scratch: Clean the area thoroughly. For deeper scratches, you might need to slightly widen the scratch with a fine utility knife or a small file to create a clean edge for the filler to adhere to. This is called ‘V-grooving’ and helps the filler bind better.
- Mix the filler: Follow the instructions on the repair kit carefully. Most two-part fillers require mixing specific ratios. Mix only what you need, as some fillers cure quickly.
- Apply the filler: Using a small spatula or applicator tool, carefully apply the filler into the scratch. Press it down firmly to ensure it fills the entire depth of the scratch without air bubbles. Overfill slightly, as the filler will shrink a bit as it cures.
- Cure the filler: Allow the filler to cure completely according to the manufacturer’s instructions. This can take anywhere from 15 minutes to several hours, depending on the product.
- Sand and level: Once cured, carefully sand the excess filler down to the level of the surrounding plastic. Start with a medium grit (e.g., 400-600) and progressively move to finer grits (1000-2000). Use wet sanding techniques.
- Color match and finish: If your kit includes colorants, mix them to match the surrounding plastic. Apply thin coats, allowing each to dry. Once the color is satisfactory, polish the area to blend it with the original finish. If the plastic has a texture, you might need a texturing tool or spray to replicate it.
Consider a case where a car owner accidentally dropped a metal tool on their dashboard, leaving a noticeable gouge in the textured plastic. They used a plastic repair kit with a filler and a texturing spray. After applying and curing the filler, they used the texturing spray to match the surface.
A light application of a matte finish protectant made the repair almost invisible.
It’s crucial to work in a well-ventilated area, especially when using fillers and sprays. Wear gloves to protect your skin.
Choosing the Right Repair Kit
Look for kits that are specifically designed for automotive interior plastics. Some kits are universal, while others are tailored to specific plastic types or finishes (glossy, matte, textured).
Read reviews and compare products. A kit with good color-matching capabilities and clear instructions will be more successful.
Method 4 Heat Gun Application (Advanced Technique)
This is a more advanced method that can be very effective for certain types of scratches on thermoplastic materials. It involves carefully applying controlled heat to melt and smooth the plastic. This method is best suited for plastics like ABS or polypropylene that become pliable when heated.
This technique should be used with extreme caution, as excessive heat can quickly melt and deform the plastic, creating a much worse problem. It’s often used by professionals but can be done by careful DIYers.
Step-by-Step Heat Gun Process
- Clean the area: Ensure the area is clean and dry.
- Set up the heat gun: Use a heat gun with adjustable temperature settings. Start with the lowest setting. You will also need a nozzle to focus the heat.
- Apply heat slowly: Hold the heat gun at a distance of about 6-8 inches from the scratch. Move the gun constantly in a sweeping motion. The goal is to gently warm the plastic until it just begins to soften, not melt. You’ll see the surface become slightly glossy.
- Smooth the scratch: As the plastic softens, the edges of the scratch should begin to flow and level out. You can use a specialized plastic smoothing tool or even the back of a metal spoon (very carefully) to gently guide the softening plastic and flatten the area.
- Cool and inspect: Once the scratch appears smoothed, remove the heat and allow the plastic to cool completely. Do not touch it while it’s hot.
- Refine if needed: If the scratch is still visible, you can repeat the process with slightly more heat or for a slightly longer duration, but always with extreme caution. After cooling, you may need to lightly polish the area if the gloss is uneven.
A common application for this method is on slightly melted or scuffed plastic trim pieces that have lost their original shape due to heat exposure or minor contact. A skilled technician can use a heat gun to gently reshape and smooth these areas.
Some professionals also use a heat gun in conjunction with plastic welding rods made of the same material as the interior trim. This is a more involved process that essentially welds new plastic into the scratch.
Safety and Precautions
- Ventilation: Always work in a well-ventilated area, as heating plastics can release fumes.
- Temperature control: Start low and increase gradually. It is better to apply heat multiple times than to overheat and damage the plastic.
- Distance: Maintain a consistent distance from the plastic surface. Too close can cause immediate damage.
- Test first: If possible, practice on a scrap piece of similar plastic to get a feel for the heat required.
Method 5 Replacing Damaged Trim
For very deep, irreparable damage or if the plastic is brittle and cracking, replacing the entire trim piece might be the most practical and aesthetically pleasing solution. While this is a more involved process, it guarantees a perfect finish.
This is the ultimate solution when other repair methods have failed or are not feasible. It ensures that the damaged part is completely removed and
Finding Replacement Parts
Finding the right replacement part can sometimes be challenging, especially for older vehicles.
- Dealerships: The most reliable source for original parts, though often the most expensive.
- Auto parts stores: Many carry aftermarket trim pieces. Quality can vary.
- Online retailers: Websites like eBay, Amazon, or specialized auto parts sites often have a wide selection of new and used parts.
- Salvage yards: A good option for finding used parts at lower prices. You might need to inspect carefully for condition.
When ordering online, double-check part numbers and vehicle compatibility to ensure you get the correct piece. Photos can be very helpful in confirming the part.
Tools for Trim Replacement
Replacing trim often requires basic tools.
- Trim removal tools: These plastic tools are designed to gently pry apart plastic panels without damaging them.
- Screwdrivers: Phillips and flathead screwdrivers are commonly needed.
- Socket set: For bolts or nuts holding larger trim pieces.
It’s a good idea to consult your car’s service manual or look for online tutorials specific to your vehicle model for detailed instructions on removing and installing trim pieces.

Frequently Asked Questions
Question: Can I use toothpaste to fix car interior scratches
Answer: Toothpaste can sometimes work on very, very light scratches on glossy plastic because of its mild abrasive quality. However, it’s not ideal. It can leave a hazy residue, and it doesn’t contain the proper conditioners to restore the plastic.
For best results, use products designed for plastic repair.
Question: How long does it take to repair a scratch
Answer: Repairing a light scratch by buffing can take as little as 15-30 minutes. For moderate scratches that require sanding, you might spend an hour or two. Deep scratches filled with repair kits can take several hours, including curing time.
Question: Will sanding damage my car’s interior plastic
Answer: Sanding can damage plastic if not done carefully. Always use very fine grit sandpaper (1500 grit and higher), sand wet, and apply light pressure. The goal is to level the scratch, not to remove large amounts of plastic.
Question: What if the plastic is textured
Answer: Textured plastic is trickier. For light scratches, gentle polishing might work. For deeper scratches, a plastic repair kit that includes a texturing tool or spray is your best bet.
Heat gun methods can also help smooth some textures if done very carefully.
Question: How can I prevent future scratches
Answer: Regularly clean your interior with soft cloths. Avoid placing sharp objects directly on plastic surfaces. Use seat covers or floor mats that offer protection.
Be mindful when loading or unloading items from your car.
Wrap Up
Fixing scratches on your car’s plastic interior is achievable. Whether it’s a minor scuff or a deeper mark, these methods offer solutions. Start with simple cleaning and polishing for light damage.
Progress to sanding, repair kits, or even heat for more significant issues. Always remember to test first and work patiently. Your car interior can look great again with a little effort.