P0139 Honda O2 Sensor Fix: What Actually Works and What Wastes Your Money
You’re driving, the check engine light pops on, and the scanner says P0139. If you’ve seen this code on a Honda, you already know the vague dread that follows. The internet says it’s an oxygen sensor, but your buddy says it’s the catalytic converter, and the parts store guy hints it could be a wiring issue. Nobody gives you a straight answer.
This code is specific to the rear (downstream) O2 sensor on Bank 1, Sensor 2. It means the sensor’s response time is too slow. The fix is usually straightforward, but not always. This guide covers the actual diagnostic steps, the common myths that lead people to replace parts they don’t need, and the exact conditions where a sensor swap works versus when it won’t.

Gledewen
O2 Sensor Upstream Downstream 2Pcs | Oxygen…
- 【REPLACE#】15716, 15717, 15718, 15719, ZZC318861, XR3Z9G444CA, 15664, 234-4401, 234-4046. IF THE PLUG OF THE O2 SENSOR IS DIFFERENT…
- 【REPLACEMENT FOR】2003-2014 Ford E150 E250 | 1999-2016 Ford E350 Super Duty | 2001-2010 Ford Escape | 1997-2011 Ford Expedition | 1…
- 【12-MONTH WARRANTY】If for any reason at all, you are not fully satisfied with the upstream downstream oxygen sensor, simply contac…
You’ll walk away knowing how to test the circuit, when to blame the sensor versus the wiring, and why a quality replacement matters more than you think.
If you need a replacement, a solid option is the Gledewen upstream/downstream O2 sensor pair. It covers many Ford and Lincoln models, and the double laser-welded stainless body handles heat well. Check the fitment list before ordering, because plug shape matters.
What P0139 Actually Means on a Honda
P0139 is not a generic “sensor bad” code. It’s a response time fault. The engine computer (ECM) sends a signal and expects the rear sensor to react within a certain window. When the sensor takes too long to switch voltage, the ECM logs P0139.
The rear sensor’s job is to monitor the catalytic converter’s efficiency. It reads oxygen content after the converter. A slow response means the ECM can’t trust the data, so it assumes something is degrading.
Here’s the catch most people miss: the front sensor (Bank 1, Sensor 1) controls fuel trim. The rear sensor only monitors. So a P0139 won’t usually cause a rough idle or poor fuel economy right away. It will fail emissions, though.
Common Honda models that see this code include the Accord, Civic, CR-V, and Odyssey from the late 1990s through the 2010s. The diagnostic logic is the same across them.
Myth #1: You Must Replace Both Sensors at Once
Parts stores love to sell you two sensors. The logic sounds reasonable: if one is slow, the other is probably aging too. But that’s not how Honda’s ECM works.
The front sensor and rear sensor are independent circuits. A slow rear sensor doesn’t affect the front sensor’s operation. Replacing both is a waste of money unless the front sensor is also throwing a code or showing slow switching on a scan tool.
I’ve seen plenty of cars where a customer replaced both sensors, cleared the code, and P0139 came back within a week. The problem wasn’t the sensor at all. It was a small exhaust leak before the sensor or a corroded connector.
Test first. Replace only what’s broken.
Myth #2: Any O2 Sensor Will Work as Long as It Fits
The physical thread size might match, and the connector might plug in, but the sensor’s internal heater resistance and response characteristics vary by manufacturer. Honda specifies a particular response curve for the rear sensor.
A cheap aftermarket sensor with a slower response time can trigger P0139 even when it’s brand new. The ECM measures response time in milliseconds. If the new sensor is slower than the factory spec, you’ll get the same code.
That’s why you should stick with a reputable brand, ideally one that lists OEM equivalent part numbers. The Gledewen O2 sensor lists direct replacement numbers like 15717 and 15664, which helps match the right response profile.
Don’t buy the cheapest no-name sensor from a random seller. You’ll likely be doing this job twice.
Diagnostic Steps Before You Buy Anything
You can clear the code and see if it returns. That’s a fine first step, but it’s not a diagnosis. Here’s the proper order:
- Check for exhaust leaks. A leak near the rear sensor lets outside air in, which makes the sensor read lean and respond slowly. Listen for hissing, or spray soapy water on the joints while the engine runs. Bubbles mean a leak.
- Inspect the wiring and connector. The rear sensor wire often routes near the exhaust heat shield. Heat damage, melted insulation, or a loose connector all cause voltage drops that slow the response. Unplug and inspect for corrosion or bent pins.
- Test the heater circuit. The rear sensor has four wires: two for the heater, two for the signal. With the engine off, measure resistance across the heater wires. It should be around 3 to 5 ohms at room temperature. Open circuit means a dead heater, and that’s a sensor failure.
- Measure the signal voltage with a multimeter. With the engine warm and idling, back-probe the signal wire. A healthy rear sensor should cycle slowly between about 0.1V and 0.9V. If it sits flat or takes several seconds to move, it’s slow.
- Check the ECM ground. A bad ground at the engine block can cause slow response on multiple sensors. Clean the ground strap connections.
If all these check out and the code returns, replace the sensor.
Sensor Replacement: The Right Way
Removing a stuck O2 sensor can be a fight. The threads are often seized from heat cycles. Use a dedicated O2 sensor socket with a cutout for the wire, and apply penetrating oil an hour before you start.
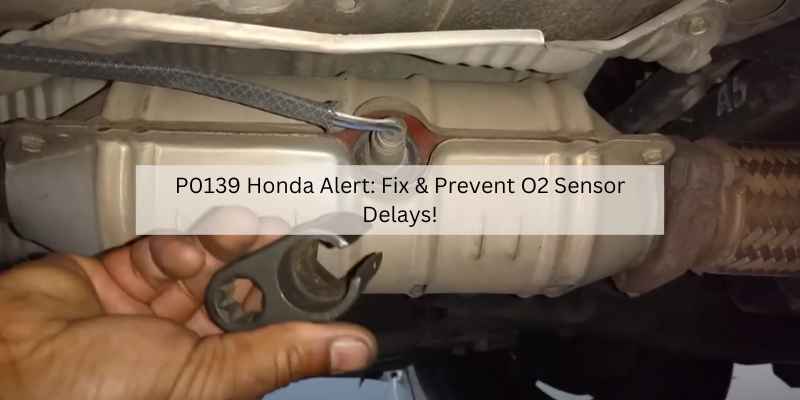
Run the engine for a couple minutes to warm the exhaust manifold area. Heat expands the metal and helps break the seal. Just be careful not to burn yourself.
When installing the new sensor, apply a small amount of anti-seize compound to the threads. Most quality sensors come pre-coated, but if yours doesn’t, add a thin layer. Do not get anti-seize on the sensor tip.
Tighten to about 30 to 45 foot-pounds. Over-tightening can damage the threads in the catalytic converter or exhaust pipe.
After installation, clear the code and drive the car for at least 20 minutes, including some highway time. The ECM needs a full drive cycle to re-evaluate the sensor response.
Comparison: OEM vs. Aftermarket vs. Universal Sensors
| Sensor Type | Cost Range | Fitment | Reliability | Best For |
|---|---|---|---|---|
| OEM (Honda genuine) | Highest | Plug-and-play | Excellent, matches exact response curve | Owners who want zero guesswork |
| Premium aftermarket (like Gledewen) | Mid-range | Plug-and-play for listed models | Very good, laser-welded body | Most DIYers; good balance of cost and quality |
| Universal (wire-it-yourself) | Lowest | Requires cutting and splicing | Variable; depends on your splicing skill | Budget builds or custom wiring |
| No-name cheap sensors | Very low | Often claims universal fit | Poor; slow response times trigger P0139 | Avoid unless you like doing the job twice |
The Gledewen option sits in the sweet spot for most people. It’s not the cheapest, but it’s a direct-fit unit with a 12-month warranty. That warranty matters because a defective sensor can happen, and you want a replacement without a fight.
When P0139 Isn’t the O2 Sensor at All
This is the part that surprises people. Sometimes the sensor is fine, and the code is a symptom of something else.
A failing catalytic converter can cause the rear sensor to respond slowly because the exhaust gas composition changes. The sensor is trying to read a converter that’s not doing its job. If your Honda has high mileage and the converter is clogged, you’ll see P0139 along with a possible P0420 code.
Another culprit is a vacuum leak. A large unmetered air leak changes the air-fuel mixture, and the rear sensor sees a different signal than expected. Fix the vacuum leak first, then re-evaluate.
I also see wiring harness damage from rodents or previous repairs. The rear sensor wire can get pinched under the undercarriage. A simple continuity test with a multimeter between the sensor connector and the ECM connector will tell you if the wire is intact.
If you’ve replaced the sensor and the code still returns, get a smoke test done on the exhaust system. A pinhole leak at a weld joint is invisible to the eye but enough to trick the sensor.
Frequently Asked Questions
Can I drive with P0139?
Yes, for a while. The car won’t strand you, and fuel economy usually stays normal because the rear sensor doesn’t control fuel trim. But you’ll fail an emissions test, and a slow sensor can mask a failing converter. Don’t let it sit for months.
Will P0139 cause a rough idle?
Usually not. The front sensor controls the air-fuel ratio. A rear sensor fault is isolated to converter monitoring. If you have a rough idle, look at the front sensor, vacuum leaks, or ignition parts instead.
How long does it take to replace a rear O2 sensor?
Plan for 30 to 60 minutes if the sensor comes out easily. Add another 30 minutes if you need to fight a seized unit. The hardest part is reaching the connector, which can be tucked above the heat shield.
Do I need to reset the ECM after replacing the sensor?
Yes. Clear the code with a scan tool, or disconnect the battery for 30 seconds. Then drive through a full cycle. The ECM needs to see the sensor switch properly at operating temperature before it will clear the readiness monitor.
Is a universal O2 sensor worth the savings?
Only if you’re comfortable splicing wires and the sensor has a matching response time. Most universal sensors are slower than Honda’s spec. The savings disappear when you buy a second sensor after the code returns. Spend the little extra for a direct-fit unit.
What to Remember Before You Start
- P0139 is a slow response code, not a dead sensor code. Test before you replace.
- Check for exhaust leaks and wiring damage first. They cause false P0139 codes.
- Replacing both sensors at once is unnecessary unless both are failing.
- Buy a sensor with a matching OEM part number. Response time matters.
- Use anti-seize on the threads and torque to spec. Over-tightening cracks the bung.
- Clear the code and complete a full drive cycle to confirm the fix.
- If the code returns after a new sensor, smoke-test the exhaust and check the converter.
A P0139 fix doesn’t have to be a guessing game. Work through the diagnosis in order, and you’ll likely solve it on the first try. If you need a replacement, the Gledewen O2 sensor pair covers a wide range of vehicles and comes with a warranty that backs the part. Check the current price and fitment on Amazon before ordering.
For more Honda maintenance insight, see Honda oil filter differences and essential car oil fix.
Products related to this article
Sponsored / affiliate links. As an Amazon Associate I earn from qualifying purchases. I may earn additional commission from eligible campaigns.