Why Is My Cart Leaking Oil: Proven Fixes
If your cart is leaking oil, it’s likely due to worn-out seals, a loose drain plug, or gasket issues. These are common, and often simple fixes you can tackle yourself to get your cart running smoothly and prevent further damage.
Seeing an oil leak from your cart can be a bit concerning. That dark puddle under your vehicle isn’t just messy; it’s usually a sign that something needs attention. Don’t worry, though! Most oil leaks are quite common issues that many cart owners face. They often stem from simple wear and tear or loose connections that are surprisingly easy to fix. You don’t need to be a master mechanic to understand what’s happening or even to get your cart back in top shape. We’re going to break down exactly why your cart might be leaking oil and provide you with straightforward, proven fixes. Let’s get your cart running clean and strong again!
Understanding Cart Oil Leaks: What You Need to Know
Oil is the lifeblood of your cart’s engine, keeping everything lubricated and cool. When it starts to escape, it means that protective seal has been broken somewhere. For golf carts, utility vehicles, and other small carts, these leaks are often more noticeable because they typically happen at lower speeds and in more stationary situations, like when parked. Identifying the source of the leak is the first big step toward fixing it.
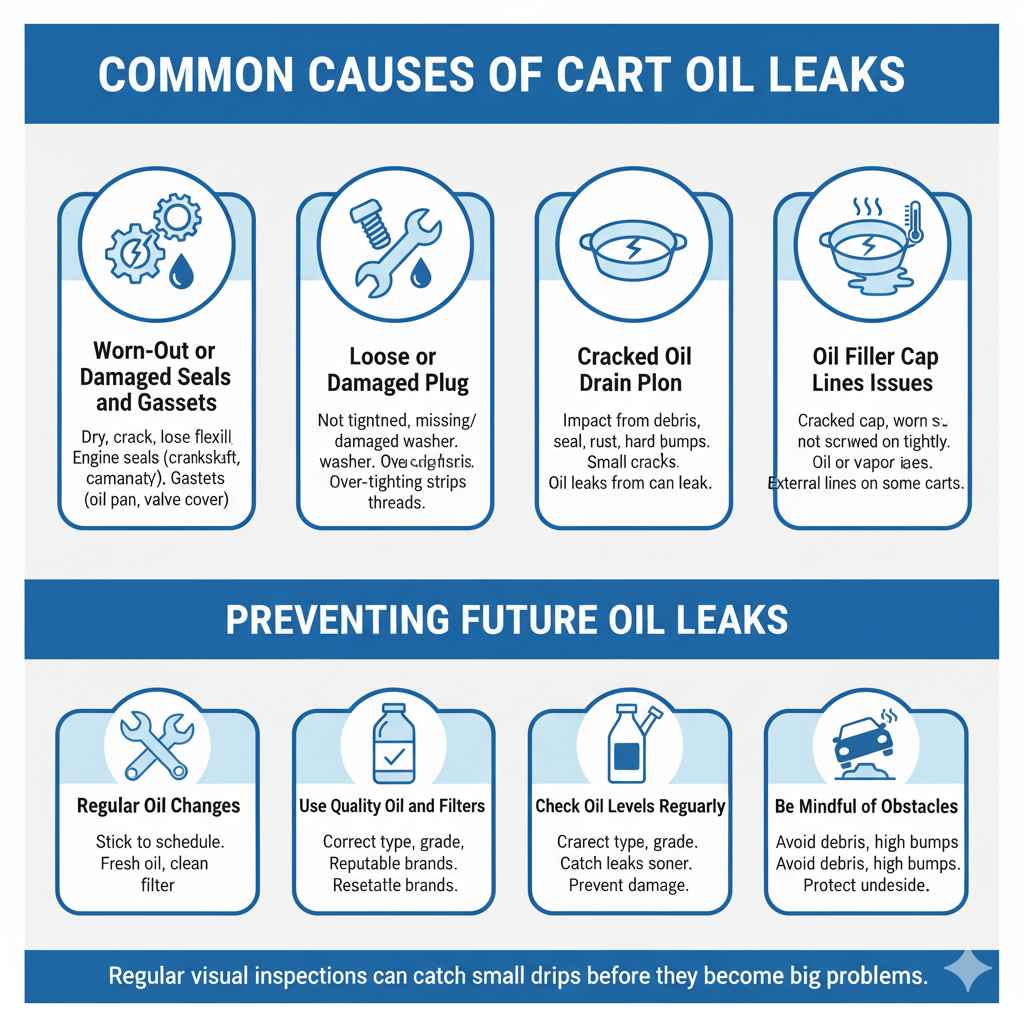
Common Causes of Cart Oil Leaks
Several parts of your cart’s oil system can develop leaks over time. Let’s explore the most frequent culprits:
1. Worn-Out or Damaged Seals and Gaskets
Seals and gaskets are like the rubber or cork rings that create a tight barrier between engine parts. They prevent oil from seeping out. Over time, heat, pressure, and simple aging can cause these materials to dry out, crack, or lose their flexibility. When that happens, they can no longer form a perfect seal, and oil will find its way out.
- Engine Seals: These are found in places like the crankshaft, camshaft, and valve stems. If they wear down, oil can leak around these rotating parts.
- Gaskets: These are used between larger stationary parts, such as the oil pan gasket, valve cover gasket, or cylinder head gasket. A leaky gasket here means oil can escape where two metal surfaces meet.
2. Loose or Damaged Oil Drain Plug
Every engine needs an oil drain plug to let out the old oil during changes. This plug is usually tightened with a wrench and relies on a washer (often a crush washer) to create a seal with the oil pan. If the plug isn’t tightened enough, or if the washer is missing or damaged, oil can drip from this point.
- Over-tightening: Believe it or not, overtightening the drain plug can damage the threads in the oil pan or strip the plug itself, leading to leaks.
- Stripped Threads: If the plug or the oil pan threads are stripped, they won’t hold the plug tightly, causing persistent leaks.
3. Cracked Oil Pan
The oil pan sits at the bottom of your engine and holds the oil. While it’s made of metal, it can be damaged. Hitting a speed bump too hard, driving over debris, or even rust can cause the oil pan to crack or develop holes. Even a small crack can allow oil to leak out.
4. Loose or Damaged Oil Filter
The oil filter cleans your engine oil. It screws onto the engine block, and a rubber gasket on the filter creates the seal. If the filter isn’t seated correctly, is cross-threaded, or its gasket is old and brittle, oil can leak from around the filter.
5. Oil Filler Cap Issues
The cap you remove to add oil can also be a source of leaks. If the cap is cracked, the seal inside it is worn out, or it’s not screwed on tightly, oil or oil vapor can escape.
6. Issues with Oil Lines or Hoses
Some carts, especially larger utility vehicles or those with specific cooling systems, may have external oil lines or hoses. These flexible lines can develop cracks, splits, or loose connections over time, leading to leaks.
Troubleshooting Your Cart’s Oil Leak: A Step-by-Step Guide
Let’s dive into how you can pinpoint and potentially fix that oil leak yourself. Safety first! Always make sure your cart is on a flat, level surface and the engine is cool before you start.
Step 1: Clean the Area
Oil leaks can spread and splatter, making it hard to see the original source. Use a degreaser and some shop towels to thoroughly clean the suspected leaking area. This might be the oil pan, around the engine block, or the filter. Once clean, start the engine for a few minutes, then shut it off and look for fresh oil drips. This will help you spot the exact origin.
Step 2: Inspect the Oil Drain Plug
Locate the oil drain plug at the bottom of the oil pan. Check if it feels loose by gently trying to turn it with a wrench. If it is loose, tighten it carefully. If you recently had an oil change, it’s possible the plug wasn’t tightened properly. Also, inspect the condition of the drain plug and its washer. If the threads on the plug or the oil pan look damaged, this might require a professional repair, but a damaged washer can often be replaced easily.
Step 3: Examine the Oil Filter
Locate your oil filter. Make sure it’s snug. If it feels loose, tighten it by hand. If it’s already tight, and you suspect it’s the source, it might be time to replace it entirely. Ensure the rubber gasket on the new filter is clean and lubricated with a little fresh oil before screwing it on hand-tight, then an additional 1/4 to 1/2 turn.
Step 4: Inspect Gaskets and Seals
This is where it gets a bit more involved. You’ll need to look for oil seeping from the edges of major engine components:
- Valve Cover Gasket: Look for oil seeping from the top of the engine, where the valve cover meets the cylinder head.
- Oil Pan Gasket: Carefully inspect the seam where the oil pan meets the bottom of the engine block.
- Timing Cover Gasket / Crankshaft Seals: These are usually near the front or rear of the engine, where the engine spins. Leaks here are harder to see without getting underneath.
If you find a leak around a gasket, the gasket likely needs replacement. For seals, it’s often about replacing the seal itself.
Step 5: Check the Oil Filler Cap
Ensure the oil filler cap is properly seated and tight. Remove it and check the rubber seal on the underside. If it’s cracked or brittle, the cap itself might need replacing. You can often find a replacement cap at an auto parts store or online.
Step 6: Look for Cracked Components
Carefully inspect the oil pan for any visible cracks or damage. If you see any, the oil pan will likely need to be replaced. Also, check any visible oil lines or hoses for damage.
Tools You Might Need
Here’s a list of common tools that will help you tackle most oil leak fixes. Having these on hand can save you a trip to the mechanic.
- Socket Set and Ratchet: For removing and tightening bolts like the drain plug.
- Wrenches: Various sizes for different nuts and bolts.
- Shop Rags or Paper Towels: For cleaning up oil.
- Engine Degreaser: To make identifying leaks easier.
- Drain Pan: To catch any spilled oil.
- Gloves: To protect your hands.
- Safety Glasses: Always protect your eyes.
- Torque Wrench: For ensuring bolts are tightened to the correct specification (especially important for drain plugs).
- New Gaskets/Seals/Filter: If you identify the faulty part.
- New Crush Washer: For the oil drain plug.
Proven Fixes for Common Cart Oil Leaks
Let’s get specific about how to fix the leaks we’ve identified.
Fix 1: Tighten or Replace the Oil Drain Plug
If the drain plug is loose, the fix is simple: tighten it. Use the correct size socket and tighten it until it’s snug. Don’t overtighten, as this can strip the threads. If the washer is damaged or missing, you’ll need to drain the oil, remove the plug, replace the washer, and then reinstall and tighten the plug. A new crush washer is usually very inexpensive.
Fix 2: Replacing the Oil Filter
If the oil filter is leaking, or if you suspect it’s old and contributing to issues, replace it.
- Place a drain pan underneath the oil filter.
- Grip the filter and unscrew it counter-clockwise. Some oil will drain out.
- Wipe the filter mounting surface on the engine clean.
- Lightly lubricate the rubber gasket of the new oil filter with a drop of fresh oil.
- Screw the new filter on by hand until the gasket makes contact with the engine.
- Then, tighten it an additional 1/4 to 1/2 turn by hand. Do not use a wrench unless specified by the manufacturer, as over-tightening can damage the filter or gasket.
Fix 3: Replacing Gaskets (Valve Cover, Oil Pan)
Replacing a gasket usually involves removing the component it’s attached to, cleaning both mating surfaces, installing the new gasket, and reassembling. For example, replacing a valve cover gasket:
- Ensure the engine is cool!
- Carefully remove any components blocking access to the valve cover (e.g., air intake hoses, spark plug wires).
- Unbolt the valve cover. It might be stuck, so gently tap it with a rubber mallet if needed.
- Remove the old gasket and clean both the valve cover and the cylinder head thoroughly. Ensure all old gasket material and oil residue are gone.
- Install the new gasket into the valve cover or onto the cylinder head (follow the gasket manufacturer’s instructions).
- Reinstall the valve cover and tighten the bolts in a criss-cross pattern to the manufacturer’s specified torque.
Oil pan gasket replacement is similar but involves draining all the oil first and working underneath the cart.
Fix 4: Replacing Seals (Crankshaft, Camshaft)
Replacing engine seals (like crankshaft or camshaft seals) is a more advanced repair and often requires removing other parts like pulleys, belts, or even the timing cover. If you suspect a seal is leaking and you’re not comfortable with engine disassembly, it’s best to have a professional mechanic handle this. The Automotive Service Association (ASA) recommends seeking professional help for anything beyond basic maintenance if you’re unsure.
Fix 5: Repairing or Replacing the Oil Pan
If the oil pan is cracked, it will need to be replaced. This involves draining the oil, unbolting and removing the old pan, cleaning the engine block surface where the pan attaches, applying sealant (if required by the RTV gasket type) and installing the new pan with a new gasket. For minor damage, some very small cracks might be weldable by a professional, but replacement is usually the most reliable long-term solution.
When to Call a Professional
While many oil leaks are DIY-friendly, some situations warrant professional expertise:
- If the leak is coming from hard-to-reach areas.
- If you suspect a cracked engine block or internal engine damage.
- If you’ve attempted a repair and the leak persists.
- If you lack the necessary tools or confidence to perform the repair safely.
- For complex seal replacements (like crankshaft or camshaft seals) that require significant engine disassembly.
A qualified technician can diagnose the issue accurately and perform the repair correctly, ensuring your cart’s longevity.
Preventing Future Oil Leaks
Just like with car maintenance, a little prevention goes a long way for your cart.
- Regular Oil Changes: Stick to your cart’s recommended oil change schedule. Fresh oil and a clean filter help your engine run better and can highlight developing issues.
- Use Quality Oil and Filters: Using the correct type and grade of oil, along with a reputable brand of oil filter, ensures optimal engine protection.
- Check Oil Levels Regularly: While this doesn’t prevent leaks, it helps you catch them sooner before they cause major damage.
- Be Mindful of Obstacles: Avoid driving over large debris, rocks, or excessively high speed bumps that could strike the underside of your cart and damage the oil pan or other components.
- Proper Tightening: When performing maintenance, always ensure bolts and drain plugs are tightened correctly and not over-tightened.
Regular visual inspections – perhaps once a month, or after any potentially rough driving – can catch small drips before they become big problems. A quick look underneath your cart can reveal a lot.
FAQ: Your Cart Oil Leak Questions Answered
Q1: Is a small oil leak from my cart dangerous?
A1: Even a small leak can become a bigger problem over time. It can lead to low oil levels, causing engine damage or overheating. It also creates a fire hazard and is bad for the environment. It’s best to address it promptly.
Q2: How much oil should I expect to lose from a minor leak?
A2: A minor leak might drip slowly, losing only a few ounces of oil over a week or two. However, the rate of loss can increase significantly if the problem isn’t fixed. A significant leak could lose a quart or more in a short period.
Q3: Can I drive my cart if it has an oil leak?
A3: It’s generally not recommended to drive for extended periods with a noticeable oil leak. Check your oil level frequently. If the oil level drops significantly, stop driving the cart immediately to prevent serious engine damage.
Q4: How can I tell if the oil is leaking from the engine or the transmission?
A4: Engine oil is typically amber or dark brown and smells like hot oil. Transmission fluid can vary in color (often reddish or clear) and has a different, usually less acrid, smell. The location of the leak can also give clues. Engine oil leaks are more common and usually originate higher up or from the oil pan/filter area. Transmission leaks are often from the transmission housing or seals.
Q5: What are the different color oils I might see under my cart?
A5: Typically, you’ll see dark brown or black engine oil. If you see bright red fluid, it’s likely transmission fluid. Though less common, a light brown or milky fluid could indicate coolant mixing with oil, which is a serious problem usually pointing to a blown head gasket.
Q6: Do I need to change my oil every time I fix a leak?
A6: Not necessarily. If the leak was caused by a loose drain plug that you simply tightened, you likely don’t need an immediate oil change. However, if you replaced the oil filter or had to remove and reinstall the oil pan/drain plug, it’s often a good idea to consider an oil change to ensure everything is clean and properly sealed, especially if the oil leaked significantly.
Conclusion
Discovering an oil leak on your cart can feel like a setback, but as we’ve seen, most causes are quite common and often straightforward to fix. By understanding the potential problem areas – from simple drain plugs and filters to more involved gaskets and seals – you’re already halfway to solving it. Taking the time to clean the engine and carefully inspect the area is your best tool for diagnosis. Remember to prioritize safety, use the right tools, and don’t hesitate to tackle the simpler fixes yourself.
Gaskets, seals, plugs, and filters are all wear-and-tear items, and knowing how to address them will save you time and money. For more complex issues, knowing when to consult a professional ensures your cart stays in its best running condition. With a little care and these proven fixes, you can confidently keep your cart leak-free and running smoothly for all your adventures.