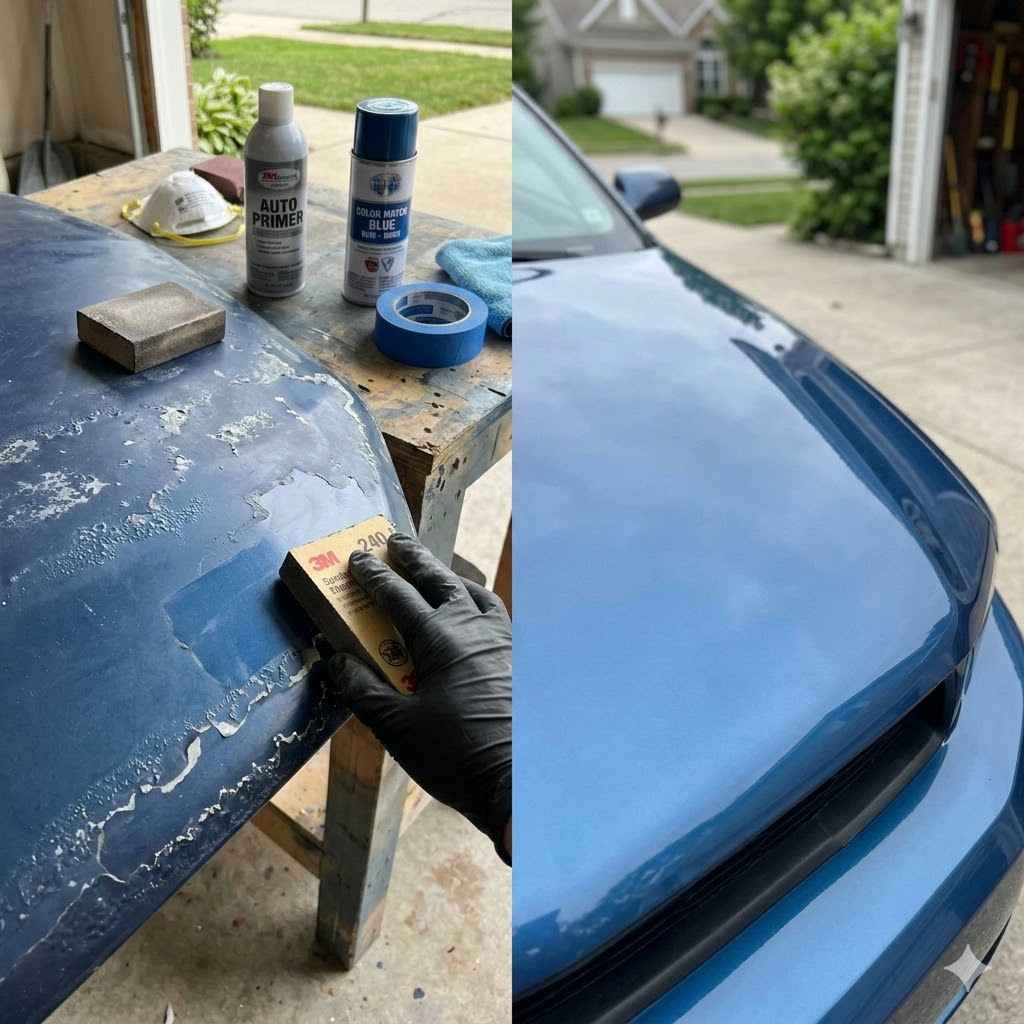
Cheap Fix for Peeling Paint on Car Hood
Is your car’s hood looking a bit sad with peeling paint? It happens to many cars, especially as they get older and face the sun’s rays and weather. For many car owners, tackling this kind of repair can seem tricky or expensive, especially if you’re new to car care.
But don’t worry! We’ll show you a simple, budget-friendly way to fix that peeling paint and make your car look much better. Get ready for easy steps that will get you a great result.
Understanding Peeling Car Hood Paint
Peeling paint on a car hood is a common problem that affects many vehicle owners. It happens when the protective layers of paint on your car’s surface start to break down and detach. This issue can be frustrating because it not only makes your car look bad but can also lead to further damage if left untreated.
This section will explore why this happens and what you can expect when you decide to fix it.
Causes of Peeling Car Hood Paint
Several factors contribute to paint peeling on a car hood. The most common culprit is prolonged exposure to ultraviolet (UV) radiation from the sun. UV rays can degrade the paint’s polymers, making it brittle and prone to cracking and peeling over time.
Another major cause is oxidation. When the paint’s surface is exposed to oxygen in the air, especially if the protective clear coat is compromised, the underlying paint layers can oxidize. This process weakens the paint’s bond with the metal surface underneath.
Environmental factors like extreme temperature changes, moisture, and harsh chemicals from road salt or acidic rain also play a role. These elements can stress the paint, causing it to lose adhesion. Inadequate paint application during manufacturing or previous repairs can also lead to premature peeling.
UV Radiation Damage
Sunlight is a powerful force that can wreak havoc on your car’s paint. The sun emits ultraviolet (UV) rays, which are a form of electromagnetic radiation. When these rays hit your car’s paint, they can penetrate the clear coat and reach the color layers beneath.
Over time, this constant bombardment of UV rays breaks down the chemical bonds within the paint. Think of it like the paint getting tired and weak. This weakening makes the paint less flexible and more susceptible to cracking, fading, and eventually, peeling off.
Cars that are parked outside for long periods, especially in sunny climates, are more likely to experience this type of damage.
Oxidation and Environmental Factors
Oxidation is a chemical reaction where paint loses electrons, often when exposed to oxygen. This can happen more readily if the paint’s protective layers are damaged. Imagine rust forming on metal; oxidation on paint is similar in that it degrades the material.
Beyond oxidation, other environmental elements contribute. Rainwater, especially acidic rain, can etch into the paint. Road salt used in winter can be highly corrosive.
Even bird droppings or tree sap can contain chemicals that damage paint if not cleaned off promptly. Constant cycles of heat and cold also cause the car’s body to expand and contract, putting stress on the paint.
Improper Application or Previous Repairs
Sometimes, the problem isn’t just about external factors. The way the paint was applied originally can affect its longevity. If the surface wasn’t properly prepped, or if the wrong paint products were used, the paint might not adhere well from the start.
This can lead to early signs of peeling, even on relatively new cars.
Similarly, if your car has had bodywork done before, the quality of those repairs matters. A poorly done paint job from a previous repair can be a ticking time bomb for peeling issues. This is why it’s important to choose reputable shops for any car body work.
DIY Cheap Fix for Peeling Paint on Car Hood Steps
Tackling peeling paint on your car hood yourself can be a rewarding experience, saving you money and giving you a sense of accomplishment. This guide breaks down the process into simple, manageable steps, perfect for beginners. We focus on a cost-effective approach without sacrificing quality.
Step 1 Preparing the Damaged Area
Before you do anything else, you need to get the damaged area ready. This is super important for making sure your fix sticks. You’ll want to gently remove all the loose, flaking paint.
Use a plastic scraper or a putty knife to carefully lift and peel away the paint that’s already coming off. The goal is to get down to a smooth, solid surface. Don’t try to force off paint that is still firmly attached.
Once the loose paint is gone, you’ll need to sand the edges where the paint is peeling. Use fine-grit sandpaper, maybe around 220-grit, to feather the edges. This means smoothing the transition between the bare metal or primer and the remaining paint.
You’re making a smooth ramp, not a sharp edge.
Removing Loose Paint
The first and most critical step is to remove all the paint that is already loose or peeling. If you don’t remove this, your new paint will just peel off with it later. This requires patience.
Use a plastic scraper or a small putty knife. Gently work it under the edge of the peeling paint. Try to lift it away from the surface.
If the paint is really brittle, it might flake off easily. If it’s a bit stubborn, you might need to apply a little more pressure, but be careful not to damage the surrounding good paint or the metal underneath.
Work your way around the entire area where the paint is compromised. You want to remove every single piece of paint that is not firmly attached. This might take longer than you think, but it’s essential for a lasting repair.
Sanding and Smoothing Edges
After you’ve removed all the loose flakes, you’ll notice a rough edge where the paint stopped. This edge needs to be smoothed out. This process is called feather-edging.
Get some fine-grit sandpaper. A grit of around 220 is usually good to start with. You can use a sanding block to keep the sanding flat and even.
Gently sand the edges of the remaining paint. You’re not trying to sand off the good paint, just to smooth down the transition.
The goal is to create a smooth ramp from the bare metal or primer up to the edge of the existing paint. This makes the repair less noticeable. You should be able to run your finger over the area and not feel a distinct edge.
If you still feel a lip, keep sanding gently.
Step 2 Cleaning and Priming
Once you have a smooth, clean surface, it’s time to get it ready for the new paint. This involves thorough cleaning to remove any dust or grease, followed by applying a primer. Primer is like glue for paint; it helps the new color stick well.
For cleaning, use a wax and grease remover or a good degreaser. Apply it to a clean microfiber cloth and wipe down the entire sanded area. Make sure to get into all the nooks and crannies.
Let it dry completely.
Next, apply a thin, even coat of automotive primer. Choose a primer that is suitable for metal and the type of paint you plan to use. Spray primer in light coats, holding the can about 6-8 inches away.
Allow each coat to dry according to the product’s instructions before applying another. You might need 2-3 coats for good coverage.
Cleaning the Surface
Dust and grease are the enemies of a good paint job. They prevent paint from sticking properly and can cause bubbles or an uneven finish. So, cleaning is a critical step that cannot be skipped.
Use a dedicated automotive wax and grease remover. These products are specifically designed to break down oils, silicones, and road grime without leaving a residue. You can find them at auto parts stores.
Apply the remover to a clean, lint-free cloth. Wipe down the entire sanded area, including the surrounding good paint where you might have accidentally sanded. Work in sections, and use a clean part of the cloth for each section.
Let the area air dry completely. Do not touch the cleaned surface with your bare hands, as oils from your skin can transfer.
Applying Automotive Primer
Primer is essential for a durable paint repair. It acts as a bonding agent between the metal (or old paint) and your new paint, ensuring it sticks well and lasts. It also helps to fill in minor imperfections and provides a uniform surface color for your topcoat.
You’ll want to use a primer designed for automotive use, often labeled as “etch primer” or “high-build primer.” Etch primers are good for bare metal as they bite into the surface. High-build primers help to fill slight imperfections.
When applying, shake the can well. Hold it about 6 to 8 inches away from the surface. Spray in light, even coats.
Overlapping each pass slightly will ensure complete coverage. Don’t try to cover everything in one thick coat; this can lead to runs and an uneven finish. Allow each coat to dry for the time recommended on the can before applying the next.
Typically, 2-3 thin coats are sufficient.
Step 3 Applying the Color Coat
Now for the fun part – adding the color back to your car’s hood! This stage requires careful application of the base coat paint. The key is to build up the color in thin, even layers.
This helps achieve a smooth, uniform finish that blends well with the rest of your car.
Make sure the primer is fully dry and lightly sanded if recommended by the primer manufacturer. Again, clean the area thoroughly with wax and grease remover and let it dry.
When you’re ready to paint, hold the can about 8-10 inches from the surface. Apply in smooth, sweeping motions, overlapping each pass by about 50%. Work in one direction, then switch to the opposite direction for the next coat.
This cross-hatching technique helps ensure even coverage.
Allow adequate drying time between coats, as specified on the paint can. This might be 10-15 minutes. You’ll likely need 2-4 coats to achieve good color coverage.
The goal is to have the color look solid and consistent across the repaired area.
Choosing the Right Paint Color
Selecting the correct paint color is crucial for a seamless repair. Most auto parts stores can match your car’s paint color. You’ll need your car’s paint code, which is usually found on a sticker inside the driver’s side doorjamb, in the glove compartment, or under the hood.
If you can’t find the code, take a small chip of the peeling paint (if you can get one without damaging good paint) to a paint shop. They can use a spectrophotometer to match the color precisely. When buying spray cans, make sure you select a quality automotive spray paint that is designed for your car’s finish.
Technique for Applying Base Coat
Applying the base coat is where you add the actual color. It’s vital to apply this in thin, even coats to avoid drips and uneven coverage. The technique is similar to applying primer but with a bit more attention to hiding the bare spots.
Ensure the primer is clean and dry. Give your base coat spray can a good shake for at least two minutes after you hear the mixing ball rattling.
Hold the can about 8-10 inches from the surface. Use smooth, consistent sweeping motions. Overlap each pass by about half.
Work in one direction (e.g., horizontally) for a pass, then immediately do a pass in the perpendicular direction (vertically). This cross-hatching ensures you don’t miss spots and helps build an even layer.
Allow the recommended flash-off time between coats, usually around 10-15 minutes. This allows the solvents to evaporate. You’ll likely need 2 to 4 coats to get good, solid coverage.
The goal is for the repaired area to look uniformly colored.
Step 4 Applying the Clear Coat
The clear coat is the protective shield that gives your car its shine and protects the color coat from the elements. Applying it correctly is key to making your repair look professional and last. Like the color coat, this is best done in multiple thin layers.
Make sure your base coat has dried for the amount of time specified on the can. This is critical; if the base coat isn’t dry enough, the clear coat can react badly, causing problems.
Again, hold the can 8-10 inches away. Apply the clear coat using the same sweeping, overlapping motions as you did with the color coat. You want to apply enough coats to get a glossy finish, but avoid applying too much in one go, which can cause runs.
You’ll typically need 2-3 coats of clear coat. Allow adequate drying time between coats, usually around 10-15 minutes. After the final coat, let the clear coat cure for at least 24-48 hours, or as directed by the product.
Purpose of Clear Coat
The clear coat is the final protective layer on your car’s paint. It’s a transparent coating that doesn’t have pigment, but it’s vital for several reasons. Its primary job is to protect the color coat from UV damage, oxidation, scratches, and chemical contaminants like bird droppings or acid rain.
Without a clear coat, the color coat would fade, chalk, and degrade much more quickly when exposed to sunlight and the elements. The clear coat also gives your car its signature gloss and depth of shine. It’s like a strong, clear shield that keeps the vibrant color underneath looking its best.
Technique for Applying Clear Coat
Applying clear coat requires a steady hand and good technique. The goal is to achieve a smooth, glossy finish that matches the rest of your car’s paint. This is done by applying multiple thin coats rather than one thick one.
Ensure your base coat is dry according to the manufacturer’s instructions. This is extremely important because if the base coat is still wet, the clear coat can react with it, causing it to wrinkle or bubble.
Hold the spray can about 8 to 10 inches away from the surface. Use the same smooth, sweeping motion you used for the base coat, overlapping each pass by about 50%. Apply the clear coat in light, even layers.
Allow a flash-off time of 10-15 minutes between coats. This allows the solvents to evaporate before applying the next layer. You will typically need 2 to 3 coats of clear coat to achieve a good, deep gloss.
The final coat should look wet and reflective.
Step 5 Wet Sanding and Polishing (Optional but Recommended)
For a truly professional finish, you can take your repair to the next level with wet sanding and polishing. This step helps to level out any minor imperfections, smooth out orange peel (a textured look that can happen with spray paint), and bring out a deep shine. It makes your repair blend in almost perfectly.
First, let the clear coat cure completely, which might take 24-72 hours depending on the product and temperature. Then, get some very fine-grit wet/dry sandpaper, starting around 1500-grit. Wet the sandpaper and the painted surface.
Gently sand the clear coat in a back-and-forth motion. The goal is to lightly level the surface, not to sand through the clear coat. You’ll notice the gloss disappear slightly; this is normal.
After sanding, wash the area clean.
Next, use a polishing compound. Apply a small amount to a clean microfiber applicator pad or a buffing wheel. Work it into the surface in small, overlapping circles.
You’ll see the shine start to return. Finish with a finer polishing compound or swirl remover to restore maximum gloss.
Understanding Wet Sanding
Wet sanding is a technique used in auto bodywork to smooth out imperfections in painted surfaces. It involves using very fine-grit sandpaper with water. The water acts as a lubricant, which reduces friction and prevents the sandpaper from clogging up with paint particles.
This process is usually done after the paint and clear coat have fully cured. The purpose of wet sanding is to level out minor inconsistencies like dust nibs, slight orange peel, or minor imperfections left from the spraying process. It creates a smoother surface for polishing.
When done correctly, wet sanding can make a significant difference in the final appearance of a paint job. However, it requires care, as sanding too aggressively or using too coarse a grit can damage the paint and require redoing the entire section.
Polishing for Shine
Polishing is the step that brings out the deep shine and gloss in your car’s paint. After wet sanding, the surface will look dull, but it will be incredibly smooth. Polishing compounds contain very fine abrasives that work to remove the microscopic scratches left by sanding and to bring out the reflectivity of the paint.
There are different types of polishing compounds, ranging from heavy-cut compounds designed to remove deeper scratches to fine polishes that enhance gloss. For a DIY repair, a medium-cut polishing compound followed by a finishing polish or swirl remover is ideal.
You can apply polish by hand using a microfiber applicator pad or with a machine polisher. When applying by hand, use small, circular, overlapping motions. Work the compound into the surface until it begins to clear.
Wipe off any residue with a clean microfiber towel. Using a machine polisher, especially a dual-action polisher, can make the process faster and easier to achieve professional results.
Tools and Materials Needed
To perform this cheap fix for peeling paint on your car hood, you’ll need a few essential items. Having everything on hand before you start will make the process much smoother. We’ll list the key materials and tools that are readily available at most auto parts stores or online.
Essential Supplies for the Repair
Gathering the right supplies is half the battle. For this repair, you’ll want to get a few specific items. Don’t skimp on quality for these, as they directly impact the outcome.
You’ll need sandpaper in various grits, starting with around 220-grit for initial shaping, then finer grits like 400, 600, and up to 1500-2000 grit for wet sanding if you choose to do that step.
You’ll also need a good quality automotive primer, your car’s color-matched base coat spray paint, and a clear coat spray. Make sure the color code for your car is accurate. A wax and grease remover is crucial for cleaning.
For application, have clean, lint-free cloths or microfiber towels.
Consider using masking tape and paper to protect the areas you don’t want to paint. A plastic scraper or putty knife will be needed for removing loose paint. Gloves and eye protection are also a must for safety.
Sandpaper and Blocks
Sandpaper is your primary tool for preparing the surface and smoothing the finish. You’ll need several different grits.
Start with a coarser grit, like 220, to feather the edges of the peeling paint. Then move to finer grits for smoothing the primer and for wet sanding. Grits like 400, 600, and 800 are good for prepping the primer.
If you plan to wet sand the clear coat, you’ll need grits as fine as 1500, 2000, or even 3000.
Using a sanding block can help keep your sanding flat and prevent you from creating uneven pressure points that can cause dips or waves in the surface. Foam sanding blocks are flexible and work well on curved surfaces.
Automotive Paint Products
For this repair, you’ll need specific automotive paint products.
Primer: Use an automotive-grade primer. An etch primer is good for bare metal, while a high-build primer can help fill minor imperfections.
Base Coat Paint: This is the color coat. You need to get a can of spray paint that precisely matches your car’s original color. Auto parts stores can often mix this for you if you provide your car’s paint code.
Clear Coat: This is the protective top layer that provides gloss. Use a high-quality automotive clear coat spray. It will protect the base coat and give it that deep shine.
Always read the instructions on the product labels. Different brands may have slightly different drying times and application recommendations.
Cleaning and Protective Gear
Proper cleaning and safety are paramount.
Wax and Grease Remover: This is essential for cleaning the surface before priming and painting. It removes oils, silicones, and contaminants that can prevent paint adhesion.
Lint-Free Cloths/Microfiber Towels: Use these for applying cleaners and wiping surfaces. Regular paper towels can leave lint behind, which will show up in your paint.
Masking Tape and Paper: To protect areas you don’t want to paint, like trim, headlights, or adjacent body panels. Automotive masking tape is designed to stick well but remove cleanly.
Gloves: Nitrile gloves protect your hands from paint and chemicals and prevent oils from your skin from contaminating the surface.
Eye Protection: Safety glasses or goggles are crucial to protect your eyes from paint overspray and dust.
Respirator Mask: When working with spray paints, especially in an unventilated area, a respirator mask is highly recommended to protect your lungs from harmful fumes.
Troubleshooting Common Issues
Even with the best intentions, sometimes things don’t go perfectly when you’re doing a DIY paint repair. Knowing how to handle common problems can save your project from disaster. This section covers a few issues you might run into and how to fix them.
Addressing Runs and Sags
Runs and sags happen when you apply too much paint at once, causing it to drip down the surface. This is most common with the base coat or clear coat. The key is to apply paint in light, even coats.
If you get a small run, you can sometimes catch it before it fully dries by gently tipping the panel or using a clean brush to carefully nudge the excess paint back into place. For larger runs that have started to dry, you’ll need to let them cure fully.
Once dry, you can gently sand down the run with fine-grit sandpaper (e.g., 600-grit, then 1000-grit). Be very careful not to sand through the surrounding paint. After sanding, you’ll need to reapply primer if you sanded through to it, then reapply the base coat and clear coat over the repaired area.
Causes of Runs and Sags
Runs and sags in paint are almost always caused by applying too much paint too quickly. Several factors can contribute to this:
Too Much Paint: The most direct cause is spraying too much paint in one pass. This can happen if the spray nozzle is too close to the surface, if the spray is too wide, or if you spray too slowly in one spot.
Wrong Temperature or Humidity: Very high humidity can slow down paint drying, making it more prone to sagging. Extreme heat can cause paint to dry too quickly on the surface, forming a skin that traps solvents underneath, leading to drips.
Incorrect Spraying Technique: Not overlapping passes enough, or stopping the spray mid-pass, can lead to thicker application in certain areas, increasing the risk of runs.
Poor Surface Preparation: If the surface isn’t properly cleaned and degreased, or if there’s an incompatible substance on the surface, paint adhesion can be compromised, making it more likely to run.
Fixing Runs and Sags
Don’t panic if you get a run or sag. They can usually be fixed, though it takes a bit of patience.
Minor Runs: If the run is small and still wet, you might be able to carefully use a clean brush or the edge of a clean rag to gently wick away the excess paint before it dries. You can also try tilting the panel slightly to encourage the paint to flow back into the area.
Dried Runs: For runs that have already dried, you’ll need to address them after the paint has fully cured. Use very fine-grit sandpaper (start with 600-grit, then move to 1000-grit or higher) and a sanding block to carefully sand down the raised edge of the run. The goal is to level it with the surrounding paint without going through the clear coat or base coat.
After sanding the run flat, you’ll need to reapply primer if you sanded too deep, followed by the base coat and clear coat to the entire affected area. Then, you can wet sand and polish the area to blend it in.
Dealing with Orange Peel
Orange peel refers to the textured, uneven surface that sometimes appears after painting, resembling the skin of an orange. It happens when the paint doesn’t flow out smoothly during the drying process.
If you notice significant orange peel, the best way to fix it is through wet sanding. Use fine-grit wet/dry sandpaper, starting around 1500-grit and progressing to 2000- or 3000-grit. Gently sand the entire clear-coated area using plenty of water.
The gloss will disappear, and the surface will look dull. This is normal. After sanding, use a polishing compound and then a finer swirl remover to bring back the shine.
This process levels the orange peel and restores a smooth, glossy finish.
What Causes Orange Peel
Orange peel is a common paint defect that occurs when the paint fails to level out properly as it dries. Several factors can cause this:
Spraying Too Far Away: Holding the spray gun too far from the surface causes the paint droplets to partially dry in the air before they hit the panel. This prevents them from flowing together smoothly.
Wrong Viscosity: If the paint is too thick (high viscosity) or if it’s not reduced properly, it won’t flow out as intended. Conversely, if it’s too thin, it can run.
Temperature Issues: Spraying in too cool of temperatures can slow down the paint’s flow, while spraying in very hot conditions can cause it to dry too quickly, trapping solvents and creating the texture.
Incorrect Spray Gun Settings: Wrong air pressure or fluid tip settings on the spray gun can also lead to poor atomization and improper flow.
How to Fix Orange Peel
The most effective way to fix orange peel is by using a process called wet sanding and polishing. This method is designed to level the uneven surface.
First, ensure the clear coat has fully cured. Then, take very fine-grit wet/dry sandpaper, starting with 1500-grit. Keep both the sandpaper and the painted surface wet.
Gently sand the affected area in smooth, even strokes. You can use a sanding block for larger, flatter areas.
The goal is to lightly level down the high spots of the orange peel. You’ll see the gloss disappear, and the surface will look dull. This is a good sign.
After sanding with 1500-grit, progress to finer grits like 2000-grit and then 3000-grit. This refines the surface and prepares it for polishing.
Once you have sanded the entire area smooth, wash it thoroughly. Then, use a polishing compound. Apply a small amount to a clean microfiber applicator pad or a buffing wheel.
Work it into the surface using circular or back-and-forth motions. This will remove the sanding scratches and restore the gloss. Follow up with a finer polish for maximum shine.
Addressing Dust Contamination
Dust in the paint is another common annoyance. Tiny particles can settle on the wet paint while it’s drying, creating a bumpy texture. This often happens when painting in less-than-ideal conditions, like an open garage or outdoors.
If you have light dust nibs, you can often remove them by carefully wet sanding them down with very fine-grit sandpaper (1500-grit or higher) after the clear coat has cured. Then, polish the area to restore the shine, as described for orange peel.
For more significant dust contamination, you might need to sand down the affected area more thoroughly, reapply primer if necessary, and then re-spray the color and clear coats. Always try to paint in the cleanest environment possible.
Why Dust Gets Into Paint
Dust contamination in paint occurs when airborne particles settle onto a wet paint surface before it has a chance to dry and cure. Common sources of dust include:
Unclean Work Environment: Garages, driveways, or any open area are prone to dust from normal activity, construction, or even wind.
Poor Ventilation: If the area isn’t properly ventilated, dust can circulate. If ventilation systems aren’t equipped with proper filters, they can also introduce dust.
Moving Parts: Things like fans used for drying can stir up dust from the floor or other surfaces.
Static Electricity: Paint surfaces can attract dust due to static charges, making it harder to keep them clean.
Improper Handling: Even the car itself can shed fibers or dust if it’s not properly cleaned before painting.
How to Remove Dust Nibs
Removing dust nibs, those little bumps caused by dust particles in the paint, is usually manageable with careful work.
First, allow the clear coat to cure completely. This might take 24 to 72 hours, depending on the product and environmental conditions. Once cured, you can tackle the nibs.
Take very fine-grit wet/dry sandpaper, starting with 1500-grit. Wet the sandpaper and the painted surface. Gently sand over the dust nibs.
The goal is to carefully level down the top of the nibs until they are flat with the surrounding paint. You don’t need to sand the entire panel unless there are many nibs.
After you’ve flattened the nibs, progress to finer grits like 2000-grit and 3000-grit, using the same wet sanding technique. This will refine the surface. Wash the area thoroughly.
Then, use a polishing compound to remove the sanding marks and restore the shine. You might need a few passes with different polishing grades to achieve a perfect match to the surrounding paint.
Preventing Future Peeling
Once you’ve successfully repaired the peeling paint on your car hood, the next step is to prevent it from happening again. Proper care and protection can extend the life of your car’s paint job significantly.
Regular Washing and Waxing
Washing your car regularly is one of the easiest and most effective ways to protect the paint. Use a pH-neutral car wash soap and plenty of water to remove dirt, grime, bird droppings, and tree sap before they can damage the paint.
Waxing is equally important. A good quality car wax provides a protective barrier against UV rays and environmental contaminants. Apply wax every 3-6 months, depending on the type of wax and your car’s exposure to the elements.
This barrier helps to prevent the paint from degrading and peeling.
Benefits of Regular Washing
Washing your car regularly is more than just keeping it looking nice; it’s a vital part of preserving its paintwork.
Removes Harmful Contaminants: Bird droppings, bug splatters, tree sap, and road tar contain acids and chemicals that can eat through your car’s clear coat and paint if left untreated. Regular washing removes these before they can cause damage.
Prevents Grime Buildup: Dirt and road grime can abrade the paint surface over time, especially when the car is in motion. Washing removes this abrasive layer.
Maintains Gloss and Appearance: A clean car simply looks better. Regular washing helps maintain the paint’s original shine and prevents it from looking dull and neglected.
Early Detection of Issues: When you wash your car, you have a good opportunity to inspect it for any new scratches, chips, or areas of concern, allowing you to address them before they become bigger problems.
The Role of Car Wax
Car wax is a sacrificial layer applied over your car’s clear coat. It’s designed to protect the underlying paint from various environmental hazards.
UV Protection: Most car waxes contain UV inhibitors that help block harmful ultraviolet rays from the sun. This is crucial for preventing paint fading and degradation, which are major causes of peeling.
Water Repellency: Wax creates a smooth, hydrophobic surface. This means water beads up and rolls off easily, taking dirt and contaminants with it. This reduces the chance of water spots and chemical etching.
Protection Against Contaminants: The wax layer acts as a barrier against road salt, pollution, and other harsh chemicals, preventing them from reaching and damaging the paint.
Enhances Shine and Depth: Beyond protection, wax fills in microscopic imperfections in the paint’s surface, making it appear smoother and enhancing its depth and gloss. Regular waxing keeps your car looking showroom-ready.
Parking Smart
Where you park your car can make a big difference in how well its paint holds up.
Whenever possible, park your car in a shaded area or a garage. This significantly reduces its exposure to direct sunlight and harmful UV rays. If you have to park outside, try to find a spot that’s protected from the elements, such as under a tree (though be mindful of sap and bird droppings) or on the shady side of a building.
Garage Parking Benefits
Parking your car in a garage offers a multitude of benefits for paint preservation.
UV Ray Protection: Garages completely block direct sunlight and its damaging UV rays, which are a primary cause of paint fading, oxidation, and peeling.
Protection from Elements: Garages shield your car from rain, snow, hail, and dew. Moisture can degrade paint and promote rust.
Reduced Contaminant Exposure: Being indoors means your car is less exposed to bird droppings, tree sap, insect residue, road salt, and industrial fallout.
Stable Temperature: Garages typically offer a more stable temperature environment than being outdoors, reducing the stress on the paint caused by extreme heat and cold cycles.
Shade Parking Strategies
If a garage isn’t an option, strategic shade parking can still offer significant protection.
Look for Natural Shade: Park under trees whenever possible. However, be aware that trees can drip sap and are often frequented by birds. If you choose this option, make sure to wash your car promptly to remove any residue.
Utilize Building Structures: Park on the side of a building that is not exposed to direct sunlight during the hottest parts of the day. This could be the north side of a building in the Northern Hemisphere.
Carports and Covered Parking: If available, carports or covered parking structures offer a good compromise between outdoor and indoor parking. They provide protection from sun and rain while allowing for better air circulation.
Temporary Shade Solutions: For extended periods, consider using a portable car cover that is UV-resistant. Ensure the car is clean before applying any cover to avoid scratching the paint.
Frequently Asked Questions
Question: How long does a cheap fix for peeling paint on a car hood typically last?
Answer: The durability of a cheap fix depends on the quality of materials used, the thoroughness of the preparation, and how well the car is maintained afterward. A well-done DIY repair can last anywhere from a few months to a couple of years before touch-ups might be needed.
Question: Can I use regular house paint for a cheap fix for peeling paint on my car hood?
Answer: No, it is not recommended to use regular house paint. Automotive paints are specifically formulated to withstand outdoor conditions, UV radiation, and temperature fluctuations. House paint will not adhere properly and will likely peel and fade very quickly.
Question: What is the most common reason for paint to peel off a car hood?
Answer: The most common reason for paint to peel off a car hood is prolonged exposure to ultraviolet (UV) radiation from the sun, which degrades the paint’s integrity over time. Oxidation and damage to the clear coat also play significant roles.
Question: Do I need a special spray booth to do this repair?
Answer: While a professional spray booth offers the best environment, it is not strictly necessary for a cheap fix. You can achieve good results in a well-ventilated, clean garage or outdoor area that is protected from wind and dust. Ensure good airflow and cover surrounding areas to prevent overspray.
Question: Is it better to fix peeling paint myself or take it to a professional?
Answer: For a minor peeling issue and if budget is a primary concern, a DIY fix is a great option. However, for extensive damage, a professional body shop can provide a more durable and flawless finish, though at a higher cost.
Wrap Up
Fixing peeling paint on your car hood doesn’t have to be expensive. By following these simple steps, you can achieve a great result yourself. Proper preparation, careful application of primer, color, and clear coat are key.
Consistent care, like washing and waxing, will help your repair last. You’ve got this.