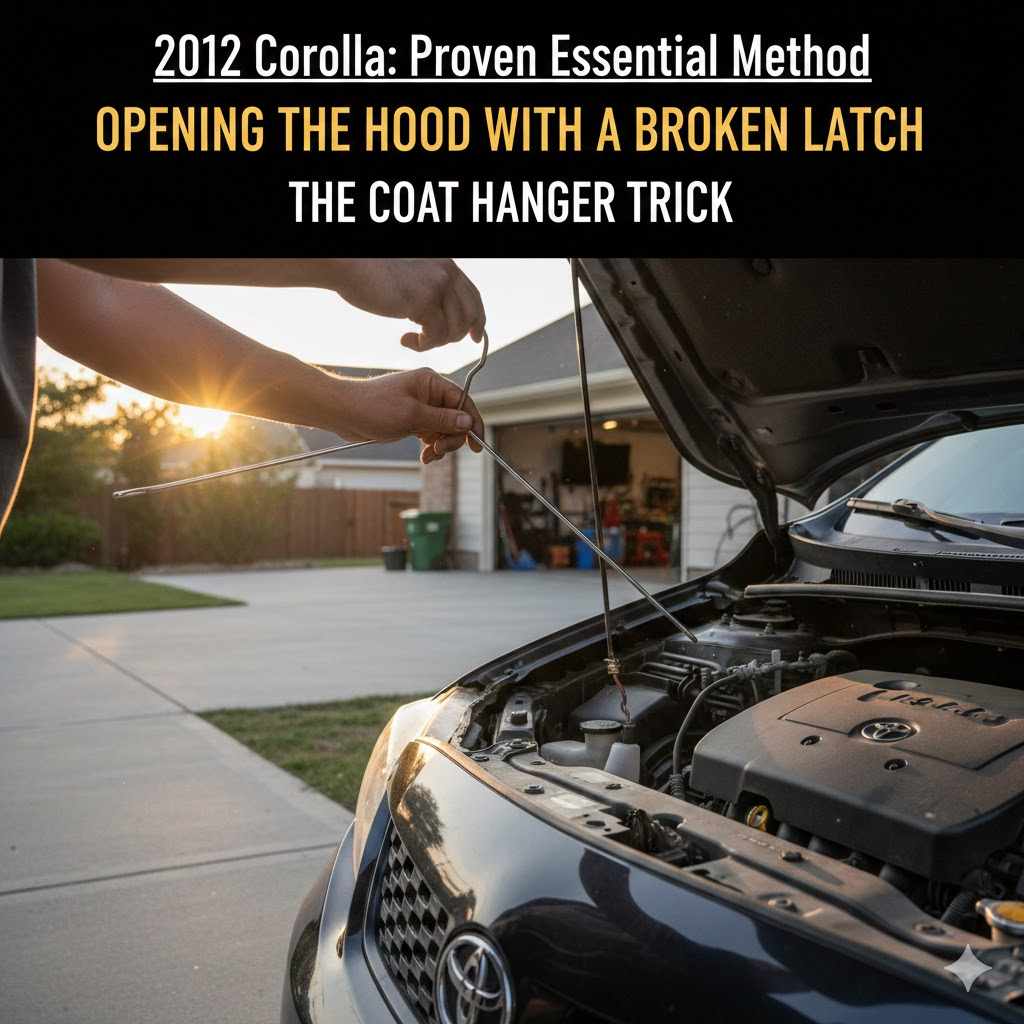
How The Open Car Hood If The Hood Latch Doesnt Work On A 2012 Corolla: A Proven, Essential Method
To open the hood on a 2012 Toyota Corolla when the latch doesn’t work, you’ll need to access the latch mechanism from underneath the car. Safely jack up the front of the vehicle, locate the latch assembly behind the grille, and use a long, flat-head screwdriver to push the release lever, which will pop the hood open.
It’s a frustrating moment for any car owner. You pull the hood release lever inside your 2012 Toyota Corolla, hear a faint click, or maybe nothing at all, and the hood stays firmly shut. Your simple plan to check the oil or top off the washer fluid is suddenly a real problem. Don’t worry—this is a common issue, and you don’t need to be a master mechanic to solve it.
Feeling stuck is normal, but I’m here to guide you through it. This guide provides a proven, step-by-step method that works for the 2012 Corolla. We’ll walk through the process together, using simple language and clear instructions. You can do this, and soon, you’ll have that hood open and be one step closer to fixing the root cause. Let’s get started!
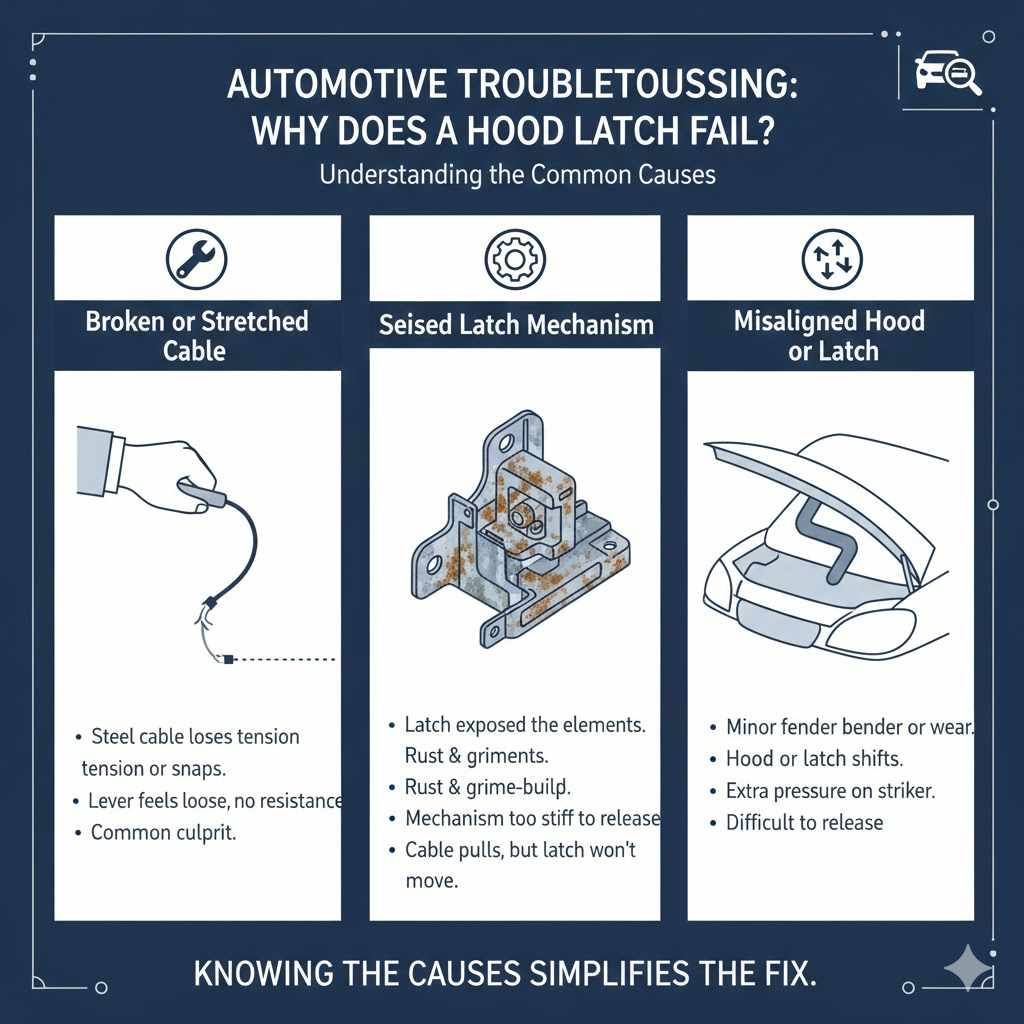
Why Does a Hood Latch Fail? Understanding the Common Causes
Before we dive into the solution, it helps to know what you’re up against. When your hood latch system fails, it’s almost always due to one of three simple mechanical issues. Understanding these can help you diagnose the problem once you get the hood open.
- Broken or Stretched Cable: The most common culprit. The steel cable connecting the inside release lever to the hood latch can stretch over time, losing its tension. Eventually, it might snap completely. If the lever feels loose with no resistance, a broken cable is likely the issue.
- Seized Latch Mechanism: The latch itself lives at the front of your car, exposed to rain, dirt, and road salt. Over time, rust and grime can build up, causing the moving parts of the latch to seize. In this case, the cable is pulling, but the latch is too stiff to release.
- Misaligned Hood or Latch: A minor fender bender or even just years of use can cause the hood or the latch to become slightly misaligned. This puts extra pressure on the striker (the U-shaped metal bar on the hood), making it difficult for the latch to release it.
Knowing these potential causes will make your inspection much easier later on. For now, our goal is just to get that hood open safely.
Safety First: Essential Precautions Before You Begin
Your safety is the most important part of any car repair, no matter how small. Before you start, please take a moment to follow these essential safety steps. They only take a few minutes and make a huge difference.
- Park on a Flat, Level Surface: Never work under a car that is parked on a slope or soft ground like grass or dirt. A flat driveway or a level garage floor is ideal.
- Engage the Parking Brake: This is a critical step to prevent the car from rolling while you are working on it.
- Use Jack Stands: If you need to lift the car, never rely on the car jack alone to support the vehicle. Jacks are for lifting, not for holding. Always place certified jack stands under the vehicle’s frame at the designated lift points. For guidance on vehicle safety, resources like the National Highway Traffic Safety Administration (NHTSA) offer valuable information.
- Wear Protective Gear: Safety glasses will protect your eyes from falling dirt and debris. A pair of mechanic’s gloves will keep your hands clean and protect them from scrapes and grime.
- Let the Engine Cool Down: If you were recently driving, give the engine at least 30-60 minutes to cool off. The radiator, exhaust, and other components can be extremely hot.
Taking these precautions ensures that you can focus on the task without any unnecessary risks.
Tools and Materials You’ll Need
You don’t need a full mechanic’s toolbox for this job. The method we’re using requires just a few basic tools that you may already have. If not, they are inexpensive and easy to find.
Here is a simple list of what you’ll need:
- Floor Jack: To lift the front of the car.
- Two Jack Stands: For safely supporting the car.
- Flashlight or Headlamp: It’s dark under the car, and you’ll need to see the latch mechanism clearly.
- Long, Flat-Head Screwdriver: A screwdriver at least 12-18 inches long is ideal. A thin pry bar or a long metal rod can also work.
- Mechanic’s Gloves: To protect your hands.
- Safety Glasses: To protect your eyes.
Tool Purpose Table
This table quickly explains why each tool is important for the job.
| Tool | Purpose |
|---|---|
| Floor Jack & Jack Stands | To safely lift and secure the front of the car for access from underneath. |
| Flashlight / Headlamp | To illuminate the hood latch area, which is hidden in shadow. |
| Long Screwdriver or Pry Bar | To reach up from under the car and manually trigger the latch release lever. |
| Gloves & Safety Glasses | To protect your hands and eyes from dirt, debris, and potential injury. |
Step-by-Step Guide: The Proven Method to Open Your 2012 Corolla’s Hood
Alright, you’ve done your safety checks and gathered your tools. Now it’s time for the main event. Follow these steps carefully, and don’t rush. We’ll get that hood open together.
Step 1: Try the Simple Two-Person Method First
Before you lift the car, let’s try the easiest trick in the book. This works if the cable is just stretched or the latch is slightly stuck.
- Ask a friend to pull and hold the hood release lever inside the car.
- While they are holding it, stand at the front of the car and use the palm of your hand to firmly press down on the hood, right above the latch area. Sometimes this little jolt is enough to free a sticky latch.
- You can also try gently pulling up on the hood while your friend holds the lever.
If this doesn’t work after a couple of tries, don’t worry. It was worth a shot! Now, we move on to the primary method.
Step 2: Safely Lift the Front of the Car
Now we need to get access from underneath. This is where your jack and jack stands come in.
- Position the floor jack under the front central jack point of your 2012 Corolla. This is a reinforced piece of the frame, often indicated in your owner’s manual.
- Slowly pump the jack to raise the front of the car high enough to give you comfortable working space underneath.
- Slide a jack stand under one of the designated pinch welds or frame points on one side of the car, just behind the front wheel. Raise the stand to the proper height.
- Do the same with the second jack stand on the other side.
- Slowly and carefully lower the car until its weight is resting securely on both jack stands. Give the car a gentle push to ensure it is stable and won’t wobble. Do not proceed until the car is stable.
Step 3: Locate the Hood Latch Mechanism
With the car safely in the air, it’s time to find our target.
- Slide under the front of the car, feet first. Make sure you have your flashlight and long screwdriver with you.
- Look straight up behind the front bumper and grille. You will see the bottom of the radiator. Directly in front of the radiator, in the center, you will find the hood latch assembly. It’s a black metal mechanism bolted to the frame.
- Shine your flashlight on it. You should be able to see where the hood striker (the U-shaped loop from the hood) goes into the latch.
Step 4: Identify and Activate the Release Lever
This is the key step. You’re looking for a small lever or tab that the release cable normally pulls on. On the 2012 Corolla, this is typically a small, spring-loaded lever on the side or bottom of the latch mechanism.
- Take your long, flat-head screwdriver and carefully guide it up toward the latch assembly. You may need to navigate around some plastic splash guards, but there is usually a gap you can use.
- Use your flashlight to get a clear view. The release lever is the part that moves when the cable is pulled. You are going to move it manually with your screwdriver.
- Position the tip of your screwdriver on this lever. You’ll need to push it either to the side (usually towards the driver’s side) or downwards. Apply steady pressure.
- When you push the lever correctly, you should hear a loud “POP!” or “CLICK!” – that’s the sound of the hood releasing.
If you don’t get it on the first try, reposition the screwdriver and try again. Sometimes it takes a few attempts to find the right spot and apply pressure in the right direction. Be patient!
Step 5: Lower the Hood and the Car
Success! You heard the pop, which means the primary latch has released. Now, let’s get everything back on the ground safely.
- Carefully slide out from under the car.
- Go to the front of the car. You should now be able to slide your fingers under the hood and find the secondary safety latch. Push this small lever to the side and lift the hood all the way open.
- Use the hood prop rod to secure the hood in the open position.
- Now, use your floor jack to lift the car slightly off the jack stands.
- Remove both jack stands and clear them out of the way.
- Slowly and smoothly lower the car back to the ground.
Congratulations! You’ve successfully opened your hood. Now you can check your fluids or move on to diagnosing the real problem.
What to Do Next: Diagnosing the Problem
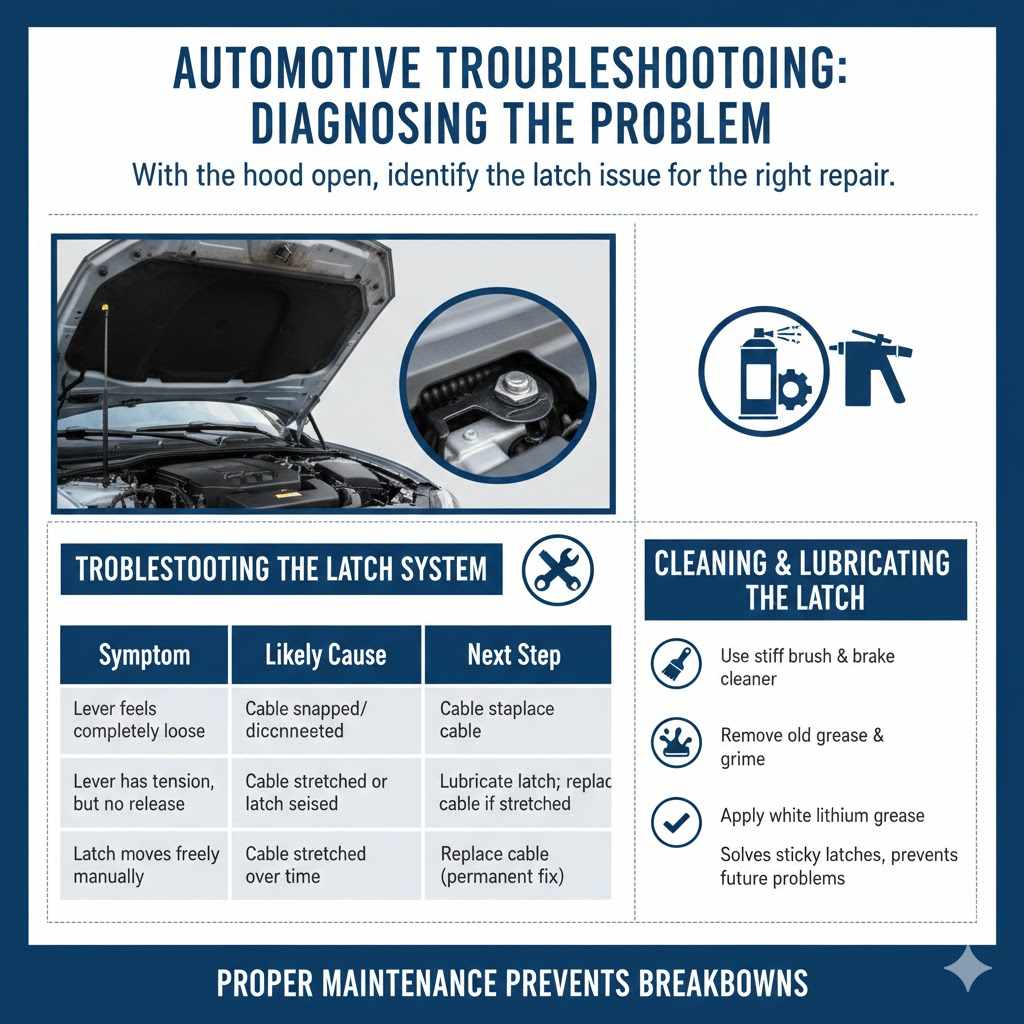
With the hood open, you can now figure out why it wouldn’t open in the first place. This will help you decide on the right repair.
Troubleshooting the Latch System
| Symptom | Likely Cause | Next Step |
|---|---|---|
| The release lever inside feels completely loose with no tension. | The hood release cable has snapped or disconnected from the lever. | Inspect the cable at the lever inside the car and at the latch itself. You will likely need to replace the entire cable assembly. |
| The lever has some tension, but the latch doesn’t release. | The cable may be stretched, or the latch mechanism is seized/dirty. | Have a friend pull the lever while you watch the latch. If you see the cable pulling the lever but the latch doesn’t move, the latch is the problem. Clean it thoroughly with a brake cleaner and lubricate it with white lithium grease. |
| The latch looks fine and moves freely when you pull the cable manually. | The cable has likely stretched over time and is no longer pulling the lever far enough to release. | Replacing the cable is the best long-term solution. Some people attempt to shorten it, but this is often a temporary fix. |
Cleaning and lubricating the latch mechanism is always a good idea. Use a stiff brush and a can of brake cleaner to remove all the old grease and grime. Once it’s clean and dry, apply a generous amount of white lithium grease or a similar lubricant to all moving parts. This can often solve issues with sticky latches and prevent future problems.
Frequently Asked Questions (FAQ)
1. Can I drive my 2012 Corolla if the hood latch is broken?
It is not recommended. If the primary latch is broken, you are relying solely on the secondary safety catch. If that fails at high speed, the hood could fly up, block your vision, and cause a serious accident. It’s best to get it fixed as soon as possible.
2. How much does it cost to fix a broken hood release cable?
The cost can vary. If you do it yourself, the cable for a 2012 Corolla is typically inexpensive, costing around $20-$40. If you take it to a mechanic, you can expect to pay for about one to two hours of labor, bringing the total cost to somewhere between $150 and $300, depending on local labor rates.
3. How can I tell if it’s the cable or the latch that’s broken?
The easiest way is to observe the latch while a friend pulls the interior release lever. If you see the cable moving the mechanism at the latch, but the hood doesn’t open, the latch itself is likely seized. If you don’t see any movement at the latch, or the interior lever feels completely slack, the cable has snapped or disconnected.
4. Can I use WD-40 on a stuck hood latch?
WD-40 can be a good temporary solution to free up a stuck latch because it’s a penetrating oil. However, it is not a long-term lubricant. After using it to clean and unstick the parts, you should follow up with a proper lubricant like white lithium grease, which will provide lasting protection against moisture and rust.
5. Why did my hood release cable snap?
Hood release cables typically fail due to age, wear, and corrosion. The cable is made of thin steel strands that can fray and weaken over many years of use. Rust can also form inside the cable housing, causing friction that puts extra strain on the cable until it eventually breaks.
6. What if I can’t reach the latch from underneath the car?
In some rare cases, access from underneath can be very tight. An alternative, more advanced method involves going through the front grille. This may require carefully cutting or removing a piece of the plastic grille to gain access with a tool. This should only be considered a last resort, as it can damage your car’s appearance.
7. Is this a difficult repair for a beginner to do?
Opening the hood using the method described is very achievable for a beginner, as long as you follow safety procedures for lifting the car. Replacing the cable can be a bit more involved, as it requires routing the new cable through the firewall. However, with patience and a good guide, it’s a manageable DIY project.
Conclusion: You’ve Got This!
A hood that won’t open can feel like a major roadblock, but as you’ve just seen, it’s a problem with a clear and manageable solution. By following the steps outlined in this guide, you were able to safely access the latch, release the hood, and take back control of your car. You’ve not only solved the immediate issue but also gained valuable experience and confidence in handling your own vehicle maintenance.
Remember to properly diagnose the root cause—whether it’s a snapped cable or a sticky latch—and perform the necessary repair to prevent this from happening again. Regular maintenance, like cleaning and lubricating the latch mechanism once a year, can go a long way. You’ve proven that with a little guidance and the right tools, you are more than capable of tackling car troubles head-on. Great job!