How to Paint Cars in Car Mechanic Simulator
Getting your paint job right in How to Paint Cars in Car Mechanic Simulator can be tricky for newcomers. It’s easy to mess up, but don’t worry! This guide is here to help you get professional-looking results. We’ll explore the basics and show you how to avoid common mistakes. Ready to transform those rusty wrecks into shining beauties? Let’s get started, step by step.
Preparation Is Key: Before You Start Painting
Before you even think about spraying paint, there’s a lot to do to make sure your car looks its best. This part is super important. It sets the stage for a great paint job. If you skip this, your paint will look bad, no matter how good you are with a spray gun. It’s like building a house. You need a good foundation before you can put up the walls. This section will walk you through the essential steps to prepare your car for the paint booth. You will learn about how to remove rust, how to clean the car, and other helpful techniques.
Rust Removal and Bodywork Prep
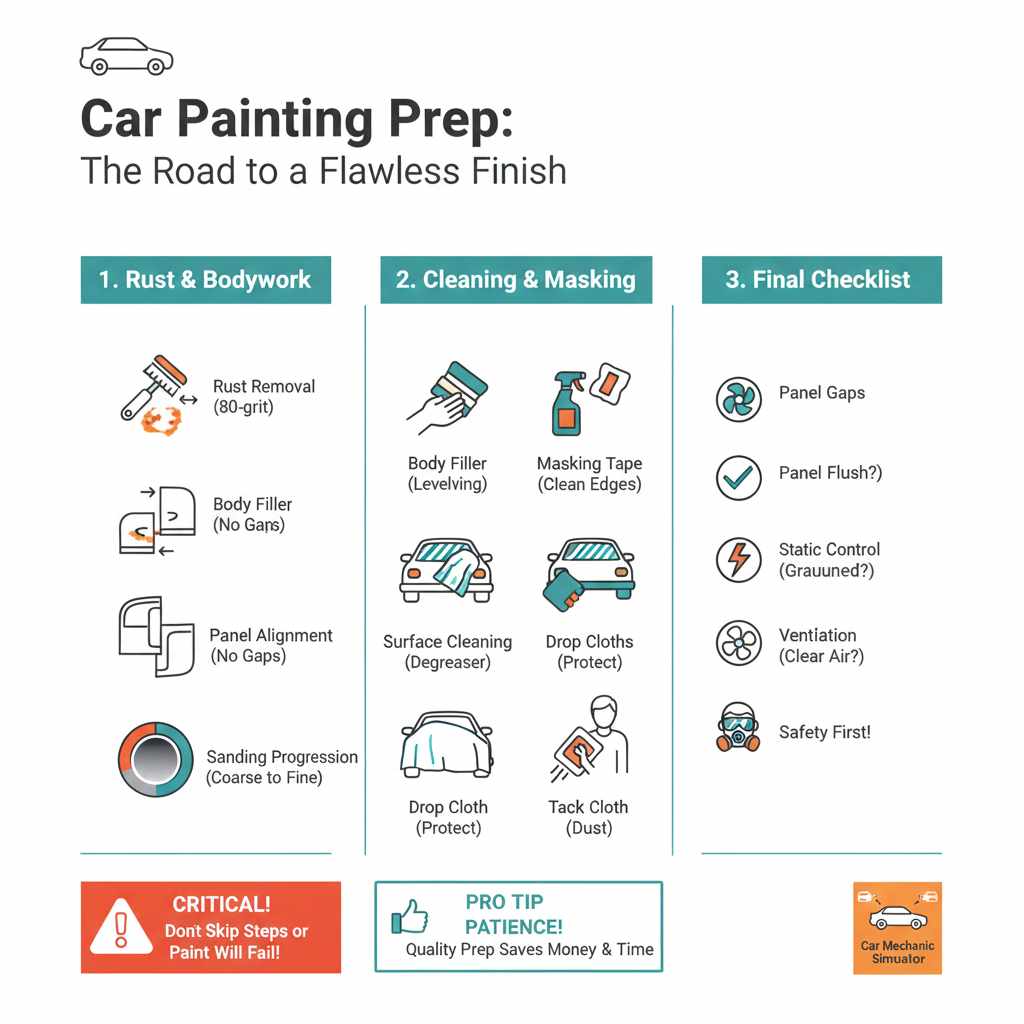
Rust is the enemy! It can ruin a paint job quickly. In How to Paint Cars in Car Mechanic Simulator, getting rid of rust is usually the first step. You’ll need to use tools to remove it. Sanding tools are useful for removing the rust. They will also smooth the metal surface. Once the rust is gone, the bodywork will need some love. This includes fixing dents, scratches, and any other damage. When repairing the bodywork, you should apply a body filler. The filler can level out the damaged area. Sand the filler to match the original shape of the car. Make sure all the body panels line up correctly. Now, your car will be ready for paint.
- Sanding Tools: Sanding tools are available in different types. They include handheld sanders, orbital sanders, and other tools. Each tool is suitable for removing rust in a specific area. Some tools are useful for tight spaces. Others are better for large, flat surfaces. Always start with a coarser grit. Then, gradually work your way to a finer grit. This ensures a smooth finish.
- Body Filler: Body filler is a type of material. It is used to fill dents and other imperfections on a car’s body. It’s a two-part epoxy. It hardens after mixing. It’s applied to the damaged area with a spreader. It’s then sanded down to create a smooth, even surface. Different types of body fillers are available. They’re designed for different applications. Some are better for large repairs. Others are better for small dents.
- Panel Alignment: After the repairs, check that all panels fit. The panels include the doors, hood, trunk, and fenders. Ensure there are no gaps. The panels should be flush. If any panels are misaligned, they will need adjustment. Use shims or other tools to get them into place. Misaligned panels can cause the paint job to look uneven. They can also create problems when opening and closing doors.
- Surface Cleaning: Always make sure the car surface is totally clean. Any dust, dirt, or grease on the surface will ruin your paint job. Make sure you use a degreaser. Wipe the car down with a tack cloth before painting.
Cleaning and Masking
Once the bodywork is ready, the next step is cleaning and masking. This part is about getting the car ready for painting. Make sure all surfaces are free of debris, dust, and any other contaminants. This helps the paint stick. Masking helps keep paint off parts of the car that you don’t want to paint. This will prevent overspray from getting on windows, tires, and other areas. A clean, masked car ensures a professional finish. It saves a lot of time and effort in the long run.
- Surface Cleaning: Use soap and water to wash the car. Rinse thoroughly. Make sure to get rid of any dirt or grease. Then, use a degreaser. The degreaser will remove any remaining residue. You can also use a tack cloth to wipe down the entire surface.
- Masking Tape: Masking tape is used to cover up areas that you don’t want to paint. Tape around windows, door handles, and lights. Use high-quality masking tape. Ensure the edges are sealed well. If not, the paint will bleed under the tape.
- Drop Cloths: Place drop cloths over the areas that you are not painting. This includes the engine bay, the interior, and the wheels. Drop cloths will protect these areas from paint.
- The Car Mechanic Simulator Spray Booth: In Car Mechanic Simulator, you’ll paint inside a booth. Ensure the car is positioned correctly. This is important for even coverage. Make sure the booth is well-ventilated. This will reduce the risk of fumes and improve paint quality.
Choosing Your Paint: Color, Type, and Quality
The fun part! Choosing the paint is where your car gets its personality. You can pick any color. The paint type and quality will determine the final result. In How to Paint Cars in Car Mechanic Simulator, you have a selection of paints. Understanding the differences between these options is a key to getting the results you want. Consider the color’s effect on the car’s appearance. Think about how easy or difficult the paint will be to apply. The better your knowledge, the more satisfying the outcome.
Paint Types Explained
Different paint types have different looks and qualities. It is important to know the differences. Each type has its benefits. Some are easier to use than others. Some provide a longer-lasting finish. Understanding paint types will help you pick the best paint for the car. Think about what you want to achieve with the paint job. A classic car might look great with a glossy enamel. A modern sports car might benefit from a more durable and vibrant base coat/clear coat system. Choose the right paint, and you’ll get a professional finish.
- Enamel Paints: Enamel paints are known for their gloss and ease of application. They are relatively easy to work with. They do not require a clear coat. They offer good durability. Enamel paints dry to a hard finish. They are a good choice for classic cars or projects where ease of use is a priority.
- Acrylic Lacquer Paints: Acrylic lacquer paints offer a high-gloss finish. They are known for their fast drying times. Lacquer paints can be polished to a mirror-like shine. These paints are not as durable as other options. They require more care to maintain.
- Base Coat/Clear Coat Systems: These systems are common in the auto industry. A base coat provides color. A clear coat protects the paint. The clear coat also adds gloss and durability. These systems offer excellent protection. They are good at resisting scratches. The clear coat provides UV protection.
- Metallic Paints: Metallic paints contain tiny metallic flakes. They produce a unique shimmering effect. These paints can be more difficult to apply than solid colors. They require special techniques to ensure even coverage. They produce a very attractive finish.
Color Selection and Effects
The color you select has a huge impact on the final look. Consider the car’s style. Bright colors might work on a sports car. A classic car might look better with a more traditional color. It’s also worth considering the effects. Some paints will have special effects. Metallic paints will produce a shimmering effect. Pearl paints have an iridescent appearance. Understanding color and effects helps to achieve the desired outcome. The right color can transform your car.
- Solid Colors: Solid colors are a basic choice. They are easy to apply. They offer a simple, clean look. Solid colors do not have any special effects. They are a great choice for beginner painters.
- Metallic Colors: Metallic paints include tiny metal flakes. They give the paint a shimmering look. Applying metallic paints can be trickier. They require even coverage. The flakes can settle unevenly. This creates a blotchy finish.
- Pearl Colors: Pearl paints have a special effect. They use tiny particles. These particles create an iridescent appearance. Pearl paints reflect light in different ways. They change color. They offer a unique and luxurious look.
- Color Matching: Make sure the color matches the original paint. Most paint shops can match a paint color. They can create a custom mix. This ensures a consistent finish. Color matching is vital. This is especially true when doing partial repairs.
The Painting Process: Step-by-Step Guide
Now, let’s get into the main part: painting! The key to success is in the process. It’s all about how you apply the paint. The steps will include applying primer, the base coat, and the clear coat. Then, there’s sanding and polishing. Following each step carefully gets the best results. The following process gives the best results in How to Paint Cars in Car Mechanic Simulator. Following these steps will also give you great results.
Applying Primer and Base Coat
Primer and base coat are essential. Primer prepares the surface. It provides an even base. It also helps the paint to stick better. The base coat adds color. This part needs to be done carefully. You need even coats. Otherwise, your paint job won’t be as good. These two steps lay the groundwork for a perfect finish. Without these steps, the final results will be poor.
- Primer Application: Primer creates the base. Make sure to apply the primer in thin, even coats. Avoid runs or drips. Let the primer dry completely. Follow the manufacturer’s instructions for drying times. Sand the primer lightly. This will smooth out any imperfections.
- Base Coat Application: The base coat is the color. Apply the base coat in thin, even layers. Apply multiple coats. Allow each coat to dry. The number of coats required will depend on the paint. You will get a good result if the color is consistent.
- Spraying Technique: Hold the spray gun at the correct distance. Move the gun in smooth, even strokes. Overlap each stroke by about 50%. This helps to ensure even coverage. Avoid spraying too much paint at once. This can lead to runs.
- Drying Times: Always follow the manufacturer’s instructions for drying times. Waiting between coats is essential. This is important before applying the clear coat. Drying times can vary. They depend on the paint type and the conditions.
Applying Clear Coat and Polishing
The clear coat adds protection and shine. It protects the base coat from UV rays. It also adds a glossy finish. After the clear coat dries, the final step is polishing. Polishing removes any imperfections. It creates a smooth, mirror-like finish. These steps bring the whole project together. It transforms a good paint job into a great one. The clear coat provides the durability. Polishing gives the shine.
- Clear Coat Application: Apply the clear coat in thin, even coats. The clear coat adds a glossy finish and protection. Apply the clear coat in multiple coats. Allow each coat to dry. The drying time will depend on the product. Use the manufacturer’s instructions for best results.
- Sanding the Clear Coat: After the clear coat dries, you may need to sand it lightly. This is needed if there are imperfections. Use fine-grit sandpaper. Wet sand the clear coat to create a smooth surface. Be very careful. You don’t want to sand through the clear coat.
- Polishing Compounds: Use different polishing compounds. Start with a coarse compound. This removes deeper imperfections. Then, move to a finer compound. This will bring out the shine. Follow the product instructions.
- Waxing and Finishing: After polishing, apply wax. Wax adds extra protection. Wax provides the best shine and a lasting finish. It helps protect the paint. It also keeps the car looking its best.
Troubleshooting Common Paint Issues
Painting is sometimes a bit tricky. There can be problems. You may see runs, orange peel, or other issues. Don’t worry. Most issues can be fixed. Understanding the cause of each problem will help you fix it. This is why How to Paint Cars in Car Mechanic Simulator is helpful. It will prepare you. It will help you fix any problems. You will be able to get a better-looking car.
Runs, Drips, and Orange Peel
Runs and drips occur when too much paint is applied. Orange peel looks like the surface of an orange. This happens when the paint doesn’t flow correctly. It is caused by improper spraying techniques. Troubleshooting these problems is an important part of painting. This can save you time and money. Correcting these issues gets you a better-looking finish. With a little practice, these issues can be avoided.
- Runs and Drips: Runs and drips result from applying too much paint. They also can occur when the spray gun is held too close. To fix runs and drips, let the paint dry completely. Then, sand the area. Smooth the area. Reapply paint in thinner coats.
- Orange Peel: Orange peel happens when the paint does not flow smoothly. It looks like the texture of an orange peel. It is caused by incorrect spray gun settings. It can also be caused by spraying too far away. Use the right settings. Apply the paint at the correct distance. Then, you can fix it. Lightly sand the area. Then, buff and polish the paint.
- Solvent Pop: Solvent pop happens when the solvents in the paint evaporate too quickly. This results in small bubbles. It is caused by applying the paint too thick. It can also be caused by applying the paint in hot conditions. Applying thin coats and proper ventilation can fix this.
- Fish Eyes: Fish eyes are small, circular imperfections. They look like a fish eye. They are caused by surface contamination. Clean the surface. Then, apply a special additive to the paint. This will help prevent the fish eyes.
Dust, Dirt, and Other Contaminants
Dust and dirt can ruin a paint job. The problems happen when dust gets on the wet paint. This results in rough areas. Contaminants can create tiny bumps and imperfections. Knowing what causes these problems helps avoid them. Cleaning the environment is important. Cleaning the car is also important. The following tips will help ensure a smooth, clean finish. Cleaning is essential for a good outcome.
- Dust and Dirt: Dust and dirt can land on the wet paint. Make sure to keep the painting area clean. Use tack cloths to remove dust from the car. Always wear clean clothing. Use a well-ventilated area.
- Contaminants: Other contaminants can get on the wet paint. These include insects, leaves, and other debris. Make sure to keep the area clean. Inspect the car for contaminants before painting.
- Air Quality: Ensure the air is free of dust and debris. Use an air filter on your compressor. If possible, paint in a dust-free environment. A paint booth is ideal. It helps to keep the air clean.
- Proper Ventilation: Good ventilation can help. It can remove dust and fumes. Ensure the area is well ventilated. Use fans to circulate the air. Be aware of any hazards.
Did you know that in 2022, the global automotive paint market was valued at approximately 15.6 billion USD? This highlights the importance of paint in the automotive industry and shows how many vehicles are being repainted worldwide. According to recent research, the most popular car color is white, followed by black and grey. These colors are frequently chosen due to their ability to complement a variety of car designs and their ease of maintenance. So, when painting in How to Paint Cars in Car Mechanic Simulator, you’re engaging with an industry that’s both vast and impactful.
Advanced Techniques and Tips
Once you are comfortable with the basics, you can try advanced techniques. These techniques can get even better results. They can create unique looks. You can make your cars stand out. Practicing these techniques can take your painting skills to the next level. This includes custom paint jobs and using specialty tools. With practice, you can transform ordinary cars into works of art. These advanced techniques let you explore your creativity.
Custom Paint Jobs and Special Effects
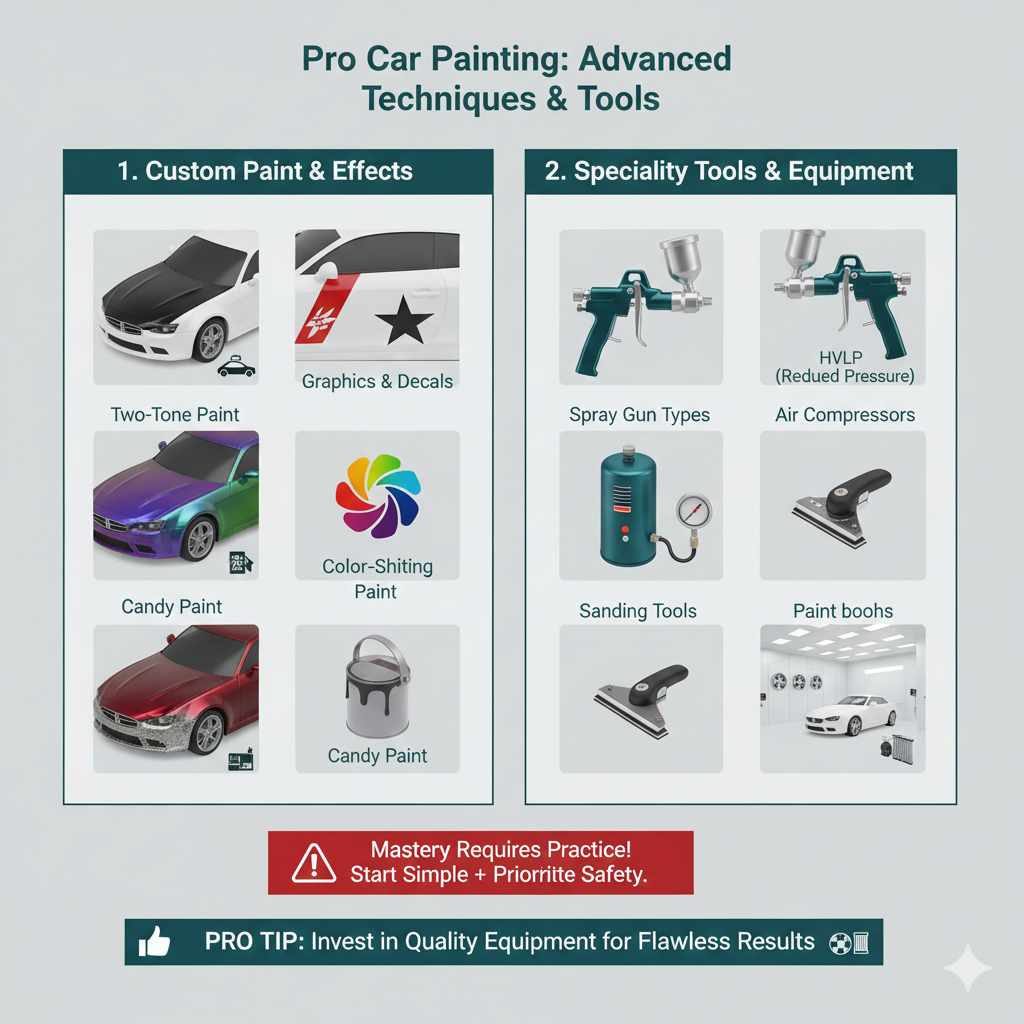
Custom paint jobs can transform your car. They let you personalize your ride. You can use different techniques. You can get custom colors, graphics, and other effects. These options let you express yourself. Special effects add a unique look. They can make your car stand out. These techniques will create something special. Think about flames, stripes, or other details. They will make your car stand out from the crowd.
- Two-Tone Paint: Two-tone paint involves using two different colors on the car. Mask off the areas. Then, apply the first color. Let it dry. Then, mask the first color. Apply the second color. This creates a stylish look.
- Graphics and Decals: Adding graphics and decals can personalize your car. Use stencils. Then, apply paint to create custom designs. Decals can add a unique touch. Consider racing stripes, logos, or other graphics.
- Color Shifting Paint: Color-shifting paint changes colors. This depends on the angle you are viewing the car. These paints are complex. They require multiple coats. They give a unique look.
- Candy Paint: Candy paint uses transparent color. It’s applied over a base coat. It creates a deep, vibrant look. Candy paint requires skill. It is best for experienced painters.
Using Specialty Tools and Equipment
Using specialty tools will improve your painting. The right equipment can save you time. They can also improve the quality of your results. This equipment includes different types of spray guns. It also includes sanders. Using the correct tools is very important. This helps you work effectively. These specialty tools are useful. They help you achieve great results. Specialty tools will also give you more options.
- Spray Gun Types: Different types of spray guns are available. There are HVLP guns. There are also RP guns. The type of spray gun you use affects the finish. HVLP guns offer good efficiency. RP guns provide a balance.
- Air Compressors: An air compressor is needed. It provides the air for the spray gun. Pick a compressor that can provide enough air. Make sure that it delivers a consistent flow. This ensures a uniform paint application.
- Sanding Tools: Use various types of sanders. They include orbital sanders and detail sanders. These tools will save time and effort. You can achieve a smooth surface. These are useful for preparing the car. They also assist with removing imperfections.
- Paint Booths: Paint booths create a clean and controlled environment. They also provide proper ventilation. They help prevent contamination. They help achieve the best finish.
Frequently Asked Questions
Question: What is the best way to prepare the car’s surface before painting?
Answer: Thoroughly clean the car’s surface. Remove rust, use body filler to smooth imperfections, and sand the entire area until it is smooth.
Question: What type of paint should I use for my car?
Answer: It depends on what you want. Enamel paints are great for ease of use. Base coat/clear coat systems are long-lasting. Metallic and pearl paints add unique effects.
Question: How can I prevent runs and drips in the paint?
Answer: Apply thin, even coats of paint. Make sure to hold the spray gun at the correct distance and avoid applying too much paint at once.
Question: What should I do if my paint has orange peel?
Answer: Let the paint dry. Then, sand the surface lightly. After this, you should buff and polish the paint to restore the finish.
Question: How do I choose the right color for my car?
Answer: Consider the car’s style and your personal preferences. The color you choose should complement the car’s design. If you want a unique effect, try metallic or pearl paint.
Final Thoughts
You have learned a lot! You now have the knowledge to paint cars in How to Paint Cars in Car Mechanic Simulator. You’ve explored the steps. From rust removal to choosing the right paint. You’ve looked at the techniques. You’ve learned how to deal with common problems. Now, you’re ready to get to work. Don’t be afraid to experiment. With practice, you can transform cars into amazing works of art. Remember the importance of preparation. Pay attention to the details. Keep practicing. Soon, you’ll be creating stunning paint jobs. Go out there and make those cars shine!