Do You Check AC Pressure with Car Running? Step-by-Step
Many car owners wonder, Do You Check AC Pressure with Car Running? Step-by-Step. This question is common, especially for those new to car maintenance.
It can seem a bit tricky, and you might worry about doing something wrong. But don’t stress! We’ll break it down in a really easy, step-by-step way that anyone can follow.
Get ready to learn exactly what you need to do to check your car’s AC pressure safely and effectively.
Why Checking AC Pressure Matters
Checking your car’s AC system pressure is a fundamental part of diagnosing and fixing cooling issues. When the pressure is off, your air conditioning won’t blow cold air, leaving you uncomfortable during hot weather. This section explains why this check is so important for keeping your car’s AC working well.
It’s about preventing bigger problems and ensuring you have cool air when you need it most.
The Role of AC Pressure
AC pressure is essentially the force of the refrigerant inside your car’s air conditioning system. This refrigerant is the special fluid that absorbs heat from the car’s cabin and releases it outside. Imagine it like the blood in your body; it needs to flow at the right pressure to do its job.
Too low pressure means the refrigerant can’t absorb enough heat. Too high pressure can damage system components.
The pressure changes depending on whether the AC system is running or not. This is a key point for diagnostics. When the compressor is on and the system is circulating refrigerant, the pressures at the high and low sides will be different.
A technician uses these readings to see if the system is performing as it should.
Signs of Incorrect AC Pressure
You’ll likely notice a few tell-tale signs if your car’s AC pressure is not right. The most obvious is that the air coming from your vents isn’t as cold as it used to be, or it’s not cold at all. You might also hear strange noises from the AC system, like hissing or rattling, which can indicate a problem with the refrigerant flow or pressure.
Another sign could be that the AC system cycles on and off frequently, or it struggles to maintain a consistent temperature. Sometimes, you might even see frost forming on AC lines under the hood, which is a sign of abnormal pressure or refrigerant levels. These symptoms are all clues that it’s time to check the AC pressure.
- AC performance degradation: The most common sign is reduced cooling power. The air coming from your vents feels warmer than usual, even when the AC is set to its coldest setting and fan speed is high. This indicates that the system is not effectively removing heat from the cabin.
- Strange noises: Hissing, bubbling, or rattling sounds coming from the engine bay while the AC is on can point to issues with refrigerant flow or leaks. These sounds often occur when refrigerant is escaping or when components like the compressor are working under incorrect pressure conditions.
- System cycling: The AC compressor clutch engaging and disengaging rapidly, or the entire system shutting off unexpectedly, can be a sign of overpressure or underpressure situations that trigger safety cut-offs. This erratic behavior prevents the system from operating efficiently and can cause further damage.
- Visible signs: While less common for the average driver, sometimes you might notice oily residue around AC components, which is a sign of refrigerant leaks since refrigerant carries oil. In very rare cases, you might see ice or frost forming on AC lines, indicating extreme pressure imbalances.
Tools and Safety Precautions for AC Pressure Checks
Before you begin checking your car’s AC pressure, it’s vital to have the right tools and understand safety measures. Working with AC systems involves pressurized refrigerant, which can be cold and harmful if not handled properly. This section will guide you through the essential tools and safety tips to ensure you can perform the check without any issues.
Safety first is always the best approach.
Essential Tools for the Job
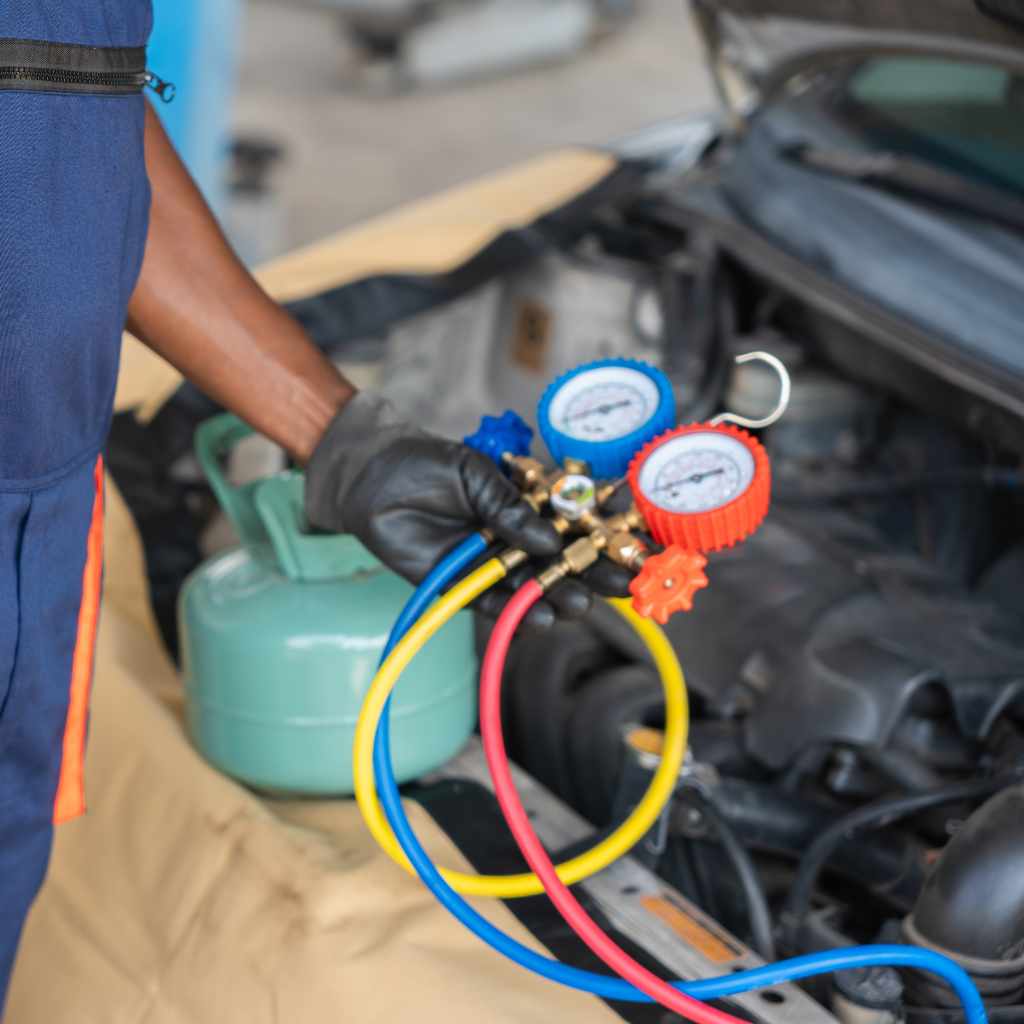
The primary tool you’ll need is an AC manifold gauge set. This kit typically includes two gauges, one for the high-pressure side and one for the low-pressure side of the AC system, along with hoses and connectors. These gauges let you read the exact pressure readings for both parts of the system simultaneously.
You’ll also need a pair of safety glasses to protect your eyes from any potential spray of refrigerant. Gloves are a good idea too, as refrigerant can cause frostbite on contact with skin. Make sure you have a clean rag for wiping up any spills.
Having the correct automotive refrigerant oil can also be beneficial if you suspect a leak and need to recharge.
Safety First When Checking AC Pressure
Working with automotive AC systems requires caution. Refrigerant is under pressure and can cause serious frostbite if it comes into contact with your skin or eyes. Always wear safety glasses and gloves.
Never point the AC service ports or hoses at yourself or others.
Ensure the engine is running when you are taking readings as per the instructions in the “Do You Check AC Pressure with Car Running? Step-by-Step” guide. The AC system needs to be operational for accurate pressure measurements.
Avoid touching hot engine parts. If you are unsure about any step, it’s best to consult a professional mechanic.
- Eye Protection: Always wear safety glasses. Refrigerant can spray out unexpectedly during connection or disconnection, and it can cause serious eye injury. Even a small amount can be painful and damaging.
- Gloves: Wear heavy-duty gloves, preferably those designed for handling chemicals or cold temperatures. Refrigerant can quickly freeze skin on contact, leading to frostbite. Protect your hands from potential leaks and extreme cold.
- Ventilation: Perform the check in a well-ventilated area, preferably outdoors. Refrigerant can displace oxygen and cause suffocation in enclosed spaces. Never work on a running engine in a closed garage.
- Proper connection and disconnection: Ensure hoses are securely attached to the correct service ports before opening valves. When disconnecting, do so carefully and quickly to minimize refrigerant loss and exposure.
- System knowledge: Familiarize yourself with your car’s AC system and the location of the high and low-pressure service ports. Knowing what you’re dealing with reduces the risk of errors and accidents.
Do You Check AC Pressure with Car Running? Step-by-Step Guide
Now let’s get to the main event. The answer to “Do You Check AC Pressure with Car Running? Step-by-Step” is a resounding yes, you absolutely should.
The system operates differently when the engine is off compared to when it’s running. The compressor needs to be active to circulate refrigerant and create the pressure differences you need to measure accurately. Follow these steps carefully for a successful check.
Step 1 Locate the AC Service Ports
Your car’s AC system has two main service ports. These are small caps, usually made of brass or plastic, that allow access to the refrigerant lines. One is on the low-pressure side, and the other is on the high-pressure side.
The low-pressure port is typically larger and located on the suction line, which feels cool to the touch when the AC is on.
The high-pressure port is usually smaller and located on the liquid line. It will feel warm to the touch. They are often labeled with an “L” for low and an “H” for high, or sometimes with specific thread sizes.
If you can’t find them, consult your car’s owner’s manual or look for diagrams online specific to your car’s make and model.
Step 2 Connect the Manifold Gauge Set
Once you’ve located the ports, it’s time to connect your AC manifold gauge set. Start with the low-pressure side. Unscrew the cap from the low-pressure service port.
Connect the blue hose (usually for the low side) from your gauge set to this port. It should click or screw on securely.
Next, move to the high-pressure side. Unscrew the cap from the high-pressure service port. Connect the red hose (usually for the high side) from your gauge set to this port.
Ensure both connections are tight to prevent leaks. The gauge set has three hoses; the middle one (often yellow) is typically for connecting to a refrigerant can or vacuum pump, but for just pressure reading, it can remain disconnected or capped.
Step 3 Start the Engine and Turn on the AC
With the gauges connected, start your car’s engine. Once the engine is running smoothly, turn on the air conditioning system to its coldest setting and set the fan speed to high. This ensures the AC compressor is engaged and the refrigerant is circulating at its normal operating levels.
Let the system run for a few minutes. This allows the pressures to stabilize. You’ll see the needles on your manifold gauges begin to move and settle.
It’s important to let it reach a steady state before you take your readings. This is the crucial part of the “Do You Check AC Pressure with Car Running? Step-by-Step” process that many overlook.
Step 4 Read the Pressure Gauges
Now, observe the readings on your manifold gauges. The low-pressure gauge (usually on the left, connected to the blue hose) will show the pressure in the low side of the system. The high-pressure gauge (usually on the right, connected to the red hose) will show the pressure in the high side.
For a typical car AC system at ambient temperatures around 70-80°F (21-27°C), you might expect readings around 30-50 psi on the low side and 150-250 psi on the high side. These values can vary significantly with outside temperature, humidity, and the specific type of refrigerant your car uses. Always consult a reliable AC pressure chart for your specific vehicle and ambient conditions.
Step 5 Interpret the Readings and Disconnect
Comparing your readings to a standard chart is key to understanding what’s going on. If pressures are too low on both sides, it might indicate a low refrigerant charge. If pressures are too high, it could suggest an overcharge or a restriction in the system.
Imbalanced pressures between the two sides can point to other issues like a faulty compressor or expansion valve.
Once you have your readings and a general idea of what they mean, it’s time to disconnect the gauges. First, close the valves on your manifold gauge set. Then, carefully disconnect the hoses from the service ports.
Be prepared for a small hiss of refrigerant as you disconnect. Immediately replace the caps on the service ports to keep dirt and moisture out.
- Low Refrigerant Charge: If both the low-side and high-side pressures are significantly below normal ranges, it’s a strong indicator that the system is low on refrigerant. This usually means there’s a leak somewhere that needs to be found and repaired.
- Overcharged System: If the high-side pressure is excessively high while the low-side pressure is also higher than normal, the system might be overcharged with refrigerant. This can cause the system to work harder and potentially damage components.
- Blockage or Restriction: A very high high-side pressure and a very low low-side pressure can indicate a blockage in the system, such as a clogged expansion valve or clogged receiver/drier. This prevents proper refrigerant flow.
- Faulty Compressor: If the low-side pressure is abnormally high and the high-side pressure is abnormally low, it could mean the AC compressor isn’t compressing the refrigerant effectively. This requires further diagnosis of the compressor itself.
- Ambient Temperature Impact: Remember that pressure readings are directly affected by the outside temperature. A warmer day will naturally result in higher system pressures than a cooler day. Always use a reference chart that accounts for ambient temperature.
Common AC Pressure Issues and Troubleshooting
Understanding what those pressure readings mean is just half the battle. Now, let’s look at some common AC pressure problems and how you can start troubleshooting them. Knowing these issues can help you identify whether a simple recharge is needed or if a more complex repair is in order.
This part of the “Do You Check AC Pressure with Car Running? Step-by-Step” process helps you act on your findings.
Low Refrigerant Level
This is the most frequent culprit behind poor AC performance. Refrigerant doesn’t get “used up” like oil or gasoline; it circulates. If your system is low, it means there’s a leak.
A low refrigerant level will typically show up as very low pressures on both the low and high sides of the gauge. The compressor might cycle more frequently, and the cooling will be weak. To fix this, you first need to find and repair the leak, then recharge the system with the correct type and amount of refrigerant.
Overcharged System
Putting too much refrigerant into the system is also problematic. It creates excessive pressure, stressing components.
An overcharged system usually presents with high pressures on both sides, particularly the high side. The system might also run noisily. The solution is to carefully recover the excess refrigerant until the pressures are within the normal operating range.
Blocked Orifice Tube or Expansion Valve
These components regulate refrigerant flow into the evaporator. If they get clogged, refrigerant flow is restricted.
This often results in a very high high-side pressure and a very low low-side pressure. The cooling will be poor because not enough refrigerant is reaching the evaporator to absorb heat. This usually requires replacing the blocked component.
Faulty Compressor
The compressor is the heart of the AC system, pumping the refrigerant. If it’s not working correctly, the whole system suffers.
Symptoms of a failing compressor can include abnormal noise, leaks, and incorrect pressure readings. Specifically, you might see a high low-side pressure and a low high-side pressure. This is a more serious repair that often requires replacing the compressor.
Example Scenario A Leaky AC Line
Sarah noticed her car’s AC wasn’t blowing cold air anymore. She decided to check the pressure using her new manifold gauge set. With the engine running and AC on, she observed the low-side gauge reading only 15 psi and the high-side gauge reading 100 psi.
These numbers were significantly lower than the recommended range for the current 75°F (24°C) ambient temperature.
She then used a UV dye leak detection kit, adding the dye to the low-pressure service port (after briefly releasing a tiny bit of refrigerant to make space, wearing gloves and glasses). She ran the AC for about 15 minutes, then used a UV light to inspect all the AC components under the hood. She found a faint greenish glow around a joint in the AC hose near the firewall, indicating a leak.
After a local mechanic repaired the leaky hose and vacuumed out the system, Sarah followed up by having the system recharged with the precise amount of R-134a refrigerant specified by the car manufacturer. The AC then started blowing cold air again, and her pressure readings returned to normal (around 35 psi low and 200 psi high). This case highlights how low pressures usually point to leaks.
Troubleshooting Table
| Symptom | Likely Cause | Pressure Readings (Low Side / High Side) | Action |
|---|---|---|---|
| Poor Cooling, Low Pressures | Low Refrigerant Charge (Leak) | Very Low / Low | Find and repair leak, then recharge system. |
| Poor Cooling, High Pressures | Overcharged System | High / Very High | Recover excess refrigerant. |
| Poor Cooling, Imbalanced Pressures | Blocked Orifice Tube/Expansion Valve | Very Low / Very High | Replace blocked component. |
| Poor Cooling, Imbalanced Pressures | Faulty Compressor | High / Very Low | Diagnose and potentially replace compressor. |
| AC Cycles Frequently, Weak Cooling | Low Refrigerant Charge or Cycling Switch Issue | Fluctuating Low / Normal to Low | Check refrigerant level and cycling switch operation. |
Frequently Asked Questions
Question: Do I need to check AC pressure with the car running?
Answer: Yes, it is essential to check AC pressure with the car running and the AC system engaged. The pressures will be significantly different when the engine is off compared to when the compressor is actively circulating refrigerant.
Question: What are the typical AC pressure readings?
Answer: Typical readings for R-134a refrigerant at around 70-80°F ambient temperature are roughly 30-50 psi on the low side and 150-250 psi on the high side. However, these vary greatly with temperature and specific vehicle.
Question: Can I just add refrigerant if my AC is not cold?
Answer: Adding refrigerant without finding the cause of low pressure (usually a leak) is not recommended. It’s a temporary fix, and overcharging can damage your AC system. It’s best to find and repair leaks first.
Question: How long should I run the engine before taking pressure readings?
Answer: Allow the engine to run with the AC on for at least 5-10 minutes. This gives the system time to reach stable operating pressures and temperatures for accurate readings.
Question: What happens if I connect the gauges to the wrong ports?
Answer: Connecting the low-side gauge to the high-side port or vice versa can cause damage to the gauge or inaccurate readings. Always double-check that you are connecting to the correct “L” and “H” ports.
Final Thoughts
So, when it comes to that common question, “Do You Check AC Pressure with Car Running? Step-by-Step,” the answer is a definite yes, and following the steps outlined here can help you get a clear picture of your car’s AC system health. You’ve learned why pressure is so vital for keeping your car cool, what tools you need, and the safety precautions to keep in mind.
We’ve walked through how to locate those service ports, connect your gauges, start the engine, and finally, read and understand what those numbers mean for your vehicle.
Remembering to compare your readings to a relevant chart for your car’s refrigerant type and the ambient temperature is key for accurate diagnosis. Whether you’re seeing signs of a simple low refrigerant charge or something more complex like a blocked line or a struggling compressor, this knowledge empowers you to make informed decisions. Don’t hesitate to tackle these checks yourself to save on potential diagnostic fees, but always prioritize safety.
If you encounter anything beyond a simple recharge, or if you’re ever unsure, seeking help from a qualified mechanic is a wise move to ensure your AC system is fixed correctly and safely. Keep cool out there!