How to Clean a Car AC Condenser Properly Step by Step
Cleaning your car’s AC condenser might seem hard at first, but don’t worry! For many, figuring out How to Clean a Car AC Condenser Properly can feel tricky. It’s common to feel unsure where to begin. But, with the right steps, it’s easier than you think. We’ll explore exactly how to do it, breaking down each step in a way that’s easy to follow. Let’s start by looking at what you’ll need and why this task is important for keeping your car cool.
Why Is Cleaning Your Car’s AC Condenser Important?
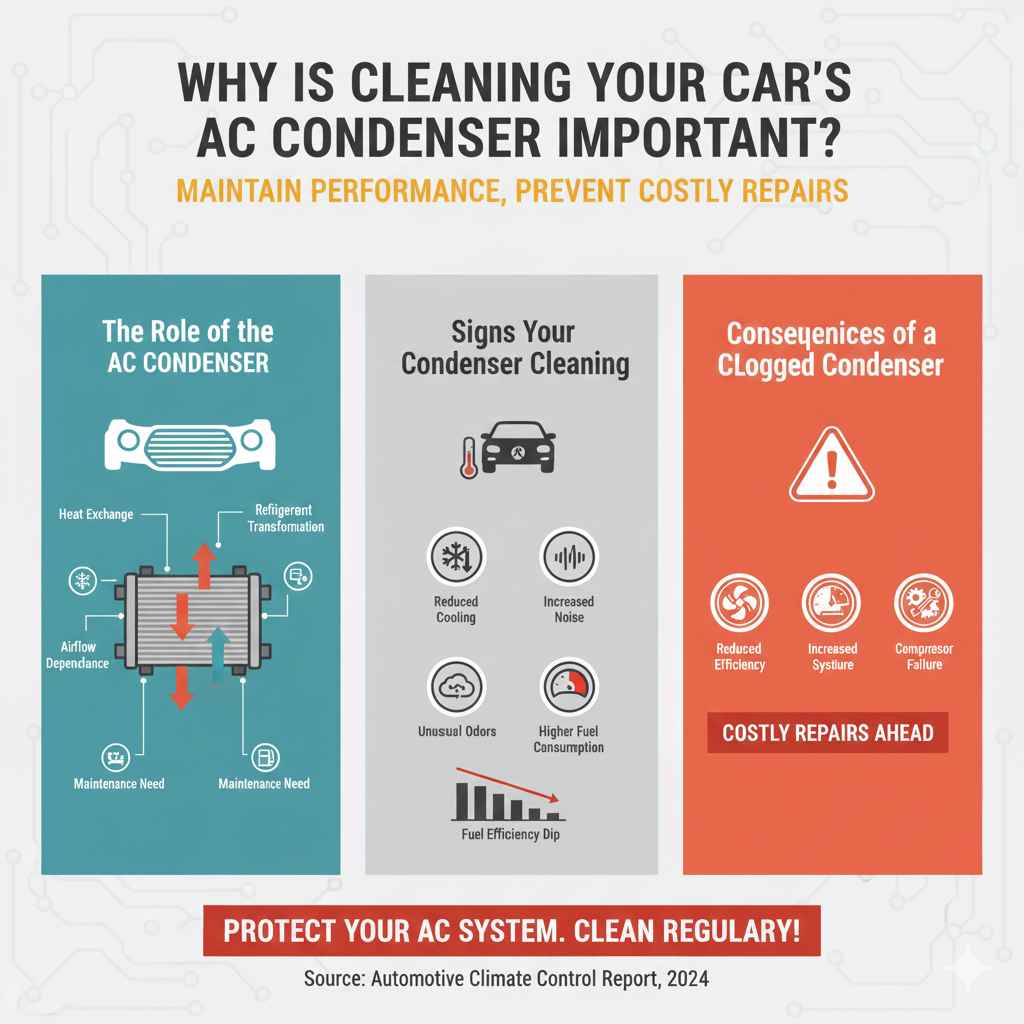
The AC condenser plays a vital role in your car’s air conditioning system. It’s essentially a heat exchanger, and it releases the heat from the refrigerant. When the condenser gets dirty, it can’t do its job well. This leads to reduced cooling efficiency and potentially more significant problems. Regularly cleaning it helps maintain your AC’s performance and can prevent costly repairs. It also impacts fuel efficiency, because a clogged condenser forces the AC system to work harder, reducing your car’s gas mileage.
The Role of the AC Condenser
The AC condenser is a critical part of the air conditioning system. Located at the front of your car, usually in front of the radiator, it looks like a smaller version of the radiator. Its primary function is to cool down the hot, high-pressure refrigerant gas that comes from the compressor. This cooling process turns the refrigerant into a high-pressure liquid, ready to flow through the rest of the system, eventually providing cool air inside the car. The condenser uses the movement of air, whether from driving or from a fan, to release heat.
- Heat Exchange: The condenser acts like a radiator, dissipating heat from the refrigerant. Its design, with many fins, maximizes surface area for heat transfer.
- Refrigerant Transformation: It changes hot refrigerant gas into high-pressure liquid form. This is a fundamental step in the cooling cycle.
- Airflow Dependence: Efficient operation relies on adequate airflow. Blockages like dirt, bugs, and leaves can reduce its performance.
- Location: Typically placed in front of the radiator, it benefits from the direct airflow when the car is moving.
- Maintenance Need: Because it’s exposed to the elements, regular cleaning keeps it working well. This avoids the AC struggling to keep the cabin cool.
Signs Your Condenser Needs Cleaning
Knowing the signs that your condenser needs cleaning can help you take action before it becomes a major issue. Sometimes the signs are obvious, while other times you need to observe the car’s performance. By recognizing these indicators, you can address problems early. Pay close attention to changes in how your AC works. Common indicators often relate to reduced cooling or unusual noises.
- Reduced Cooling: The most obvious sign is a decrease in the cold air your AC blows. If the airflow is weak or not cold enough, the condenser might be dirty.
- Increased Noise: A dirty condenser can sometimes lead to the AC system working harder. This may cause unusual noises, like a rattling sound from the front of the car.
- Unusual Odors: Buildup of debris on the condenser can encourage mold and mildew, leading to unpleasant smells when you turn on your AC.
- Higher Fuel Consumption: A clogged condenser causes the AC system to strain. This results in the engine working harder, leading to a dip in fuel efficiency.
- Compressor Issues: If the condenser fails to cool the refrigerant properly, it can lead to compressor failure, which is a big repair.
Materials You’ll Need to Clean the Condenser
Before you begin, gather the necessary supplies. Having everything prepared beforehand makes the cleaning process easier and smoother. The right tools and materials ensure you can clean your car’s AC condenser correctly. You won’t need many things, and you might already have most of them. Also, remember to take safety precautions for a successful cleaning.
Essential Tools and Supplies
This list includes everything you’ll need to properly clean the condenser. Using the right tools protects the condenser from damage and helps you clean it correctly. Each item serves a specific purpose in ensuring the condenser is free from dirt and debris. Make sure to have everything on hand before you start the process, so you don’t need to stop and search.
- Safety Glasses: Crucial to protect your eyes from debris that might fly off the condenser.
- Gloves: Recommended to protect your hands from dirt and potentially sharp edges.
- Soft-Bristled Brush: For gently removing loose debris without causing damage to the condenser fins.
- Garden Hose with a Spray Nozzle: For rinsing the condenser. The nozzle should have different settings, like a fan or a shower spray.
- Car Wash Soap or Condenser Cleaner: Choose a cleaner designed for car condensers to remove stubborn dirt.
- Screwdrivers and Wrenches: For removing any necessary panels or components to access the condenser.
- Shop Towels or Rags: To wipe up any spills or moisture.
- Work Light or Flashlight: To make it easier to see in the engine compartment.
Safety Precautions
Safety is a priority when working on any part of your car. By taking these precautions, you reduce the risk of injury. Before you begin cleaning, ensure you are in a well-ventilated area. Working safely involves protective gear and appropriate practices, making it important to keep your well-being in mind. These steps help prevent potential harm during the process.
- Eye Protection: Always wear safety glasses to shield your eyes from debris.
- Gloves: Protect your hands from sharp edges, dirt, and cleaning chemicals.
- Work in a Well-Ventilated Area: Ensure the area has good airflow to avoid inhaling any fumes from cleaning products.
- Disconnect the Battery (Optional): Although not always necessary, disconnecting the negative battery terminal is a safety precaution to prevent electrical issues.
- Avoid High-Pressure Water: Don’t use a pressure washer, as it could damage the condenser fins.
Step-by-Step Guide to Cleaning Your AC Condenser
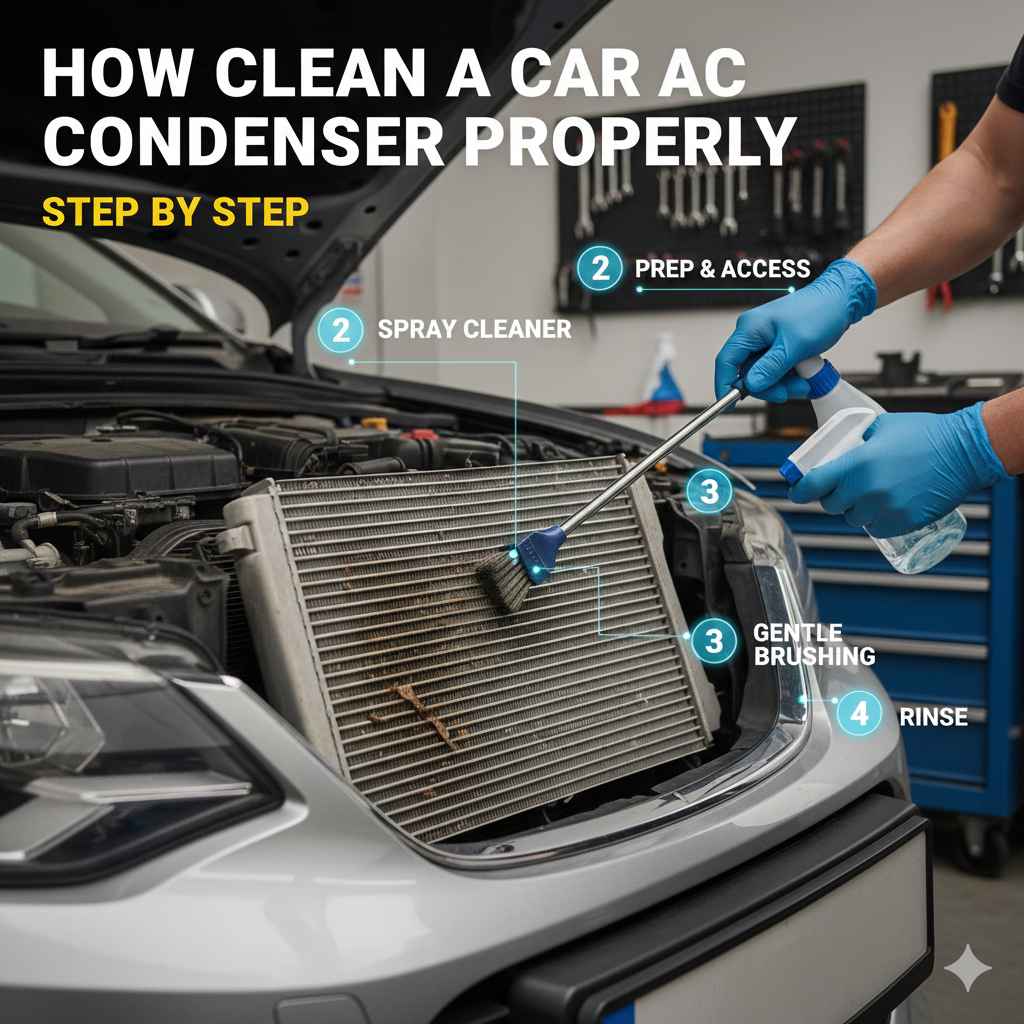
Now, let’s explore the process of cleaning your car’s AC condenser. This part of the guide explains each step clearly. Follow each instruction carefully for the best results. By taking your time and being thorough, you’ll improve your car’s AC performance.
Step 1: Preparing Your Vehicle
Preparation is key for a successful cleaning. First, ensure the car is turned off and the engine has cooled down. This step is about gaining access and making sure everything is ready. It will help you work safely and efficiently. If your car has a plastic cover in front of the condenser, you might need to remove it. Having access is important to clean the condenser thoroughly.
- Park your car on a level surface and turn off the engine.
- Allow the engine to cool down completely to prevent burns.
- Open the hood of your car.
- Locate the AC condenser, typically in front of the radiator.
- Remove any plastic covers or panels that might be blocking access to the condenser. Keep the screws or clips safe.
Step 2: Removing Loose Debris
The next step is removing surface dirt and larger debris. This involves using a soft-bristled brush to remove the initial layer of dirt, leaves, and bugs. This will make the next stages of cleaning easier. Cleaning the condenser in this way helps remove obstructions. It also prepares the condenser for a deeper cleaning.
- Use the soft-bristled brush to gently brush away any loose leaves, bugs, dirt, and other debris from the condenser fins. Move the brush in the same direction as the fins to avoid bending them.
- Pay attention to the areas where debris might collect, like the bottom of the condenser.
- Take care not to apply too much pressure. Avoid damaging the delicate fins.
Step 3: Washing the Condenser
Rinsing is important for removing the remaining grime and dirt. Using water helps to flush out the debris. Be careful while rinsing to avoid bending the fins. You might have to use some car wash soap to get the job done properly. This step is very important to get your car ready to produce cool air.
- Use your garden hose with a spray nozzle set to a gentle setting, such as a fan or shower spray.
- Direct the water from the front to the back of the condenser. This will help to flush out debris.
- If there’s heavy dirt, you can use car wash soap or a condenser cleaner. Spray the cleaner on the condenser, let it sit for a few minutes, and then rinse.
- Avoid using high water pressure, as it might bend the fins.
- Rinse thoroughly until all traces of soap and dirt are gone.
Step 4: Inspecting and Drying
After cleaning, inspect the condenser and let it dry. Carefully check to make sure the fins are straight. Then, allow the condenser to air dry. This ensures that the condenser functions correctly and prevents any issues with your AC system. These steps finalize the process and prepare your car for use. Proper inspection and drying ensure that your car’s AC system will operate as expected.
- Carefully inspect the fins for any bends or damage. If you notice any bent fins, you can gently straighten them with a fin comb or a small screwdriver.
- Allow the condenser to air dry completely. You can also use a shop towel to remove any excess water.
- Once dry, replace any panels or covers you removed earlier.
- Close the hood and you are ready to enjoy your car’s cooling again.
Advanced Cleaning Techniques and Considerations
In addition to the basic cleaning steps, you may want to explore some advanced methods and consider other factors. Using these techniques can address more complex issues and help to optimize your AC system. Learning these techniques offers solutions to a range of cleaning challenges. Knowing these extra steps will help you achieve better results.
Using a Fin Comb
The fin comb is a simple tool for fixing bent condenser fins. It helps restore proper airflow through the condenser. The fin comb has teeth that are designed to fit between the fins. Carefully slide the comb through the fins to straighten them. Remember that having straight fins is critical for the best airflow and AC performance. It’s an easy-to-use tool that can improve your AC’s efficiency.
- Identifying Bent Fins: After washing the condenser, carefully look for any bent fins. These can restrict airflow and reduce cooling efficiency.
- Selecting the Right Comb: Get a fin comb that matches the fin spacing of your condenser. Many auto part stores have a variety of fin combs.
- Gentle Application: Insert the fin comb into the fins and gently pull it through. Do this slowly to avoid further damage.
- Correcting the Angle: Make sure you restore the fins to their original position to optimize airflow.
- Inspection and Repeat: After using the comb, check the fins again. Repeat the process if needed until the fins are straight.
Using Condenser Cleaner Sprays
Condenser cleaner sprays offer an added advantage when removing dirt and grime. They are designed to dissolve stubborn contaminants. You can find these cleaners at auto parts stores. They are easy to use and can enhance the cleaning process. These sprays can remove dirt that the water can’t get rid of. Consider these cleaners if you want better results.
- Choosing the Right Cleaner: Pick a condenser cleaner designed for automotive use. It should be safe for your car’s materials.
- Application Method: Follow the instructions on the cleaner’s label. Usually, you spray the cleaner on the condenser.
- Dwell Time: Allow the cleaner to sit for the recommended time to dissolve dirt and grime.
- Rinsing: After the dwell time, rinse the condenser thoroughly. Make sure all the cleaner is gone.
- Safety Precautions: When using these cleaners, wear protective gear, such as gloves and eye protection.
Checking for Leaks
Checking for leaks can prevent bigger issues. After cleaning, check your AC system for leaks. A leak can affect your AC’s performance and potentially cause significant damage. You can do this visually by looking for oil stains. If you see an oil residue, your system may have a refrigerant leak. Leaks can be found in the condenser or in other parts of the AC system. These problems can lead to costly repairs.
- Visual Inspection: Examine the condenser and surrounding areas for any oil stains. Refrigerant leaks often leave an oily residue.
- Dye Tests: You can use a UV dye. Add it to your AC system, and look for any areas where the dye is leaking.
- Pressure Testing: Use a gauge to check the system’s pressure. A drop in pressure can indicate a leak.
- Professional Assistance: If you find a leak, it’s best to have a professional repair it.
- Regular Checks: Regularly check for any signs of leaks. Early detection can help prevent larger problems.
How Often Should You Clean Your Car’s AC Condenser?
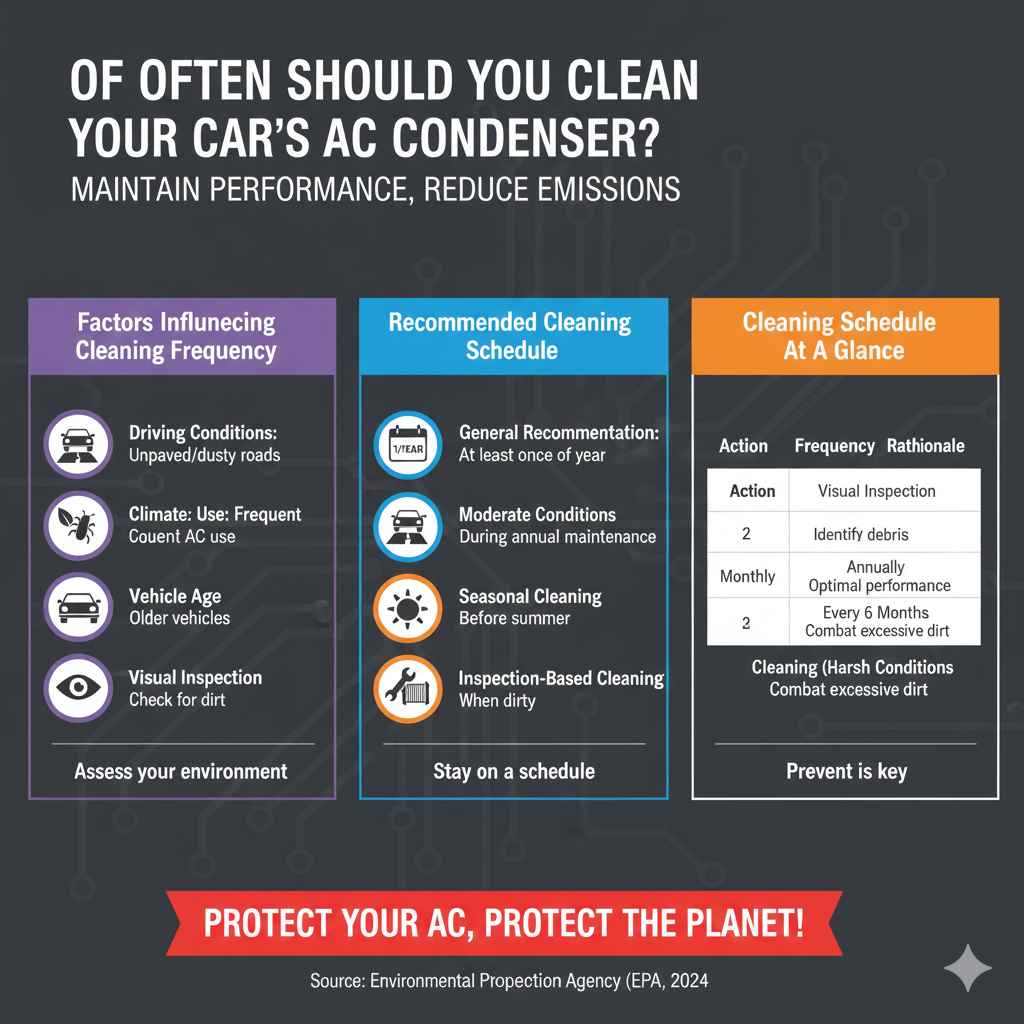
Knowing how often to clean your condenser can maintain optimal performance. Routine cleaning helps prevent a buildup of dirt. The frequency depends on your driving conditions. If you often drive on dirt roads or in dusty areas, you might need to clean it more often. By adopting a good cleaning schedule, you can keep your AC operating efficiently.
Factors Influencing Cleaning Frequency
Several factors will impact how often your car’s AC condenser needs cleaning. Where you drive, environmental conditions, and the car’s age can all affect cleaning frequency. These factors help determine how often the condenser collects dirt and debris. Understanding these factors will help you establish an effective cleaning schedule. Keep these things in mind to decide when to clean.
- Driving Conditions: If you regularly drive on unpaved roads or dusty environments, your condenser will accumulate more dirt and require more frequent cleaning.
- Climate: In areas with heavy pollen or insect populations, the condenser might need cleaning more often.
- Vehicle Use: If you use your AC frequently, more cleaning may be necessary to maintain performance.
- Vehicle Age: Older vehicles might be more prone to collecting debris.
- Visual Inspection: Regularly check your condenser for any signs of dirt or buildup. Clean it when you see any accumulation.
Recommended Cleaning Schedule
Establishing a schedule helps maintain your car’s AC performance. Depending on your driving conditions, this might be once a year, twice a year, or more frequently. Sticking to a schedule will keep your AC system in good working order. Adjust the frequency based on your local environment and driving habits. Remember, prevention is the key to preserving the life of your AC system.
- General Recommendation: Cleaning the condenser at least once a year is a good starting point.
- Moderate Conditions: If you drive in normal conditions, cleaning the condenser during your annual vehicle maintenance is often sufficient.
- Harsh Environments: If you often drive on dirt roads or dusty areas, cleaning it every six months or even more frequently might be necessary.
- Seasonal Cleaning: You might consider cleaning the condenser before the start of the summer season.
- Inspection-Based Cleaning: Regularly inspect the condenser. Clean it when you notice a buildup of dirt or reduced AC performance.
According to the Environmental Protection Agency (EPA), vehicle air conditioning systems, if not properly maintained, can contribute to air pollution. Dirty AC condensers can cause the system to work harder, increasing emissions. Regular cleaning, therefore, not only improves your car’s efficiency but also helps reduce environmental impact.
| Action | Frequency | Rationale |
|---|---|---|
| Visual Inspection | Monthly | To identify any debris buildup or damage. |
| Cleaning (General) | Annually | To remove accumulated dirt and ensure optimal performance. |
| Cleaning (Harsh Conditions) | Every 6 Months | To combat excessive debris accumulation in dusty or dirty environments. |
Frequently Asked Questions
Question: What happens if I don’t clean my car’s AC condenser?
Answer: If you don’t clean your car’s AC condenser, dirt and debris can accumulate, reducing its cooling efficiency. This can lead to decreased AC performance, higher energy costs, and potentially, damage to the AC system’s compressor.
Question: Can I use a pressure washer to clean the AC condenser?
Answer: It’s generally not recommended to use a pressure washer. The high-pressure water can damage or bend the condenser fins, which can hinder airflow and reduce AC efficiency.
Question: Where is the AC condenser located in my car?
Answer: The AC condenser is typically located in front of the radiator. It’s usually easy to identify as it looks like a smaller version of the radiator and is exposed to the front airflow.
Question: What should I use to clean the condenser?
Answer: You can use a soft-bristled brush, water from a garden hose with a gentle spray setting, and car wash soap or a condenser cleaner designed for automotive use.
Question: How can I tell if my AC condenser is dirty?
Answer: You can tell if your AC condenser is dirty if you notice a reduction in cooling performance, unusual noises coming from the AC system, or increased fuel consumption. Visual inspection may also reveal dirt and debris.
Final Thoughts
Now that you know How to Clean a Car AC Condenser Properly, you’re well on your way to keeping your car cool. The procedure involves some basic tools and a few simple steps. You’ve learned about the importance of a clean condenser, the tools needed, the step-by-step cleaning process, and helpful extra techniques. Remember, regularly cleaning the AC condenser can save you money and prevent big repairs, and it’s also good for the environment. By keeping up with this simple task, you will ensure efficient AC performance. So, grab your gear, follow the steps, and give your car’s AC system some TLC!