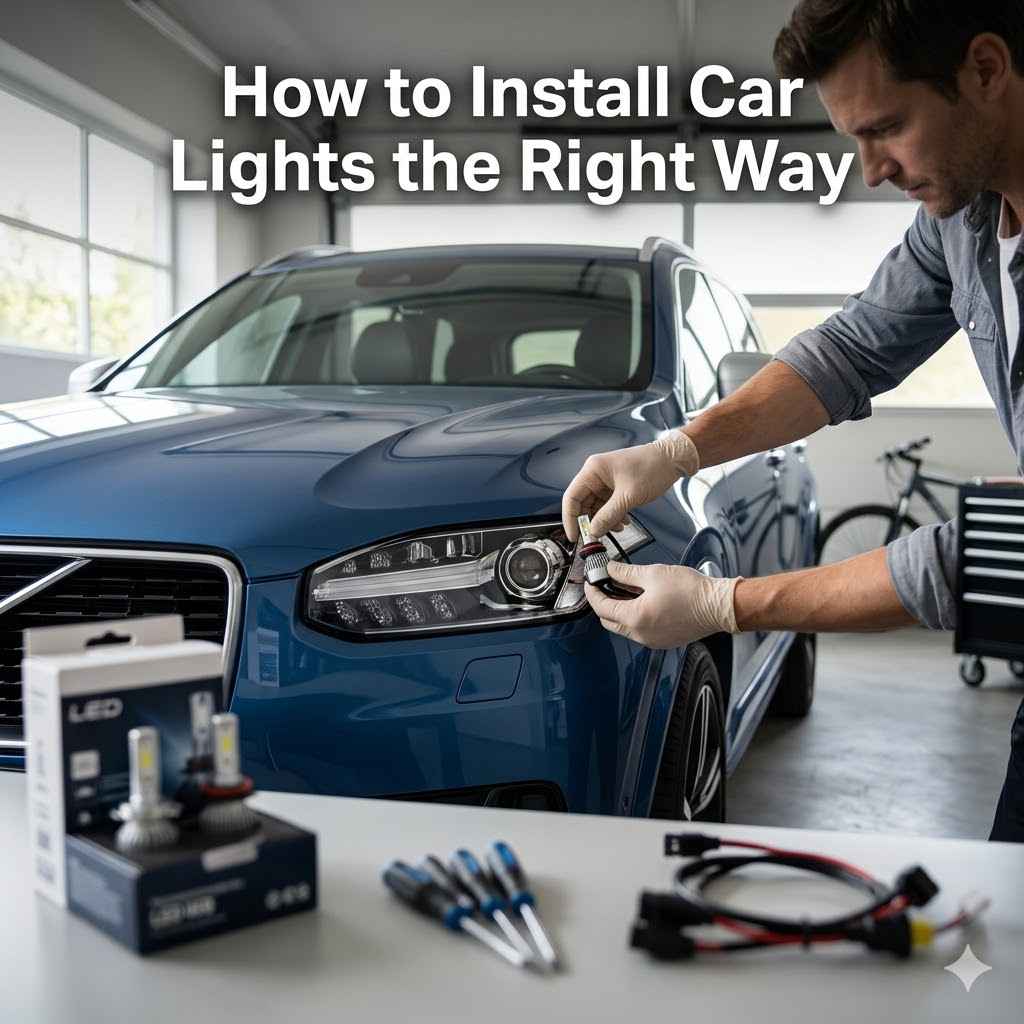
How to Install Car Lights the Right Way
Many people find working on their car a bit tricky, especially when it comes to things like putting in new lights. It can seem like a big job, and you might worry about getting it wrong. But don’t worry!
We’ll show you exactly how to install car lights the right way. We’ll break it down into simple steps so you can do it yourself with confidence.
Understanding Car Light Basics
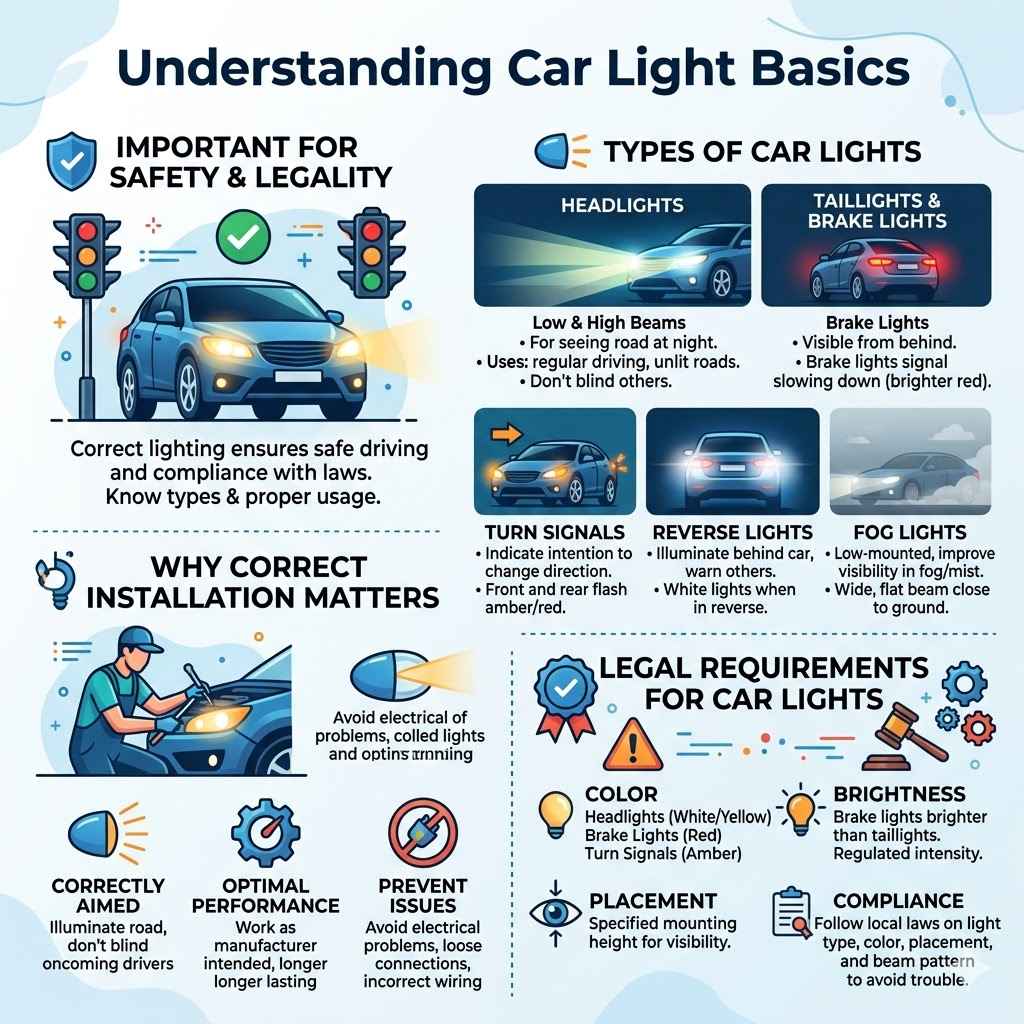
This section covers the fundamentals of car lights. We’ll explain why having the correct lighting is important for driving safely and legally. You’ll learn about the different types of lights your car has and what they’re used for.
Knowing these basics helps you choose the right lights and understand why installing them correctly matters.
Types of Car Lights
Cars have many lights, each serving a specific purpose. Headlights are crucial for seeing the road at night and for others to see you. They usually have high and low beams.
Taillights include brake lights, which signal when you’re slowing down, and running lights, which make your car visible from behind. Turn signals, front and rear, indicate your intention to change direction. Reverse lights come on when you back up, helping you see and warning others.
Fog lights are designed to cut through mist or fog.
Headlights are your primary lights for driving in darkness. They have two settings: low beams for regular driving and high beams for better visibility on unlit roads. Using high beams correctly is important so you don’t blind other drivers.
Taillights and brake lights are essential for others to see your vehicle, especially in low light conditions or at night. Brake lights are usually brighter red lights that activate when you press the brake pedal.
Turn signals, or blinkers, are used to communicate your intended direction of travel. They flash amber or red at the front and amber or red at the rear, depending on local regulations.
Reverse lights illuminate the area behind your car when you shift into reverse. They are typically white and help you see obstacles and alert nearby pedestrians or vehicles.
Fog lights are low-mounted lights that can help improve visibility in foggy or misty conditions. They are designed to cast a wide, flat beam close to the ground.
Why Correct Installation Matters
Installing car lights the right way is more than just making them light up. It ensures they are aimed correctly to illuminate the road without blinding oncoming drivers. Improperly aimed headlights can reduce your visibility and create a safety hazard for everyone.
It also means your lights will work as intended by the manufacturer, providing optimal performance and longevity. Correct installation also prevents electrical issues that can arise from loose connections or incorrect wiring.
Legal Requirements for Car Lights
Most places have laws about car lights. These laws cover things like the color of the lights, how bright they should be, and where they must be placed on your car. For example, headlights must be white or yellow, and taillights red.
Brake lights must be red and brighter than regular taillights. Turn signals are usually amber. Making sure your lights meet these rules keeps you out of trouble with the law.
Headlight color is typically regulated to be white or a soft yellow to provide clear visibility without causing glare.
Brake lights must be a distinct bright red to easily signal deceleration to following drivers.
Turn signal colors are generally amber at the front and can be amber or red at the rear, depending on the vehicle’s design and local laws.
Most jurisdictions specify the height at which lights must be mounted to ensure they are visible at appropriate distances.
The intensity and beam pattern of headlights are also regulated to balance the need for visibility with the prevention of blinding other drivers.
Tools and Preparation for Installation
Before you start, gathering the right tools and preparing your workspace makes the job much easier. This section will guide you through what you’ll need. We’ll cover basic tools and safety precautions.
Being prepared means you can tackle the installation smoothly without interruptions or unnecessary hassle.
Essential Tools You Will Need
You don’t need a lot of fancy equipment to install most car lights. A basic toolkit is usually enough. You’ll likely need a set of screwdrivers, both Phillips head and flat head, in various sizes.
A wrench set or socket set is often necessary for removing bolts and nuts. Pliers can be useful for gripping and pulling small parts. Sometimes, a trim removal tool can help you gently pry off plastic panels without damaging them.
Always have a flashlight handy to see in dark areas.
Screwdrivers: A variety pack of Phillips and flathead screwdrivers is fundamental for removing screws holding light assemblies or covering panels.
Wrench or Socket Set: Different cars use different bolt sizes. Having a set with common metric and SAE sizes will cover most needs for securing or loosening parts.
Pliers: Needle-nose pliers are great for grabbing small clips or wires, while standard pliers can help with more general tasks.
Trim Removal Tools: These plastic tools are designed to safely pry apart interior or exterior trim panels without scratching the paint or damaging the plastic.
Flashlight or Headlamp: Good lighting is crucial. A headlamp keeps your hands free, which is very helpful when working on your car.
Safety Precautions to Follow
Safety is super important when you’re working on your car. Always make sure the engine is off and the car is parked on a level surface. Engage the parking brake firmly.
If you’re working under the car, use jack stands for support; never rely solely on a jack. Wear safety glasses to protect your eyes from debris or dust. If you’re dealing with the electrical system, it’s a good idea to disconnect the car’s battery to prevent shorts or shocks.
Park on a Level Surface and Engage Parking Brake: This prevents the car from rolling unexpectedly, which is a primary safety concern.
Use Jack Stands for Elevated Work: If lifting the vehicle, always use sturdy jack stands to support the car. Never work under a vehicle supported only by a jack.
Wear Safety Glasses: Protect your eyes from dust, debris, or any stray chemicals that might be released during the process.
Disconnect the Battery: For any electrical work, disconnecting the negative battery terminal first is a critical step to prevent electrical shorts and potential shocks.
Allow Components to Cool: If you’ve been driving, lights and engine components can be very hot. Let them cool down before you start working.
Preparing Your Workspace
Before you start, clear the area around your car. You’ll need space to move and lay out your tools. If you’re working in a garage, ensure it’s well-lit.
You might want to lay down a mat or some cardboard to protect your driveway or garage floor and to keep parts from rolling away. Make sure you have all your parts ready. It’s helpful to have a place to put screws and small parts so you don’t lose them.
Clear the Area: Ensure you have enough room to work comfortably around the car without tripping hazards.
Protect Surfaces: Lay down old newspapers, cardboard, or a garage mat to catch drips and prevent scratches on your floor.
Organize Tools and Parts: Have a designated spot for your tools and a system, like a magnetic tray or labeled containers, for screws and clips.
Good Lighting: Natural light is best, but if working indoors or at night, make sure you have ample artificial lighting.
How to Install Car Lights the Right Way Step by Step
This is the core of our guide on how to install car lights the right way. We’ll walk you through the process for common types of lights, like headlights and taillights. Each step is designed to be clear and easy to follow.
We want to make sure you feel confident doing this yourself.
Replacing Headlights
Replacing headlights often involves accessing the back of the headlight assembly. This might mean removing a few clips or screws, or sometimes an entire grille or bumper cover. Once you can reach the back of the headlight, you’ll see the bulb holder.
Twist the old bulb holder to remove it. Then, carefully pull out the old bulb. Never touch the glass part of a new halogen bulb with your bare fingers, as oils from your skin can cause it to overheat and break.
Use a clean cloth or glove. Insert the new bulb firmly into the socket and twist to lock it in place. Reassemble any parts you removed.
Step 1 Accessing the Headlight Assembly
Open your car’s hood. Locate the back of the headlight assembly. You might see a plastic cover or a section of the grille that needs to be removed.
Consult your car’s manual if you’re unsure. Some cars require bumper removal for headlight access, which is a more involved process.
Step 2 Removing the Old Bulb
Once you can see the back of the headlight bulb, you’ll find a connector plugged into it. Carefully disconnect the electrical connector. Then, you’ll usually need to twist the bulb holder counter-clockwise to release it from the headlight housing.
Some bulbs might have a spring clip that needs to be unhooked.
Step 3 Installing the New Bulb
Take your new bulb and carefully insert it into the socket. Make sure it’s seated properly. Again, avoid touching the glass.
For halogen bulbs, oils from your skin can shorten their lifespan. Turn the bulb holder clockwise to lock it into place. Reconnect the electrical connector, ensuring it snaps securely.
Step 4 Reassembling and Testing
If you removed any covers, grilles, or other parts, reattach them now. Make sure all clips and screws are secured. Close the hood.
Turn on your car’s lights to test the new bulbs. Check both low and high beams to ensure they are working correctly and are properly aimed.
Replacing Taillights and Brake Lights
Taillights are generally easier to
Step 1 Accessing the Taillight Assembly
Open the trunk or tailgate of your vehicle. Look for a plastic panel on the inside of the taillight assembly. This panel may be held on by clips or screws.
Gently pry it off or unscrew it to expose the wiring and bulb sockets.
Step 2 Removing the Old Bulb or Assembly
You’ll see the bulb holders twisted into the taillight housing. Identify the specific bulb that is out (e.g., brake light, tail light, turn signal). Twist the bulb holder counter-clockwise to remove it.
Then, pull out the old bulb from the holder. For some modern cars, the entire circuit board or module with multiple bulbs might need to be replaced.
Step 3 Installing the New Bulb or Assembly
Insert the new bulb into the holder, ensuring it’s aligned correctly. Twist the holder clockwise to lock it back into the taillight housing. If replacing a full module, ensure it snaps into place and all electrical connectors are firmly attached.
Step 4 Reassembling and Testing
Upgrading to LED or HID Lights
Many people upgrade their car lights to LED or HID for brighter light and longer life. LED (Light Emitting Diode) lights use semiconductors to produce light. HID (High-Intensity Discharge) lights use an electric arc through a gas to create light.
Upgrading usually involves removing the old bulb and installing the new LED or HID bulb, often with a ballast or driver that needs to be securely mounted.
LED Lights: These are energy-efficient and produce bright, white light. They last much longer than traditional halogen bulbs.
HID Lights: Also known as xenon lights, these produce a very bright, bluish-white light. They are more energy-intensive than LEDs and often require a ballast.
Ballasts and Drivers: For HID and some LED bulbs, you’ll need to install a ballast or driver. This device regulates the power supplied to the bulb.
Wiring Adapters: Some upgrades might require special wiring adapters to connect the new lights to your car’s existing wiring harness.
Mounting Location: Ensure the ballast or driver is mounted securely in a dry location, away from excessive heat and vibration, to ensure longevity.
A recent survey showed that 45% of drivers consider headlights to be the most critical safety feature on their vehicle, highlighting the importance of proper lighting.
Common Pitfalls and How to Avoid Them
One common mistake is not using the correct bulb type. Always check your car’s manual or the old bulb for the exact part number. Another pitfall is touching halogen bulbs with bare hands, which, as mentioned, can ruin the bulb.
Forgetting to re-secure all clips and screws can lead to rattles or parts coming loose later. Always double-check your work. If your car has complex lighting systems, like those with integrated daytime running lights or adaptive beams, it’s best to consult a professional.
Using the Wrong Bulb Type: Always verify the correct bulb number and type for your specific vehicle model and year to ensure compatibility.
Touching Halogen Bulbs: Oils from your skin can cause hot spots on the bulb, leading to premature failure. Use gloves or a clean cloth.
Incomplete Reassembly: Double-check that all fasteners, clips, and covers are securely reinstalled after replacing the bulbs.
Ignoring Aiming Issues: After replacing headlights, ensure they are properly aimed. Many cars have adjustment screws for this purpose.
Overlooking Electrical Compatibility: Some modern vehicles have complex electrical systems. If unsure, consult a professional or research specific guides for your car.
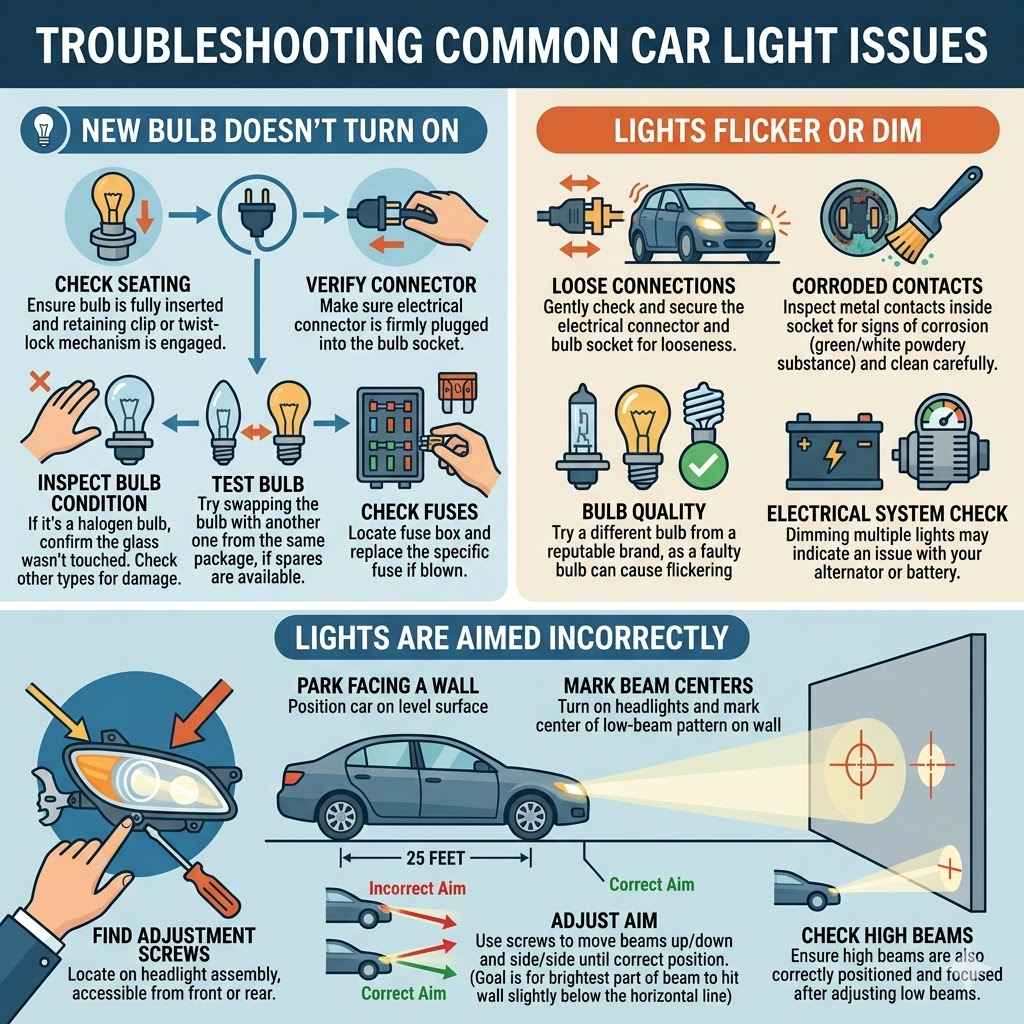
Troubleshooting Common Car Light Issues
Even with careful installation, you might run into problems. This part of our guide helps you fix common issues. We’ll look at why a new light might not work or what to do if lights flicker.
Getting these things sorted ensures your lights function perfectly.
New Bulb Doesn’t Turn On
If your new light doesn’t turn on, first check if it’s seated correctly in the socket. Make sure the electrical connector is pushed in all the way. If it’s a halogen bulb, ensure you didn’t touch the glass.
Sometimes, a new bulb can be faulty right out of the box; try swapping it with another one from the same package, if you have spares. Also, check the fuse for that particular light. A blown fuse will prevent the light from working.
Check Seating: Ensure the bulb is fully inserted and the retaining clip or twist-lock mechanism is engaged.
Verify Connector: Make sure the electrical connector is firmly plugged into the bulb socket.
Inspect Bulb Condition: If it’s a halogen bulb, confirm the glass wasn’t touched. For other types, check for any visible damage.
Test Bulb: If possible, test the bulb in another known working socket or try a known good bulb in your vehicle’s socket.
Check Fuses: Locate your car’s fuse box and identify the fuse for the affected light. Replace it if it appears blown.
Lights Flicker or Dim
Flickering or dim lights can point to a few issues. A loose electrical connection is a common cause. Wiggle the connector gently to see if it improves.
It could also be a sign of a failing bulb or a problem with the car’s electrical system, like a weak alternator. Corroded contacts in the socket can also cause poor light. You might need to clean them with a wire brush or electrical contact cleaner.
Loose Connections: Gently check and secure the electrical connector and bulb socket for any looseness.
Corroded Contacts: Inspect the metal contacts inside the socket for signs of corrosion (green or white powdery substance) and clean them carefully.
Bulb Quality: If the issue persists, try a different bulb from a reputable brand, as a faulty bulb can cause flickering.
Electrical System Check: Dimming across multiple lights could indicate an issue with your car’s alternator or battery.
Lights Are Aimed Incorrectly
If your new headlights aren’t aimed right, they might shine too high or too low. Most headlight assemblies have adjustment screws. You’ll typically find them on the sides or top of the headlight housing.
To adjust them, you usually need a Phillips head screwdriver or a socket wrench. Park your car on a level surface facing a wall, about 25 feet away. Mark the center of your current headlight beams.
Then, use the adjustment screws to move the beams up or down and side to side until they are in the correct position. Your car’s manual will have specific instructions for aiming.
Find Adjustment Screws: Locate the adjustment screws on the headlight assembly, usually accessible from the front or rear of the unit.
Park Facing a Wall: Position your car about 25 feet from a flat, vertical wall on a level surface.
Mark Beam Centers: Turn on your headlights and mark the center of the low-beam pattern on the wall.
Adjust Aim: Use the screws to raise or lower the beams. The goal is for the brightest part of the beam to hit the wall slightly below the horizontal line.
Check High Beams: After adjusting low beams, ensure high beams are also correctly positioned and focused.
Frequently Asked Questions
Question: How long should it take to install a car headlight?
Answer: For most standard headlight bulb
Question: Can I mix LED and halogen bulbs on my car?
Answer: While it’s technically possible, it’s generally not recommended. Mixing bulb types can lead to uneven lighting and may even cause issues with your car’s electrical system.
Question: How do I know if my car lights are legal?
Answer: Most countries have regulations on light color, brightness, and placement. Check your local Department of Motor Vehicles (DMV) website or equivalent for specific rules regarding vehicle lighting.
Question: Do I need to disconnect the battery before replacing a headlight bulb?
Answer: It’s a good safety practice, especially if you’re unsure about the wiring. Disconnecting the negative terminal of the battery prevents accidental shorts or shocks.
Question: What is the difference between HID and LED lights?
Answer: HID lights use an electric arc through a gas to produce light and are very bright. LED lights use semiconductors and are more energy-efficient and last longer, also providing bright light.
Conclusion
You’ve learned how to install car lights the right way. From gathering your tools to troubleshooting issues, you now have the knowledge to tackle this job. Remember to always prioritize safety.
With these steps, you can confidently replace your car’s lights for better visibility and safety on the road.