How To Use A Torque Wrench For Tire Change
Changing a tire is something many car owners need to do at some point. For beginners, knowing how tight to make the lug nuts can be tricky. Overtightening can damage the studs or wheels, while undertightening can be unsafe.
This is where learning How to Use a Torque Wrench for Tire Change becomes really important. It’s not as hard as it sounds, and this guide will walk you through it step-by-step so you can feel confident doing it yourself.
What Is A Torque Wrench And Why You Need One
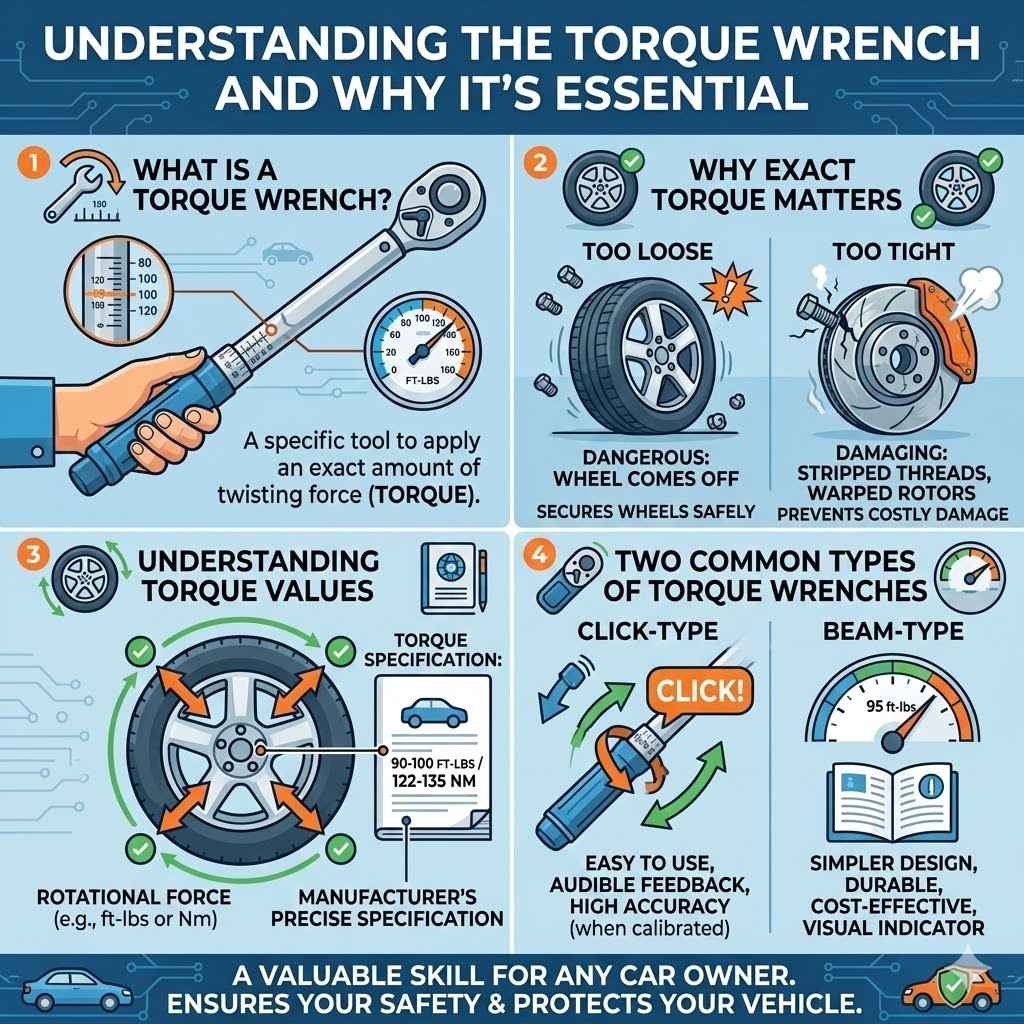
A torque wrench is a special tool that helps you apply a specific amount of turning force, called torque, to a fastener like a lug nut. Unlike a regular wrench, which just tightens things as much as you can, a torque wrench lets you set an exact level of tightness. This is super important for car parts, especially lug nuts on your tires.
Using one correctly ensures your wheels are secured safely and prevents damage.
Many people don’t realize how critical precise tightening is. When you change a tire, the lug nuts hold your wheel onto the car. If they’re too loose, the wheel could wobble or even come off while you’re driving, which is very dangerous.
If they’re too tight, you can strip the threads on the lug nuts or the wheel studs, or even warp the brake rotor. A torque wrench takes the guesswork out of it, giving you peace of mind that your car is safe to drive.
Learning how to use a torque wrench for a tire change is a valuable skill for any car owner. It ensures your safety and protects your vehicle from costly damage. You’ll avoid common mistakes that can lead to serious problems down the road.
This guide will show you the simple steps to master this essential car maintenance task.
Understanding Torque Values
Torque is a measurement of rotational force. Think of it like how hard you’re twisting something. On your car, lug nuts need to be tightened to a specific torque value.
This value is set by the car manufacturer to ensure the wheel is held securely without putting too much stress on the parts. This specific torque value prevents the wheel from loosening on its own but also stops you from over-tightening and causing damage.
Every vehicle has a recommended torque setting for its lug nuts. You can find this information in your car’s owner’s manual. It’s usually listed in foot-pounds (ft-lbs) or Newton-meters (Nm).
For example, a typical passenger car might require about 90-100 ft-lbs of torque. This number is not just a suggestion; it’s a precise engineering specification. Ignoring it can lead to serious safety issues.
The importance of this specific value cannot be overstated. Proper torque ensures even pressure distribution around the wheel hub. This helps prevent warping of brake rotors and ensures the wheel is mounted flush against the hub.
It’s a simple step that has significant safety implications for everyone on the road.
What is Torque
Torque is a twisting force. Imagine trying to open a tight jar lid. The force you apply with your hand to twist the lid is torque.
In mechanics, torque is used to tighten bolts, nuts, and screws. It’s measured in units like foot-pounds (ft-lbs) or Newton-meters (Nm). For car wheels, specific torque values are vital for safety.
Why Exact Torque Matters
Exact torque is crucial because it ensures lug nuts are tight enough to keep the wheel securely attached, but not so tight that they cause damage. Overtightening can strip threads, break studs, or warp brake rotors. Undertightening can lead to wheels loosening during driving, a very dangerous situation.
Precise torque creates an even clamping force holding the wheel onto the hub.
Finding Your Vehicle’s Torque Specs
Your car’s owner’s manual is the best place to find the correct torque specification for your lug nuts. This manual is usually found in the glove compartment. If you can’t find it, you can often look up this information on the manufacturer’s website or by contacting a dealership.
Always use the specification recommended for your specific make, model, and year of vehicle.
Types of Torque Wrenches
There are several types of torque wrenches, but for changing tires, two are most common and suitable for home mechanics: click-type and beam-type. Each has its own way of indicating when the set torque has been reached. Understanding these differences helps you choose the right tool for your needs and use it effectively for a safe tire change.
Click-type torque wrenches are very popular because they are easy to use. You set the desired torque by turning a collar on the handle. When you reach the set torque, the wrench makes a distinct “click” sound and might also feel like it’s slipping.
This audible and tactile feedback tells you to stop tightening. This makes them great for beginners who need a clear signal.
Beam-type torque wrenches are simpler in design. They have a pointer that moves along a scale marked on the wrench. As you apply force, the pointer indicates the torque level.
You watch the pointer and stop tightening when it reaches your desired torque setting. While less common for everyday home use than click-type, they are often more affordable and can be very accurate when used correctly.
Click-Type Torque Wrenches
These are probably the most user-friendly torque wrenches. They have a mechanism inside that triggers a click when the preset torque is achieved. You turn the handle to adjust the torque setting, which is usually displayed on a scale on the handle itself.
Once you hear and feel the click, you know you’ve reached the target torque and should stop applying force.
The advantage of a click-type wrench is its clear indication of reaching torque. This reduces the chance of overtightening, which is a common problem for people new to using torque wrenches. They are excellent for ensuring your lug nuts are tightened correctly without guesswork.
Ease of Use
Click-type wrenches are known for their straightforward operation. Setting the torque is as simple as twisting the handle. The audible and tactile click provides immediate confirmation that the correct torque has been applied.
This makes them ideal for beginners and for tasks where consistent accuracy is important, like changing a tire.
Accuracy
When properly calibrated and used correctly, click-type torque wrenches offer excellent accuracy. They are designed to be precise tools for specific applications. Regular calibration is recommended to maintain their accuracy over time and with frequent use.
Storage
It is important to store click-type torque wrenches at their lowest torque setting. Leaving them set to a high torque can damage the internal spring mechanism, affecting their accuracy. Always remember to reset the wrench to its minimum setting after use.
Beam-Type Torque Wrenches
Beam-type torque wrenches are a more traditional design. They feature a needle that moves along a calibrated scale as you apply force. The scale is marked directly on the wrench’s beam.
You observe the needle and stop tightening when it aligns with your desired torque value on the scale. They are generally less expensive than click-type wrenches.
While they don’t provide an audible or tactile cue, beam-type wrenches are still accurate if used with careful observation. They are a good option if you are on a budget or prefer a simpler mechanical design. Their simplicity means there are fewer internal parts that can wear out, potentially leading to a longer lifespan.
Simplicity and Durability
Beam-type torque wrenches have a very simple mechanical design. This makes them durable and less prone to breaking compared to more complex wrenches. Their straightforward construction means they are less likely to lose accuracy over time due to internal mechanism wear.
Cost-Effectiveness
Generally, beam-type torque wrenches are more affordable than click-type or digital models. This makes them an attractive option for hobbyists or individuals who only need a torque wrench for occasional use, such as a few tire changes per year.
Visual Indicator
The primary way you know you’ve reached the correct torque with a beam wrench is by watching the needle move across the scale. This requires close attention to ensure you stop at the precise mark. It’s a visual confirmation rather than an auditory or tactile one.
How To Use A Torque Wrench For Tire Change Step-By-Step
Ready to get your hands dirty? Changing a tire is a straightforward process with the right tools and knowledge. Knowing how to use a torque wrench is the key to securing your wheel safely.
This guide breaks down the process into simple, manageable steps. Follow along, and you’ll have your spare tire on and your car ready to roll in no time.
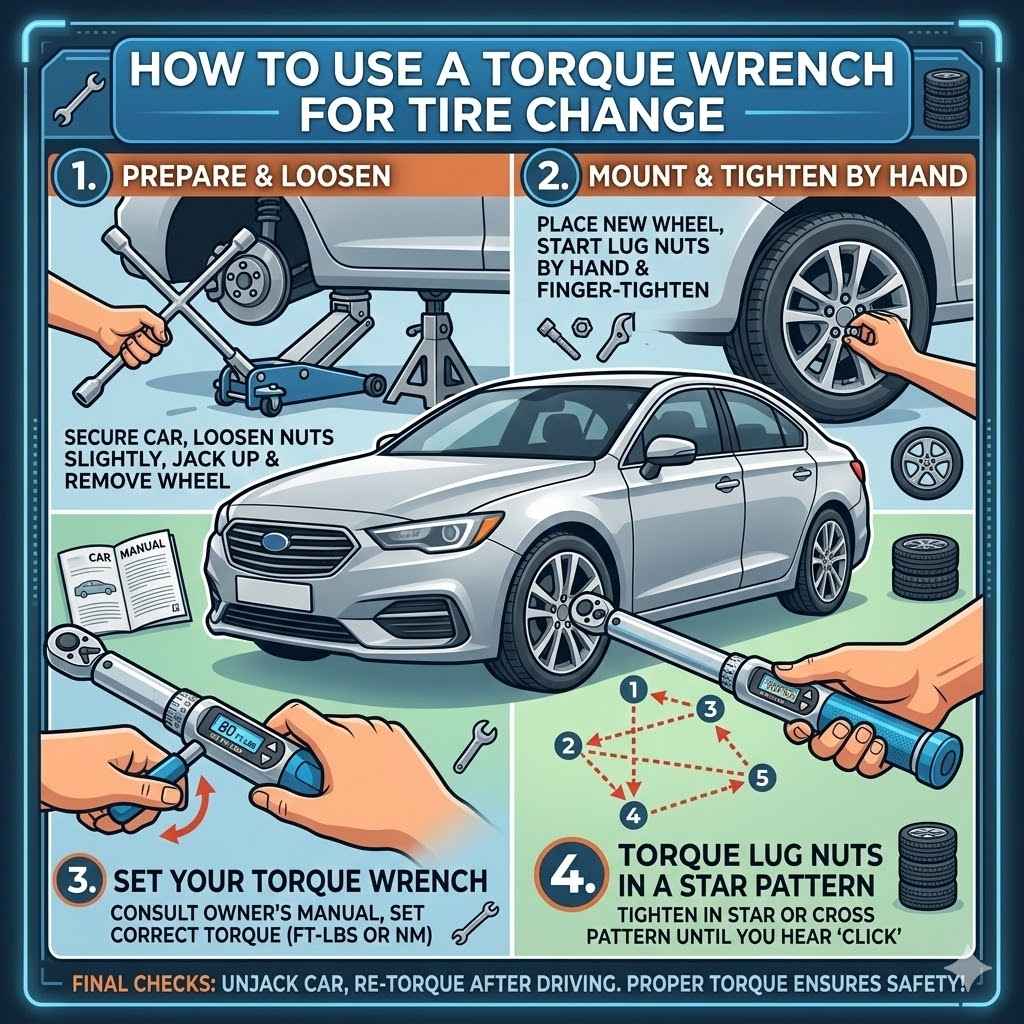
Preparation And Safety First
Before you even think about touching your lug nuts, safety is the top priority. You need a safe, level surface to work on. Avoid changing a tire on a busy road shoulder or a sloped area.
Ensure your car is parked securely, with the parking brake engaged. If you have wheel chocks, place them on the opposite side of the car from the tire you’re changing.
Gather all your tools before you start. You’ll need your car’s jack, a lug wrench (often comes with your car), wheel chocks (optional but recommended), your torque wrench, and the spare tire. Make sure your spare tire is properly inflated.
Having everything ready in one place saves time and prevents you from discovering you’re missing something halfway through the job.
Safe Location
Always choose a flat, stable surface for changing a tire. This is crucial to prevent the jack from slipping or the car from rolling. A paved surface is best.
If you’re on a gravel surface, place a sturdy piece of wood under the jack for stability. Never change a tire on a highway shoulder if you can avoid it; pull over to a safer spot.
Engage Parking Brake
Before lifting the vehicle, firmly apply the parking brake. This is a critical safety step that helps prevent the car from rolling. If your car has a manual transmission, put it in first gear or reverse.
For automatic transmissions, place it in “Park.”
Use Wheel Chocks
Wheel chocks are wedges placed against the tires to stop them from rolling. If you are changing a front tire, chock the rear tires. If changing a rear tire, chock the front tires.
This provides an extra layer of security and prevents unexpected movement of the vehicle while it’s lifted.
Gather Your Tools
Have your jack, lug wrench, spare tire, and torque wrench readily accessible. Ensure your spare tire is properly inflated. A flat spare won’t help you get anywhere.
Check the spare tire pressure regularly, even when you’re not expecting to use it.
Loosening The Lug Nuts
Once your car is safely prepared, you can begin loosening the lug nuts. It’s important to loosen them before you lift the car off the ground. This is because the weight of the car on the tire helps to hold it in place, making it easier to break the lug nuts free.
Trying to loosen them when the tire is in the air will just make the wheel spin.
Use your lug wrench for this step. Fit the wrench securely onto a lug nut. Turn the wrench counter-clockwise.
You might need to use some force. If they are very tight, you can try using your foot to apply pressure to the wrench handle, but be careful not to lose your balance. Loosen each lug nut about half a turn to a full turn.
Do not remove them completely yet.
Loosen Before Lifting
This is a key rule for tire changes. With the car’s weight on the tire, the lug nuts are held firmly in place. This allows you to apply significant force to loosen them without the wheel spinning.
If you try to loosen them when the wheel is in the air, the wheel will just rotate, making it impossible to get them off.
Counter-Clockwise Rotation
To loosen any fastener that uses standard threads, you turn it counter-clockwise. Think of “lefty loosey, righty tighty.” Apply steady pressure to the lug wrench. If the nuts are extremely tight, you might need to use your body weight carefully.
Avoid jerky movements.
Partial Loosening
Only loosen each lug nut about a half to a full turn. The goal here is just to break them free from being tightly seized. You do not want to remove the lug nuts completely at this stage.
They need to remain on the studs to keep the wheel attached until you’re ready to take it off.
Jacking Up The Vehicle
Now it’s time to lift the car. Your car’s jack should have specific points where it can be safely placed. These are usually reinforced areas on the frame near each wheel.
Consult your owner’s manual to find the correct jacking points for your vehicle. Using the wrong spot can damage your car or cause the jack to slip.
Position the jack securely under the designated jacking point. Slowly operate the jack to raise the vehicle. Lift the car just enough so that the tire you need to change is completely off the ground.
You want a little bit of clearance so you can easily remove the flat tire and put the spare on. Once the car is at the desired height, ensure the jack remains stable.
Locate The Jacking Point
Every car has specific, reinforced areas designed to support the jack. These are usually found along the vehicle’s frame near each wheel. Using the wrong spot can bend metal or cause the jack to slide out from under the car.
Always refer to your car’s owner’s manual for the exact location of these points.
Operate The Jack
Once the jack is correctly positioned, begin to raise the vehicle. Most jacks are operated by a lever or a crank. Lift the car slowly and steadily.
You are aiming to get the tire just high enough off the ground so that it can be removed freely. Too high, and the car might become unstable. Too low, and you won’t be able to swap the tires.
Check For Stability
After the car is lifted, double-check that the jack is stable and the vehicle is secure. The car should not be wobbling. If you have any doubts about stability, lower the car immediately and reposition the jack.
Safety is paramount during this step.
Removing The Flat Tire
With the car safely lifted and the lug nuts partially loosened, you can now remove them completely. Unscrew each lug nut by hand or with the lug wrench until they come off. Keep them in a safe place, like your pocket or a small container, so you don’t lose them.
Dropping them can be a real headache.
Once all the lug nuts are removed, you can pull the flat tire straight towards you. It might be a bit heavy or stuck. If it’s difficult to remove, you can try giving it a gentle kick on the side with your foot to loosen it.
Once the flat tire is off, set it aside, preferably under the car frame near the jack for an extra safety measure in case the jack fails.
Now you can fully unscrew the lug nuts that you previously loosened. Turn them counter-clockwise until they are completely off the wheel studs. It’s a good idea to place them in a secure location, such as your pocket or a designated tray, to ensure they don’t get lost.
Losing even one lug nut can be a problem.
Pull Off The Tire
Grip the tire firmly with both hands and pull it straight towards you. The tire should slide off the wheel studs. If it feels stuck, you can try gently kicking the tire from the side to break it free.
Avoid excessive force that could destabilize the vehicle.
Secure The Flat Tire
As an extra safety precaution, slide the removed flat tire under the vehicle’s frame near the jack. If the jack were to fail, the car would land on the tire instead of the ground, potentially preventing further damage and injury. This is a simple but effective safety tip.
Mounting The Spare Tire
Take your spare tire and align the holes in the wheel with the wheel studs on the hub. Carefully lift the spare tire and slide it onto the studs. Make sure it sits flush against the hub.
This can sometimes be a bit awkward, so take your time to get it positioned correctly.
Once the spare tire is in place, put the lug nuts back on. Thread them on by hand as far as they will go. This helps to seat the wheel properly and ensures you don’t cross-thread the nuts.
You want to get them snug, but don’t worry about tightening them fully yet. We’ll use the torque wrench for that precise tightening later.
Align With Wheel Studs
Take your spare tire and carefully line up the holes in the wheel with the threaded wheel studs sticking out from the car’s hub. This step requires a bit of finesse. Ensure the wheel is positioned correctly so it can slide onto the studs without forcing.
Seat The Wheel
Slide the spare tire onto the wheel studs until the wheel is seated flat against the hub assembly. It should fit snugly. If it doesn’t seem to sit flush, double-check that there isn’t any debris preventing it from seating properly or that the wheel is oriented correctly.
Hand-Tighten Lug Nuts
Put the lug nuts back onto the studs and tighten them by hand as much as you can. This ensures that you don’t cross-thread them, which could damage the threads. Hand-tightening also helps to pull the wheel evenly onto the hub.
You’re just getting them snug for now.
Using The Torque Wrench To Tighten Lug Nuts
This is where your torque wrench comes into play. Set your torque wrench to the manufacturer’s recommended torque value for your vehicle. You can find this in your owner’s manual.
It’s usually a specific number in foot-pounds (ft-lbs) or Newton-meters (Nm).
Now, tighten the lug nuts. It’s important to tighten them in a star or criss-cross pattern. This ensures even pressure is applied to the wheel, preventing it from becoming warped.
Tighten one lug nut a bit, then move to the one directly opposite it, and so on. Repeat this pattern until all lug nuts are tightened to the specified torque. For click-type wrenches, you’ll hear and feel a click.
For beam-type, watch the indicator. Do not over-tighten. Once all nuts reach the set torque, you’re done with this step.
Consider this example scenario: Let’s say your car requires 100 ft-lbs of torque. You would set your torque wrench to 100 ft-lbs. You’d pick a lug nut, tighten it until the wrench clicks (or the beam shows 100 ft-lbs).
Then, you’d move to the lug nut directly across from it and do the same. You continue this star pattern, tightening each nut to the set torque, until all are done. This ensures uniform pressure.
Set The Correct Torque
Consult your vehicle’s owner’s manual to find the exact torque specification for your lug nuts. Set your torque wrench to this precise value. If you have a click-type wrench, you’ll usually adjust a collar on the handle.
For beam-type, you’ll read the scale.
Follow A Star Pattern
Never tighten lug nuts in a circle. Always use a star or criss-cross pattern. This method ensures that the wheel is pulled evenly against the brake rotor and hub.
Tighten one lug nut, then move to the one directly opposite it. Continue this pattern until all lug nuts are tightened to the correct torque.
Achieve Target Torque
Tighten each lug nut until your torque wrench indicates the set value has been reached. For a click-type wrench, this will be an audible and tactile click. For a beam-type, watch the needle on the scale.
Ensure you don’t go past the set torque. A second pass, snugging each nut again in the star pattern, can be beneficial after all have reached torque the first time.
Lowering The Vehicle And Final Tightening
With the spare tire securely mounted and all lug nuts torqued, it’s time to lower the car back to the ground. Slowly operate the jack in reverse to lower the vehicle until the spare tire is resting fully on the road. Remove the jack from underneath the car.
Once the car is back on the ground, it’s a good idea to give each lug nut one final check with your torque wrench. Even though you torqued them before lowering, the weight of the car settling can sometimes cause slight shifts. Go around in the star pattern again and re-torque each lug nut.
This confirms everything is still perfectly secure after the car’s weight is back on the wheel.
Lower The Vehicle Slowly
Carefully operate the jack to lower the car back to the ground. Do this slowly and smoothly. Ensure that the tire makes contact with the ground evenly.
Once the vehicle is fully lowered, remove the jack from under the car.
Final Torque Check
After the car is on the ground, it is highly recommended to perform a final torque check on all lug nuts. Use your torque wrench and go around in the same star pattern. This confirms that the wheel is still seated properly and that all lug nuts are at the correct torque specification.
This final step ensures maximum safety.
Store Tools Properly
After you are completely finished, store all your tools properly. Clean your torque wrench and store it according to the manufacturer’s instructions, usually at its lowest setting to protect the internal spring. Put your jack, lug wrench, and the flat tire back into their designated storage locations in your vehicle.
Post-Change Checks And Maintenance
You’ve successfully changed your tire and used your torque wrench! But your job isn’t quite done yet. There are a few important follow-up steps to ensure everything remains safe and functional.
These checks help catch any potential issues early and maintain the integrity of your wheel installation.
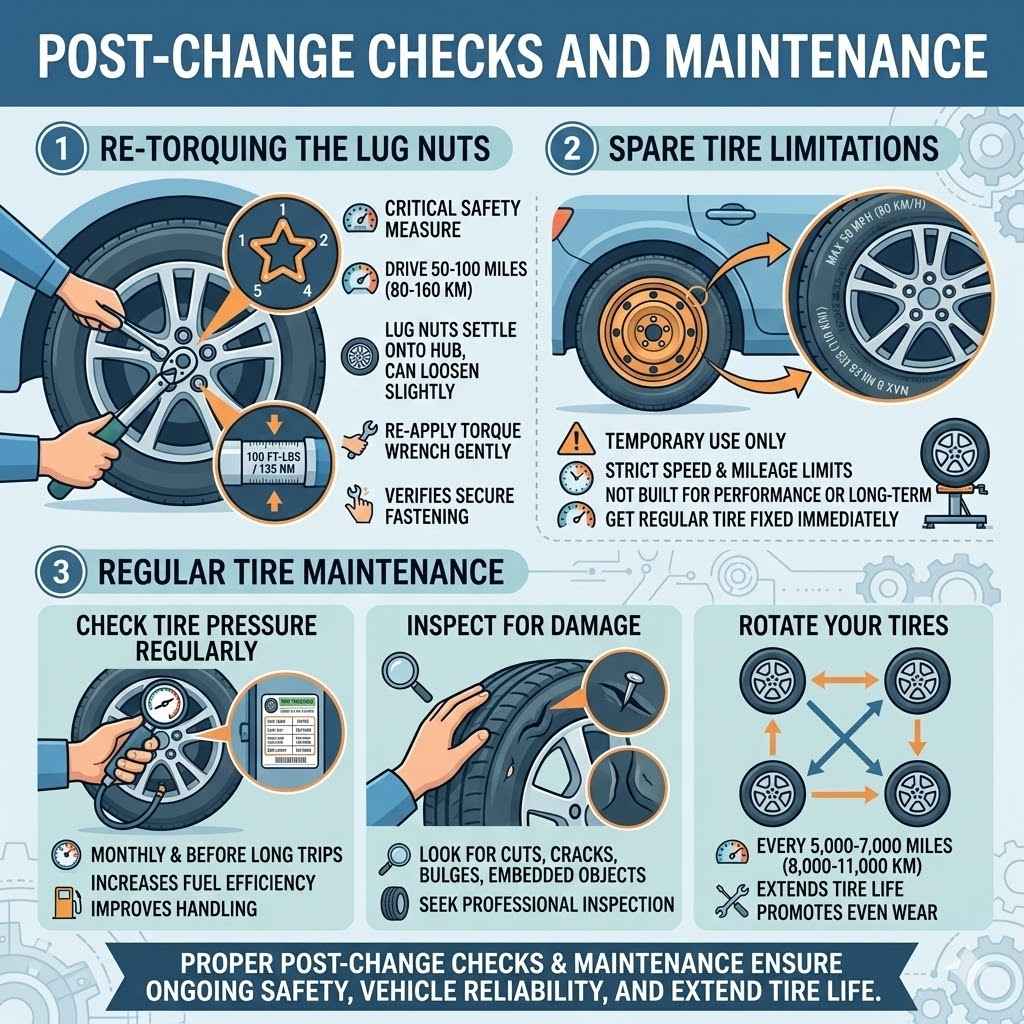
After driving a short distance, about 50-100 miles, it’s crucial to re-torque your lug nuts. The wheel can settle onto the hub as you drive, and the lug nuts can sometimes loosen slightly. A quick check with your torque wrench will ensure they are still at the correct tightness.
This is a vital safety measure for any wheel installation.
Also, remember to get your flat tire repaired or replaced as soon as possible. Don’t drive on a spare tire for longer than necessary, as they are often temporary and not designed for long-term use or high speeds. Always follow the speed and mileage limitations for your spare tire.
Finally, remember to check the air pressure in your spare tire regularly, even when it’s just stored in your car.
Re-Torquing The Lug Nuts
It is absolutely essential to re-torque your lug nuts after driving a short distance, typically between 50 to 100 miles. When a wheel is first mounted, and as you drive, the lug nuts can sometimes loosen slightly as the wheel settles onto the hub. This settling effect is normal, but it means the precise torque you initially set could be compromised.
Using your torque wrench again, repeat the tightening process in the star pattern. You will likely find that some or all of the lug nuts will click or indicate they need a little more tightening to reach the specified torque value. This re-torquing step ensures the wheel remains securely fastened to the vehicle for ongoing safety.
It’s a quick but critical maintenance check.
Importance Of Re-Torquing
After initial installation, wheels can settle onto the hub. This settling can cause lug nuts to loosen slightly. Re-torquing is a critical safety step to ensure the wheel remains securely attached to the vehicle.
It verifies that the lug nuts are still at the manufacturer’s recommended torque specification.
When To Re-Torque
It is standard practice to re-torque lug nuts after driving approximately 50 to 100 miles. This allows enough time for the wheel to settle onto the hub. Some mechanics recommend doing this even sooner, after the first few stops, if possible.
Always check your owner’s manual for specific recommendations.
How To Re-Torque
Use your torque wrench and follow the same star pattern you used during installation. Gently tighten each lug nut until the wrench indicates the correct torque setting. You are not trying to overtighten; you are simply ensuring they are still at the specified value.
This confirms the wheel’s security.
Spare Tire Limitations
Spare tires, especially the smaller “donut” spares, are designed for temporary use only. They are not built to the same standards as your regular tires. They typically have lower speed ratings and lower mileage limits.
Exceeding these limits can be dangerous and can damage the spare tire.
Always check the sidewall of your spare tire for specific speed and mileage limitations. Most temporary spares should not be driven faster than 50 mph (about 80 km/h) and should not be used for more than a few hundred miles. They are intended solely to get you to a repair shop to fix your main tire.
Temporary Use Only
Spare tires, particularly compact spares often called “donuts,” are not meant for long-term use. They are a temporary solution to get you to a tire repair shop. Driving on a spare for extended periods can lead to uneven tire wear and other issues.
Speed And Mileage Restrictions
Most temporary spare tires have strict speed and mileage limitations. You will often see these restrictions printed on the sidewall of the spare tire itself. Common limits are around 50 mph (80 km/h) and a maximum distance of a few hundred miles.
Always adhere to these guidelines for your safety.
Get Regular Tires Fixed
The moment you can, you should have your original tire repaired or replaced. Don’t delay getting your regular set of tires back on your car. Spare tires are not designed for the same performance or safety as full-sized tires.
Drive directly to a tire service center.
Regular Tire Maintenance
Beyond changing a tire, consistent tire maintenance is key to your car’s safety and performance. Regularly checking tire pressure, inspecting for wear and damage, and rotating your tires are all important practices. Proper tire care extends tire life and improves fuel efficiency.
Tire pressure should be checked at least once a month and before any long trips. Underinflated tires can lead to poor handling, decreased fuel economy, and an increased risk of blowouts. Overinflated tires can cause a rough ride and uneven wear.
Your car’s recommended tire pressure is usually found on a sticker in the driver’s side doorjamb or in the owner’s manual.
Also, visually inspect your tires regularly for any signs of damage, such as cuts, bulges, or embedded objects. Uneven tread wear can indicate alignment issues, and worn treads reduce traction, especially in wet conditions. Tire rotation, typically done every 5,000 to 7,000 miles, helps ensure even wear across all four tires.
Check Tire Pressure Regularly
Tire pressure decreases over time, especially in colder weather. It’s recommended to check your tire pressure at least once a month and before any long journeys. The correct pressure for your vehicle is listed on a sticker found on the driver’s side doorjamb or in your owner’s manual.
Inspect For Damage
Periodically look over your tires for any visible damage. This includes cuts, cracks, bulges on the sidewalls, or objects like nails or screws stuck in the tread. Any damage should be inspected by a professional immediately to ensure it’s safe to continue driving.
Rotate Your Tires
Tires wear unevenly due to different forces on the front and rear axles, and from turning. Rotating your tires according to your vehicle manufacturer’s schedule (usually every 5,000-7,000 miles) helps to equalize this wear. This extends the life of your tires and promotes consistent handling.
Frequently Asked Questions
Question: How tight should lug nuts be?
Answer: Lug nuts should be tightened to the specific torque value recommended by your vehicle’s manufacturer, which you can find in your owner’s manual. Using a torque wrench ensures they are tightened correctly—not too loose and not too tight.
Question: Can I use any wrench to tighten lug nuts?
Answer: While a standard lug wrench can tighten them, it doesn’t guarantee the correct torque. For safety and to prevent damage, a torque wrench is essential for the final tightening of lug nuts.
Question: What happens if lug nuts are too tight?
Answer: Overtightening lug nuts can strip the threads on the nuts or studs, warp brake rotors, or even crack the wheel. This can lead to costly repairs and safety hazards.
Question: What happens if lug nuts are too loose?
Answer: Loose lug nuts can cause the wheel to wobble, vibrate, and potentially detach from the vehicle while driving, which is extremely dangerous and can cause serious accidents.
Question: Do I need to re-torque lug nuts after changing a tire?
Answer: Yes, it is highly recommended to re-torque your lug nuts after driving about 50-100 miles, as the wheel can settle and the nuts may loosen slightly.
Conclusion
Learning how to use a torque wrench for a tire change ensures your wheels are securely fastened. You now know to find your car’s specific torque settings and use the wrench correctly in a star pattern. Always re-torque after driving and get your spare tire replaced promptly.
This skill keeps you safe and saves you money.