P0327 Chevy Knock Sensor: Complete Diagnosis and Fix Guide
You’re driving your Silverado or Tahoe, and the check engine light pops on. You scan it, and there it is: P0327. The code definition says “Knock Sensor 1 Circuit Low Input.” But what does that actually mean for your truck, and how urgent is it? Most people assume the engine is knocking and prepare for a major repair. The truth is usually simpler, but it pays to know exactly what you’re dealing with before you start throwing parts at it.
This guide covers the P0327 code specifically for Chevy and GM trucks with the 4.8L, 5.3L, and 6.0L engines. You’ll get exact electrical values for testing, torque specs for the sensor, and a clear path from diagnosis to repair. No vague advice — just numbers you can use with a multimeter and instructions that make sense.

HiSport
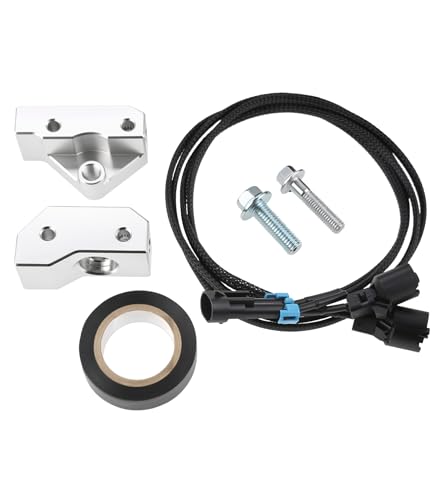
HiSport Knock Sensor Wiring Harness 139981 Solves…
- 【Fitment】Replacement for Infiniti G35 (VQ35DE model only) 2003-2007, M35 2006-2008,FX35 2003-2008
- 【Fitment】Replacement for Nissan 350Z 2003-2006
- 【Reminders】Please must read our description and pictures carefully to check details about our Knock Sensor Connector Wiring Harens…
If you find the wiring harness is the culprit, a replacement like the HiSport Knock Sensor Wiring Harness 139981 can resolve the issue without replacing the sensor itself. It’s built for specific Nissan and Infiniti VQ35DE models, so verify fitment carefully before ordering.
What Does P0327 Mean on a Chevy?
P0327 is a diagnostic trouble code (DTC) that sets when the engine control module (ECM) detects the knock sensor circuit on bank 1 is reading too low. The knock sensor is a piezoelectric device that generates a small AC voltage when it detects engine vibration or spark knock. The ECM uses this signal to adjust ignition timing and prevent detonation.
On GM LS-based engines, the knock sensors sit in the valley under the intake manifold. Bank 1 is the driver’s side. The sensor itself doesn’t have a power wire — it generates its own voltage. The ECM sends a 5-volt reference signal through a pull-up resistor, and the sensor pulls that voltage down based on vibration. When the ECM sees the voltage stuck near zero, it sets P0327 as a low input condition.
This is different from a high input code (P0328), which means the signal is stuck high. Low input usually points to a short to ground, an open circuit, a bad sensor, or a wiring issue. It can also happen if the sensor connector is corroded or if the harness is chafed against the engine.
P0327 vs. P0325 vs. P0332: Know the Difference
GM engines use multiple knock sensors, and the codes can get confusing. Here’s how they break down:
- P0325: Knock Sensor 1 Circuit Malfunction (bank 1) — general fault, could be signal or reference issue
- P0327: Knock Sensor 1 Circuit Low Input (bank 1) — signal voltage is too low
- P0332: Knock Sensor 2 Circuit Low Input (bank 2) — same condition, but on the passenger side
On most Chevy trucks with the 4.8L, 5.3L, or 6.0L engines, you have two knock sensors. One sits under the intake manifold on each side. The rear sensor is the one that usually fails first because it’s exposed to more heat and moisture. If you get P0327, focus on the driver’s side sensor and its wiring. If you get P0332, look at the passenger side.
Some engines have a single knock sensor, but the LS family in Chevy trucks uses two. The ECM monitors each one independently, which is why you can get a bank-specific code.
Also note that P0325 is a more general code — it doesn’t specify low or high input. P0327 is more specific, which makes diagnosis easier. You know the signal is low, so you can narrow your testing to the sensor, the wiring, or the ECM’s reference circuit.
Symptoms of a P0327 Knock Sensor Code
The most obvious symptom is the check engine light. But you might notice other things before the light even comes on:
- Reduced fuel economy: The ECM retards timing when it can’t trust the knock sensor, which burns more fuel
- Poor acceleration: Timing retard kills throttle response, especially under load
- Engine feels sluggish: You might notice it when climbing hills or towing
- Spark knock under load: Ironically, a faulty knock sensor can cause the very thing it’s supposed to prevent
- Failed smog test: The code will fail an OBD-II emissions check
Some drivers report no symptoms at all beyond the light. That’s common if the code sets intermittently. The ECM may not pull timing until the condition persists, so a fresh code might not affect drivability yet.
Don’t ignore it, though. Long-term, the ECM will keep timing retarded, which increases exhaust temperatures. That extra heat can damage catalytic converters over time. Fuel trims also go rich, which can foul spark plugs and contaminate engine oil. It’s not a catastrophic failure, but it’s a slow burn that costs you money.
Root Causes: Wiring, Sensor, or Engine Noise?
P0327 has three main root causes. You need to figure out which one you have before replacing anything.
1. Wiring and connector issues. This is the most common cause on older GM trucks. The knock sensor harness runs through the engine valley, where heat and oil residue break down the insulation. The connector pins corrode, or the wires chafe against the intake manifold. A short to ground on the signal wire will pull the voltage down and set P0327.
2. Sensor failure. The piezoelectric element inside the sensor can crack or degrade over time. When that happens, the sensor stops generating voltage, and the ECM sees a constant low input. Heat cycles and vibration are the main culprits. Sensors typically last 100,000 miles or more, but they do fail.
3. False knock from engine noise. This is the one most people miss. The knock sensor is a microphone for engine vibrations. If something else makes noise — a loose heat shield, a worn accessory belt, an exhaust rattle — the sensor can pick it up. The ECM interprets that as knock and retards timing. Over time, the constant vibration can also damage the sensor’s internal element, causing it to fail and set P0327.
There’s also a less common cause: the ECM itself has a fault in the reference circuit. This is rare, but it happens, especially if the truck has been in a flood or had electrical work done poorly.
How to Diagnose P0327 Step-by-Step
You need a multimeter and basic hand tools. A scan tool that shows live data helps, but it’s not required. Here’s the process I use.
Tools You’ll Need
- Digital multimeter (DMM) with resistance and DC voltage functions
- OBD-II scanner (code reader is fine, but live data is better)
- Basic socket set, including extensions and a swivel socket for the intake manifold
- Torque wrench (inch-pounds for the sensor, foot-pounds for the manifold)
- Dielectric grease and electrical contact cleaner
Test 1 – Check for Additional Codes
Scan the ECM for all codes, not just P0327. If you also have misfire codes (P0300-P0308), a fuel trim code, or a crankshaft position sensor code, that changes your approach. A mechanical issue like a misfire can cause knock sensor readings to look abnormal. Clear the codes, fix any misfire issues first, then re-scan to see if P0327 comes back.
Test 2 – Inspect Wiring and Connector Pins
Unplug the knock sensor connector on the driver’s side. Look for green corrosion on the pins, bent terminals, or broken wire insulation. Follow the harness along its path to the ECM. Check where it crosses the intake manifold or valve cover — those are the spots where chafing happens. If you see bare wire, that’s your problem.
If the connector looks clean, check the terminal tension. Push the female terminal onto a spare male pin or the sensor itself. It should feel snug. Loose terminals cause intermittent low input, which is the worst kind to diagnose. If it’s loose, gently squeeze the terminal with a pick to tighten it.
Test 3 – Measure Resistance and Voltage (with exact specs)
This is where you get definitive answers. With the sensor unplugged and the ignition off, set your multimeter to resistance (ohms).
Measure across the two sensor terminals. A good GM knock sensor reads about 100 kilohms (100,000 ohms) at room temperature. The exact spec is 90-110 kΩ. If you read open (OL) or a dead short (0 ohms), the sensor is bad. Temperature affects the reading — warmer sensors read lower resistance — so don’t panic if it reads 80 kΩ on a hot engine.
Next, check the wiring harness. With the sensor still unplugged, measure resistance from the sensor connector pin to the ECM connector pin. You should see near 0 ohms (less than 1 ohm). Anything above 5 ohms means there’s resistance in the circuit, which will cause a low input reading.
Now check for a short to ground. With the sensor unplugged, set the multimeter to ohms and measure from each sensor connector pin to a clean engine ground. You want to see infinite resistance (OL). If you get a reading, the wire is shorted to ground somewhere.
Finally, check the voltage at the harness connector. Turn the ignition to the ON position (engine off). Set the multimeter to DC volts. Probe the signal wire (the one that goes to the ECM). You should see about 5 volts. If you see 0 volts, the ECM reference circuit is dead, or the wire is shorted to ground. If you see 5 volts, the ECM side is fine, and the problem is the sensor or the connector.
Test 4 – Verify Sensor Mounting and Torque
If the sensor passes electrical tests, the problem might be mechanical. The knock sensor must be torqued to spec. If it’s loose, it won’t make solid contact with the engine block, and the signal will be weak or erratic. GM spec for the knock sensor is 15 ft-lbs (180 in-lbs). Don’t guess — use a torque wrench.
Also check the sensor’s mounting surface. It should be clean and free of debris. Some GM sensors sit in a bracket or use a metal sleeve. Make sure nothing is interfering with the sensor’s contact with the block.
How to Fix P0327: Replacement Guide
Once you’ve confirmed the sensor or harness is bad, replacement is straightforward. The hard part is getting to it, because on most Chevy trucks, the knock sensors live under the intake manifold.
Removing the Intake Manifold (if needed)
On the 4.8L, 5.3L, and 6.0L engines, you can sometimes reach the knock sensors from the side without pulling the manifold, but it’s tight. For the rear sensor, it’s easier to pull the manifold. Here’s the process:
- Disconnect the battery negative cable.
- Drain the coolant below the level of the thermostat housing.
- Disconnect the throttle body and EVAP lines.
- Remove the fuel rail and injectors (cover the injector openings with tape).
- Unbolt the intake manifold. The bolts are typically 10mm or 11mm. There are usually 8 of them.
- Lift the manifold straight up. Watch for the knock sensor harness — it routes through the valley.
Once the manifold is off, you can see both knock sensors. They’re small, round sensors with a single bolt in the center. Unplug the connector and remove the bolt. Clean the mounting surface, then install the new sensor.
Torque Specs and Connector Care
Torque the sensor to 15 ft-lbs. Over-tightening can crack the sensor’s piezoelectric element, which will cause it to fail again. Under-tightening gives a weak signal.
Before you plug the new sensor in, apply a small amount of dielectric grease to the connector pins. This keeps moisture out and prevents corrosion. Make sure the connector clicks into place. The locking tab should seat fully.
If the harness looks brittle or the connector pins are corroded, replace the harness while you’re in there. It’s cheap insurance. A new sensor on an old, cracked harness will fail again within a year.
Cost to Fix: DIY vs. Shop
Here’s a realistic breakdown of what you’ll spend. Prices vary by region and parts availability, so these are ballpark figures.
| Item | DIY Cost | Shop Cost |
|---|---|---|
| Knock sensor (OEM or equivalent) | $30 – $60 | $50 – $90 (parts markup) |
| Wiring harness (if needed) | $20 – $50 | $40 – $70 (parts markup) |
| Intake manifold gasket set | $15 – $30 | $25 – $50 (parts markup) |
| Coolant (for refill) | $15 – $25 | Included in labor |
| Labor | $0 (your time) | $250 – $450 (3-4 hours) |
| Total | $80 – $165 | $365 – $660 |
The labor is the big cost because pulling the intake manifold takes a few hours. If you’re comfortable with basic wrenching, DIY is the way to go. The job isn’t hard — it’s just tedious. Set aside a full afternoon.
If you pay a shop, ask if they’ll warranty the parts. Some shops include a 12-month warranty on sensors, which is worth something given that cheap knock sensors sometimes fail early.
Can You Drive with P0327? Risks and Safety
Short answer: yes, you can drive with P0327, but you shouldn’t ignore it. The engine won’t blow up immediately. The ECM defaults to a conservative timing map, which protects the engine from detonation but hurts performance and fuel economy.
The real risks show up over time:
- Catalytic converter damage: Retarded timing raises exhaust temps, which can melt the converter substrate
- Reduced fuel economy: You’ll see a 5-10% drop, which adds up at $3.50 a gallon
- Failed emissions test: The code will cause an automatic fail in most states
- Increased oil contamination: Rich fuel trims wash fuel into the oil, reducing its lubricating properties
If the code is intermittent and the light is off, you’re fine for a while. If the light is flashing, that’s a different story — a flashing light means severe misfire, which can damage the catalytic converter quickly. But P0327 alone rarely causes a flashing light.
My advice: drive it to work for a day or two, but get it fixed within the week. The longer you wait, the more it costs in fuel and potential downstream damage.
Preventing P0327 from Returning
Once you fix the code, you want it to stay fixed. Here’s what I’ve learned from doing this job more times than I care to count:
- Use dielectric grease on every connector you touch. Moisture is the enemy of knock sensor circuits.
- Route the harness carefully. Zip-tie it away from sharp edges and hot surfaces. The factory routing is fine, but it degrades over time.
- Don’t overtighten the sensor. 15 ft-lbs is the spec. A torque wrench is mandatory here.
- Replace the harness if it looks old. If the insulation is cracked or the pins are corroded, don’t reuse it.
- Fix oil leaks. Oil in the engine valley will eventually soak the sensor and harness. If your valve cover or intake gaskets leak, fix those first.
One more thing: after you clear the code, the ECM needs to see a clean run cycle to turn the light off for good. That means driving through a full drive cycle without the fault recurring. Don’t be surprised if the light stays on for a few drives after the repair — that’s normal. You can clear it with a scanner, but it’ll come back if the problem is truly fixed.
Frequently Asked Questions
Can I replace just one knock sensor or should I replace both?
You can replace just the one that’s faulty. But on high-mileage trucks, I’d replace both while the intake manifold is off. The other sensor is the same age and likely to fail soon. The extra $40 in parts saves you from pulling the manifold again. If you’re on a budget, replace only the faulty one.
Will a bad knock sensor cause a misfire?
Not directly. A bad knock sensor won’t cause a misfire, but it can make an existing misfire worse. The ECM retards timing when it can’t trust the knock sensor, which can make a borderline misfire more noticeable. If you have both P0327 and misfire codes, diagnose the misfire first — it might be causing the knock sensor code.
What’s the difference between P0327 and P0328?
P0327 is low input — the signal voltage is stuck near zero. P0328 is high input — the signal voltage is stuck high. Low input usually means a short to ground, an open circuit, or a dead sensor. High input often means a short to power or a faulty ECM. The diagnosis process is similar, but the wiring checks are different.
Can a loose heat shield cause P0327?
Yes, indirectly. A loose heat shield or exhaust rattle creates vibration that the knock sensor picks up. The ECM sees that as knock and retards timing. Over time, the constant vibration can damage the sensor’s internal element, causing it to fail and set P0327. If you hear a rattle, fix it before replacing the sensor.
How do I clear P0327 after the repair?
Use an OBD-II scanner to clear the code. If you don’t have one, disconnect the battery negative cable for 30 seconds, then reconnect it. That clears the code, but the ECM will re-run its readiness monitors on the next drive cycle. If the repair is solid, the code won’t come back.
What I’d Do If It Were My Truck
Here’s the short version of everything above — the stuff I’d want to know if I was standing in my garage with a code reader:
- P0327 means the knock sensor on bank 1 (driver’s side) is reading too low — it’s a wiring or sensor problem, not an engine mechanical issue.
- Test the sensor resistance first: expect 90-110 kΩ at room temperature. Open or short means it’s dead.
- Check for 5 volts at the harness connector with the ignition on. No voltage means a wiring or ECM problem.
- Torque the new sensor to 15 ft-lbs. Loose or over-tightened sensors fail fast.
- Replace the wiring harness if it’s brittle or corroded — it’s cheap and prevents a repeat job.
- DIY cost is about $80-$165 and a few hours of your time. A shop will charge $365-$660.
- Don’t ignore the code — it’ll cost you in fuel and can damage your catalytic converter over time.
For more context on how knock sensors work across different vehicles, check out our knock sensor guide and the breakdown of knock sensor counts on modern engines. If you’re dealing with a Silverado specifically, this P0327 Silverado walkthrough covers model-specific quirks.
Products related to this article
Sponsored / affiliate links. As an Amazon Associate I earn from qualifying purchases. I may earn additional commission from eligible campaigns.