Proven Ways How To Refill Car AC
Quick Summary: Refilling your car’s AC at home is achievable with a DIY recharge kit. Follow safety precautions, locate the low-pressure port, connect the refrigerant can, and charge until the desired pressure is reached on the gauge. Always choose the correct refrigerant type for your vehicle’s AC system.
Is your car’s air conditioning system blowing warm air? It’s a common problem, especially on those sweltering summer days when you really need that cool blast. It can be frustrating and costly if you think you need a mechanic. But good news! For many cars, especially those with simple leaks, refilling the AC system yourself is a totally doable DIY task. We’ll walk you through it, step by step, making it easy to get that cold air flowing again without breaking the bank. You’ve got this!
How to Refill Your Car AC: A Beginner’s Guide
Dealing with a warm car can turn a comfortable drive into an uncomfortable ordeal. A common reason for this is a loss of refrigerant, the vital fluid that cools the air in your car’s AC system. Thankfully, you don’t always need to visit an expensive auto shop to fix this. With the right knowledge and a simple DIY kit, you can safely and effectively recharge your car’s AC system yourself. This guide will break down everything you need to know, from understanding why your AC might be losing its cool to the straightforward steps involved in refilling it.
Why Your Car AC Might Need a Refill
Car air conditioning systems are designed to be closed loops, meaning they shouldn’t lose refrigerant under normal operating conditions. However, over time, small, almost imperceptible leaks can develop in the various components. These can include:
- Rubber hoses that can degrade and crack
- Seals and gaskets that can wear out
- O-rings that can become brittle
- Connections that may loosen
When refrigerant (often called Freon or R-134a) leaks out, the system can’t produce as much cool air, or any cool air at all. It’s important to understand that refilling the system doesn’t fix the underlying leak; it’s a temporary solution. However, for minor leaks, it can keep your AC working for a good while.
Understanding Refrigerant Types
Before you do anything, you must know what type of refrigerant your car uses. The most common types you’ll find in cars are R-134a and, in newer models, R-1234yf. These refrigerants are not interchangeable, and using the wrong one can severely damage your AC system and be hazardous. How do you find out which one you need?
- Check Your Owner’s Manual: This is the best and most reliable source of information.
- Look Under the Hood: Many cars have a sticker under the hood, often on the radiator support or firewall, that specifies the refrigerant type and the amount needed.
- Consult a Reputable Auto Parts Store: If you’re still unsure, a quick visit to an auto parts store with your car’s make, model, and year information will help them identify the correct product.
For this guide, we will focus on systems using R-134a, as it’s very common in vehicles manufactured before 2015 and DIY kits are widely available for it. R-1234yf systems typically require professional equipment due to different service ports and safety protocols.
What You’ll Need: Essential Tools and Materials
Gathering the right tools and materials before you start will make the process smoother and safer. Here’s what you’ll need:
| Item | Description |
|---|---|
| AC Recharge Kit | Choose a kit specifically for your refrigerant type (e.g., R-134a). Kits typically include one or more cans of refrigerant and a hose with a built-in pressure gauge. Some kits also contain a sealant to help with minor leaks. |
| Safety Glasses | Refrigerant can cause serious eye damage. Always protect your eyes. |
| Gloves | Protect your skin from the cold refrigerant and any potential contaminants. |
| Work Rag or Paper Towels | For wiping down ports and cleaning up any minor spills. |
| Car Owner’s Manual | To confirm refrigerant type and correct system pressure. |
| Pen and Paper | To record pressure readings. |
Step-by-Step Guide: How to Refill Car AC (R-134a)
Let’s get your car’s AC blowing cold again! Follow these steps carefully. Safety first, always!
Step 1: Prepare Your Vehicle and Locate the AC Low-Pressure Port
Here’s how to get ready:
- Park your car in a well-ventilated area, preferably outdoors or in an open garage. Never work on your AC system in an enclosed space due to the risk of refrigerant fumes.
- Start the car’s engine and turn on the air conditioning to its coldest setting, with the fan on high. This pressurizes the system and ensures the compressor is running, which is necessary for proper charging.
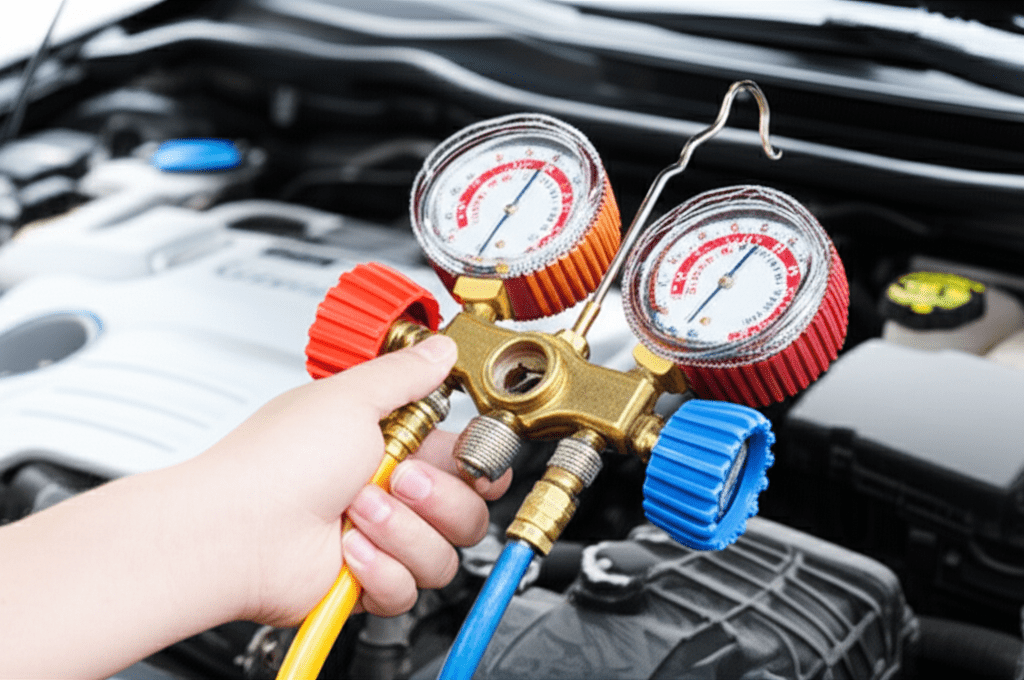
- Open the hood and locate the AC system’s low-pressure service port. This port is usually the larger of the two service ports and is typically found on the suction line, which is the larger diameter AC line. It will have a plastic cap on it, often labeled “L”. The high-pressure port is smaller and marked “H”. NEVER connect the recharge hose to the high-pressure port.
If you have trouble finding it, consult your owner’s manual or search online for AC diagrams specific to your car model.
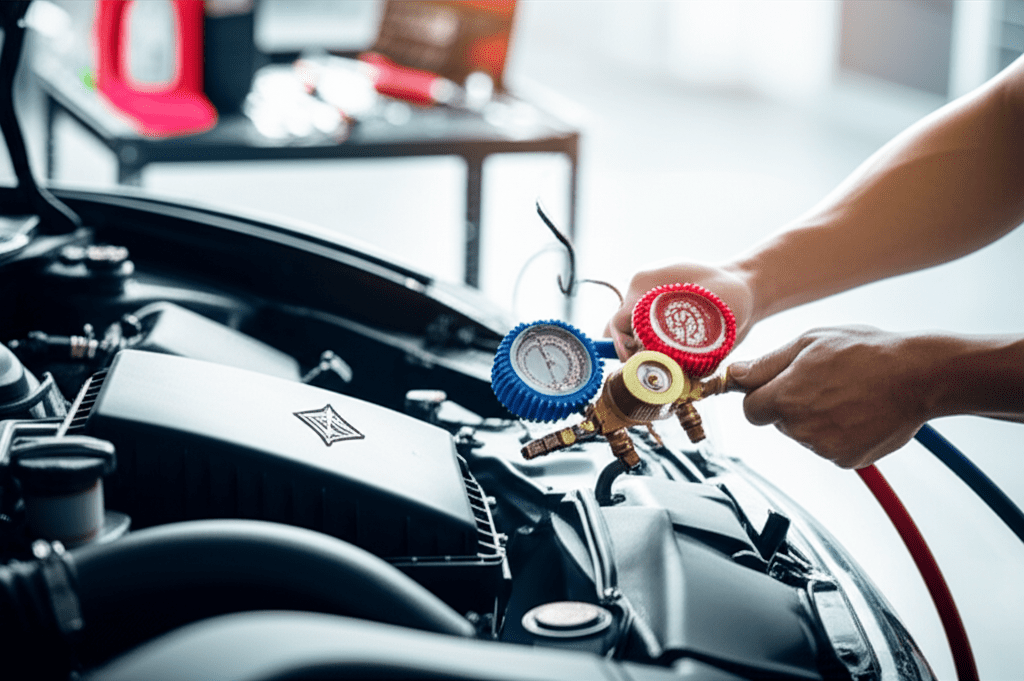
Step 2: Connect the Recharge Hose and Gauge
It’s time to hook up the equipment:
- Take the recharge hose from your kit and screw the connector end onto the R-134a can tightly.
- Ensure the can’s valve is closed. You’ll typically do this by turning the knob or lever counter-clockwise.
- Align the quick-connect fitting on the other end of the hose with the low-pressure service port on your car’s AC system.
- Push the fitting firmly onto the port until it clicks into place. This quick connector is designed to seal onto the port.
Step 3: Check the System Pressure
This is where the gauge comes in:
- With the engine still running and AC on high, observe the pressure gauge on your recharge hose.
- Note the reading. The optimal pressure varies depending on ambient temperature. Most gauges have a guide or colored zones to help you determine if the system is low, full, or overcharged. A common guideline for R-134a is that the low-side pressure should be around 25-45 psi, but this is highly dependent on the outside temperature. Higher temperatures mean higher pressures.
- If the gauge shows zero or is in the very low (white) zone, your system is likely very low or possibly empty, indicating a significant leak.
The Environmental Protection Agency (EPA) provides guidance on refrigerant handling and safety, which is crucial to be aware of.
Step 4: Add Refrigerant
Now, let’s add the “cool”:
- Ensure the can is upright.
- Slowly turn the valve knob or lever clockwise to open the valve and allow refrigerant to flow into the system.
- Watch the pressure gauge closely. You may need to cycle the can on and off (open and close the valve) to maintain pressure within the desired range.
- Do NOT overcharge the system. Overcharging can cause damage and reduce cooling efficiency.
- If your kit has a “low-side” pressure reading, aim to bring it into the green zone if one is provided, or consult your kit’s instructions for target pressures based on ambient temperature. For example, at 70°F (21°C) ambient, the low-side pressure might be around 30-35 psi. At 90°F (32°C), it could be 40-45 psi.
Many DIY kits, like those often sold by companies like AC-PRO, are designed for ease of use with built-in gauges.
Step 5: Monitor Pressure and Stop When Filled
Keep an eye on things:
- Continue adding small amounts of refrigerant, pausing frequently to let the system stabilize and reading the gauge.
- Stop adding refrigerant when the gauge indicates the system is properly charged. This typically means the gauge needle is in the recommended operating range for the current ambient temperature.
- Once you’ve reached the correct pressure, quickly disconnect the hose from the service port by pulling the lever back. The quick-connect fitting is designed to automatically seal and prevent significant refrigerant loss upon disconnection.
Step 6: Final Checks and Cleanup
Almost done!
- Replace the service port cap securely.
- Turn off the engine.
- Start your car again, turn the AC to max, and check if the air is now cold.
- Dispose of the empty refrigerant can properly according to local regulations.
- Put away your tools, and you’re all set!
Tips for a Successful AC Recharge
Here are some extra pointers to help the process go smoothly:
- Check the Ambient Temperature: Temperature significantly affects the pressure readings. Use a thermometer to get an accurate ambient air temperature reading near the front of your car and refer to the guide on your recharge kit or online charts for recommended pressures.
- Work in an Upright Position: Always keep the refrigerant can upright when charging to prevent liquid refrigerant from entering the system, which can cause damage.
- Don’t Rush: Take your time to avoid overcharging. It’s better to add a little at a time.
- Consider a Sealant: If you suspect a slow leak, some kits include a sealant. Follow the kit’s instructions carefully, as sealants can sometimes cause issues if not used correctly or if the leak is too large.
- Professional Leak Detection: If your AC system was completely empty or is still not blowing cold after a recharge, it indicates a significant leak. In such cases, it’s best to have a professional use specialized equipment to find and repair the leak before attempting another recharge.
When to Seek Professional Help
While DIY recharging can be effective for minor issues, there are times when professional help is necessary:
- System is Completely Empty: If the AC system had no refrigerant to begin with, it implies a large leak that a DIY kit won’t fix.
- Constant Leaks: If you find yourself needing to recharge the system frequently, there’s a persistent leak that needs professional diagnosis and repair.
- System Malfunctions: If the AC still doesn’t work after recharging, or if you notice strange noises or issues, it could be a problem with the compressor, condenser, evaporator, or other components.
- R-1234yf Systems: As mentioned, R-1234yf systems require different equipment and procedures, and it’s generally recommended to have these serviced by professionals.
- Lack of Confidence: If you’re not comfortable with any part of the process, it’s always wiser to consult a qualified mechanic.
For comprehensive guides on AC system components and maintenance, resources like the Cars.com explain the workings of automotive air conditioning.
Frequently Asked Questions (FAQ)
- Q1: How long should a DIY AC recharge last?
- A: The duration depends on the size of the leak. For minor leaks, a recharge can last anywhere from a few months to a couple of years. If the system loses refrigerant quickly, it means you have a larger leak that needs professional repair.
- Q2: Can I overcharge my car’s AC?
- A: Yes, overcharging is possible and can be harmful. It can damage the compressor and other components, reduce cooling efficiency, and even rupture a hose. Always follow the gauge readings and recommended pressure levels.
- Q3: What’s the difference between the low-pressure and high-pressure ports?
- A: The low-pressure port (usually larger, marked “L”) is where you add refrigerant. The high-pressure port (smaller, marked “H”) is for system diagnostics and should only be accessed by professionals with specialized equipment.
- Q4: Should I recharge my AC when the engine is off?
- A: No, it’s crucial to recharge your AC system while the engine is running and the AC is turned on. This circulates the refrigerant and ensures the pressure readings are accurate for charging.
- Q5: Can I use any R-134a refrigerant I find?
- A: Stick to reputable brands specifically designed for automotive AC systems. Some products contain additives like leak sealants or oil, which can be beneficial but ensure they are compatible with your system.
- Q6: What if my car uses R-1234yf refrigerant?
- A: R-1234yf systems are newer and have different service ports, requiring specialized equipment and procedures. It is generally recommended to have these systems serviced by a professional technician.
Conclusion
Keeping your car’s air conditioning system in good working order is essential for a comfortable ride, especially during warmer months. You’ve learned that even for beginners, refilling your car’s AC with the correct refrigerant like R-134a can be a very manageable DIY project. By using a proper recharge kit, understanding the pressure gauge, and following the safety steps outlined above, you can successfully top up your system and enjoy cool air once again.
Remember, this process addresses the symptom (low refrigerant) but not necessarily the cause (a leak). If your AC was completely empty or continues to lose its chill rapidly, it’s a clear sign to visit a qualified mechanic for a thorough inspection and repair. But for many minor top-ups, you’ve now got the confidence and knowledge to handle it yourself, saving time and money. Drive cool!