2003 Honda Civic Water Pump Replacement
The first sign is usually a faint ticking sound at idle, or a small puddle of green coolant under the front of the car. You might ignore it for a week. Then the temperature gauge creeps past halfway on the highway, and you know the 2026 Honda Civic water pump replacement is no longer a someday job. It’s a now job.
This guide walks through the entire process on the 1.7L D17A1 engine, which is what most 2026 Civics have. You’ll get exact torque specs, part numbers, and the TDC (Top Dead Center) alignment steps that most guides skip. By the end, you’ll know whether to tackle it yourself or hand the keys to a shop, and what a fair price actually looks like.

A-Premium
A-Premium Engine Timing Belt Kit with Water…
- [Vehicle Fitment]: Compatible with Acura EL 2001-2005; Compatible with Honda Civic 2001-2005
- [Special Note]: Please enter your vehicle information in the top left corner of the listing and check our Special Notes before ord…
- [Kit Parts Included:]: The A-Premium Civic Timing Belt Kit with Water Pump Includes ① Timing Belt; ② Timing Belt Tensioner; ③ Bolt…
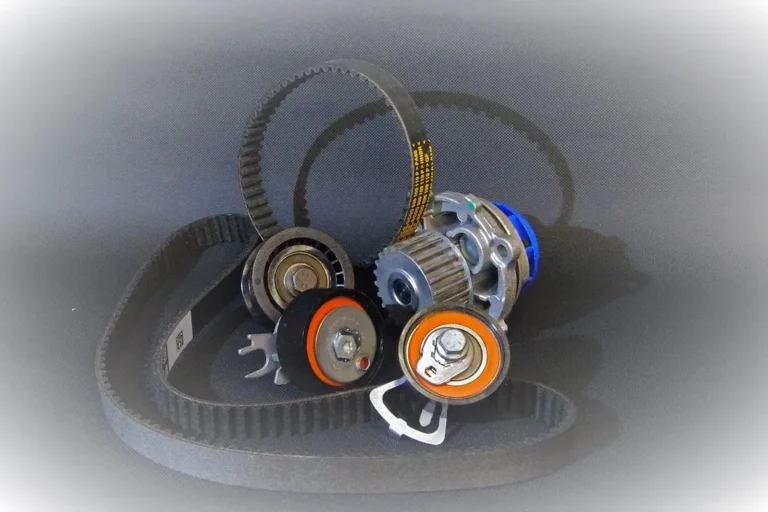
If you’re doing the timing belt at the same time—and you should—a kit like the A-Premium Engine Timing Belt Kit with Water Pump bundles the belt, tensioner, water pump, and seals into one purchase. That saves you from buying parts separately and hoping they play nice together.
Tools and Parts Checklist
Gather everything before you start. Running to the parts store mid-job with the car disassembled is miserable.
Parts
- Water pump: Aisin TKH-002 (this is the OEM supplier for Honda) or Honda OEM 19200-PLC-003
- Timing belt kit: Aisin TKH-002 includes the belt, tensioner, and water pump—buy this if you’re doing the full job
- Coolant: Honda Type 2 antifreeze (premixed or concentrate) — about 1.5 gallons
- Thermostat: Honda OEM 19301-PLC-003 (replace it while the coolant is drained)
- Serpentine belt: Reuse if it’s less than 3 years old, otherwise replace
- Gasket maker: Honda Bond HT or Permatex Ultra Grey for the water pump mating surface
Tools
- Socket set: 8mm, 10mm, 12mm, 14mm, 17mm sockets
- Torque wrench (ft-lbs and in-lbs ranges)
- Breaker bar with 17mm socket for the crankshaft pulley bolt
- Jack and jack stands
- Coolant drain pan (at least 2 gallons)
- Funnel with a long neck for the radiator
- Mirror and flashlight for inspecting the timing marks
One thing people forget: the crankshaft pulley bolt is torqued to 181 ft-lbs. You will not break it loose with a regular ratchet. Rent or borrow an impact wrench, or use a breaker bar with a pipe over the handle.
Symptoms: Is It the Pump or the Tensioner?
Before you tear anything apart, figure out what’s actually failing. The water pump and the timing belt tensioner make different noises and leak in different places. Getting this wrong means replacing parts that weren’t broken.
Water Pump Failure Signs
- Coolant leak: Look under the timing cover area. The pump has a weep hole on the bottom—coolant dripping from it means the internal seal is gone.
- Grinding or whirring noise: A failing bearing sounds like a metallic whir that gets louder with RPM. It’s often mistaken for a bad alternator bearing.
- Overheating: The impeller can corrode and stop moving coolant, even if the pump doesn’t leak.
Tensioner Failure Signs
- Rattling noise at idle: A loose tensioner makes a rapid clatter, especially when the engine is cold.
- No coolant leak: The tensioner is dry. If you see no puddle but hear the noise, it’s likely the tensioner.
- Timing belt slap: In severe cases, the belt slaps against the cover. You’ll hear a rhythmic thumping.
Here’s the honest truth: on a 2026 Civic with over 100,000 miles, both parts are past their service life. Honda recommends replacing the timing belt and tensioner every 105,000 miles, and the water pump is right there. If either one fails, the other isn’t far behind. Replace both at the same time.
Safety First: Disconnecting the Battery and Draining Coolant
Start with the car cold. Never open the radiator cap on a hot engine—you will get a face full of boiling coolant.
- Disconnect the negative battery cable. The alternator and starter are right near where you’ll be working.
- Place the drain pan under the radiator drain plug. The plug is on the bottom of the radiator, passenger side. Open it slowly.
- Remove the radiator cap to let air in and speed up the drain.
- While the coolant drains, remove the engine undercover (plastic splash shield) if your car has one. It’s held on by 10mm bolts and a few clips.
Draining the block is a separate step. There’s a drain bolt on the back of the engine block, but most DIYers skip it. Skipping it leaves about a quart of old coolant in the block, which mixes with your fresh coolant. It’s not ideal, but it’s acceptable if you’re not doing a full flush. If you want it done properly, the block drain bolt is a 17mm, located on the driver’s side of the block near the transmission.
Setting the Engine to TDC
This is the step that separates a clean job from a nightmare. The engine must be at Top Dead Center (TDC) on the compression stroke before you remove the timing belt. If the crank and cam aren’t aligned, the valves will hit the pistons when you turn the engine.
- Remove the spark plugs. This makes the engine easy to turn by hand.
- Put a 17mm socket on the crankshaft pulley bolt. Turn it clockwise (viewed from the passenger side) until the timing marks align.
- The crankshaft timing mark is a small notch on the crank pulley. It aligns with a pointer on the oil pump housing.
- The camshaft timing mark is a line on the cam sprocket. It aligns with a mark on the valve cover or the upper timing cover.
- Both marks must be aligned. If the cam mark is 180 degrees off, turn the crank one full revolution and check again.
A common mistake is setting the crank to TDC but not verifying the cam. The crank comes around to TDC twice per cycle—once on compression, once on exhaust. If the cam isn’t aligned, you’re at TDC on the wrong stroke. Double-check both marks before you remove the belt.
Take a photo with your phone. You’ll want a reference when you install the new belt.
Removing the Accessory Belts and Timing Cover
Now the disassembly starts. Work methodically and keep bolts organized in a magnetic tray.
- Loosen the serpentine belt tensioner. It’s a 14mm bolt on the tensioner pulley. Rotate the tensioner to release belt tension, then slip the belt off.
- Remove the crankshaft pulley. This is the big bolt (17mm) in the center. Use the breaker bar. If the engine turns, hold the pulley with a strap wrench or wedge a screwdriver in the flywheel teeth (if you have a manual transmission).
- Remove the upper and lower timing covers. The upper cover has 8mm bolts, the lower has 10mm bolts. The lower cover is the tricky one—it wraps around the crank pulley and requires wiggling to get out.
- You should now see the timing belt, the cam sprocket on top, the crank sprocket at the bottom, and the tensioner on the driver’s side.
Inspect the old belt. Cracks on the ribs, glazing, or missing teeth mean it was overdue. If you see oil on the belt, track down the leak before reassembly—oil destroys a new belt in a few thousand miles.
Removing the Old Timing Belt and Water Pump
With the covers off, the old parts come out.
- Loosen the tensioner bolt (12mm). The tensioner has a spring that pushes against the belt. Release the tension by rotating the tensioner pulley with a wrench, then slide the belt off the sprockets.
- Remove the tensioner assembly. Note how the spring and damper sit—you’ll need to compress the damper when reinstalling.
- Remove the water pump. It’s held by six 10mm bolts in a circular pattern. The pump sits behind the timing belt, on the driver’s side of the engine.
- Scrape the old gasket material off the block. Use a plastic scraper—metal will gouge the aluminum surface.
Before installing the new pump, inspect the old one. Spin the bearing by hand. If it feels gritty or wobbles, it was failing. Look at the impeller blades. If they’re corroded or worn down, the pump was losing flow even if it wasn’t leaking yet.
Torque Specs and Installation of the New Pump
Here are the exact numbers. Don’t guess.
| Component | Torque Spec (ft-lbs) | Torque Spec (in-lbs) |
|---|---|---|
| Water pump bolts (10mm) | 9 ft-lbs | 108 in-lbs |
| Timing belt tensioner bolt (12mm) | 33 ft-lbs | — |
| Timing belt tensioner pulley bolt | 33 ft-lbs | — |
| Crankshaft pulley bolt (17mm) | 181 ft-lbs | — |
| Camshaft sprocket bolt (if removed) | 37 ft-lbs | — |
| Upper timing cover bolts | 9 ft-lbs | 108 in-lbs |
| Lower timing cover bolts | 9 ft-lbs | 108 in-lbs |
Clean the mating surface on the block thoroughly. Apply a thin, even bead of gasket maker around the water pump’s mounting face. Place the new pump on the block and thread the bolts in by hand. Torque them in a crisscross pattern to 9 ft-lbs. Over-tightening these bolts strips the aluminum threads in the block—that’s a repair you don’t want.
Installing the New Timing Belt and Tensioner
This is the moment of truth. The belt must be installed with zero slack between the crank and cam sprockets.
- Make sure the crank and cam marks are still aligned from your TDC setup.
- Install the new belt, starting at the crank sprocket, then up over the cam sprocket. Keep the belt snug on the driver’s side (the side opposite the tensioner).
- Install the tensioner. The spring should push the pulley against the belt. If the damper is extended, compress it with a bench vise or large C-clamp, then install it compressed. Once installed, release the damper slowly.
- Rotate the crankshaft two full turns clockwise. This seats the belt and checks the timing marks.
- Recheck the marks. If they’re off, the belt skipped a tooth—remove and reinstall.
Here’s a detail most guides miss: the tensioner spring sets the initial tension, but the belt will stretch slightly over the first few hundred miles. Honda’s spec is to set the tensioner, then verify the belt deflection is about 0.4 inches (10mm) at the longest span between sprockets. If it’s looser than that, the belt will slap.
Reassembly, Coolant Refill, and Bleeding Procedure
Everything goes back together in reverse order. Install the lower timing cover, then the crank pulley. Torque the crank bolt to 181 ft-lbs—this is critical. If it’s loose, the pulley will wobble and chew up the keyway.
Install the upper timing cover, then the serpentine belt. Reconnect the battery.
Now the coolant fill, which is where people screw up. The 2026 Civic’s cooling system traps air in the block, and if you don’t bleed it, the engine will overheat even with fresh coolant.
- Fill the radiator with Honda Type 2 coolant (50/50 mix with distilled water) until it’s full.
- Fill the coolant reservoir to the MAX line.
- Start the engine and let it idle. Turn the heater to full hot, fan on low. This opens the heater core valve and lets coolant flow through it.
- Watch the radiator. As the thermostat opens, the level will drop. Top it off.
- Run the engine until the cooling fans cycle on and off twice. Turn it off, let it cool, then check the level again. Top off if needed.
If you see bubbles in the radiator after the engine warms up, air is still trapped. Repeat the process. Patience here saves you from a warped head gasket.
Common Mistakes and How to Avoid Them
I’ve seen every one of these screw-ups in forums and on cars that came into the shop.
- Not replacing the thermostat. It’s $15 and right there. Do it now or you’ll be draining the coolant again in six months.
- Using the wrong coolant. Green universal coolant causes corrosion in the D17’s aluminum block. Honda Type 2 is specifically formulated for it.
- Reusing old gaskets. The water pump gasket is one-time-use. The cam and crank seals are too.
- Misaligning the timing marks by one tooth. The engine will run, but poorly. It’ll have low power and may backfire. Verify twice.
- Over-tightening the water pump bolts. 9 ft-lbs is not a suggestion. Stripped threads in the block mean a helicoil repair.
- Forgetting the block drain bolt. If you didn’t drain the block, you’ve diluted the fresh coolant with old fluid. Not catastrophic, but sloppy.
One more: don’t skip the water pump replacement guide for other vehicles if you own multiple cars—the principles translate, but the torque specs don’t.
Cost Analysis: DIY vs. Shop
Let’s talk money. A shop will charge you 4-6 hours of labor for this job, plus parts. On a 2026 Civic, that’s often more than the car is worth.
| Option | Parts Cost | Labor Cost | Total Estimate |
|---|---|---|---|
| DIY with Aisin kit (TKH-002) | $150 – $220 | $0 (your time) | $150 – $220 |
| DIY with Honda OEM parts | $250 – $350 | $0 (your time) | $250 – $350 |
| Independent shop | $200 – $300 (marked up) | $300 – $450 | $500 – $750 |
| Dealership | $300 – $400 | $500 – $700 | $800 – $1,100 |
Those are realistic numbers for most of the US. The Aisin kit is the same pump and belt Honda installs at the factory, just without the Honda logo. Check the current price on Amazon for the A-Premium timing belt kit—it includes the water pump, tensioner, and seals, which covers everything you need.
If you’ve never turned a wrench before, the DIY route is a weekend job. Plan for 6-8 hours, plus a trip to the parts store when you realize you’re missing a socket. If you have basic mechanical sense, you can do it. If the thought of aligning timing marks makes you nervous, pay the shop. A botched timing belt job costs more than the labor you saved.
What Happens If You Skip the Timing Belt?
This is the part nobody wants to talk about. The D17A1 is an interference engine. That means the pistons and valves occupy the same space at different times. When the timing belt snaps, the camshaft stops instantly, but the crankshaft keeps spinning from momentum. The pistons slam into the open valves.
The result is bent valves, damaged pistons, and often a cracked cylinder head. The repair bill for that is $1,500 to $2,500—assuming the block isn’t damaged. Compare that to the $200 cost of a timing belt and water pump replacement done on schedule. The math is obvious.
The water pump on this engine is driven by the timing belt. When the pump’s bearing seizes, it stops the belt dead. That’s why the water pump and belt are replaced together. You’re not being upsold—it’s mechanical necessity.
If your Civic is approaching 105,000 miles and you don’t know if the belt was ever changed, assume it wasn’t. Check the maintenance records. If there are none, do the job now. Maintenance lights on Hondas don’t always tell the full story, but the mileage doesn’t lie.
Frequently Asked Questions
How long does a 2026 Honda Civic water pump replacement take?
A first-timer should budget 6-8 hours. Someone who’s done it before can finish in 3-4 hours. The job isn’t hard, but it’s fiddly—the timing covers have awkward bolts, and getting the belt tension right takes patience.
Can I replace the water pump without touching the timing belt?
Technically yes, but you shouldn’t. The water pump is behind the timing belt, so you have to remove the belt to get to the pump. Once the belt is off, replacing it costs $50 more in parts and adds 20 minutes. The belt is already 105,000 miles old. Put a new one in.
What coolant does a 2026 Honda Civic take?
Honda Type 2 coolant, premixed or concentrate. It’s blue-green in color. Do not use universal “all makes” coolant—it lacks the corrosion inhibitors the D17 engine needs. You’ll need about 1.5 gallons for a full fill.
How do I know if my water pump is leaking internally?
Internal leaks show up as coolant in the oil. Check the dipstick—if the oil looks milky or frothy, coolant is getting into the crankcase. That’s a serious failure. External leaks from the weep hole are more common and easier to spot: look for dried coolant residue on the bottom of the pump housing.
Is the Aisin TKH-002 kit as good as OEM?
Yes. Aisin is the original equipment manufacturer for Honda’s water pumps and timing belts. The TKH-002 kit contains the same parts Honda sells in its branded kit, minus the markup. It’s the kit most independent shops install. The A-Premium kit is a solid alternative if you want everything in one box, including the seals.
Final Checklist Before You Start
- Confirm the engine is cold before draining coolant.
- Disconnect the battery negative terminal first.
- Set the engine to TDC and photograph the timing marks.
- Torque the water pump bolts to 9 ft-lbs, not more.
- Torque the crank pulley bolt to 181 ft-lbs—use a torque wrench, don’t guess.
- Bleed the cooling system completely before driving.
- Check the timing marks again after rotating the engine two full turns.
This job is the single most important maintenance item on a 2026 Civic. Do it right, and the D17 will run another 100,000 miles without complaint. Skip it, and you’re gambling an engine over $200 in parts. The choice is yours.
“,”slug”:”2026-honda-civic-water-pump-replacement
Products related to this article
Sponsored / affiliate links. As an Amazon Associate I earn from qualifying purchases. I may earn additional commission from eligible campaigns.