2019 Honda CRV Codes: The Essential, Proven Reboot
After installing a new battery in your 2019 Honda CRV, multiple warning codes can appear. The proven reboot is simple: drive the car on a straight road at a steady speed of 25-40 mph for several minutes. This allows the vehicle’s advanced safety sensors to automatically recalibrate, clearing the codes without any special tools.
It’s a frustrating moment. You’ve just successfully replaced the battery in your 2019 Honda CRV, feeling proud of your DIY accomplishment. You turn the key, the engine purrs to life, but then… your dashboard lights up like a holiday tree. Brake System warning, Lane Keeping Assist failure, Collision Mitigation problem—it seems like everything is broken. Don’t panic! This is a very common issue, and the fix is surprisingly simple. You haven’t broken your car; you’ve just temporarily confused it. In this guide, I’ll walk you through the essential reboot process, step by step.
Why Your Dashboard Lights Up After a Battery Change
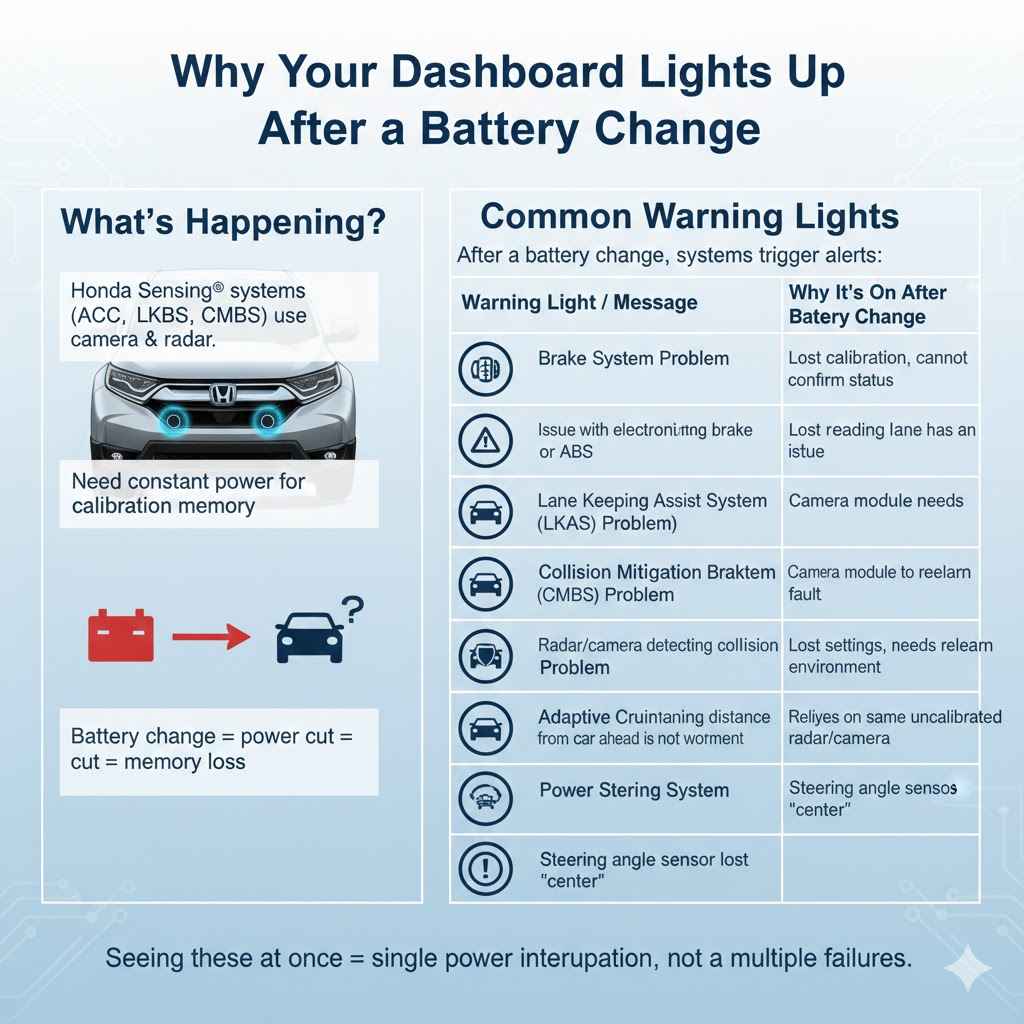
First, let’s understand what’s happening. Your 2019 Honda CRV is packed with amazing technology, including the Honda Sensing® suite of safety features. This system uses a camera mounted near your rearview mirror and a radar sensor in the front grille to manage features like:
- Adaptive Cruise Control (ACC)
- Lane Keeping Assist System (LKAS)
- Collision Mitigation Braking System™ (CMBS™)
- Road Departure Mitigation System (RDM)
These systems need constant power to remember their calibration settings—essentially, their understanding of the world around them. When you disconnect the battery, even for a few minutes, you cut off that power. The car’s main computer (the ECU) is fine, but these sensitive sensor modules lose their memory. When you reconnect the new battery and start the car, these systems wake up confused. They don’t know their precise alignment or status, so they trigger warning lights to tell you, “Hey, I need to be reset!”
Think of it like unplugging your smart TV from the wall. When you plug it back in, it might need a moment to reconnect to the Wi-Fi and remember your app logins. Your CRV is doing the same thing, just with its safety systems.
The Common Culprits: Warning Lights You Might See
When this happens, you’ll likely see a flurry of messages on your driver information display. Don’t let the scary-sounding names intimidate you. They are all related to the same root cause. Here are the most common ones:
| Warning Light / Message | What It Means (Normally) | Why It’s On After a Battery Change |
|---|---|---|
| Brake System Problem | Indicates an issue with the electronic parking brake, brake fluid, or ABS. | The system has lost its calibration and cannot confirm the status of the braking assists. |
| Lane Keeping Assist System (LKAS) Problem | The camera that reads lane lines has an issue. | The camera module needs to be recalibrated by seeing the road again. |
| Collision Mitigation Braking System (CMBS) Problem | The radar or camera that detects potential collisions has a fault. | The radar and camera have lost their settings and need to relearn their environment. |
| Adaptive Cruise Control (ACC) Problem | The system that maintains distance from the car ahead is not working. | This system relies on the same radar and camera that are now uncalibrated. |
| Power Steering System (EPS) Problem | There might be an issue with the electronic power steering. | The steering angle sensor has lost its “center” position and needs to be reset. |
Seeing all of these at once feels like a catastrophe, but it’s actually a good sign. It points to a single, system-wide power interruption (your battery change) rather than multiple, separate mechanical failures.
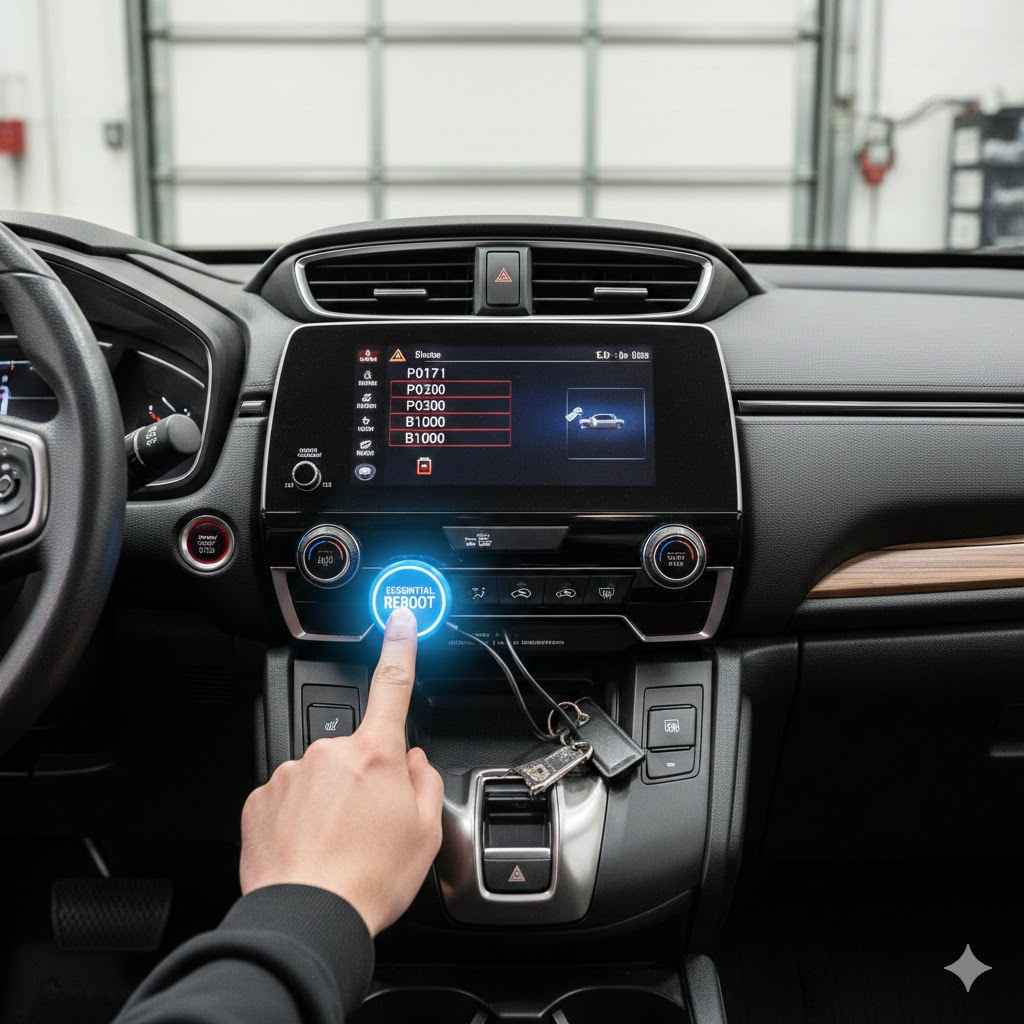
The Essential Reboot: Your Step-by-Step Guide to Clearing the Codes
The solution is not about plugging in a complicated diagnostic tool or taking it to the dealer. The solution is simply to drive. Your Honda CRV is designed to re-learn and recalibrate these systems automatically once it’s moving under the right conditions. This process is often called a “recalibration drive.”
Follow these steps exactly, and your dashboard should be clear in no time.
Step 1: Perform a Quick Safety Check
Before you start driving, let’s make sure the foundation is solid. The most common reason for a failed reboot is a simple mistake during the battery installation.
- Check the Battery Terminals: Open the hood and look at the new battery. Are the positive (+) and negative (-) terminals tight? Grab each one and try to wiggle it. There should be absolutely no movement. A loose terminal can cause voltage fluctuations that prevent the systems from resetting properly. If they are loose, use a 10mm wrench to tighten them snugly. Don’t overtighten, but make sure they are secure.
- Confirm Battery Size and Type: Ensure you installed the correct battery for a 2019 Honda CRV. Your owner’s manual or a quick search on a reputable auto parts site will confirm the right group size (usually Group 51R). An incorrect battery might not provide stable power.
Step 2: Start the Engine and Let It Settle
Get in the car, close all the doors, and start the engine. You will see the warning lights are still on. This is normal. Don’t try to clear them or press any buttons. Just let the car idle for about a minute. This gives all the electronic modules a chance to power up and run their initial self-checks.
Step 3: Find a Suitable Road for the Recalibration Drive
This is the most important part of the process. You need to find a road where you can drive safely and consistently without a lot of stops, turns, or traffic.
The ideal road is:
- Relatively straight: The camera system needs to see clear lane markings to recalibrate itself.
- Low-traffic: You need to maintain a steady speed without constant braking.
- Speed limit between 25 and 50 mph: The recalibration happens within a specific speed range.
A quiet suburban road, a rural highway, or an empty section of a city street during off-peak hours works perfectly. Avoid rush-hour traffic or roads with lots of stoplights and sharp curves.
Step 4: Perform the Recalibration Drive
Once you are on your chosen road and it’s safe to do so, follow these instructions:
- Accelerate smoothly to a speed between 25 and 40 mph (40 to 65 km/h). The key is to be steady. Try not to fluctuate your speed too much. Using cruise control can help, but it’s not necessary.
- Drive continuously at this speed for at least 5 to 10 minutes. In most cases, you will start to see the magic happen within the first few miles.
- Watch your dashboard. You will notice the warning lights and messages begin to disappear one by one. The Brake System light might go out first, followed by the Lane Keeping Assist, and so on. This is the car’s systems successfully recalibrating themselves.
- Once all the Honda Sensing-related warning lights have turned off, the process is complete.
It’s a huge relief to see them vanish! The car has successfully “re-learned” its environment and confirmed that its sensors are working correctly.
Step 5: Park and Restart the Vehicle
After the lights have gone out, find a safe place to pull over and park. Turn the engine off and wait about 30 seconds. Then, start the car again. This final step confirms that the new calibration settings have been saved to the system’s memory. The dashboard should now be completely clear of warnings.
Congratulations! You’ve just performed an essential system reboot on your Honda CRV and saved yourself a potentially expensive trip to the dealership.
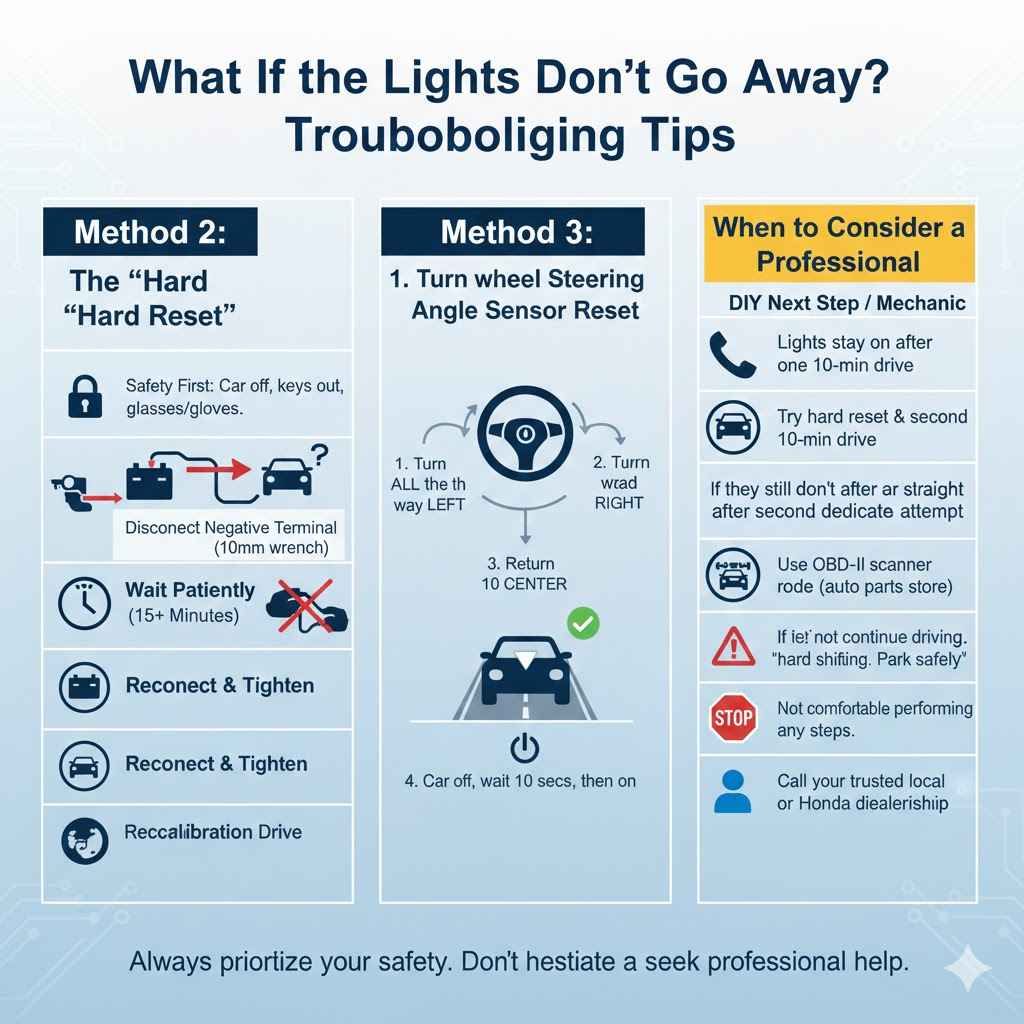
What If the Lights Don’t Go Away? Troubleshooting Tips
Sometimes, things don’t go as planned. If you’ve performed the recalibration drive for 15-20 minutes and the lights are still on, don’t worry. There are a few other things to try before calling for professional help.
Method 2: The “Hard Reset” (Disconnecting the Battery Again)
If the simple drive doesn’t work, a full hard reset can sometimes clear out a stubborn electronic glitch. This forces every module in the car to fully power down and restart from scratch.
- Safety First: Make sure the car is off and the keys are out of the ignition. Put on safety glasses and gloves if you have them.
- Disconnect the Negative Terminal: Using a 10mm wrench, loosen the nut on the negative (-) battery terminal (it’s usually black or marked with “NEG”). You only need to loosen it enough to wiggle the cable clamp off the battery post. You do not need to disconnect the positive terminal.
- Wait Patiently: Tuck the negative cable aside so it can’t accidentally touch the battery post. Now, wait for at least 15 minutes. This is longer than your initial battery swap, and this duration ensures that any residual power in the capacitors of the car’s computer systems is fully drained.
- Reconnect and Tighten: After 15 minutes, place the negative cable clamp back onto the battery post and tighten it securely with your wrench.
- Repeat the Recalibration Drive: Start the car and immediately perform the same recalibration drive as described in the steps above. This hard reset often clears the memory fault that was preventing the system from recalibrating on the first attempt.
Method 3: The Steering Angle Sensor Reset
If you have a Power Steering System (EPS) light that won’t go away, the steering angle sensor might need a specific reset. This sensor tells the car which way the wheels are pointed. It’s an easy reset to perform.
- Start the car while it is parked.
- Turn the steering wheel all the way to the left until it stops.
- Then, turn the steering wheel all the way to the right until it stops.
- Return the steering wheel to the center (straight-ahead) position.
- Turn the car off, wait 10 seconds, and turn it back on.
This simple maneuver often recalibrates the steering angle sensor and can clear the EPS light, which may allow the other systems to then recalibrate during the drive.
When to Consider a Professional
If you have tried all the steps above—checked the terminals, performed the drive multiple times, and even tried a hard reset—and the lights remain on, it might be time to seek help. Here’s a checklist to help you decide.
| Symptom | DIY Next Step | When to Call a Mechanic |
|---|---|---|
| Lights stay on after one 10-minute drive. | Try the hard reset (disconnecting battery for 15 mins), then try the drive again on a different, straighter road. | If they still don’t clear after a second, dedicated attempt. |
| A “Check Engine” light is on in addition to the other warnings. | You can use a basic OBD-II scanner to read the code. You can buy one online or many auto parts stores will scan it for free. | If the code points to something other than “lost communication,” there might be an unrelated issue that needs professional diagnosis. |
| The car is driving poorly (e.g., hard shifting, stalling, strange noises). | Do not continue driving. Park the car safely. | Call a mechanic immediately. The warning lights might be indicating a real mechanical problem that coincidentally appeared after the battery change. |
| You are not comfortable performing any of these steps. | It’s always okay to prioritize your comfort and safety. | Call your local trusted mechanic or the Honda dealership. Explain what you did (changed the battery) and what happened. They will know exactly what to do. |
Frequently Asked Questions (FAQ)
1. Why do all these warning lights come on after just a battery change?
Your Honda’s advanced safety systems, like lane assist and collision mitigation, use sensors that need constant power to remember their settings. When you disconnect the battery, they lose this memory and power up in a “confused” state, triggering a warning light until they are recalibrated by driving.
2. Is it safe to drive my 2019 CRV with these warning lights on?
Yes, it is generally safe to drive the car to perform the recalibration. The underlying mechanical systems (engine, transmission, and base brakes) are working fine. However, the advanced safety features mentioned in the warnings (like automatic emergency braking and lane assist) will be disabled until the lights go out. Drive cautiously, as you would in a car without these features.
3. How long does it take for the lights to turn off during the drive?
For most 2019 Honda CRVs, the lights will begin to turn off within 5 to 10 minutes of steady driving at 25-40 mph. The entire process rarely takes more than 15 minutes. If they haven’t turned off after 20 minutes, you should try one of the troubleshooting methods.
4. What if the warning lights don’t turn off after trying everything?
If you’ve confirmed the battery terminals are tight, performed the recalibration drive for at least 20 minutes, and tried a hard reset without success, there might be another issue. It could be a faulty wheel speed sensor or a problem with the camera/radar module itself. At this point, it’s best to have the vehicle scanned by a professional mechanic or a Honda dealership.
5. Do I need to go to the dealer to fix this?
No, in over 95% of cases, you do not need to go to the dealer. The recalibration drive described in this article is the standard procedure and will fix the issue for free. You only need to visit a dealer or mechanic if the drive-and-reboot procedure fails to clear the codes.
6. Will this reboot process erase my radio presets or Bluetooth connections?
Disconnecting the battery will likely erase your preset radio stations, trip computer data (like average MPG), and the clock. However, it usually does not erase paired Bluetooth phones, as that information is often stored in a different type of memory. You will probably need to reset your radio stations after the reboot is complete.
7. Can a weak or dying battery cause these same warning lights to appear?
Absolutely. A battery that is failing can provide inconsistent or low voltage, especially during startup. This voltage drop can be enough to confuse the sensitive electronic modules, causing the same array of warning lights to appear randomly. If you see these lights but haven’t changed your battery, the first step should be to get your battery tested at an auto parts store.
Conclusion: You’re in Control
Seeing your dashboard flash with multiple warnings can be alarming, but now you know the secret: it’s usually just your 2019 Honda CRV asking for a quick refresh. The system reboot, performed with a simple and steady drive, is the proven, official way to get things back to normal. By understanding why it happens and how to fix it, you’ve not only solved the problem but also deepened your understanding of how your vehicle works.
Remember to always start with the basics: check your connections and then go for a calm, steady drive. This simple knowledge empowers you to handle one of the most common modern car quirks with confidence, saving you time, money, and the stress of an unnecessary trip to the repair shop. Happy driving!