Chevy Starter Solenoid Wiring: What Each Terminal Does and How to Test It
You turn the key and hear one click. Then nothing. The dash lights are bright, the battery tests fine, but the engine won’t crank. Nine times out of ten, the problem sits right on top of the starter: the solenoid. It’s a small part with a big job, and its wiring confuses more people than it should.
This guide covers Chevy starter solenoid wiring in plain terms. You’ll learn what each of the small terminals does, how to test the circuit with a multimeter, and why the GM starter system differs from other brands. By the end, you’ll be able to diagnose a no-crank condition without guessing or throwing parts at the truck.

Victory Lap
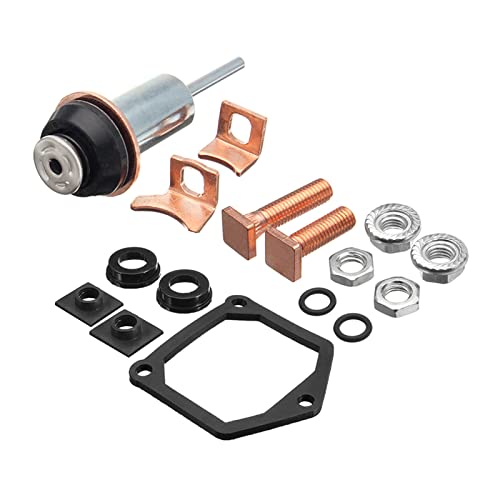
Victory Lap ND-34SOL Solenoid Repair Kit
- THE Victory Lap ND-34-SOL Solenoid Repair Kit fits Nippondenso (Denso) 1.0kW, 1.2kW, 1.4kW, 1.6kW, 2.0kW OSGR Starters with a 34.8…
- · The ND-34-SOL solenoid repair kit fits Denso OSGR starters used from 1973 to 2015.
- · The components of the kit are of the highest quality to meet or exceed the original specifications of the factory parts. Each co…
Before diving into the wiring, one note on parts. If your diagnosis points to worn contacts inside the solenoid, the Victory Lap ND-34SOL Solenoid Repair Kit is worth a look. It includes the movable plunger and five stationary contacts for Denso OSGR starters, which many Chevy models use. Rebuilding the solenoid costs less than a new starter and takes about an hour. Check the current price on Amazon if you’re considering that route.
Understanding the S-Terminal, R-Terminal, and Battery Terminal
Chevy starters use a distinct solenoid layout. You’ll see three small terminals and one large stud. Each has a specific purpose, and mixing them up causes real problems.
The large stud connects directly to the battery positive cable. This terminal is always hot, so keep tools and wrenches away from it when working under the car. The other large terminal on the solenoid body connects to the starter motor itself.
Now for the small terminals. The S terminal (sometimes labeled S or 50) receives the start signal from the ignition switch. When you turn the key to start, 12 volts hits this terminal and energizes the solenoid’s pull-in and hold-in windings. That magnetic force pushes the plunger forward, which engages the drive gear with the flywheel and closes the main contacts to send power to the motor.
The R terminal (sometimes labeled R or I) is a bypass terminal. During cranking, it feeds full battery voltage to the ignition coil. This compensates for the voltage drop that occurs while the starter draws hundreds of amps. On older points-style ignition systems, this bypass is critical. On modern HEI or electronic ignitions, the R terminal often sits unused. If you don’t need it, just cap it off with electrical tape.
Some aftermarket solenoids have a third small terminal labeled I. That’s for the ignition bypass on certain models. On a typical Chevy V8, you’ll only use the S terminal and possibly the R terminal. The rest stay disconnected.
How the Chevy Starter Circuit Works From Key to Crank
Trace the path of power and you’ll understand why the wiring matters. The ignition switch sends a signal through the neutral safety switch (automatic) or clutch safety switch (manual), then to the S terminal on the solenoid.
Here’s the sequence in order:
- Battery positive connects to the solenoid’s large battery stud.
- Ignition switch sends 12V to the S terminal when the key turns to START.
- The solenoid plunger moves, closing the internal contacts.
- Battery power flows through the solenoid to the starter motor.
- The starter motor spins the flywheel, and the engine cranks.
A common mistake happens when someone wires the S terminal directly to battery positive to test the starter. That bypasses the safety switches. The engine cranks, but only because you removed the safety interlock. For diagnosis, that’s fine. For daily driving, never do this.
Another frequent issue is a weak ground. The starter’s ground path runs through the engine block, the engine-to-frame strap, and the battery negative cable. A corroded engine ground strap makes the solenoid click but not engage fully. Check all ground connections before blaming the solenoid itself.
Testing the Solenoid and Wiring With a Multimeter
You don’t need a test light and a prayer. A cheap digital multimeter tells you exactly where the circuit fails. Here’s a step-by-step method that works on nearly every Chevy from the 1960s through today.
Step 1: Check battery voltage. Put the meter on DC volts and read across the battery terminals. You need at least 12.4V. Below 12V, the battery may not have enough power to pull in the solenoid. Charge it and retest before anything else.
Step 2: Check voltage at the solenoid battery stud. Connect the red lead to the large stud and the black lead to the starter housing. You should see the same voltage as the battery. If it’s lower, the battery cable has resistance. Clean the connections and replace the cable if it’s corroded.
Step 3: Test the S terminal trigger. Have an assistant hold the key in START. Put the red lead on the S terminal and the black lead on the starter housing. You should see 12V. No voltage means the problem is upstream—ignition switch, safety switch, or wiring between them. Check the starter ignition switch wiring for the full circuit.
Step 4: Test for voltage drop during cranking. With the key held in START, measure from the battery positive post to the solenoid battery stud. The meter should show less than 0.5V. Anything higher means the cable is too thin or the connections are bad.
Step 5: Bench test the solenoid. Remove the starter and solenoid assembly. Connect battery negative to the housing and battery positive to the S terminal. The plunger should snap in and the drive gear should extend. Then connect battery positive to the battery stud. The motor should spin. If the plunger moves but the motor doesn’t, the internal contacts are burnt.
Burnt contacts are the most common solenoid failure. The high current arcing pits the copper discs and terminals. A rebuild kit like the Victory Lap ND-34SOL replaces those parts, restoring full current flow. It’s a straightforward repair if you’re comfortable with small parts and springs.
Common Wiring Mistakes and How to Avoid Them
Over the years, I’ve seen the same wiring errors repeat in garages and parking lots. Here are the ones that cause the most frustration.
Swapping the S and R terminals. The S terminal needs the start signal. The R terminal connects to the coil. Put the start wire on R and the solenoid won’t engage. The engine won’t crank at all. Double-check the terminal labels before connecting anything.
Using the wrong gauge wire for the S terminal. The start signal draws a few amps, so 14-gauge wire works fine. Someone might use 18-gauge or smaller, which adds resistance and drops voltage. The solenoid clicks weakly or not at all. Stick with 14-gauge or thicker for the trigger wire.
Leaving the R terminal ungrounded. The R terminal is not a ground. It outputs 12V during cranking. If it touches the housing, it shorts the ignition coil feed. Cap it or connect it properly to the coil positive side.
Ignoring the purple wire color convention. On most Chevy applications, the S terminal wire is purple. That’s the factory color. If someone rewired the harness with different colors, trace the wire back to the ignition switch to confirm which one carries the start signal. Don’t trust color alone on a modified car.
For older trucks and cars with column-mounted ignition switches, the wiring path includes the neutral safety switch inside the column or on the transmission. A failing switch causes intermittent no-crank conditions. The 70s Chevy starter switch wiring guide covers that specific era in detail.
Comparing Solenoid Repair vs. Replacement vs. Remote Mounting
| Approach | Cost | Difficulty | Time | Best For |
|---|---|---|---|---|
| Rebuild with contact kit | Low (kit only) | Moderate | 1–2 hours | Original starter, minor wear |
| Replace solenoid only | Medium (part only) | Easy | 30–60 minutes | Failed windings or cracked housing |
| Replace entire starter | High (new unit) | Easy | 1–2 hours | Motor brushes worn or armature damage |
| Remote solenoid mount | Medium (wiring + bracket) | Hard | 3–4 hours | Heat-soak issues, custom builds |
Rebuilding makes sense when the starter motor itself spins fine but the solenoid clicks. The contacts wear out faster than the motor in most cases. Replacing the whole starter is easier if the motor drags or makes grinding noises, which points to internal wear.
Remote mounting moves the solenoid away from exhaust heat, which causes hot-start problems on some Chevy trucks. It requires heavier gauge wire to the starter and a relay to handle the trigger. It’s a real fix, but it adds complexity. I’d only do it if heat soak keeps coming back after replacing the solenoid.
Frequently Asked Questions
Which terminal on a Chevy starter solenoid gets power from the battery?
The large stud on the solenoid body connects to the battery positive cable. It’s always hot, even with the key off. The other large terminal connects to the starter motor. Power flows through the solenoid only when the internal contacts close during cranking.
What does the R terminal do on a Chevy solenoid?
The R terminal provides 12 volts to the ignition coil during cranking. It bypasses the ignition resistor wire to give full voltage for a hotter spark. On modern electronic ignitions, you usually don’t need it. Leave it disconnected and insulated.
Why does my Chevy starter click once but not crank?
A single click usually means the solenoid engages but the main contacts don’t close fully. That’s typically burnt contacts or a weak battery. Check battery voltage first, then inspect the solenoid contacts. If the battery is good, the contacts are likely pitted and need replacement.
Can I wire the S terminal directly to the battery to test the starter?
Yes, but only for a quick bench test. Connect a jumper wire from battery positive to the S terminal. The starter should engage and spin. Never do this in the vehicle with the transmission in gear, because it bypasses the safety switches. The car could lurch forward.
What color wire goes to the S terminal on a Chevy?
Factory wiring uses a purple wire for the S terminal on most Chevy models. The R terminal uses a pink or tan wire. If the harness has been modified, confirm the wire by tracing it back to the ignition switch rather than trusting the color.
What to Remember When Wiring Your Chevy Starter
- The large battery stud is always hot. Disconnect the battery before working near the starter.
- The S terminal triggers the solenoid. The R terminal bypasses the coil resistor during cranking.
- Check grounds first. A corroded engine strap causes more no-crank issues than a bad solenoid.
- Test voltage at the S terminal with the key held in START. No voltage means the problem is upstream.
- Burnt contacts are the most common failure. A rebuild kit restores the solenoid for less than a new starter.
- Cap any unused terminals. A loose R terminal touching the housing shorts the ignition feed.
- If the starter drags or makes noise, replace the whole unit rather than just the solenoid.
Wiring a Chevy starter solenoid isn’t complicated once you understand the three terminals and the current path. Take the time to test before you replace. A $10 multimeter saves you from buying a $200 starter that wasn’t the problem. And if the contacts are worn, a rebuild kit keeps your original starter running for another decade.
Products related to this article
Sponsored / affiliate links. As an Amazon Associate I earn from qualifying purchases. I may earn additional commission from eligible campaigns.