Honda Distributor Diagram: Wiring and Pinouts for Every Generation
You’re staring at a distributor with eight wires hanging out, and the diagram you found online is a blurry scan from a 1998 service manual. It doesn’t match your connector. Now you’re not sure if the car won’t start because of the ignition coil, the igniter, or just a broken wire hidden inside the rubber grommet. This situation is common, and the fix is usually simpler than you think.
This guide covers the actual wiring for Honda distributors across three generations of engine management: OBD0, OBD1, and OBD2. You’ll get the pinouts, the wire colors, and the specific test procedures that isolate the problem. We’re skipping the generic theory and focusing on what you need to get the engine running again.
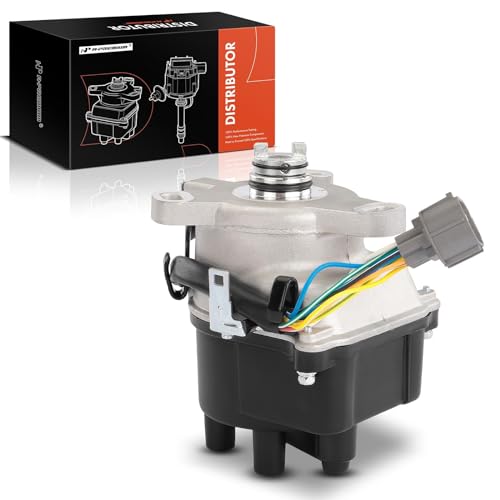
A-Premium
A-Premium Ignition Distributor with Cap and Rotor,…
- [Vehicle Fitment]: Compatible with CR-V distributor; Compatible with Honda CR-V 1997-1998 L4 2.0L
- [Reference Number]: A-Premium distributor fit for 31-17421, 84-17421, 690-129, 30100-P3F-A02, TD-97U, 3117421, 8417421, 690129, 30…
- [Specifications]: ①Cylinders: 4; ②Distributor Type: Pick Up Coil; ③With Distributor Cap; ④With Electronic Module; ⑤With Ignition R…
If you’re replacing the whole unit, a direct-fit option like the A-Premium Ignition Distributor for the 1997-1998 Honda CR-V 2.0L includes the cap, rotor, and electronic module pre-assembled. That saves you the hassle of swapping parts over from your old unit.
Understanding the Honda Distributor System
Honda distributors are not just mechanical switches. They house the ignition coil, the igniter (ICM), and the crank/cam position sensors all in one unit. That density is why a single failed component stops the whole car.
Core Components and Their Electrical Roles
- Ignition Coil: Steps up battery voltage (12V) to around 20,000-40,000V to fire the spark plugs. It has primary (low voltage) and secondary (high voltage) windings.
- Igniter (ICM): The electronic switch that grounds the coil’s primary circuit to collapse the magnetic field and induce high voltage. It receives the trigger signal from the ECU.
- Crankshaft Position Sensor (CKP): Located inside the distributor. It generates an AC voltage signal (typically 0.5V to 5V peak) that the ECU uses to determine engine speed and position.
- Camshaft Position Sensor (CMP): Also inside. It tells the ECU which cylinder is on the compression stroke for sequential fuel injection.
- Distributor Rotor and Cap: Mechanical distribution of the high-voltage spark to the correct spark plug wire in the firing order (usually 1-3-4-2 on most Honda 4-cylinders).
Comprehensive Wiring Diagram by Generation
You cannot use an OBD1 diagram on an OBD2 car. The connectors and the signals are different. Here’s the breakdown.
OBD0 (1988-1991)
These are the simplest. Most have a 4-wire connector. You have a power wire (usually Black/Yellow), a ground (Black), and two sensor wires (White/Blue for CKP, and White/Green for TDC). The igniter is separate, often mounted on the distributor housing or the fender. The ECU does not control ignition timing directly in all models; some rely on the mechanical vacuum advance and centrifugal advance built into the distributor base.
OBD1 (1992-1995)
This is the most common swap platform. The distributor has a 7-pin connector. The pins are:
- Ignition Coil Primary (+) – Black/Yellow
- Ignition Coil Primary (-) – White/Blue
- Cylinder (CYP) Sensor – White
- Top Dead Center (TDC) Sensor – White/Green
- Crank Position (CKP) Sensor – Blue/Green
- Igniter Output – Yellow/Green
- Ground – Black
Note that OBD1 uses a 4-wire sensor setup (CKP, TDC, CYP) plus the coil and igniter wires. The ECU fully controls ignition timing here, so the vacuum advance is gone.
OBD2 (1996-2026)
Similar to OBD1 but with a different connector shape. The 1996-1998 CR-V and Civic use a 7-pin or 9-pin connector depending on the model. The wiring colors are usually identical to OBD1, but the connector plug is physically different. Do not try to force an OBD1 plug into an OBD2 harness.
| Generation | Years | Connector Pins | Sensor Type | Ignition Timing Control |
|---|---|---|---|---|
| OBD0 | 1988-1991 | 4-wire | CKP, TDC | Mechanical (vacuum/centrifugal) |
| OBD1 | 1992-1995 | 7-pin | CKP, TDC, CYP | ECU-controlled |
| OBD2 | 1996-2026 | 7-pin or 9-pin | CKP, TDC, CYP | ECU-controlled |
Decoding the Distributor Connector Pinout
Get the wiring harness connector that plugs into the distributor. You need to know which wire does what. Here are the standard Honda wire color codes for OBD1 and OBD2.
Wire Color Codes and Signal Functions
- Black/Yellow: Switched 12V power for the ignition coil and igniter. This wire only has power when the key is in the ON or START position.
- Black: Ground for the igniter and internal sensors.
- White/Blue: Coil negative terminal. This connects to the igniter. The voltage on this wire should pulse when the engine is cranking.
- Blue/Green: CKP sensor signal to the ECU.
- White/Green: TDC sensor signal.
- White: CYP (cylinder) sensor signal.
- Yellow/Green: Igniter output signal from the ECU to the igniter (the trigger).
The ground wire is critical. If the ground is poor, the sensors won’t have a reference voltage, and the ECU will not see a clean signal. Check the ground first when you have an intermittent no-start.
How to Test Your Distributor Wiring (Multimeter Guide)
You don’t need a lab scope. A basic multimeter will find most wiring problems. Here is the step-by-step process.
- Check for Power: Turn the ignition to ON. Probe the Black/Yellow wire at the distributor connector with the multimeter set to DC Volts. You should see battery voltage (12.5V). If you get 0V, check the main relay and the ignition switch wiring.
- Check the Ground: Set the multimeter to Ohms. Connect one lead to the Black wire and the other to the battery negative terminal. The reading should be less than 1 Ohm. Anything higher means a bad ground connection.
- Test the CKP Sensor: Unplug the distributor connector. Set the multimeter to AC Volts. Connect the leads to the Blue/Green and Black wires. Crank the engine. You should see a fluctuating AC voltage reading (usually between 0.5V and 2.0V). No voltage means the sensor is dead or the wiring is broken.
- Test the Coil Primary: Measure the resistance between the Black/Yellow and White/Blue terminals. On most Honda coils, you should see between 0.5 and 2.0 Ohms. If you see infinite resistance, the coil primary winding is open.
- Test the Igniter Signal: This is harder without a scope. You can check for a pulsed 12V on the Yellow/Green wire while cranking. If you have power and ground, and the sensors are working, but no pulse on this wire, the igniter module is likely bad.
This test procedure works for most Honda distributor diagrams from the 90s. Write your readings down. Compare them to the service manual spec for your exact model.

Common Wiring Failures and Repair Solutions
The wires don’t break in the middle of the harness. They break at stress points.
The most common failure point is inside the rubber grommet where the wires exit the distributor housing. The engine vibration constantly flexes the wires there. Over time, the copper strands fatigue and snap. The wire looks fine from the outside, but the conductor is broken inside the insulation.
Another common spot is the connector clip. When you unplug the distributor, the retaining clip can crack or the terminals can push out of the plastic housing. Corrosion on the terminals is also a killer, especially on OBD1 cars that sit for long periods.
The fix is straightforward. Cut out the damaged section of wire, solder in a new piece of the same gauge (usually 18 AWG), and use heat-shrink tubing to seal it. Do not use crimp connectors for this repair. They will corrode and fail again. If the terminals in the connector are corroded, replace the connector housing with a pigtail from a junkyard harness.
Aftermarket Distributors and Wiring Compatibility
Most aftermarket distributors, like the A-Premium unit mentioned earlier, are designed to be direct OEM replacements. They use the exact same connector and wiring pinout as the factory unit. You remove the old one and plug the new one in. No adapter harness is needed.
Performance distributors, like MSD units, are different. They often use a 3-wire hookup that bypasses the factory ECU trigger. This is for race cars that use a standalone ignition box. If you have a street car with a stock ECU, stick with a direct-fit replacement. The stock ECU needs the factory sensor signals to run the fuel injection. An MSD unit won’t provide those signals.
When you buy a remanufactured or aftermarket distributor, always check the connector shape. The A-Premium unit for the 1997-1998 CR-V is specifically built for that 9-blade pickup coil setup. It won’t fit a 1995 Civic. The reference numbers (30100-P3F-A02, TD-97U) confirm the exact application.
Step-by-Step Installation and Torque Specifications
Installation is a straightforward job, but the torque specs matter. Over-tightening the distributor bolt can crack the housing.
- Disconnect the battery. You don’t want any power going to the coil while you work.
- Remove the distributor cap. Mark the position of the rotor relative to the distributor housing with a paint pen.
- Unplug the wiring harness connector. The clip is usually a simple metal or plastic tab.
- Remove the two 10mm bolts holding the distributor to the cylinder head.
- Pull the distributor straight out. Note the orientation of the O-ring on the shaft.
- Transfer the O-ring to the new unit. Apply a thin coat of engine oil to it.
- Install the new distributor. Align the rotor with your paint mark. If the engine hasn’t been turned, this should be close to perfect.
- Torque the mounting bolts to 17 ft-lbs (23 Nm). Do not guess this. Use a torque wrench.
- Reconnect the wiring harness. Make sure the clip clicks into place.
- Reinstall the cap and plug wires. Follow the firing order on the cap (usually 1-3-4-2, counterclockwise).
After installation, the engine should start immediately. If it runs rough or backfires, the distributor is off by one tooth. Loosen the bolts, rotate the housing slightly, and retighten.
Frequently Asked Questions (FAQs)
What does the 9-blade pickup coil mean on the A-Premium distributor?
The 9-blade pickup coil refers to the number of teeth on the trigger wheel inside the distributor. The CKP sensor reads these teeth to determine crankshaft position. This is specific to certain Honda 2.0L engines from the late 90s. It is not a universal part.
Can I use an OBD1 distributor on an OBD2 car?
No. The connectors are physically different, and the OBD2 ECU expects different signal characteristics. You would need to rewire the entire harness and likely swap the ECU. It is not a plug-and-play modification.
Why is my ignition timing off after replacing the distributor?
You probably installed it one tooth off on the drive gear. The rotor needs to point at the #1 terminal on the cap when the #1 cylinder is at top dead center. If it’s off, the engine will run poorly. You can adjust it by loosening the bolts and rotating the housing slightly to fine-tune the base timing.
How do I know if my igniter or my coil is bad?
Test the coil primary resistance first. If it reads infinite Ohms, the coil is dead. If the coil tests fine, check for a pulsed signal on the Yellow/Green wire while cranking. If there is no pulse, the igniter is not switching. If there is a pulse but no spark, the igniter is likely failing under load.
Is it worth repairing a cracked distributor cap?
No. A cracked cap will let moisture in and cause misfires. The carbon tracking on the inside provides a path for the spark to jump to the wrong cylinder. Replace it. It is a cheap part compared to the diagnostic headache it causes.
Things to Remember Before You Start
- Match the distributor to your exact engine code and OBD generation. A 1995 part will not fit a 1998 car.
- Always disconnect the battery before touching any distributor wiring. The coil can hold a dangerous charge.
- Check the ground wire first. A bad ground causes more no-starts than a dead sensor.
- Use a multimeter to test the CKP sensor output while cranking. You want a fluctuating AC voltage.
- Torque the distributor bolts to 17 ft-lbs. Overtightening cracks the housing.
- If the engine starts but runs rough, rotate the distributor housing slightly to adjust the base timing.
- For a direct replacement on the 1997-1998 CR-V 2.0L, a pre-assembled unit like the A-Premium ignition distributor saves time. Check the current price on Amazon before ordering.
If you’re dealing with a no-start condition and suspect the ignition system, a Honda Accord no-start guide can help you rule out other causes. And if you’re planning to do your own wiring repairs, understanding the ignition switch wiring diagram for other vehicles can give you a broader perspective on how ignition power flows.
Products related to this article
Sponsored / affiliate links. As an Amazon Associate I earn from qualifying purchases. I may earn additional commission from eligible campaigns.