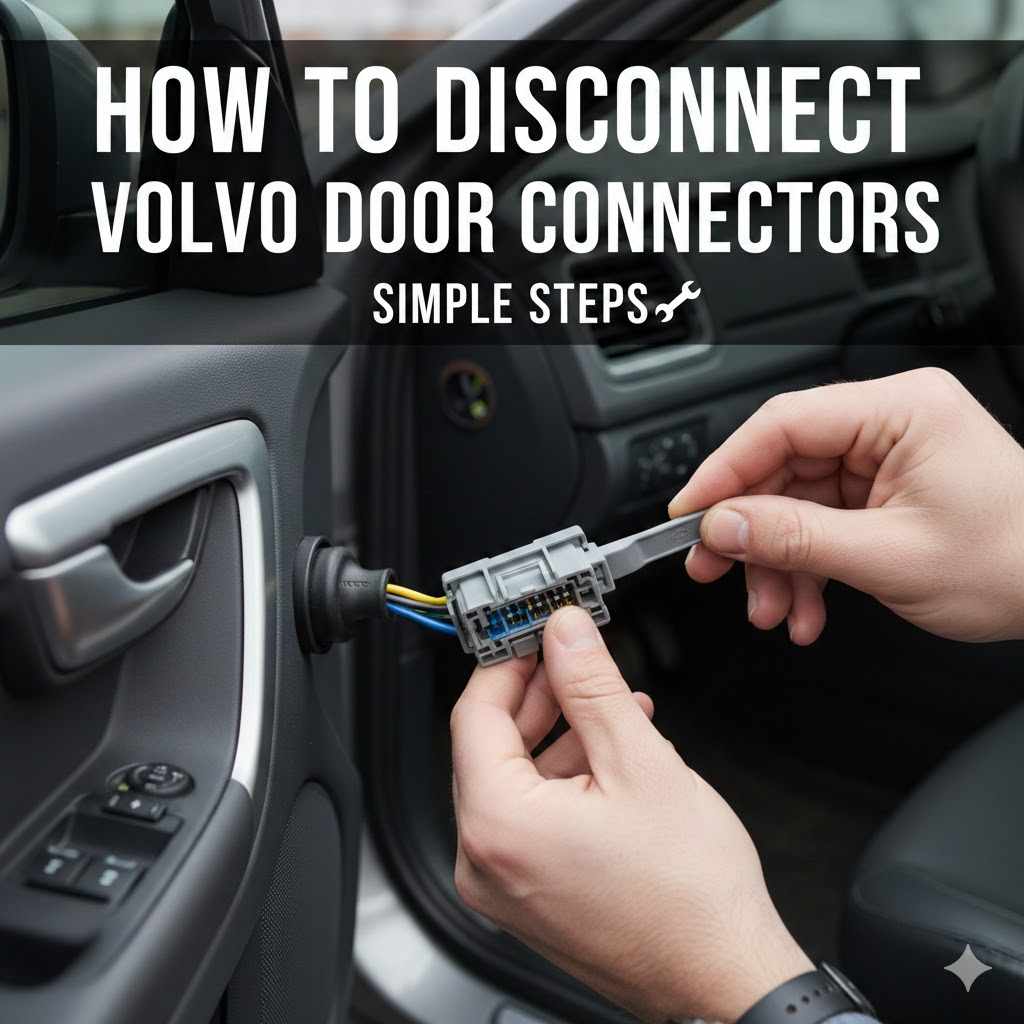
How to Disconnect Volvo Door Connectors Simple Steps
Sometimes you need to work on your car doors, like when fixing a speaker or a window. Disconnecting the door connectors might seem tricky at first. Many people find them a bit hard to get apart without knowing the trick.
But it’s usually a straightforward job with the right steps. This guide will show you exactly how to disconnect Volvo door connectors easily.
Understanding Volvo Door Connector Basics
Volvo door connectors are the electrical hubs that link your car’s main wiring system to the various components within the door panel. These include things like power windows, door locks, speakers, and sometimes even side mirrors. They are designed to be secure to prevent accidental disconnections, which is good for reliability but can make them seem challenging to separate.
Knowing how they are put together is the first step to a smooth disconnection process.
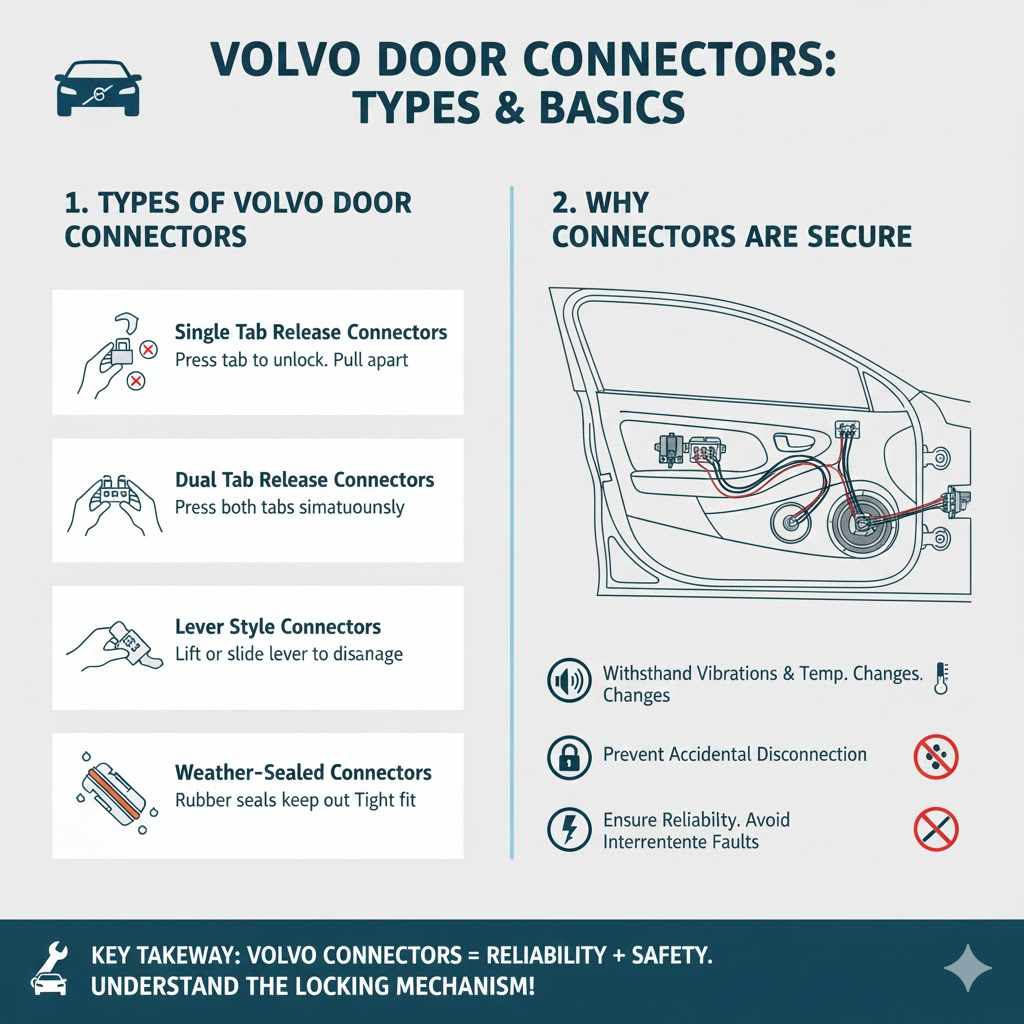
Types of Volvo Door Connectors
Volvo uses a few common types of electrical connectors in their doors. Most are multi-pin connectors, meaning they have many wires bundled together. These often have a locking mechanism to keep them firmly in place.
Some might have a single release tab, while others might require a specific sequence or a small tool to unlatch. Understanding the specific connector you are dealing with is key. It’s important to look closely at the connector before you try to pull it apart.
Many have small plastic tabs or levers that need to be pressed or lifted.
-
Single Tab Release Connectors
These are among the simplest. You’ll find a small tab, usually on the top or side of the connector. Pressing this tab down or squeezing it usually releases the locking mechanism. Once the tab is engaged, you should be able to pull the two halves of the connector apart smoothly. If it feels stuck, double-check that the tab is fully depressed. -
Dual Tab Release Connectors
Some connectors have two release tabs, one on each side. You may need to press both tabs simultaneously or in a specific order. Sometimes, you press one, then the other. Carefully examine the connector for these tabs. These are designed for added security, ensuring the connection stays put. -
Lever or Clip Style Connectors
These connectors might have a small lever or clip that needs to be lifted or slid. This action disengages the pins from their sockets. Pay close attention to any part of the connector that looks like it can move or pivot. Often, this lever is a part of the main connector housing.
Why Connectors Are Secure
Car manufacturers like Volvo make their electrical connectors secure for good reason. They need to withstand vibrations from driving, temperature changes, and moisture. A loose connection could lead to malfunctioning power windows, faulty speaker sound, or unreliable door locks.
This security feature means they don’t just pull apart easily, which can be frustrating if you’re not sure how they work. The design prevents intermittent electrical faults that could be hard to diagnose.
Steps on How to Disconnect Volvo Door Connectors
Successfully disconnecting these connectors involves a careful approach. Rushing or using excessive force can damage the plastic housing or the delicate pins inside. The key is to identify the locking mechanism and operate it correctly.
This section will walk you through the typical process, making it easy to follow.
Preparation is Key
Before you start, gather a few basic tools. You might need a small flathead screwdriver or a plastic trim tool. These are useful for gently prying or holding tabs.
Ensure you have good lighting so you can clearly see the connector. Also, it’s a good idea to disconnect your car’s battery if you are working on any electrical components to prevent short circuits. This is especially important if you’re unsure about the specific circuit you’re interacting with.
Identifying the Lock Mechanism
Take a good look at the connector itself. Most Volvo door connectors have a colored plastic tab or a small lever that acts as the lock. This is usually located on the side or top of the connector body.
It might be a single piece of plastic that you need to press, or it could be a small lever that flips up.
For example, on many Volvo models, you’ll see a small tab that is part of the connector’s housing. This tab clicks into place when the connector is fully seated. To release it, you need to push down on this tab or sometimes squeeze it inwards.
The goal is to disengage the locking tab from its slot.
The Disconnection Process
Once you’ve located the lock, apply gentle pressure. If it’s a tab you need to press, use your finger or the tip of a small flathead screwdriver to push it down. If it’s a lever, try to gently lift it.
As you apply pressure to the lock, gently try to pull the two halves of the connector apart. They should separate with moderate effort. If it’s still stuck, don’t force it.
Re-examine the connector for any other hidden tabs or clips.
Sometimes, a little wiggling can help. Gently rock the connector back and forth while applying pressure to the release tab. This can help overcome any slight binding that might be occurring.
Always pull on the plastic housing of the connector itself, never on the wires.
Troubleshooting Stubborn Connectors
If a connector is particularly stubborn, it might be due to dirt, corrosion, or simply being tightly fitted. A small amount of electrical contact cleaner can sometimes help. Spray it into the seam where the two connector halves meet and let it sit for a minute.
Then, try releasing the tab again. Avoid using excessive force, as this can break the plastic. If you’re truly struggling, it might be worth consulting a Volvo repair manual for your specific model or seeking help from a professional.
Disconnecting Specific Volvo Door Components
While the general principles of disconnecting electrical connectors apply across most Volvo models, different components within the door might have slightly different connector styles or locations. This section will explore some common ones.
Speaker Connector Removal
Door speaker connectors are usually straightforward. They are often smaller, rectangular connectors with two or three pins. The positive and negative wires for the speaker connect to these terminals.
The locking mechanism is typically a small tab on the top or side of the connector. Press this tab and gently pull the connector free from the speaker terminals. Make sure you’re pulling on the plastic connector body, not the wires.
A common scenario for speaker replacement is when a speaker blows out or starts to distort. The old speaker needs to be removed from the door panel, and its wiring disconnected. Once the new speaker is in place, the connector simply pushes back on until it clicks.
Window Regulator and Motor Connectors
The power window motor and regulator assembly also have electrical connections. These connectors are typically larger, often with four or more pins. They are vital for raising and lowering the windows.
The locking mechanism is usually integrated into the main housing, similar to other connectors. You’ll need to locate the release tab or lever and press it while gently pulling the connector away from the motor or control module.
One real-life example involved a Volvo S60 where the driver’s side window stopped working. After removing the door panel, it was found that the connector to the window motor was loose. A simple re-seating of the connector fixed the issue.
If the motor itself needed replacement, this connector would be the first thing to disconnect.
Door Handle and Lock Actuator Connectors
Internal door handles and electronic lock actuators also have their own wiring harnesses. These connectors can vary in size and shape depending on the specific component and Volvo model. The locking tabs are generally similar to other connectors, requiring a press or lift.
The location might be a bit more tucked away, so good lighting and a bit of patience are essential for accessing and disconnecting them.
For instance, if a Volvo V70’s door lock actuator fails, the connector needs to be unplugged before the actuator can be removed. This often involves reaching into the door cavity with a flashlight to pinpoint the connector and its release mechanism. The connector might be attached to the actuator itself or to a bracket nearby.
Tools and Techniques for Safe Disconnection
Using the right tools and techniques ensures that you don’t damage your Volvo’s electrical system. Force is rarely the answer when dealing with automotive electrical connectors. Precision and a gentle touch are much more effective.
Essential Tools
Here are some tools that will make the job easier and safer:
-
Plastic Trim Removal Tools
These are invaluable for safely prying off door panels and other interior trim pieces without scratching or damaging the plastic. They come in various shapes and sizes, allowing you to get into tight spaces. -
Small Flathead Screwdrivers (Insulated Handle Recommended)
A small, thin flathead screwdriver is perfect for carefully pushing down on release tabs or gently levering connectors apart if they are stuck. An insulated handle is a good safety measure when working with electrical systems. -
Needle-Nose Pliers
These can be helpful for gripping slightly larger tabs or for holding a connector steady while you operate the release mechanism. Use them gently to avoid crushing plastic parts. -
Flashlight or Headlamp
Good visibility is crucial. You need to see the connector and its locking tabs clearly to operate them correctly. A headlamp keeps your hands free.
Techniques to Avoid Damage
When you are disconnecting Volvo door connectors, remember these key techniques:
-
Never Pull on Wires
Always grip the plastic housing of the connector when trying to pull it apart. Pulling on the wires can detach them from their terminals inside the connector, creating a much more difficult repair. -
Understand the Locking Mechanism First
Before applying any force, take time to identify how the connector locks. Look for tabs, levers, or clips. Try to gently press or move these mechanisms. -
Use Gentle, Consistent Pressure
Once you’ve identified the lock, apply steady, gentle pressure to release it. If it doesn’t budge, re-check for other locking points or obstructions. Don’t yank or force it. -
Lubrication Sparingly
If a connector is very stiff, a tiny amount of electrical contact cleaner sprayed into the seam where the two halves meet can help. Allow it to penetrate before trying to disconnect. Avoid using WD-40 or other oil-based lubricants as they can degrade plastic over time.
When to Seek Professional Help
While most Volvo door connector disconnections are manageable for a DIYer, there are times when professional help is advisable. If a connector is severely damaged, corroded, or if you’re dealing with complex electronics like those in newer models, it might be best to let a Volvo technician handle it. They have specialized tools and knowledge to prevent further damage.
For instance, if a connector is part of a critical safety system like an airbag sensor, it’s always safer to consult a professional.
Maintaining and Reconnecting Volvo Door Connectors
After you’ve successfully disconnected the connectors, it’s important to know how to reconnect them properly. Reconnecting them is just as critical as disconnecting them for ensuring everything works as it should.
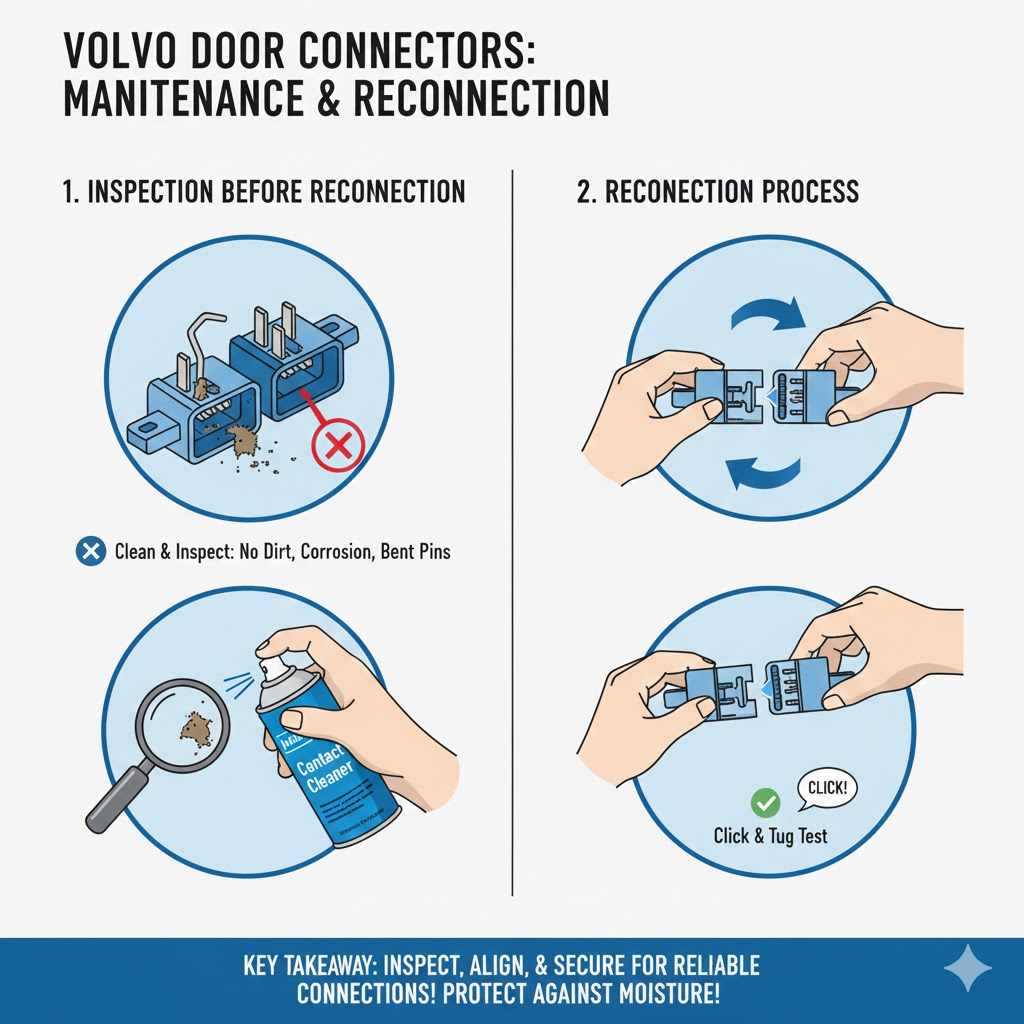
Inspection Before Reconnection
Before you push the connectors back together, take a moment to inspect them. Look at the pins and sockets. Ensure there is no dirt, debris, or corrosion.
If you see any damage, address it before reconnecting. Bent pins or damaged sockets will prevent a good electrical connection. A quick clean with electrical contact cleaner can often resolve minor issues.
The pins should be straight and free from any signs of oxidation. The plastic housing of both connector halves should be intact, with no cracks or missing pieces. This inspection ensures a reliable connection when you reassemble.
The Reconnection Process
Reconnecting is usually the reverse of disconnecting. Align the two halves of the connector carefully. They should only fit together in one orientation.
Gently push them together until you feel and hear a click. This click indicates that the locking mechanism has engaged, securing the connection.
Once they are pushed together, give them a gentle tug to ensure they are securely locked. If they pull apart easily, the lock has not engaged properly. You will need to separate them and push them together again until the lock engages fully.
This is a crucial step to ensure reliable electrical function.
Protecting Connectors for Longevity
To ensure the longevity of your Volvo’s electrical connections, proper maintenance is key. When working on your doors, always try to keep the area clean. Avoid spilling liquids near electrical components.
If you are replacing a part, ensure that the new connector is a high-quality replacement and is fully seated.
The average lifespan of electrical connectors in automotive applications is often tied to the vehicle’s lifespan, provided they are protected from extreme conditions. However, exposure to moisture, salt (in winter climates), and physical stress can shorten their effective life. Keeping them clean and dry is the best preventive measure.
Frequently Asked Questions
Question: How do I know which tab to press on a Volvo door connector?
Answer: Look for the part of the connector that seems to be designed to disengage. It’s usually a small raised tab or a section that looks like it can be squeezed or lifted. Sometimes, one side of the connector has a slightly different texture or shape indicating the release point.
Question: Can I use pliers to disconnect a Volvo door connector?
Answer: It’s best to avoid using pliers unless absolutely necessary and then only with extreme gentleness. Pliers can easily crush or damage the plastic housing of the connector. Your fingers or a plastic trim tool are usually the safest options.
Question: What happens if I break a tab on a Volvo door connector?
Answer: If you break a tab, the connector might not lock securely anymore. You can often secure it with a zip tie or electrical tape temporarily. For a permanent fix, you might need to replace the connector housing, which can be a more involved process.
Question: How many pins are usually on a Volvo door connector?
Answer: The number of pins varies greatly depending on the component. A simple speaker connector might have two or three pins, while a more complex module connector could have twenty or more pins. They are designed to carry all the necessary signals for that component.
Question: Is it safe to disconnect Volvo door connectors with the battery connected?
Answer: It is generally safer to disconnect the car’s battery before working on any electrical components. This prevents accidental short circuits that could damage sensitive electronics or blow fuses. For simple connector disconnections where you are not touching multiple wires, it might be okay, but disconnecting the battery is always the safest practice.
Wrap Up
Disconnecting Volvo door connectors is a manageable task. By carefully identifying the locking tabs and using gentle pressure, you can easily separate them. Always inspect connectors before reconnecting and ensure they click securely into place.
With these simple steps, you can confidently tackle door-related repairs on your Volvo.