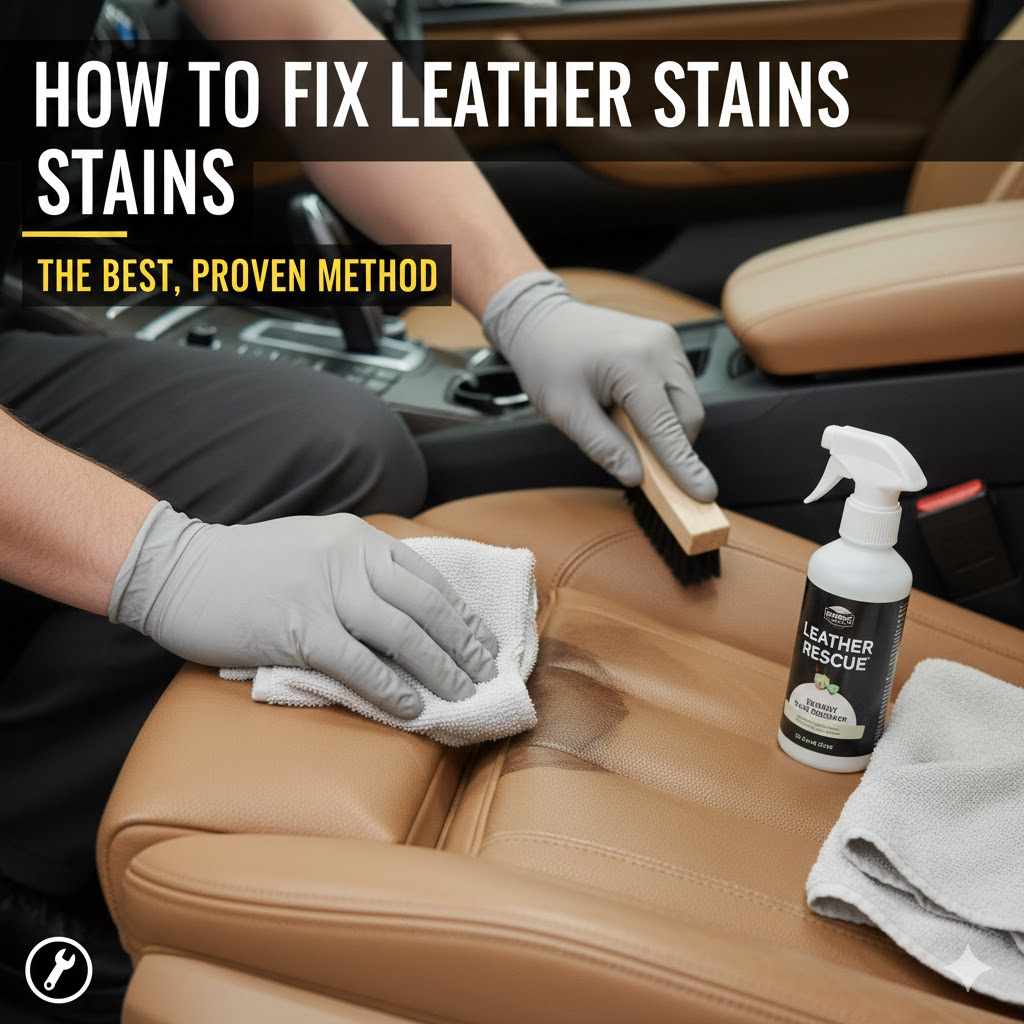
How to Fix Leather Stains: The Best, Proven Method
To remove rainwater stains from a leather car door interior, gently blot the area with a dry microfiber cloth. Then, use a slightly damp cloth to blend the stain by wiping the entire leather panel from seam to seam. Allow the area to air dry naturally. Once dry, apply a quality leather conditioner to restore moisture and shine.
Seeing a dark spot on your car’s beautiful leather interior is frustrating. Whether it’s from a spilled coffee, a leaky pen, or raindrops on the door panel, a stain can make your whole car feel less clean. You might worry that the damage is permanent, but I have good news for you.
Fixing leather stains is easier than you think! You don’t need expensive tools or professional help for most common spots. I’m Md Meraj, and I’m here to walk you through a simple, safe, and proven method to get your leather looking great again. We’ll cover everything step-by-step, so you can feel confident tackling this yourself. Let’s get started.
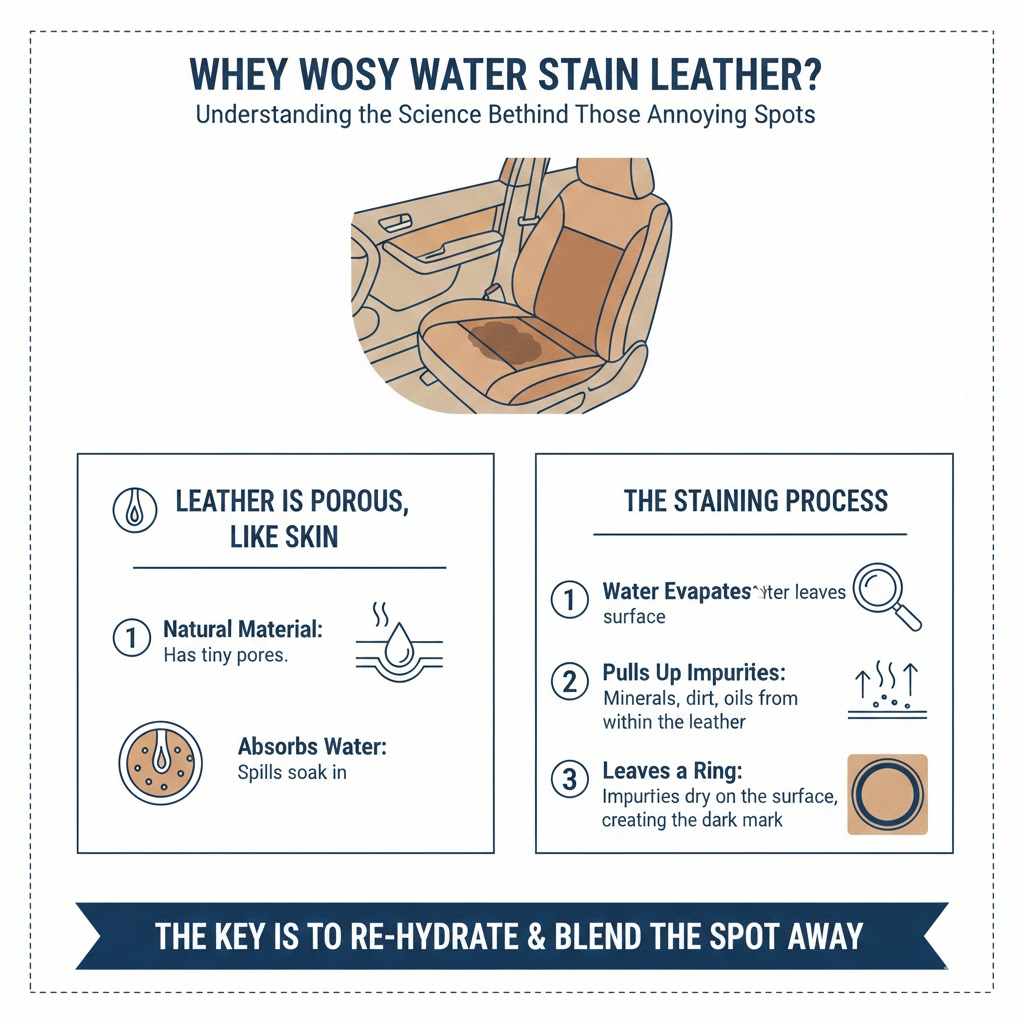
Why Does Water Stain Leather in the First Place?
It seems strange that plain water can stain something as tough as leather. But leather is a natural material, and it’s porous, a lot like your own skin. When water, especially rainwater or tap water, sits on the surface, it gets absorbed into the pores.
As the water evaporates, it can pull up minerals, dirt, and oils that were already in the leather. These get left behind on the surface when the water is gone, creating a dark ring or spot. This is why just wiping the spot away doesn’t work. The key is to treat the whole area to blend the spot away, not just the stain itself.
Understanding this helps you see why our method works so well. We aren’t scrubbing the stain out; we are gently re-hydrating the area and letting it dry evenly to make the mineral deposits disappear.
Before You Begin: The Golden Rule of Leather Care
Before you apply anything to a visible part of your leather, you must do a spot test. This is the most important step and can save you from a costly mistake.
Find a small, hidden area of the leather to test your cleaning solution. Good spots include:
- Under the seat
- On the side of the seat cushion next to the center console
- A small patch on the very bottom of the door panel
Apply a tiny amount of your cleaner to the hidden spot with a cloth, let it sit for a minute, and wipe it off. Let it dry completely. If you see any discoloration, darkening, or damage, do not use that product on the visible stain. This simple test ensures your cleaner is safe for your specific type of leather.
Gather Your Simple Supplies
You don’t need a professional detailer’s kit for this job. You likely have most of these items at home already. Here’s your checklist:
- Three Soft Microfiber Cloths: These are gentle and won’t scratch your leather. One for cleaning, one for drying/dampening, and one for conditioning.
- A Quality pH-Neutral Leather Cleaner: Avoid all-purpose cleaners or harsh soaps. A cleaner made specifically for automotive leather is always your best bet.
- A High-Quality Leather Conditioner: This is crucial for restoring moisture and protecting the leather after cleaning.
- A Small Bowl of Distilled Water: Distilled water is free of the minerals found in tap water that can cause stains.
The Step-by-Step Guide to Removing Water Stains from Your Leather Door
Ready to get that stain out? Just follow these simple steps. Take your time, be gentle, and your leather will thank you. This method is designed specifically for finished leather, which is found in over 95% of modern cars.
Step 1: Assess and Blot the Stain
First, take a look at the stain. Is it fresh or old? If it’s a fresh water spot and still damp, gently blot it with a dry, clean microfiber cloth. Don’t rub or scrub! Just press down firmly to absorb as much moisture as possible.
Step 2: Prepare Your Cleaning Solution
If you’re using a dedicated leather cleaner, spray a small amount onto a clean microfiber cloth, not directly onto the leather. This prevents oversaturation and gives you more control. If you don’t have a leather cleaner, you can make a very mild solution by mixing a few drops of a pH-neutral soap (like a gentle baby soap) into a bowl of distilled water. Again, apply it to the cloth first.
Step 3: Clean the Stained Area Gently
Using your cloth with the cleaner on it, gently wipe the stained area. Start from the center of the stain and work your way outward in a circular motion. Use very light pressure. The goal is to lift the stain, not to scrub the leather’s finish off.
Step 4: The Blending Trick (The Most Important Step!)
This is the secret to a perfect finish. Take your third microfiber cloth and get it slightly damp with only distilled water. It should not be dripping wet. Now, lightly wipe the entire leather panel where the stain was, from one seam to the next. For a door panel, this means wiping the whole section of leather evenly.
By dampening the entire surface, you ensure that the leather dries uniformly, preventing a new water ring from forming where the old one was. This blending technique is what professionals use to get flawless results.
Step 5: Let It Air Dry Naturally
Patience is key here. Let the leather air dry completely. Do not use a hairdryer, heat gun, or park the car in direct, hot sunlight to speed up the process. Heat can shrink, crack, and permanently damage the leather. Keep the car door open in a shaded, well-ventilated area like a garage for the best results. This can take an hour or two.
Step 6: Condition the Leather
Once the leather is 100% dry, it’s time to condition it. Cleaning can strip away some of the natural oils that keep leather soft and supple. Apply a small, pea-sized amount of leather conditioner to a clean microfiber cloth. Gently massage it into the entire leather panel you just cleaned, using a circular motion. This will restore moisture, protect against future stains, and give the leather a rich, beautiful finish.
Step 7: Buff to a Finish
Let the conditioner sit for about 15-20 minutes to allow it to be fully absorbed. Then, take a clean, dry part of your cloth and gently buff the entire surface. This removes any excess conditioner and leaves a nice, non-greasy sheen.
What NOT to Do When Cleaning Leather
Sometimes, knowing what to avoid is just as important as knowing what to do. Here are some common mistakes that can ruin your car’s leather interior:
- Don’t Use Harsh Chemicals: Never use bleach, ammonia, rubbing alcohol, window cleaner, or all-purpose household cleaners on leather. They are too abrasive and can strip the color and dry out the material, leading to cracks.
- Don’t Scrub with Abrasive Tools: Avoid using bristle brushes, scouring pads, or magic erasers. These are too aggressive and will scratch and wear away the protective topcoat on the leather.
- Don’t Saturate the Leather: Using too much water or cleaner can be worse than the original stain. It can soak through the leather and damage the foam padding underneath, potentially leading to mold or mildew. Always apply cleaners to your cloth first.
- Don’t Use Heat to Dry: As mentioned before, never use a hairdryer or direct sunlight to dry wet leather. This is one of the fastest ways to cause permanent shrinking and cracking.
How to Handle Other Common Leather Stains
While our focus was on water stains, your car’s leather is a target for other spills. Here’s a quick guide on how to tackle other common stains. Remember to always spot test first!
| Stain Type | Recommended Action | Important Tip |
|---|---|---|
| Grease or Oil | Blot up any excess oil immediately. Sprinkle cornstarch or baking soda on the stain, let it sit for a few hours to absorb the oil, then gently brush it off. Clean with a leather cleaner. | Do not use water initially, as it can spread the oil. The powder is key to absorbing it first. |
| Ink (Ballpoint Pen) | For fresh ink, you can sometimes use a cotton swab lightly dipped in isopropyl alcohol. Dab very gently directly on the ink line. Do not rub. Follow immediately with leather cleaner and conditioner. | This is a risky method. If you are not comfortable, it’s best to call a professional. Test in a hidden spot first, as alcohol can remove color. |
| Coffee or Soda | Blot the spill immediately with a dry cloth. Then, use a cloth dampened with leather cleaner or a mild soap and water solution. Wipe gently. | Address sugar-based spills quickly, as they can become sticky and attract more dirt over time. |
| Mud or Dirt | Let the mud dry completely. Once dry, gently brush or vacuum off the loose dirt. Then, clean the remaining spot with a leather cleaner on a microfiber cloth. | Wiping wet mud will smear it deeper into the leather grain. Letting it dry makes removal much easier. |
Choosing the Right Leather Cleaner and Conditioner
Walking down the car care aisle can be overwhelming. There are dozens of products all promising to be the best. But choosing the right one is simple if you know what to look for. As experts from Utah State University explain, leather is a natural hide, and it requires care that preserves its oils, not strips them.
Look for products that are pH-neutral or pH-balanced. This means they are gentle and won’t harm the leather’s natural chemistry. You generally have two types of products to choose from:
| Product Type | Description | Pros | Cons |
|---|---|---|---|
| All-in-One (Cleaner & Conditioner) | These products combine a light cleaning agent with conditioning oils in a single formula. |
|
|
| Two-Step (Separate Cleaner & Conditioner) | This involves using a dedicated leather cleaner first, followed by a separate leather conditioner. |
|
|
For removing an existing stain, a two-step process is always better. An all-in-one product is great for weekly or monthly wipe-downs to keep your leather in good shape, but for corrective work, you need the power of a dedicated cleaner and conditioner.
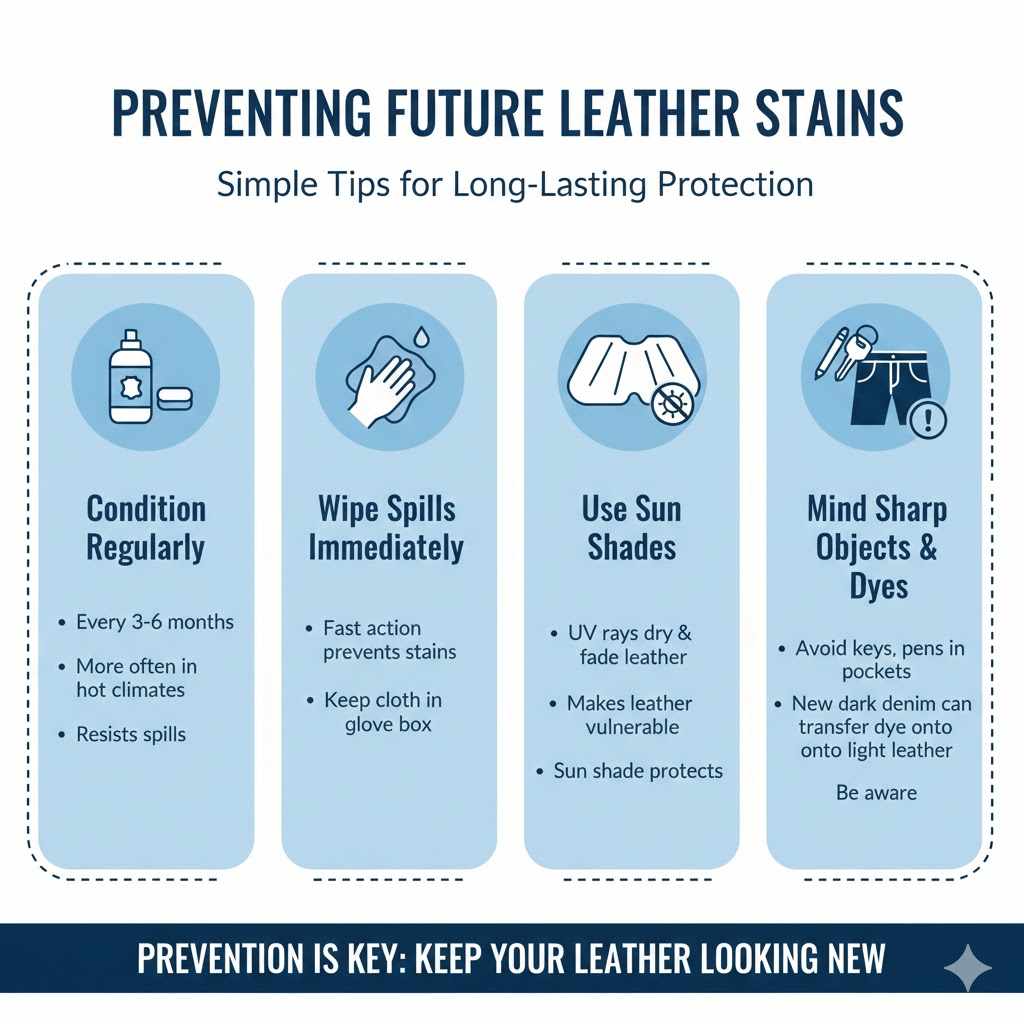
How to Prevent Future Leather Stains
The best way to fix a stain is to prevent it from happening in the first place. With a little regular care, you can keep your leather protected and looking new for years.
- Condition Your Leather Regularly: Aim to condition your car’s leather every 3 to 6 months, depending on your climate. In hot, sunny areas, you may need to do it more often. A well-conditioned leather surface is more resistant to absorbing spills.
- Wipe Up Spills Immediately: The faster you get to a spill, the less chance it has to soak in and become a stain. Keep a small microfiber cloth in your glove box for emergencies.
- Use Sun Shades: The sun’s UV rays can dry out leather, causing it to fade and crack. This makes it more vulnerable to staining. Using a windshield sun shade can make a huge difference.
- Be Mindful of Sharp Objects and Dyes: Be careful with keys, pens, and other sharp objects in your pockets. Also, be aware that the dye from new, dark denim jeans can sometimes transfer onto light-colored leather seats.
Frequently Asked Questions (FAQ)
1. Can I use household soap like dish soap on my car’s leather?
It’s best to avoid it. Most dish soaps are formulated to cut grease and can be too harsh for leather, stripping its natural oils. If you’re in a pinch, a very diluted solution of a gentle, pH-neutral soap (like baby soap) is a safer alternative, but a dedicated leather cleaner is always the best choice.
2. How often should I clean and condition my car’s leather?
For general maintenance, a light cleaning with a damp cloth or an all-in-one product every month is great. A deep clean and condition with a two-step process should be done every 3 to 6 months. If you live in a very hot and sunny climate, every 3 months is ideal.
3. Will rubbing alcohol remove stains from leather?
Rubbing alcohol can remove some stains like ink, but it is extremely risky. It’s a powerful solvent that can easily remove the leather’s color and finish along with the stain, leaving a permanent faded patch. It should only be used as a last resort and with extreme caution.
4. Why did my leather get darker after cleaning or conditioning?
A slight darkening is normal immediately after conditioning, as the leather absorbs the moisturizing oils. This usually lightens up as it dries. However, if the leather stays permanently darker, it might mean the product was too oily or the leather is a very absorbent type, like aniline leather (which is rare in cars).
5. Can I use a magic eraser on leather stains?
No, you should never use a magic eraser on leather. It is a micro-abrasive and works like very fine sandpaper. It will scrub off the leather’s protective topcoat and color, causing permanent damage that is very difficult to repair.
6. What’s the difference between finished and unfinished leather?
Almost all car leather is “finished,” meaning it has a protective pigment coating on top. This makes it durable and resistant to stains. Unfinished (or aniline) leather has no protective coating, is very soft, and stains extremely easily. The cleaning method in this article is for finished leather.
7. Is it better to use a cream or spray conditioner?
Both can be effective, but creams and lotions are often preferred. They give you more control over the application, prevent overspray onto other surfaces like glass, and tend to penetrate more deeply into the leather for better nourishment.
You Can Do This!
And there you have it! That stubborn water stain that seemed like a permanent problem is no match for a little bit of knowledge and the right technique. By following these simple steps—blotting, cleaning gently, blending the area, letting it air dry, and conditioning—you’ve done exactly what the professionals do to restore leather.
Taking care of your car’s interior isn’t just about looks; it’s about protecting your investment and enjoying every drive. Now you have the skills and confidence to handle not just water spots, but many other common leather stains. Keep those microfiber cloths and a good leather care kit handy, and your car’s interior will continue to look and feel luxurious for years to come. Happy driving!