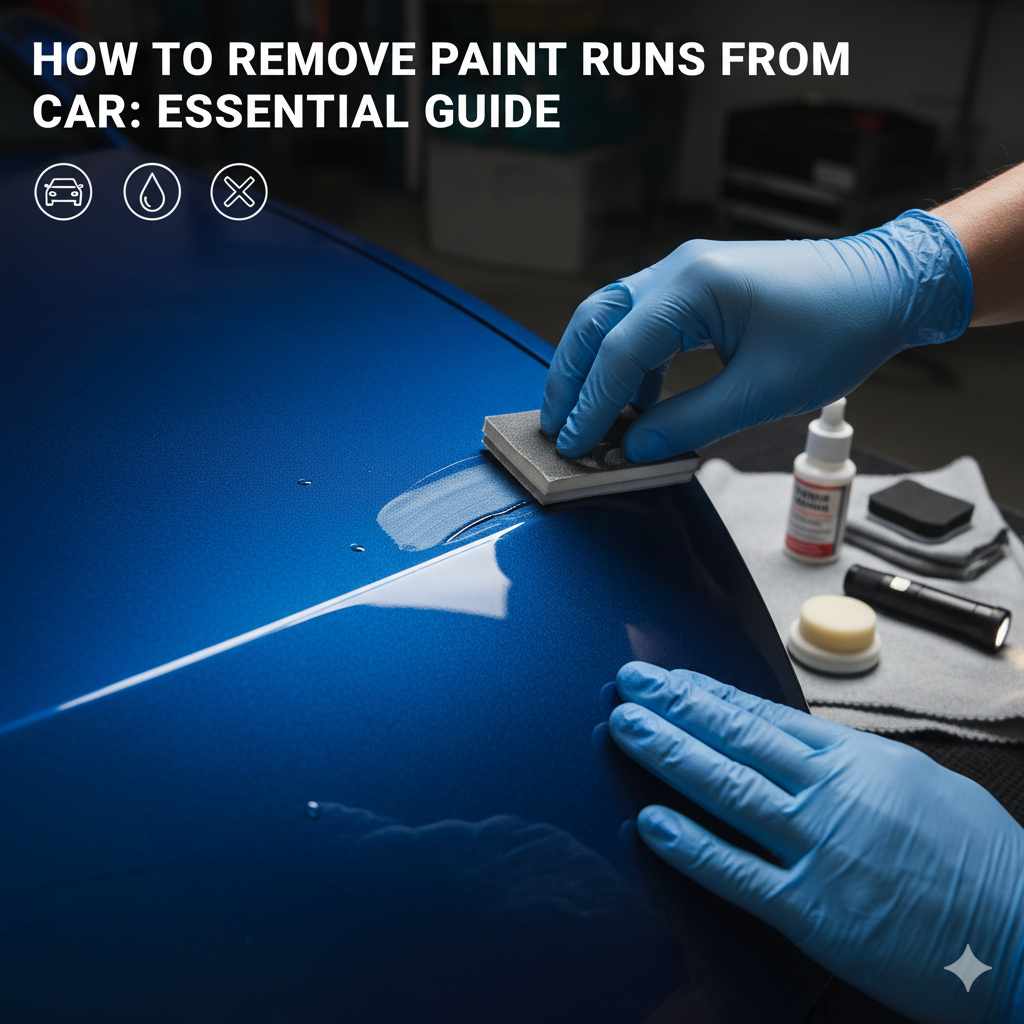
How to Remove Paint Runs From Car: Essential Guide
Don’t let paint runs ruin your car’s finish! Learn how to easily remove paint runs from your car with simple tools and a step-by-step guide. Get your car looking showroom-ready again, quickly and affordably.
It happens to the best of us – a little too much spray paint or a drip from an unexpected source can leave an unsightly run on your car’s otherwise perfect paint job. Seeing a long, thick line of paint marring your vehicle’s surface can be frustrating, especially if you’re proud of how it looks. But don’t worry! This is a fixable problem, and you don’t need to be a professional detailer to tackle it. We’ll walk you through exactly how to remove these paint runs safely and effectively, making your car shine like new again. Get ready to boost your DIY confidence!
Understanding Paint Runs and Why They Happen
Paint runs, also known as “drips” or “sags,” are imperfections that occur when liquid paint flows downwards before it has a chance to dry and set. This usually happens when too much paint is applied in one go, especially on vertical surfaces. Think of it like pouring syrup on a pancake – if you pour too much, it will spill over the edges. On a car, this can be from a spray can, an accidental brush stroke, or even from nearby painting projects where overspray settles and then drips.
Several factors increase the likelihood of paint runs:
- Too Much Paint: The most common cause. Applying paint too thickly or in too many coats without allowing drying time between them.
- Incorrect Spraying Technique: Holding the spray can too close to the surface, moving too slowly, or not having an even spray pattern.
- Environmental Factors: High humidity or lower temperatures can slow down paint drying time, making it more prone to running.
- Surface Preparation: A surface that isn’t properly cleaned or is too warm can also contribute.
The good news is that most accidental paint runs on your car are salvageable. With the right approach and a bit of patience, you can often restore your car’s surface to its original condition without professional help.

Essential Tools and Materials
Before you start tackling those paint runs, gathering the right tools is key. You’ll want to have everything ready so you can work efficiently and avoid making the problem worse. Most of these items are readily available at your local auto parts store or even a hardware store.
What You’ll Need:
- Fine-Grit Sandpaper: Look for sandpaper with grits between 1500 and 3000. Higher numbers mean finer grit, which is crucial for this task to avoid scratching the surrounding paint.
- Rubbing/Polishing Compound: This is an abrasive paste that helps to smooth out the surface and restore shine after sanding.
- Polishing/Buffing Pad or Microfiber Towels: For applying the compound and buffing.
- Clean Water and a Bucket: For rinsing and keeping your sandpaper wet (wet sanding).
- Masking Tape: High-quality automotive masking tape (like 3M) is best to protect the areas around the run.
- Razor Blade or Clay Bar (Optional): For initial removal of thicker runs. A new, clean razor blade held at a very low angle can carefully shave down a run. A clay bar kit is also excellent for removing contaminants and can help with minor runs.
- Gloves: To protect your hands.
- Safety Glasses: To protect your eyes.
- A Well-Lit Area: Good lighting is essential to see the runs clearly and make sure you’re working effectively.
Having these items on hand will make the process much smoother. Remember, patience is your best friend when working with car paint. Rushing can lead to more damage, so take your time and follow the steps carefully.
Step-by-Step Guide: How to Remove Paint Runs From Car
Here’s how to carefully remove those frustrating paint runs from your car’s finish. We’ll focus on a method that minimizes risk and maximizes results for beginners. The key is to work slowly and gently.
Step 1: Assess the Paint Run
First, take a close look at the run. How thick is it? How long is it? Is it fresh or old? Fresh runs might be easier to deal with. Older, hardened runs may require a bit more effort. Also, identify the type of paint if you can – is it from a spray can, touch-up paint, or something else? This will help determine the best approach.
Step 2: Prepare the Area
Clean the area around the paint run thoroughly with car wash soap and water. This removes any dirt or debris that could scratch your paint during the removal process. Once clean and dry, use masking tape to carefully mask off the surrounding pristine paint. This is a crucial step to prevent accidental scratches or color transfer to the good paint. Extend the tape a few inches beyond the run on all sides.
Step 3: Initial Removal (if necessary for thick runs)
If the paint run is very thick and raised, you might need to carefully shave down the bulk of it before sanding. This requires a very steady hand. The safest way for beginners is often with a clay bar. If the run is substantial, consider a very sharp, new razor blade. Hold the blade at an extremely low angle (almost flat against the paint surface) and very gently try to shave off the top of the run. Work in short, controlled strokes. The goal here is not to sand, but to gently level the highest part of the drip. If you’re uncomfortable with a razor blade, you can skip this and go straight to wet sanding, but it will take longer. A clay bar is excellent for removing loose overspray. You can purchase an automotive clay bar kit from most auto supply stores. Follow the kit’s instructions for use, which typically involves a lubricant spray and rubbing the clay over the affected area.
Step 4: Wet Sanding the Run
This is where the fine-grit sandpaper comes in. Wet sanding is essential because it lubricates the surface, reduces friction, and prevents the sandpaper from clogging up. It also helps to prevent heat buildup, which can damage your car’s paint.
- Soak your chosen fine-grit sandpaper (start with 1500 or 2000 grit) in a bucket of water for a few minutes.
- Dip your sanding block or a small piece of the sandpaper into the water.
- Gently, using light pressure, begin to sand the paint run. Use a back-and-forth or circular motion.
- Keep the surface and the sandpaper wet at all times. Periodically rinse the sandpaper and the car’s surface.
- Your goal is to gradually level the paint run down to the level of the surrounding paint. You’ll see the paint residue in the water.
- Periodically wipe away the residue to check your progress. You’ll likely see a hazy area where you’ve been sanding. This is normal.
- As the run gets closer to the surrounding paint level, switch to an even finer grit sandpaper (e.g., 2500 or 3000 grit). This will remove the finer scratches left by the coarser grit.
- Continue wet sanding with the finer grit until the run is completely leveled and the hazy area is smooth to the touch. Check by gently running your finger over the area. There should be no raised lip from the run.
This process can take time, so be patient. It’s better to go slow and steady than to rush and damage the paint. A good resource for understanding abrasives and their uses in automotive detailing can be found through organizations like NASA, which often has technical papers on material sciences that, while advanced, underscore the importance of precise material application and removal techniques relevant to surface finishing.
Step 5: Removing Sanding Marks and Restoring Shine
After sanding, the area will look dull and hazy. This is because even fine-grit sandpaper creates microscopic scratches. Now, you’ll use a rubbing or polishing compound to remove these sanding marks and bring back the shine.
- Apply a small amount of rubbing compound to a clean buffing pad or microfiber towel.
- Work the compound into the sanded area using moderate pressure. Follow the product’s instructions, usually involving small, overlapping circular motions.
- Rub until the haze starts to disappear and the shine begins to return.
- Wipe away any excess compound with a clean microfiber towel.
- If the shine isn’t fully restored, you might need to use a finer polish. Apply the polish the same way you applied the compound.
- Work the polish until it creates a uniform shine.
You can find excellent guides on polishing and compounding from reputable automotive care brands like Meguiar’s or Chemical Guys, which often detail the stages of paint correction and restoration.
Step 6: Final Cleaning and Protection
Once you’ve restored the shine, it’s time for a thorough cleaning. Wash the entire area again gently with car soap and water to remove any residue from the compound or polish. Dry the car with a clean, soft microfiber towel.
To protect your freshly repaired paint, apply a coat of car wax or sealant. This will not only enhance the gloss but also provide a protective layer against future contaminants. Apply it according to the product’s instructions, typically buffing it on and then buffing it off with a clean microfiber cloth.
Step 7: Remove the Masking Tape
Carefully peel off the masking tape. Pull it back on itself at a sharp angle to minimize the risk of pulling up any paint.
Comparing Methods: Sanding vs. Other Techniques
While wet sanding with fine-grit sandpaper is generally the most effective and safest method for beginners to remove paint runs, it’s worth understanding other approaches and their pros and cons.
| Method | Description | Pros | Cons | Best For |
|---|---|---|---|---|
| Wet Sanding (1500-3000 grit) | Using fine-grit sandpaper, wet, to carefully level the paint run. Followed by compounding and polishing. | Highly effective for most runs. Controllable. Can achieve a perfect finish. Relatively inexpensive tools. | Requires patience and a steady hand. Can inadvertently damage paint if done too aggressively. Might feel intimidating for absolute beginners. | Most paint runs, from minor to moderate thickness. Experienced beginners and DIYers. |
| Razor Blade Shaving (Very Low Angle) | Carefully shaving down the peak of a thick run with a new, sharp razor blade. Used as a precursor to sanding. | Quickly removes the bulk of very thick runs. | Extremely high risk of scratching or cutting into the clear coat or base coat if not done perfectly level and gently. Not recommended for beginners without practice. | Very thick, hardened runs where a significant amount needs to be removed before sanding. For experienced users. |
| Clay Bar Treatment | Using an automotive clay bar to lift contaminants and sometimes minor imperfections. | Excellent for overspray or very light, fresh runs. Safe and easy to use. Removes embedded contaminants. | Generally not abrasive enough for significant paint runs. Can’t level raised paint. | Light overspray paint, very minor fresh drips. As a general paint cleaner. |
| Rubbing Compound Only (No Sanding) | Aggressively rubbing a compound to try and wear down the run. | Avoids sandpaper. | Very slow and often ineffective for anything but the smallest, softest drips. High risk of creating swirl marks or uneven paint if used aggressively. Compound isn’t aggressive enough to remove raised paint. | Tiny, almost unnoticeable runs or for after light sanding. |
It’s important to note that aggressive rubbing compounds or very coarse sandpaper (e.g., below 1000 grit) should be avoided by DIYers, as they can easily remove too much paint or clear coat, leading to a much bigger problem.
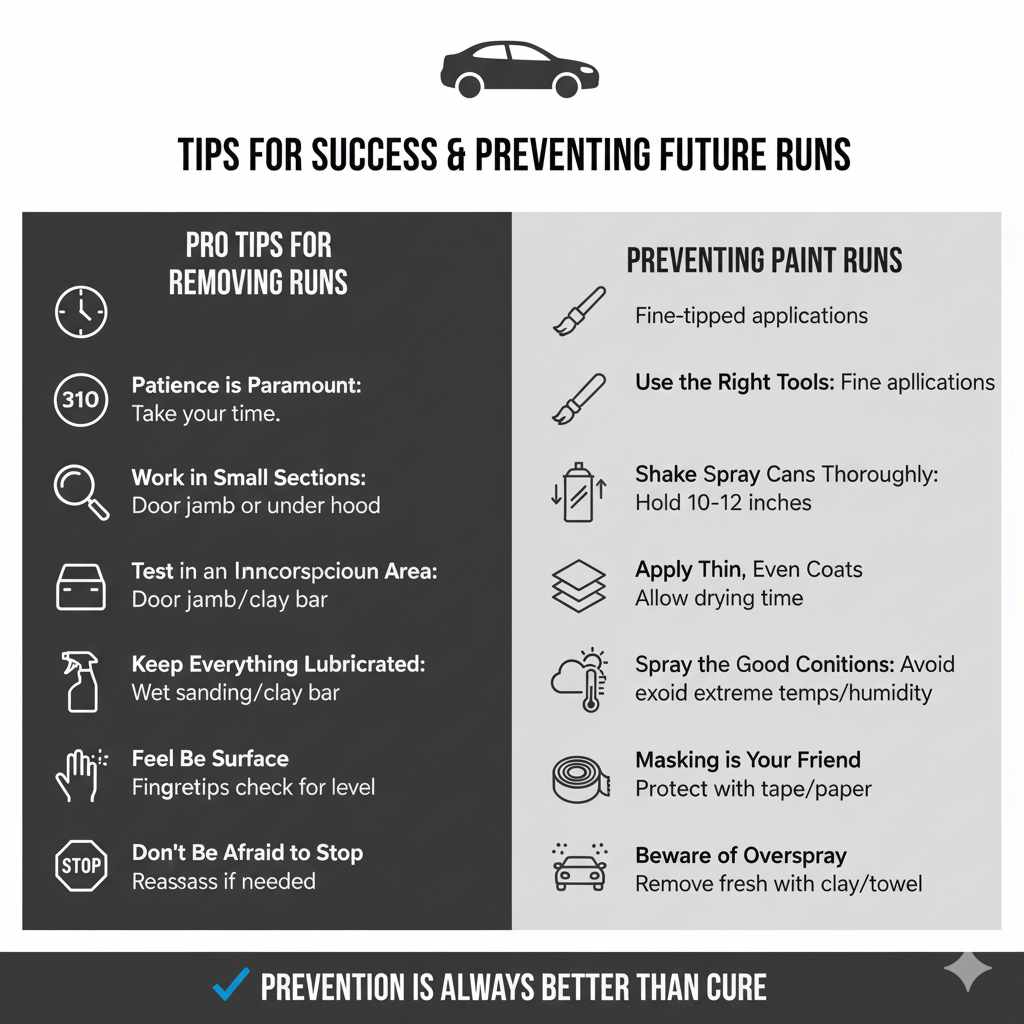
Tips for Success and Preventing Future Runs
Even with the best techniques, a few extra tips can help ensure you get the job done right and avoid future headaches. Prevention is always better than cure, so let’s also touch on how to avoid paint runs in the first place.
Pro Tips for Removing Runs:
- Patience is Paramount: Seriously, take your time. Rushing is the quickest way to make a mistake.
- Work in Small Sections: Don’t try to fix a huge run all at once. Focus on small, manageable areas.
- Test in an Inconspicuous Area: If you’re unsure about a tool or technique, try it on a hidden part of your car first, like a door jamb or under the hood.
- Keep Everything Lubricated: Whether it’s wet sanding or using a clay bar, ensure the surface stays wet or lubricated.
- Feel the Surface: Your fingertips are excellent tools for checking if the run has been leveled. When it’s smooth, you’re getting close.
- Don’t Be Afraid to Stop: If you feel you’re getting too aggressive or the paint looks like it’s thinning too much, stop and reassess. It’s better to leave a minor imperfection than to cause irreversible damage.
Preventing Paint Runs on Your Car:
- Use the Right Tools for the Job: If applying touch-up paint, use fine-tipped applicators rather than brushes that hold too much paint.
- Shake Spray Cans Thoroughly: And hold them at the recommended distance (usually 10-12 inches).
- Apply Thin, Even Coats: For any painting project on or near your car, multiple thin coats are always better than one thick coat. Allow adequate drying time between coats.
- Spray in Good Conditions: Avoid painting in extreme humidity, very cold, or very hot temperatures, as these affect drying times and paint flow.
- Masking is Your Friend: When painting anything near your car, use high-quality masking tape and paper to protect the vehicle’s finish.
- Beware of Overspray: If you notice overspray landing on your car, try to remove it immediately with a clay bar or a damp microfiber towel if it’s fresh.
For more advanced painting techniques and understanding paint chemistry, resources from organizations like the Automotive Aftermarket Suppliers Association (AASA) or educational institutions often provide in-depth information on surface coatings and automotive refinishing.
Frequently Asked Questions (FAQ)
Q1: How can I tell if a paint run is too severe to fix myself?
If the paint run is exceptionally deep, has gone through the clear coat and into the base color, or has caused significant bubbling or peeling of the paint around it, it might be best to consult a professional body shop. Severe damage can be very difficult to repair without proper equipment and experience.
Q2: Can I use a common household item like toothpaste to remove a paint run?
While some people suggest toothpaste as a mild abrasive, it’s generally not recommended for car paint. Its grit can be inconsistent, and it may not be effective enough for a real paint run, potentially leading to ineffective results or even minor scratching if you rub too hard. Stick to automotive-specific detailing products designed for the task.
Q3: How long does it take to remove a paint run?
The time required varies greatly depending on the size and thickness of the run, and your experience level. A small run might take 30 minutes to an hour, including prep and finishing. Larger or more stubborn runs could take a couple of hours, spread out over different sessions to avoid fatigue.
Q4: What is the difference between rubbing compound and polishing compound?
Rubbing compound is more abrasive and is used to remove heavier imperfections, like sanding marks. Polishing compound is less abrasive and is used to refine the finish, remove lighter swirl marks, and restore gloss after compounding. You typically use rubbing compound first, then polishing compound.
Q5: Will wet sanding damage my car’s paint?
Wet sanding, when done correctly with appropriate fine-grit sandpaper and light pressure, will not permanently damage your car’s paint. It creates microscopic scratches that are then removed by the compounding and polishing stages, restoring the original shine. However, using too much pressure, too coarse a grit, or sanding too long can remove too much clear coat, leading to dullness or damage.