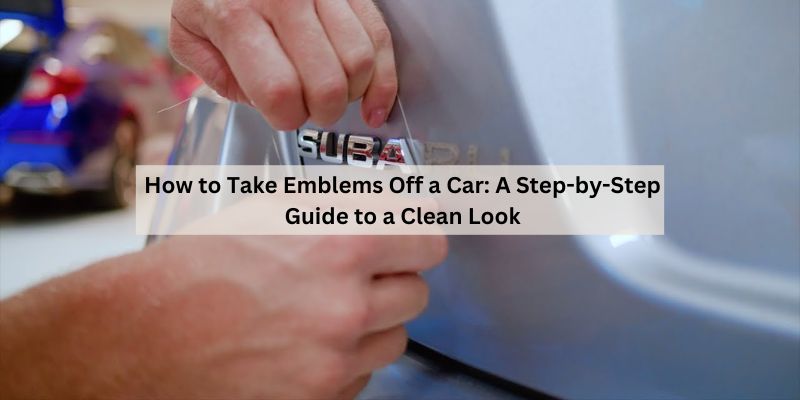
How to Take Emblems Off a Car: A Step-by-Step Guide to a Clean Look
Hey there! So, you’re thinking about how to take the emblems off your car? I get why. Maybe you want a sleek, clean look or you’re prepping for a custom paint job. I was in the same boat a few years ago when I decided to remove the badges from my Honda Civic. It felt like a big step, but once I figured it out, it was so satisfying to see that smooth, emblem-free finish.
I’ve removed emblems from a couple of cars since then, made some mistakes, and learned the best tricks along the way. I’m excited to share everything I’ve picked up to help you remove those emblems safely and easily. Whether you’re a car newbie or a seasoned DIYer, this guide will walk you through the process step by step. Let’s grab some tools and give your car a fresh new vibe!
My First Time Removing Car Emblems
Let me take you back to my first attempt at removing emblems. I had a 2008 Honda Civic, and the chrome “Civic” badge on the trunk was starting to peel. I thought, “How hard can it be to take it off?” I grabbed a screwdriver, pried at the badge, and—yep—scratched the paint. Ouch! That mistake taught me to slow down and do it right. After watching some videos, talking to a friend who’s a detailer, and trying again on my next car (a Toyota Corolla), I got the hang of it. Removing emblems is straightforward if you have the right tools and patience. I’m here to save you from my rookie mistakes and make your project a success.
What Are Car Emblems and Why Remove Them?
Car emblems are those metal or plastic badges on your car that show the make, model, or trim. Think of the “Toyota” logo on the grille or the “EX” badge on the trunk. They’re usually glued on with strong adhesive or attached with clips. I love how they add character, but sometimes they’re not my style.
Why remove them? For me, it was about aesthetics. I wanted a cleaner, minimalist look on my Civic. Other reasons I’ve heard from friends include:
- Customizing: Removing emblems lets you personalize your car, like prepping for vinyl wraps or decals.
- Paint Jobs: Emblems need to come off for a smooth repaint. I removed mine before a touch-up job.
- Resale Prep: A clean look can appeal to buyers. My Corolla sold faster after I de-badged it.
- Damage Repair: Peeling or rusted emblems look bad. I replaced a faded badge on my Civic to boost its appearance.
Whatever your reason, removing emblems can transform your car’s look. Let’s talk about how to do it right.
Tools and Supplies You’ll Need
Before I start any emblem removal, I gather my tools. Here’s what I use to make the job easy and safe:
- Fishing Line or Dental Floss: I use this to cut through the adhesive. It’s gentle on paint.
- Plastic Pry Tools: These prevent scratches when lifting emblems. I got a set for $10 at an auto store.
- Heat Gun or Hair Dryer: Heat softens the adhesive. My hair dryer works just fine.
- Goo Gone or Adhesive Remover: This cleans sticky residue. A $7 bottle lasts for multiple jobs.
- Microfiber Cloths: I wipe surfaces without scratching. I keep a stack in my garage.
- Rubbing Alcohol: It removes leftover goo and preps the surface. I use 70% alcohol from the drugstore.
- Car Wax or Polish: I apply this after to protect the paint. A $15 can of wax goes a long way.
- Painter’s Tape: I tape around emblems to protect the paint. A roll costs $5.
- Gloves (Optional): I wear gloves to keep my hands clean when using adhesive remover.
Having these ready saves time and prevents damage. I learned the hard way that skipping tools (like using a metal screwdriver) is a bad idea!
Step-by-Step Guide to Removing Car Emblems
Alright, let’s get to the main event—removing those emblems. Here’s how I do it, step by step, based on what’s worked for me.
Step 1: Prep Your Car
I start by washing the car to remove dirt and grime. A clean surface prevents scratches. I focus on the emblem area, using soap and water. Then, I dry it with a microfiber cloth. I park in the shade to keep the car cool—hot surfaces make adhesive stickier. I also tape around the emblem with painters tape to protect the paint. This prep takes 10 minutes but saves headaches later.
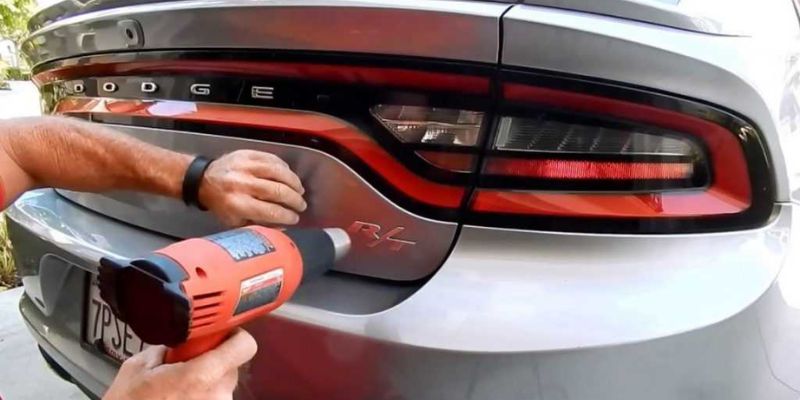
Step 2: Apply Heat to Soften the Adhesive
Heat is my secret weapon. I grab my hair dryer (a heat gun works too) and set it to medium. I hold it 6-8 inches from the emblem and move it back and forth for 1-2 minutes. The heat softens the adhesive, making the emblem easier to remove. I test it by gently tugging the edge—if it lifts slightly, it’s ready. I learned not to overheat; too much heat can damage paint. My Civic’s badge came off more easily after heating it just right.
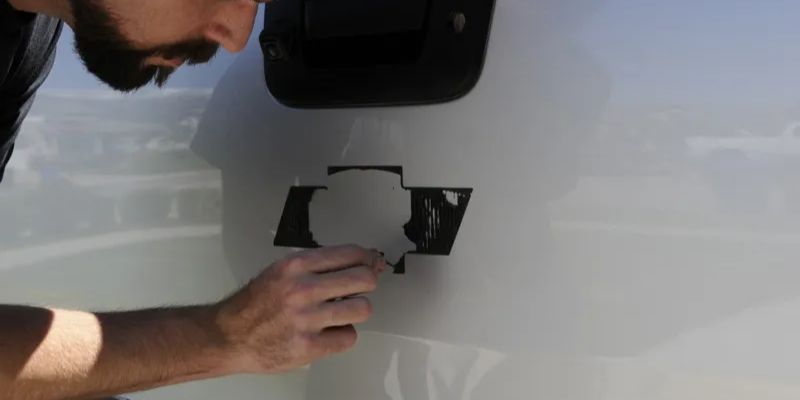
Step 3: Cut Through the Adhesive
Here’s where the fishing line comes in. I take a 12-inch piece of fishing line (dental floss works too) and hold it taut. I slide it behind the emblem, starting at one corner, and saw back and forth like I’m flossing teeth. The line cuts through the adhesive cleanly. I work slowly to avoid scratching the paint. For my Corolla’s “Toyota” badge, this took 5 minutes per letter. If the emblem has clips, I note their location (more on that later).
Step 4: Lift the Emblem Off
Once the adhesive is cut, I use a plastic pry tool to gently lift the emblem. I slide it under the edge and wiggle it up. If it resists, I apply more heat and try again. My Civic’s badge popped off easily, but my Corolla’s had a clip, so I had to twist gently to release it. I never force it—forcing can dent the metal or chip paint. Patience is key here.
Step 5: Remove Adhesive Residue
After the emblem is off, there’s usually sticky goo left behind. I apply Goo Gone to a microfiber cloth and rub the residue in circles. It dissolves the adhesive in 1-2 minutes. For stubborn spots, I let the Goo Gone sit for a minute before wiping. Then, I clean the area with rubbing alcohol to remove any leftover goo or cleaner. My Corolla’s trunk looked spotless after this step.
Step 6: Clean and Polish the Area
I wash the area with soapy water to remove any cleaner residue. Then, I dry it with a microfiber cloth. To protect the paint, I apply car wax or polish with a clean cloth, buffing it to a shine. This hides any faint adhesive marks and makes the surface look new. When I did this on my Civic, the trunk looked smoother than the rest of the car!
Step 7: Inspect and Touch Up
I check the area with a flashlight to spot any scratches or adhesive. If I see minor scratches, I use a scratch remover polish (I paid $12 for a bottle). For my Corolla, I filled two tiny clip holes with automotive filler and painted over them with touch-up paint. The result was seamless. I step back and admire my work—nothing beats that clean look!
Handling Emblems with Clips
Some emblems, like my Corolla’s grille badge, use clips instead of just adhesive. These are trickier. I check the emblem for small holes or tabs that indicate clips. If I’m unsure, I look up my car’s emblem removal process online (forums are great for this). For clip emblems, I:
- Apply heat to loosen any adhesive.
- Use a plastic pry tool to gently lift the emblem, feeling for resistance.
- Twist or slide the emblem to release the clips without breaking them.
- Check for holes left behind and fill them with automotive filler if needed.
I broke a clip once by rushing, so I go slow now. If you’re replacing the emblem, save the clips!
Common Mistakes to Avoid
I’ve made plenty of mistakes removing emblems. Here’s what I learned to skip:
- Using Metal Tools: My screwdriver scratched my Civic’s paint. Stick to plastic pry tools.
- Skipping Heat: I tried removing a badge without heat, and it took forever. Heat makes it easier.
- Pulling Too Hard: Forcing an emblem can dent the car. I was gentle with my Corolla and avoided damage.
- Not Cleaning Residue: Leaving goo attracts dirt. I always use Goo Gone and alcohol for a clean finish.
- Ignoring Clips: I broke a clip by not checking for them. Look for tabs or holes first.
Avoiding these saves time and keeps your car looking great.
Tips for a Professional Finish
I’ve picked up tricks to make my emblem removal look pro-level:
- Work Slowly: Rushing leads to mistakes. I take 30-60 minutes per emblem for a perfect result.
- Test Adhesive Remover: I dab Goo Gone on a small spot first to ensure it won’t harm the paint.
- Protect Surrounding Areas: Painter’s tape saved my Corolla’s paint from scratches.
- Polish the Whole Panel: I wax the entire trunk or hood for a uniform shine, not just the emblem area.
- Check in Different Lights: I inspect under sunlight and a flashlight to catch imperfections.
These tips turned my DIY job into something a detailer would be proud of.
When to Call a Professional
I love DIY, but sometimes I call a pro. Here’s when I do:
- Expensive Cars: For my friend’s BMW, we hired a detailer to avoid damaging the $50,000 paint job. It cost $150 but was worth it.
- Complex Emblems: Some grille badges are tied to sensors. I let a pro handle my Corolla’s radar-equipped badge for $100.
- Paint Damage: If I scratch the paint badly, a body shop fixes it. I paid $200 to repair a deep scratch on my Civic.
- Time Constraints: If I’m busy, I pay $50-$200 for a pro to remove emblems and polish the car.
I budget $100-$200 a year for occasional pro help, but DIY is usually enough.
Costs of Removing Emblems
Emblem removal can be cheap or pricey, depending on your approach. Here’s what I’ve spent:
- DIY Supplies: Fishing line ($5), plastic pry tools ($10), Goo Gone ($7), microfiber cloths ($10), rubbing alcohol ($3), wax ($15). Total: ~$50 upfront, $10/year for refills.
- Automotive Filler/Touch-Up Paint: $15-$30 for clip holes. I used $20 worth for my Corolla.
- Professional Removal: $50-$200 per emblem, depending on the car. I paid $100 for a pro to do my Corolla’s grille.
- Body Shop Repairs: $100-$500 for paint fixes. My Civic’s scratch repair was $200.
DIY is the cheapest, and I’ve saved hundreds doing it myself.
Removing Emblems on Different Car Surfaces
Not all car surfaces are the same. Here’s how I handle each:
- Painted Metal (Trunk/Hood): I use fishing line, heat, and Goo Gone. My Civic’s trunk was easy to clean.
- Plastic (Bumpers): I go extra gently to avoid cracking. My Corolla’s bumper badge needed light heat.
- Chrome/Grille: These often have clips. I used a pry tool carefully on my Corolla’s grille badge.
- Glass: Rare, but some emblems are on windows. I used fishing line and alcohol, avoiding glass cleaner to prevent streaks.
I check my car’s manual or online forums for surface-specific tips.
Legal and Practical Considerations
Removing emblems is usually fine, but I keep a few things in mind:
- Resale Value: Some buyers want original badges. I saved my Civic’s emblems in case I needed to reattach them.
- Warranty: Removing emblems doesn’t void warranties, but damaging sensors might. I checked my Corolla’s manual before removing the grille badge.
- Local Laws: In the USA, emblems aren’t legally required, but I ensure my car still shows the make/model if needed for registration.
- Insurance: De-badging doesn’t affect insurance, but I inform my insurer if I repaint to update the car’s description.
I’ve never had issues, but it’s good to double-check.
Maintaining Your Car After Emblem Removal
After removing emblems, I keep the area looking sharp:
- Regular Waxing: I wax monthly to protect the paint. It keeps my Corolla’s trunk shiny.
- Touch-Up Paint: I check for chips and apply touch-up paint as needed. A $10 bottle lasts years.
- Clean Regularly: I wash the car weekly to prevent dirt buildup on where emblems.
- Inspect for Damage: I check for rust or fading every few months, especially on filled clip holes.
These habits keep my car looking fresh and emblem-free.
Why Removing Emblems Is Worth It
Taking off emblems gave my cars a unique, clean look I love. It’s a fun DIY project that boosts curb appeal and lets me customize my ride. Plus, it’s satisfying to do it myself and save money. My Corolla’s sleek trunk gets compliments, and I sold my Civic faster because it looked modern and well-kept.
Conclusion
So, how do you take emblems off a car? It’s all about preparation, the right tools, and a careful approach. From my scratched-up Civic to my flawless Corolla, I’ve learned that anyone can remove emblems with patience and practice. By heating the adhesive, cutting with fishing line, cleaning residue, and polishing the surface, you can give your car a fresh, custom look. I hope this guide inspires you to tackle your emblem removal project with confidence. Grab your tools, take your time, and enjoy the transformation—your car’s about to look better than ever!
FAQs
How do I take emblems off my car safely?
Apply heat with a hair dryer, cut the adhesive with fishing line, lift with plastic pry tools, and clean residue with Goo Gone. I did this on my Corolla without scratches.
What tools do I need to remove car emblems?
Fishing line, plastic pry tools, a hair dryer, Goo Gone, microfiber cloths, rubbing alcohol, and wax. I spent $50 on supplies for multiple jobs.
Will removing emblems damage my car’s paint?
Not if you’re careful. I scratched my Civic’s paint with a screwdriver but avoided damage on my Corolla using plastic tools and heat.
How long does it take to remove a car emblem?
Each emblem takes 30-60 minutes, including prep and cleanup. My Corolla’s “Toyota” badge took about 45 minutes per letter.
Can I remove emblems with clips instead of adhesive?
Yes, but go slow. I used a pry tool to release clips on my Corolla’s grille badge and filled the holes with automotive filler.
Is it legal to remove emblems from my car?
In the USA, yes. Emblems aren’t required, but I ensure my car shows the make/model for registration if needed.
Should I hire a professional to remove emblems?
For expensive cars or complex badges, maybe. I paid $100 for a pro to remove my Corolla’s grille badge, but do simpler ones myself.
How much does it cost to remove car emblems?
DIY costs $50 for supplies, with $10 yearly refills. Professional removal is $50-$200 per emblem. I save money doing it myself.