How to Tune a Carbureted Motorcycle Like a Pro
Getting your motorcycle’s carburetor just right can feel like a puzzle, especially when you’re new to it. Many riders find tuning a bit tricky, thinking it requires advanced mechanical skills. But it doesn’t have to be complicated!
This guide will show you How to Tune a Carbureted Motorcycle Like a Pro with easy steps. We’ll walk through everything you need to know to get your engine running smoothly and sounding great.
Why Carburetor Tuning Matters
Your motorcycle’s carburetor is like its lungs, mixing air and fuel for the engine to run. When it’s not set up correctly, your bike might run poorly. This could mean it’s hard to start, sputters when you ride, or just doesn’t have the power it should.
Proper tuning makes sure your engine gets the right mix of air and fuel in all sorts of conditions, from cold mornings to hot afternoons.
The Basics of How a Carburetor Works
A carburetor uses the Venturi effect to draw fuel into the airflow. As air rushes through a narrowed section (the Venturi), its speed increases and its pressure drops. This low pressure pulls fuel from the float bowl through a jet and into the airstream.
This mixture then goes into the engine’s cylinders to be ignited.
Key Carburetor Components
To tune your carburetor, you need to know its main parts. Each part plays a role in getting the air-fuel mix just right.
- Float Bowl: Holds a small amount of fuel, like a mini gas tank for the carburetor.
- Float and Needle Valve: These control the fuel level in the float bowl, shutting off fuel when it’s full.
- Main Jet: Controls fuel flow at higher engine speeds or when you open the throttle wide.
- Pilot Jet (Idle Jet): Controls fuel flow at idle and low throttle openings.
- Air Screw/Fuel Screw: Adjusts the air or fuel mixture at idle. This is a key adjustment point for tuning.
- Throttle Slide and Needle: Controls the amount of air entering the carburetor and is raised and lowered by the throttle cable. The needle works with the slide to help meter fuel in different throttle positions.
- Choke: Restricts airflow to create a richer fuel mixture for starting a cold engine.
Signs Your Carburetor Needs Tuning
Your motorcycle will often tell you when something isn’t quite right with the carburetor. Paying attention to these signs can save you a lot of trouble.
- Hard Starting: If your bike is difficult to start, especially when cold, the mixture might be too lean (not enough fuel) or too rich (too much fuel).
- Rough Idle: A sputtering or unstable idle speed means the fuel mixture at low RPMs isn’t consistent.
- Hesitation or Stumbling: When you twist the throttle, if the bike hesitates or stumbles before picking up speed, the transition from idle to main jet operation isn’t smooth.
- Poor Fuel Economy: If you’re using more gas than usual, the mixture might be too rich.
- Black Smoke from Exhaust: This is a clear sign of a rich mixture, meaning too much fuel is being burned.
- Engine Overheating: A lean mixture can cause the engine to run hotter than it should.
- Surging at Steady Throttle: The engine might feel like it’s lurching forward or back even when you hold the throttle steady.
Essential Tools for Carburetor Tuning
Before you begin tuning, gather the right tools. Having them ready makes the process much smoother.
- Screwdrivers (flathead and Phillips, various sizes)
- Wrenches (metric sizes, typically 8mm, 10mm, 12mm)
- Carburetor synchronizer (if tuning multiple carburetors)
- Tachometer (if your bike doesn’t have one or you want a more precise reading)
- Gloves and safety glasses
- Clean rags
- A clean workspace
How to Tune a Carbureted Motorcycle Like a Pro Step-by-Step
Tuning your carburetor involves making adjustments to the air-fuel mixture. The most common adjustments are to the idle mixture screw and the idle speed screw. For more advanced tuning, you might look at jetting, but we’ll focus on the basics here.
Step 1: Prepare Your Motorcycle
Safety and preparation are key. Make sure your bike is in good condition before you start adjusting the carburetor.
- Warm Up the Engine: Ride your motorcycle for about 10-15 minutes to bring the engine to its normal operating temperature. A warm engine allows for accurate tuning.
- Find a Safe Location: Work in a well-ventilated area, away from traffic. Ensure the bike is on a level surface and stable, ideally on its center stand if you have one.
- Check for Air Leaks: Before touching the carburetor, check that there are no air leaks in the intake boots between the carburetor and the engine, or the airbox and the carburetor. Leaks can cause unstable idling and make tuning impossible.
Step 2: Adjust the Idle Speed
The idle speed screw controls how fast the engine runs when your throttle is completely closed. It physically props open the throttle slide a tiny bit.
- Locate the idle speed screw. It’s usually a larger knob or screw that contacts the throttle linkage.
- If your idle is too low (engine is about to stall), turn the screw clockwise to increase it.
- If your idle is too high, turn the screw counter-clockwise to decrease it.
- Aim for the manufacturer’s recommended idle speed, usually found in your service manual. A good starting point for many bikes is around 1200-1500 RPM.
Step 3: Adjust the Idle Mixture Screw
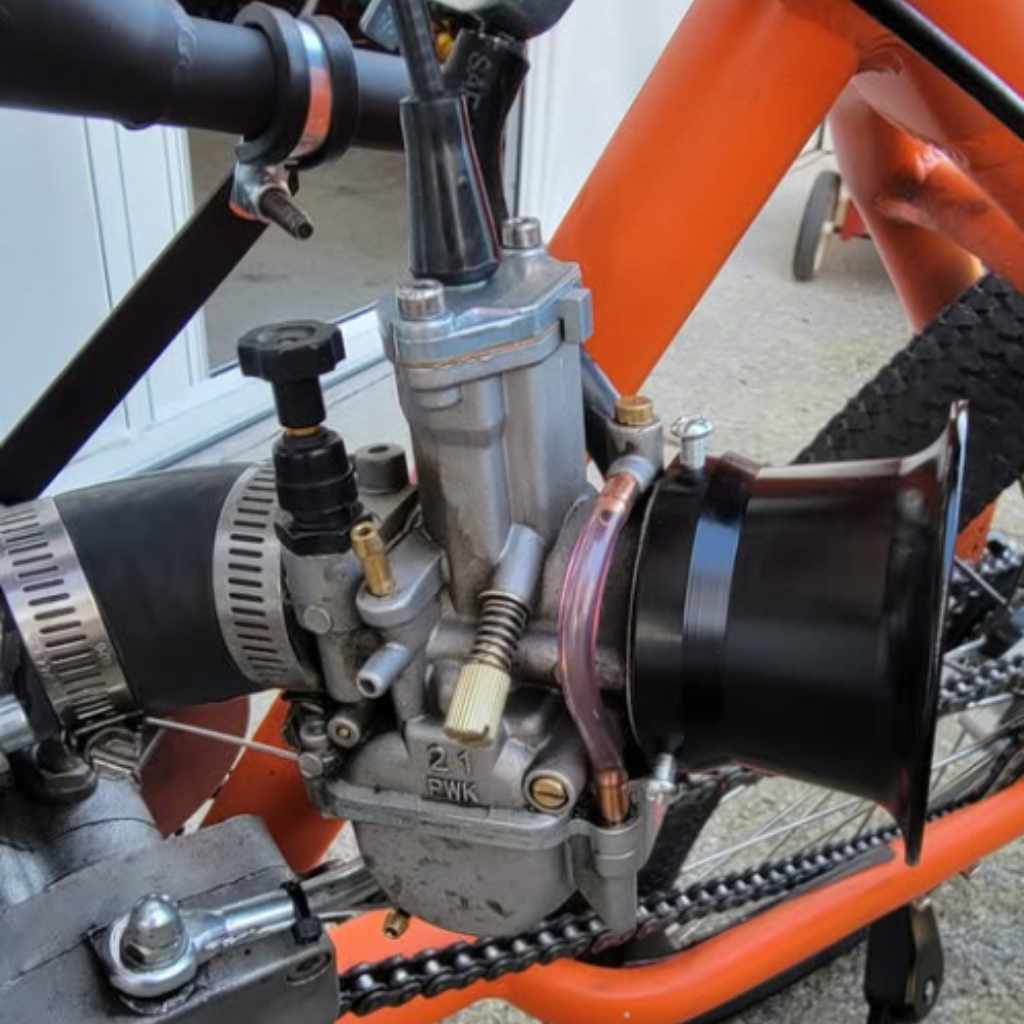
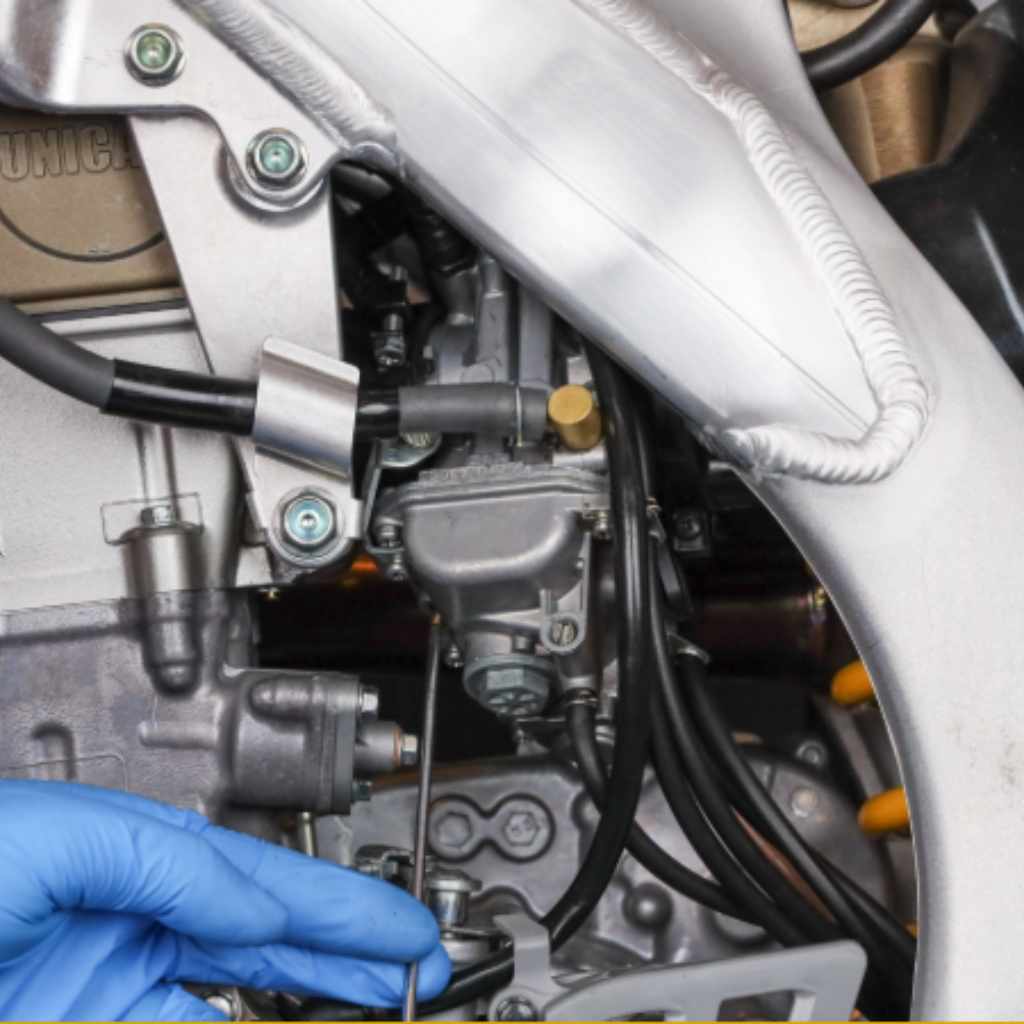
This is the most critical step for tuning the engine’s behavior at low RPMs. The air screw or fuel screw controls how much air or fuel enters the mixture when the throttle is just barely open. The location and type of screw vary between carburetors.
Finding the Air Screw or Fuel Screw
- Fuel Screw: Usually located on the engine side of the carburetor, closest to the engine. Turning it out (counter-clockwise) adds more fuel.
- Air Screw: Usually located on the airbox side of the carburetor. Turning it out (counter-clockwise) adds more air, which actually makes the mixture leaner. Conversely, turning it in (clockwise) reduces air, making the mixture richer.
Important Note: If you’re unsure which screw you have, consult your motorcycle’s service manual. Trying to adjust the wrong screw can make things worse.
The Adjustment Process
This method is often called the “float bowl drop” or “best idle” method.
- Start with Baseline: Gently turn the mixture screw all the way in until it lightly seats. Be very careful not to overtighten, as this can damage the screw. Then, back it out the number of turns recommended in your service manual (often 1.5 to 2.5 turns). This is your starting point.
- Adjust for Highest Idle: With the engine warmed up and idling, slowly turn the mixture screw in or out in small increments (quarter-turn at a time). Listen to the engine’s RPM. You’re looking for the point where the idle speed is highest and smoothest.
- Fine-Tune: Once you find the spot where the RPM is highest, you may need to slightly adjust the idle speed screw again to bring it back down to your desired idle RPM.
- Re-adjust Mixture Screw: After adjusting the idle speed, you might need to go back and re-adjust the mixture screw slightly to find the highest RPM again. You’re aiming for a balance.
- Test Throttle Response: Gently blip the throttle. The engine should rev up quickly and smoothly without hesitation or bogging down. Then, it should return to a stable idle without stalling.
- Repeat for Other Carburetors (if applicable): If your bike has multiple carburetors, you’ll need to repeat this process for each one, ensuring they are synchronized.
Step 4: Synchronizing Multiple Carburetors
For motorcycles with more than one carburetor, synchronization is crucial. This ensures that each cylinder receives the same amount of air-fuel mixture, leading to a smooth and balanced engine.
Why Synchronization is Important
When carburetors are out of sync, one cylinder might be working harder than others, leading to vibrations, uneven power delivery, and potential engine stress. Synchronization uses a tool called a vacuum gauge or carb synchronizer.
The Synchronization Process
- Connect the Gauges: Locate the vacuum ports on each carburetor (usually small nipples or plugs). Remove the plugs and connect the hoses from your vacuum gauges to these ports.
- Start the Engine: Warm up the engine and let it idle.
- Observe Readings: The vacuum gauges will show the vacuum being pulled by each carburetor. Ideally, these readings should be equal.
- Adjust Linkages: You’ll use small adjusting screws on the linkage connecting the carburetors. Adjust these screws to equalize the vacuum readings on all gauges. Turning a screw in one direction will typically increase the vacuum on one gauge and decrease it on another.
- Check Throttle Response: Gently increase the throttle and observe how the needles on the gauges react. They should move together and return to the same idle reading when the throttle is closed.
- Fine-Tune: Make small adjustments until the readings are consistent across all carburetors at idle and when the throttle is blipped.
Step 5: Check Spark Plugs
Your spark plugs can provide valuable information about the air-fuel mixture being burned in your engine.
- Remove Spark Plugs: After a good ride where the engine has been operating under various conditions, carefully remove the spark plugs.
-
Examine the Color:
- Tan or light brown color: This indicates an ideal air-fuel mixture.
- White or greyish color: This means the mixture is too lean (too much air or not enough fuel), which can cause overheating.
- Black and sooty color: This signifies a rich mixture (too much fuel or not enough air), leading to poor fuel economy and potential fouling of the spark plug.
- Wet or oily: This usually means oil is getting into the combustion chamber, which is a different problem than fuel mixture.
- Adjust if Necessary: Based on the spark plug color, you may need to make further adjustments to your mixture screw or consider changing jet sizes if the problem persists across a wide range of throttle positions.
Common Carburetor Problems and Solutions
Even after careful tuning, you might encounter specific issues. Here are some common ones and how to address them.
Problem: Carburetor Overflowing
This happens when too much fuel enters the float bowl and spills out. It’s often caused by a damaged float needle or valve, or debris preventing it from sealing properly. You might see fuel leaking from the overflow tube.
- Solution: Clean the float needle and seat. If damaged, replace them.
Problem: Engine Pops or Backfires
This often occurs when unburned fuel ignites in the exhaust system. It can be due to a lean mixture, a vacuum leak, or ignition timing issues.
- Solution: Check for vacuum leaks. Adjust the idle mixture screw for a slightly richer mixture. Ensure your ignition system is functioning correctly.
Problem: Carburetor Icing
In very cold, humid conditions, moisture in the air can freeze inside the carburetor, restricting airflow. This can cause the engine to run poorly or stall.
- Solution: There’s not much you can do on the spot except wait for it to warm up. Some older bikes had heating elements, but this is uncommon. Running a slightly richer mixture can sometimes help.
Problem: Leaking Fuel from the Throttle Shaft
If fuel leaks from where the throttle shaft enters the carburetor body, the seals are likely worn. This is less common and often requires more advanced carburetor rebuild knowledge.
- Solution: Rebuild the carburetor with new seals and O-rings.
When to Consider Jetting Changes
If you’ve adjusted the idle mixture and speed screws, and your spark plugs look good, but you’re still experiencing issues, or if you’ve made significant modifications like a new exhaust or air filter, you might need to change the jets.
Understanding Jetting
- Main Jet: Affects fuel delivery from about half throttle to full throttle.
- Pilot Jet: Affects fuel delivery from idle to about quarter throttle.
- Needle Taper and Clip Position: Affects fuel delivery from quarter throttle to half throttle.
Changing jets is a more involved process that often requires trying different sizes to find the optimal fuel delivery for your specific engine and conditions. It’s generally recommended to consult your motorcycle’s service manual or a professional mechanic for significant jetting changes.
Carburetor Tuning vs. Fuel Injection
Modern motorcycles often use electronic fuel injection (EFI) systems instead of carburetors. EFI systems automatically adjust the air-fuel mixture based on various sensor readings, meaning they don’t require manual tuning like carburetors do. While EFI offers benefits like better fuel efficiency and performance across different altitudes and temperatures, many riders still appreciate the direct mechanical connection and tuning satisfaction that carburetors offer.
Frequently Asked Questions
Question: How often should I tune my carburetor?
Answer: It’s a good idea to check and tune your carburetor annually, or if you notice performance issues like hard starting, rough idling, or hesitation. Changes in altitude or temperature can also affect performance, making a tune-up beneficial.
Question: My bike has four carburetors. How do I know if they’re synchronized?
Answer: If your engine vibrates excessively at idle, runs rough, or lacks smooth power delivery, your carburetors might be out of sync. Using a vacuum gauge or carb synchronizer is the best way to check and adjust them.
Question: Can I tune my carburetor without a tachometer?
Answer: Yes, you can tune by ear, listening to the engine’s RPM. However, using a tachometer provides a more precise and consistent result, especially when setting the idle speed to the manufacturer’s specification.
Question: What happens if I adjust the idle mixture screw too far in or out?
Answer: Turning the screw too far in can damage it or the carburetor body. Turning it too far out can cause it to fall out. Incorrect adjustments can lead to very poor engine performance, stalling, or even engine damage if the mixture becomes too lean.
Question: My motorcycle sat for a long time. What’s the first thing I should do for the carburetor?
Answer: If your motorcycle has been stored for an extended period, the fuel in the carburetor likely has gone stale and can leave deposits. The first step should be to drain the old fuel from the float bowl and clean the carburetor, paying close attention to the jets and the float needle valve, before attempting any tuning.
Final Thoughts
Mastering How to Tune a Carbureted Motorcycle Like a Pro brings a new level of connection to your ride. It’s about understanding how your engine breathes and making sure it’s doing so optimally. You’ve learned about the key parts of a carburetor, how to recognize when it needs attention, and the step-by-step process for adjusting idle speed and mixture.
We also touched upon synchronizing multiple carbs and using spark plugs as diagnostic tools. Don’t be afraid to take your time with each adjustment, making small changes and testing the results. If you encounter persistent issues or feel unsure, seeking advice from a seasoned mechanic is always a smart move.
With practice and patience, you’ll gain the confidence to keep your carbureted motorcycle running at its best, ensuring every ride is a smooth and powerful one.