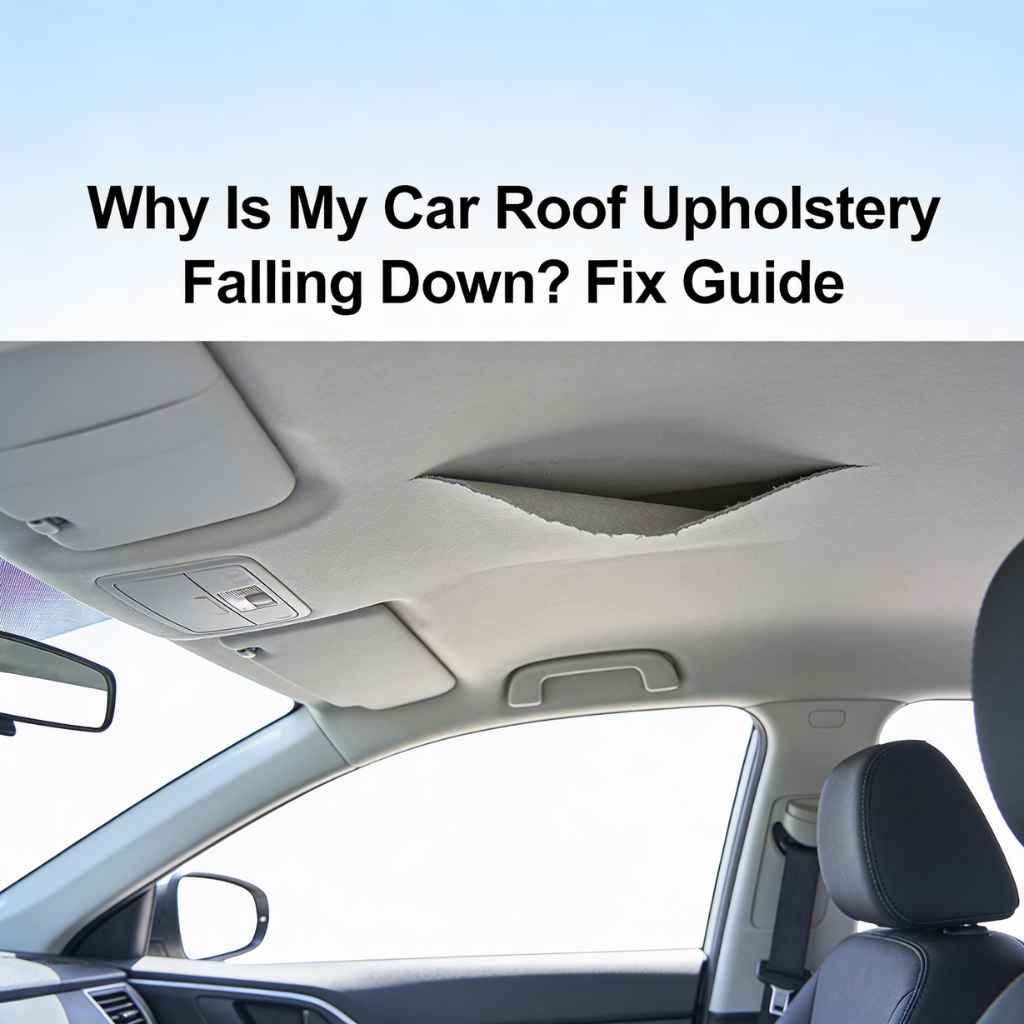
Why Is My Car Roof Upholstery Falling Down? Fix Guide
It’s a common car problem when the fabric on your car’s ceiling starts to sag. You might wonder, Why Is My Car Roof Upholstery Falling Down? Fix Guide?
This can happen for many reasons, and fixing it might seem tricky if you’re new to car care. But don’t worry, it’s often a repair you can do yourself with a little guidance. This guide will walk you through exactly what to do, step by step, to get your car’s headliner looking good again.
Understanding Why Car Roof Upholstery Falls Down
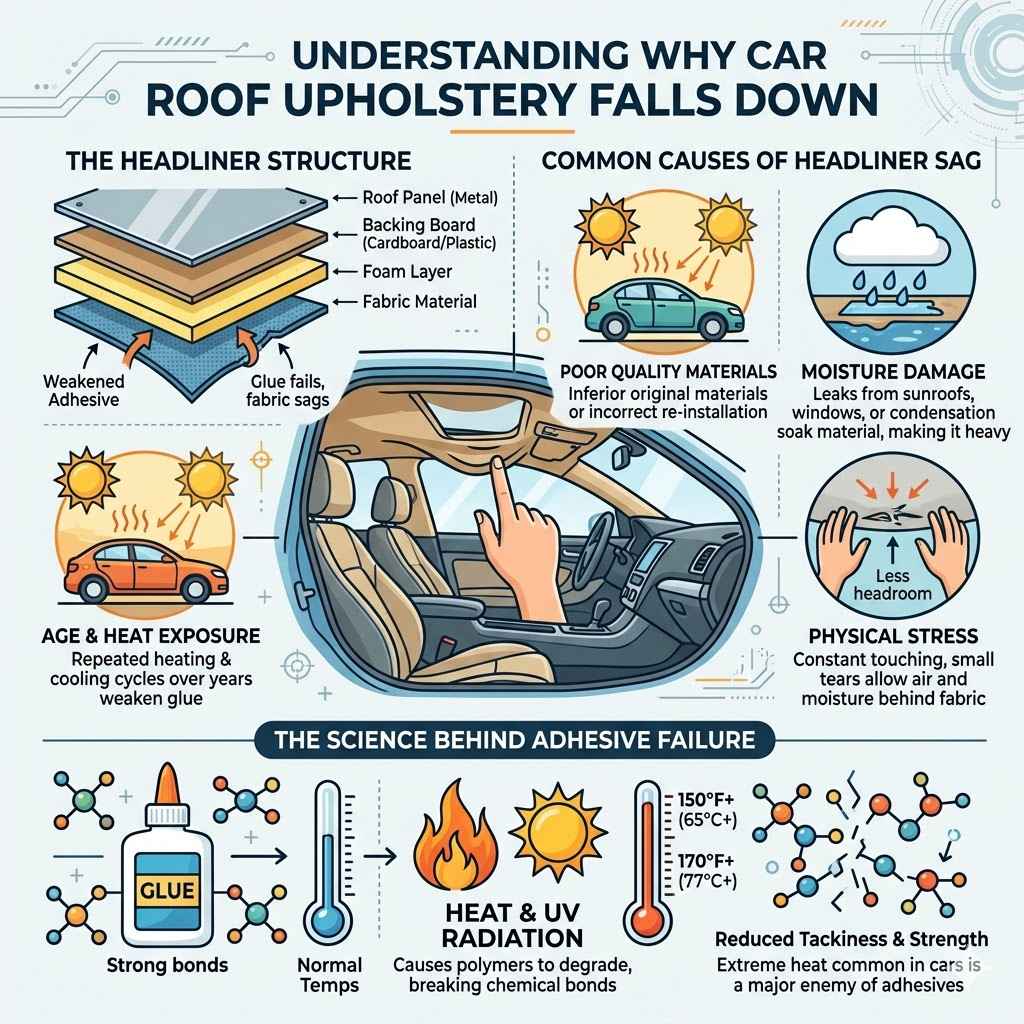
The headliner in your car is the fabric or material that covers the inside of the roof. Over time, the adhesive that holds this material to the backing board can weaken. This weakening is often caused by heat, age, or moisture.
When the glue fails, the fabric starts to sag or even detach completely. This guide aims to help you figure out why this is happening to your specific car and what steps you can take to fix it.
Common Causes of Headliner Sag
Several factors can contribute to your car’s roof lining drooping. Understanding these causes is the first step in tackling the problem effectively. It’s not just one thing; it’s often a combination of everyday wear and tear and environmental factors.
- Age and Heat Exposure: Cars parked in the sun for long periods experience significant heat buildup. This heat can break down the adhesive that bonds the headliner fabric to the foam backing and then to the cardboard or plastic roof panel. Over years, this repeated heating and cooling cycle weakens the glue.
- Moisture Damage: Leaks from sunroofs, leaky windows, or even condensation can soak the headliner. When the fabric and foam get wet, they can lose their structure and adhesion. The weight of the wet material also pulls it down.
- Poor Quality Materials or Installation: Sometimes, the original headliner material or the adhesive used might not have been the highest quality. If the headliner was replaced previously, the installation itself might have been done improperly, leading to premature failure.
- Physical Stress: Constantly touching or leaning on the headliner, especially in cars with less headroom, can also stress the adhesive bonds. Small tears or punctures can allow air and moisture to get behind the fabric, accelerating the process.
The Science Behind Adhesive Failure
Adhesives work by creating a strong bond between two surfaces. In car headliners, a spray adhesive is typically used to stick the fabric to a foam layer, which is then adhered to the car’s roof structure. These adhesives are designed to withstand some heat and vibration.
However, prolonged exposure to temperatures exceeding 150°F (65°C), common in cars on hot days, can cause the polymers in the adhesive to degrade. The chemical bonds within the adhesive start to break down, reducing its tackiness and strength. This degradation is accelerated by UV radiation from sunlight, which can also damage the fabric itself.
Consider this: a car left in direct sunlight on a summer day can reach interior temperatures of over 170°F (77°C). This extreme heat is a major enemy of any adhesive. The foam backing, which gives the headliner its shape and cushioning, can also degrade under such conditions.
If the foam breaks down, it loses its ability to support the fabric, even if the adhesive was still somewhat strong.
Your DIY Car Roof Upholstery Fix Guide
Fixing a sagging headliner doesn’t always require taking your car to a professional. With the right tools and a little patience, you can often achieve professional-looking results yourself. This guide breaks down the process into manageable steps so you can tackle this common car issue head-on.
Gathering Your Supplies
Before you start, it’s important to have all the necessary materials on hand. This will make the repair process smoother and more efficient. Having everything ready prevents interruptions and potential mistakes.
- New Headliner Fabric: Choose a material that matches your car’s interior or a complementary color. You can find this at automotive upholstery shops or online. Ensure you get enough to cover the entire roof panel with some overlap.
- Headliner Adhesive Spray: Automotive-grade spray adhesive is crucial. Look for products specifically designed for headliners, as they are formulated to withstand heat and vibration.
- Scraper or Putty Knife: For carefully removing old adhesive and foam.
- Stiff Brush or Wire Brush: To clean the backing board thoroughly.
- Screwdriver Set: To remove interior trim pieces that might be holding the headliner in place.
- Gloves and Safety Glasses: To protect yourself from chemicals and debris.
- Masking Tape: To protect surrounding areas from spray adhesive.
- Utility Knife or Scissors: For trimming excess fabric.
- Optional Cleaning Supplies: Mild soap and water, or an automotive interior cleaner, for cleaning the old fabric if you plan to re-glue it.
Step-by-Step Repair Process
The actual repair process involves several key stages. Each step needs to be performed with care to ensure a clean and durable fix. Rushing through any part can lead to a less-than-ideal outcome.
- Remove the Headliner Panel: This is often the most challenging part. You’ll need to carefully remove any interior lights, sun visors, grab handles, and trim pieces around the edges of the headliner. Take pictures as you go to remember how things were connected. Gently pry the headliner panel away from the roof. Some panels are flexible and can be carefully maneuvered out of the car, while others might need to be worked on in place.
- Clean Off Old Adhesive and Foam: Once the panel is out, you’ll see the backing board with the old fabric and foam. Carefully use a scraper or putty knife to remove as much of the old foam and adhesive as possible. A stiff brush can help remove stubborn residue. The goal is to get down to a clean, smooth surface.
- Prepare the New Fabric: Lay your new headliner fabric flat on a clean surface. If you’re re-using the old fabric, clean it thoroughly and ensure it’s completely dry. If you’re using new fabric, lay it out so you have a good idea of how much you’ll need, with plenty of overlap around the edges.
- Apply Adhesive and Re-attach Fabric: Working in sections, spray a light, even coat of the automotive headliner adhesive onto the backing board. Immediately press the fabric onto the glued area, smoothing out any wrinkles or bubbles as you go. Work from the center outwards. Overlap the edges of the fabric to ensure full coverage.
- Trim and Reinstall: Once the adhesive has cured according to the product’s instructions (usually several hours), carefully trim any excess fabric around the edges. Then, re-install the headliner panel into your car, re-attaching all the trim pieces, lights, and visors.
Dealing with Stubborn Old Adhesive
Sometimes, the old adhesive and foam can be incredibly difficult to remove. This is where a good scraper and some elbow grease come in. For very sticky residue, you might consider using a bit of adhesive remover, but be sure to test it on an inconspicuous area first to make sure it doesn’t damage the backing board material.
A wire brush on a drill can speed up the process, but use it on a low setting and with caution to avoid damaging the board.
A common mistake is not removing enough of the old material. This can lead to an uneven surface for the new adhesive and fabric, causing lumps and bumps. Aim for a surface that feels smooth and clean to the touch before you begin applying the new adhesive.
Alternative Repair Methods
If the full removal and re-gluing process seems too much, there are a few simpler alternatives, especially for minor sagging.
- Headliner Repair Kits: Some kits come with a special adhesive and clips or pins that can hold the fabric in place without full removal. These are good for small sagging spots.
- Fabric Glue or Aerosol Adhesives: For very small, localized areas of sag, a strong fabric glue or a specialized aerosol adhesive designed for upholstery can be used. You’ll need to carefully insert the glue or spray behind the fabric and press it back into place.
- Upholstery Staples or Pins: In some cases, small, discreet upholstery staples or decorative pins can be used to secure the fabric to the backing board. This is a more visible repair but can be effective for minor issues.
When to Consider Professional Help
While many headliner repairs are DIY-friendly, there are times when professional help is a better option. If your headliner is severely damaged, has extensive water stains, or if you’re uncomfortable with car interior disassembly, a professional automotive upholstery shop can handle the repair. They have the tools, experience, and materials to do a perfect job, ensuring a long-lasting fix.
Maintaining Your Car’s Headliner
Once you’ve fixed your sagging headliner, you’ll want to keep it looking its best. Proper maintenance can extend its lifespan and prevent future issues. Simple preventative measures go a long way.
Preventing Future Sagging
The best way to avoid a sagging headliner is to prevent the conditions that cause it. Parking indoors or in shaded areas whenever possible is a key step.
- Climate Control: Use your car’s air conditioning and heater to regulate interior temperature, especially during extreme weather. This helps minimize the stress on the adhesive from temperature fluctuations.
- Cleanliness: Keep the interior clean and free of excess moisture. Address any leaks immediately.
- Gentle Handling: Avoid excessive pressure on the headliner. Don’t hang heavy items from it.
Cleaning Your Headliner Fabric
When it comes time to clean your headliner, use a light touch. Over-wetting can cause the fabric to detach from its backing. A slightly damp cloth with a mild cleaner is usually sufficient for most dirt and grime.
For tougher spots, a dedicated automotive interior cleaner can be used. Always spray the cleaner onto a cloth first, not directly onto the headliner, to avoid oversaturation. Gently blot the stain rather than rubbing aggressively.
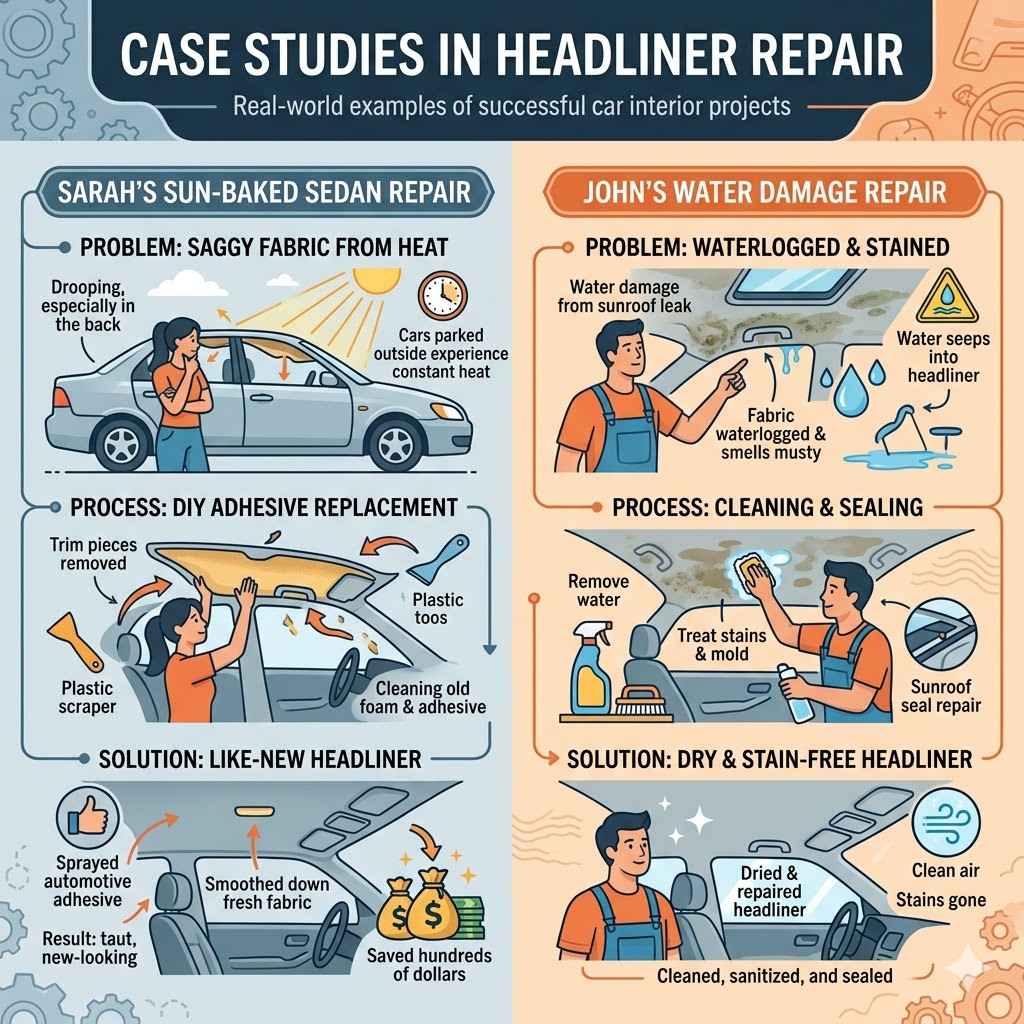
Example Scenario: The Sun-Baked Sedan
Sarah drives a 10-year-old sedan that has spent most of its life parked outside. She noticed the fabric on her car’s roof starting to droop significantly, especially in the back. The adhesive had clearly given up due to constant heat exposure.
Sarah decided to tackle the repair herself.
She carefully removed the headliner panel, which took some time due to the many trim pieces. After cleaning off the old, brittle foam and adhesive, she sprayed on a new automotive headliner adhesive and smoothed down a fresh piece of fabric. The result was a taut, like-new headliner.
This saved her hundreds of dollars compared to a professional repair.
Case Study: Water Damage Repair
John’s convertible had a small leak from its sunroof seal. Over several months, the water seeped into the headliner, causing it to become waterlogged and detach. The fabric was stained and smelled musty.
John decided to
Frequently Asked Questions
Question: How long does it take to fix a sagging car roof upholstery?
Answer: For a DIY fix, it can take anywhere from 2 to 8 hours, depending on your experience level and how easily you can remove the headliner panel. Professional repairs usually take about the same amount of time but are done by experienced technicians.
Question: Can I just spray glue behind the sagging fabric?
Answer: For very small, localized spots, you might get away with it using a specialized upholstery glue or aerosol. However, this is rarely a long-term fix. The old adhesive will likely continue to fail, and you might end up with a lumpy repair.
Question: What is the best type of adhesive for car headliners?
Answer: The best adhesive is a high-temperature, automotive-grade spray adhesive specifically designed for headliners or upholstery. These are formulated to withstand the heat found inside a car and provide a flexible, durable bond.
Question: Will my car’s headliner fall down completely?
Answer: While it can sag significantly, it’s rare for the entire headliner to completely detach and fall down unless the backing board itself breaks. Usually, it will sag until it hangs by only a few points or until the remaining adhesive completely fails.
Question: Can I use regular craft glue for headliner repair?
Answer: No, regular craft glue is not suitable. It won’t withstand the heat in a car, will become brittle over time, and will likely fail quickly, leading to an even worse sagging problem.
Conclusion
A sagging car roof upholstery is a common issue that many car owners face. Thankfully, Why Is My Car Roof Upholstery Falling Down? Fix Guide shows you that this problem is often a fixable DIY project.
By understanding the causes and following a step-by-step process, you can restore your car’s interior. Take your time, gather your supplies, and tackle the repair with confidence for a clean, finished look.