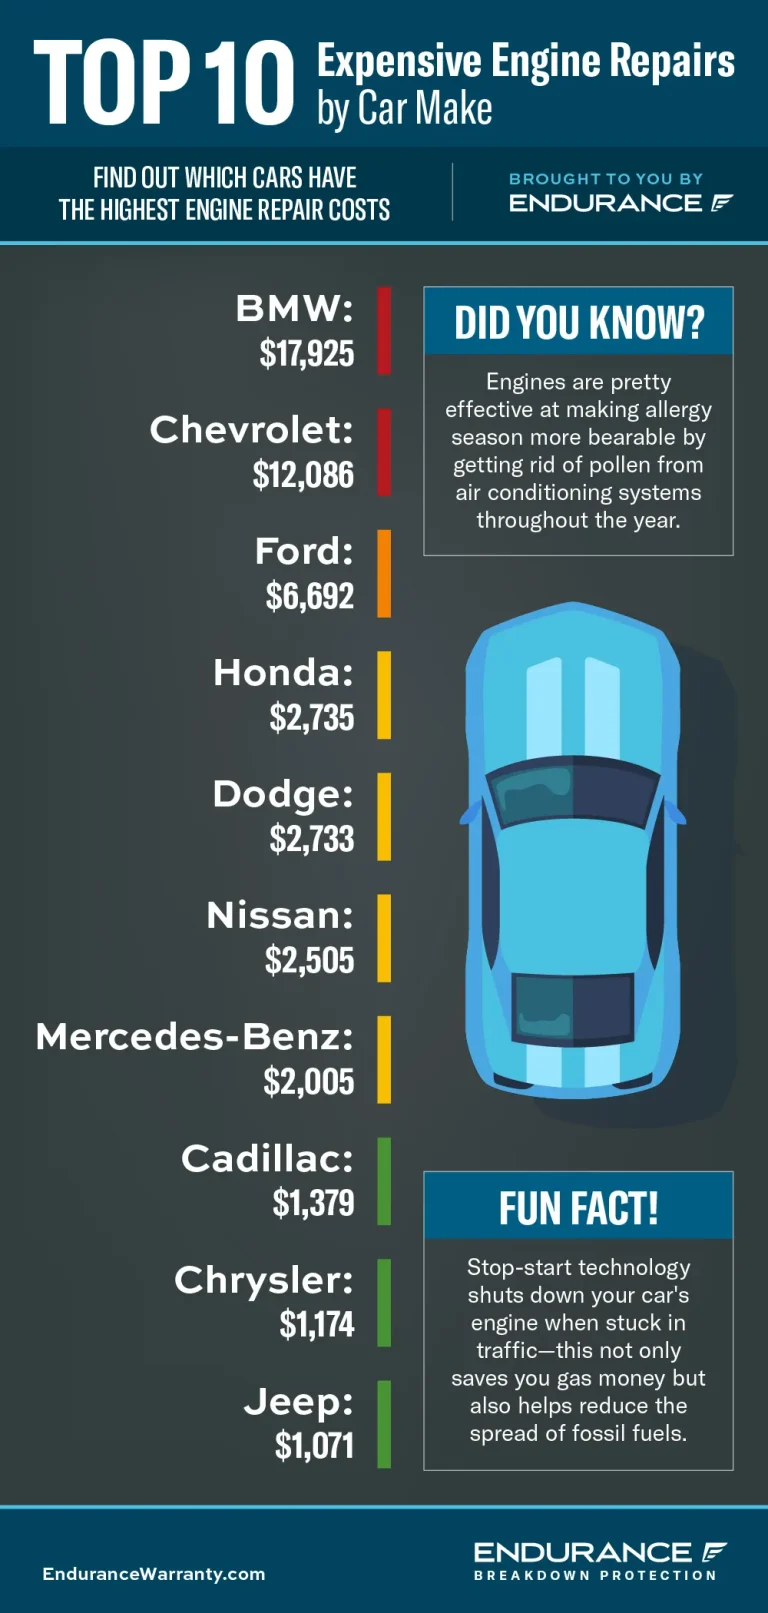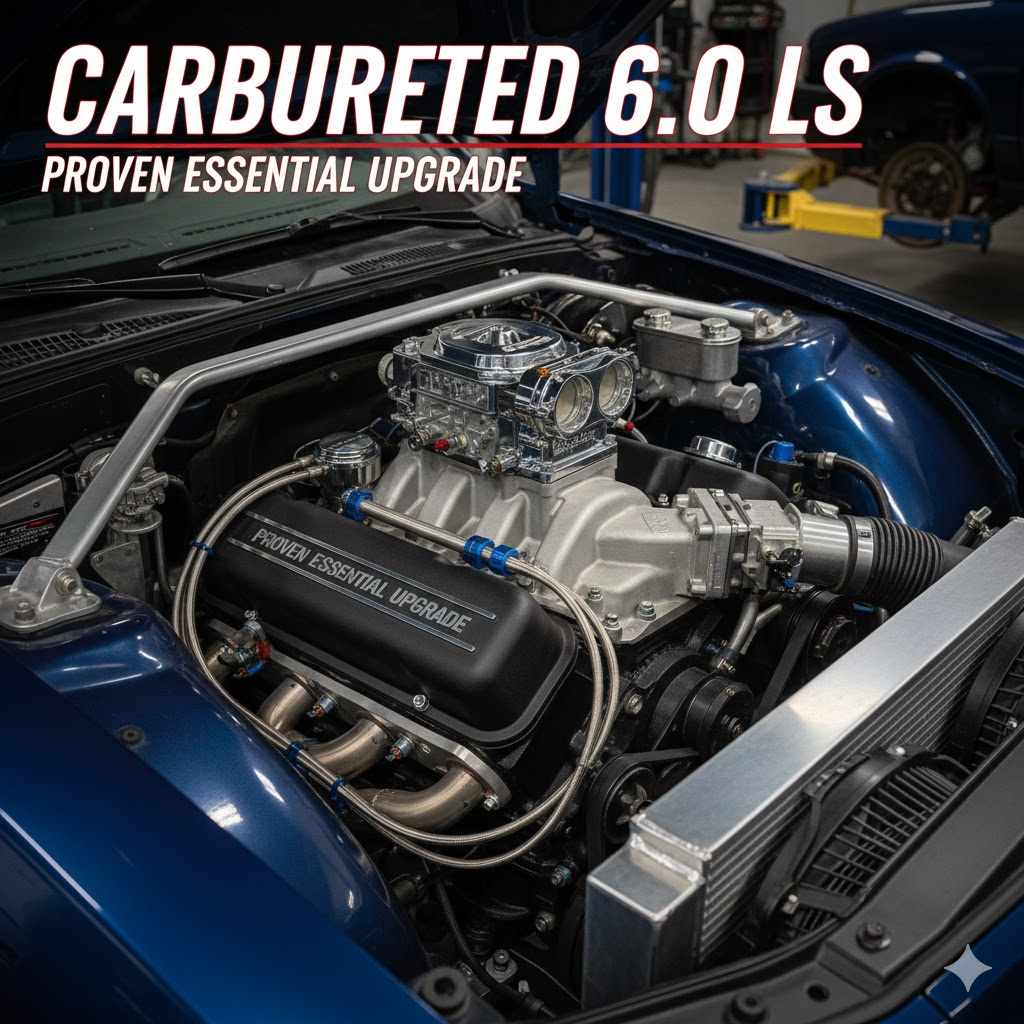
Carbureted 6.0 LS: Proven Essential Upgrade
Converting your fuel-injected 6.0L LS engine to a carburetor is a proven essential upgrade for simplicity and reliability, especially for hot rods or race applications. This swap often boosts low-end torque and removes complex wiring issues associated with the stock EFI system, making it easier for beginners to manage.
Does your modern engine swap feel overly complicated? You are not alone! Many gearheads love the power of the 6.0L LS engine, but they sometimes dread the maze of electronic fuel injection (EFI) wiring and complicated computer tuning required to get it running right. If you are building a classic hot rod, a dedicated drag car, or just prefer mechanical simplicity, switching that factory EFI to a good old-fashioned carburetor is a smart move. We will walk through exactly why this swap works so well and the essential parts you need. Let’s turn that electronic headache into simple, reliable power!
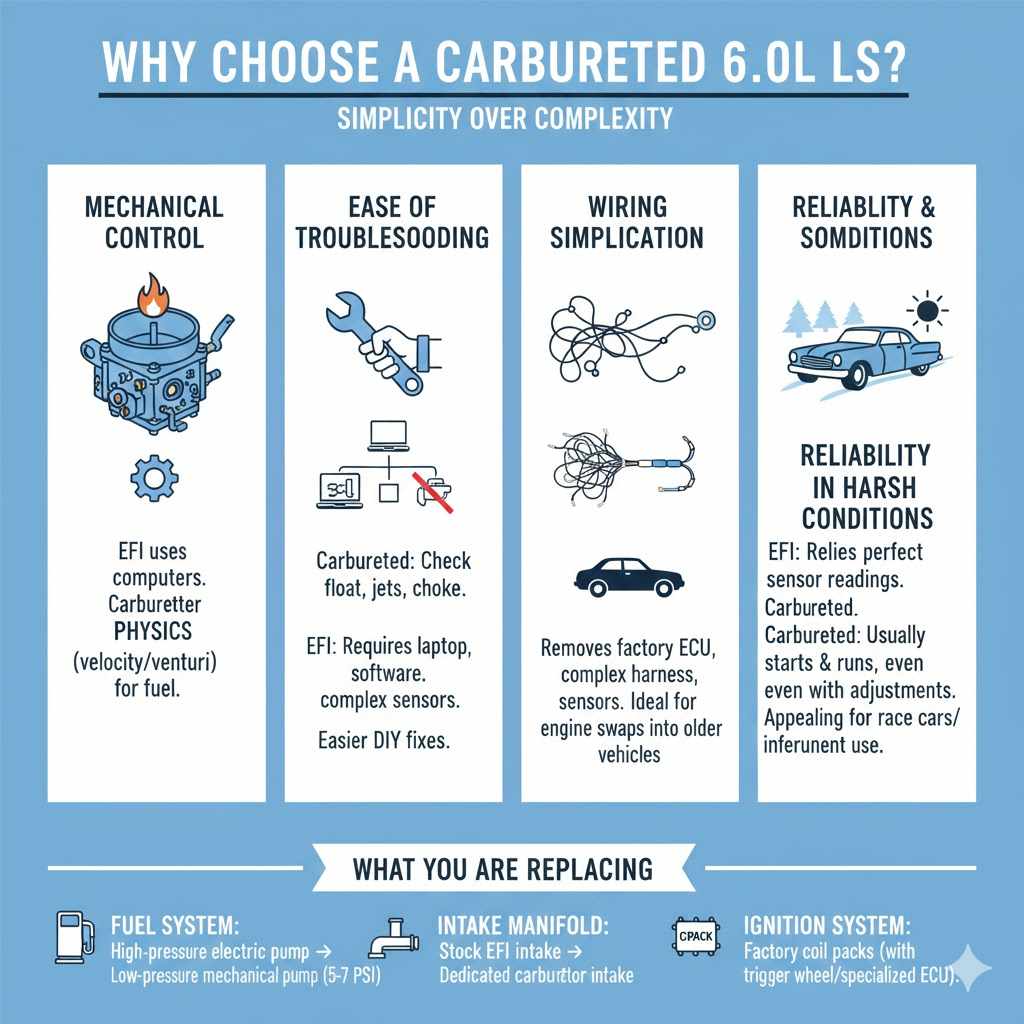
Why Choose a Carbureted 6.0 LS? Simplicity Over Complexity
The factory 6.0L LS engines are incredible pieces of engineering. They are powerful, efficient, and built tough. However, they rely entirely on the Engine Control Unit (ECU), sensors, and a complex wiring harness. For certain builds, this complexity becomes a liability. Moving to a carburetor simplifies the entire fuel delivery system dramatically.
The Beauty of Mechanical Control
Think of it this way: EFI uses computers to decide how much fuel to give the engine. A carburetor uses simple physics—air velocity and venturi effect—to do the same job. This mechanical nature offers huge benefits for specific projects.
1. Ease of Troubleshooting
When a carbureted engine runs rough, you check the float level, the jets, or the choke. When an EFI engine runs rough, you might need a laptop, specialized software, and knowledge of complex sensor readings. For the DIY beginner, mechanical systems are often much easier to diagnose and fix in the driveway.
2. Wiring Simplification
Removing the factory ECU, its harness, and all the associated sensors cleans up the engine bay immediately. This is crucial for engine swaps into older vehicles that lack the necessary factory wiring provisions.
3. Reliability in Harsh Conditions
While modern EFI systems are excellent, they rely on perfect sensor readings. In extreme heat, cold, or if the main computer fails, the car stops. A carburetor will usually start and run, even if it needs a slight adjustment, making it very appealing for dedicated race cars or older vehicles used infrequently.
Understanding the Swap: What You Are Replacing
The core of the conversion involves replacing three main EFI components with carburetor equivalents:
-
- The Fuel System: Moving from a high-pressure electric pump (58–65 PSI) to a lower-pressure mechanical pump (5–7 PSI).
- The Intake Manifold: Replacing the stock EFI intake with a dedicated carburetor intake manifold.
- The Ignition System: Often retaining the factory coil packs but requiring a dedicated trigger wheel setup or a specialized ECU to manage timing without the stock system.
Essential Components for Your Carbureted 6.0 LS Conversion
This conversion requires careful selection of parts to ensure the engine runs smoothly. You cannot simply bolt a carburetor onto a stock LS intake manifold. Here are the proven essential parts every builder needs for a successful carbureted 6.0 LS swap.
1. The Right Intake Manifold
The stock LS manifold is designed only for fuel injection runners. You must replace it with an aftermarket intake manifold specifically designed to mount a 4150-style (B.B.) or 4500-style (H.P.) carburetor. These are typically aluminum and feature a large, open plenum area.
Top Intake Manifold Considerations:
-
-
- Design: Look for dual-plane designs for better street manners and low-end torque, or single-plane designs for maximum high-RPM power (if you plan on racing).
- Manufacturer: Brands like Edelbrock, Holley, and MSD offer proven designs that bolt directly onto the LS cylinder heads.
- Throttle Body Opening: Ensure it matches the carburetor you plan to use (usually 4150 square bore).
-
2. Choosing the Perfect Carburetor
The carburetor selection depends heavily on your engine’s modifications. A stock 6.0L benefits from a different size carb than a heavily cammed, built motor. As a rule of thumb for naturally aspirated, mildly modified 6.0L engines, sizes between 650 CFM and 750 CFM are ideal starting points.
Carburetor Sizing Guide (Starting Points)
| Engine State | Recommended CFM Range | Best For |
|---|---|---|
| Stock/Mild Cam (Daily Driver) | 600–675 CFM | Street use, efficiency |
| Performance Cam/Street Strip | 700–780 CFM | Good overall power balance |
| Aggressive Race Engine | 850 CFM+ | Maximum top-end power |
3. Fuel Delivery System Overhaul
This is perhaps the most critical safety and performance change. The LS engine uses a high-pressure pump integrated into the fuel tank assembly or external high-pressure pumps. Carburetors require a low-pressure system.
-
-
- Fuel Pump: You must install a dedicated, external mechanical fuel pump designed for carbureted use (usually 5–7 PSI). This pump usually mounts near the oil pump or sometimes on the block, depending on the kit chosen.
- Fuel Lines: Replace the high-pressure EFI lines with appropriate low-pressure lines (often rubber hose or braided steel with AN fittings) and a high-quality fuel pressure regulator set precisely to the pump’s rating.
- Fuel Filter: Always install a quality filter before the fuel pump inlet and after the fuel pump outlet to protect the carburetor metering systems.
-
4. Ignition Control Module (The Brain Saver)
This is often the part beginners overlook. The factory ignition timing is controlled by the ECU based on engine load and temperature. When you remove the ECU, you lose that control, which will cause the engine to run poorly or not run at all.
You have two primary, beginner-friendly paths for ignition control:
-
-
- Standalone EFI/Ignition Controller: Many companies (like Holley or FiTech) sell standalone “HEI-style” modules or specific LS ignition boxes. These systems use the factory LS coil packs but require an external trigger signal, often provided via a specialized crank trigger kit or a distributor adapter.
- LS Conversion Distributor: For ultimate simplicity, some kits allow you to install a traditional distributor (like a GM HEI style) into the front of the LS engine block using an adapter housing. This distributor contains all the necessary timing sensors, allowing you to run a very basic, reliable ignition box that mimics older V8 timing control.
-
Always consult reliable sources like the SEMA Action Network for guidance on state-specific emissions regulations if you plan to drive this vehicle on public roads, as some areas are strict about removing factory emission controls.
Step-by-Step Guide: Converting Your 6.0 LS to Carburetion
This guide focuses on the mechanical steps. Remember to disconnect the battery before starting any work on your vehicle!
Phase 1: Removal of EFI Components
Tools Needed for Removal:
-
-
- Metric socket set (especially 10mm, 13mm)
- Torx bits (for some sensors)
- Screwdrivers and pliers
- Safety glasses and gloves
- Disconnect Battery: Safety first! Remove the negative battery cable.
- Relieve Fuel Pressure: Safely depressurize the fuel system before disconnecting any lines.
- Remove Wiring Harness Sections: Carefully trace and disconnect the EFI harness related to the fuel rail, injectors, throttle body, and main engine connections. You are aiming to remove everything unnecessary for a basic running engine (sensors, injectors, coils if moving to distributor).
- Remove Injector Fuel Rails: Unbolt and lift off the fuel rails. Cap the coolant and vacuum ports if you are deleting systems like EGR or manifold runners that relied on them.
- Remove the Stock Intake Manifold: Unbolt the intake manifold. This exposes the valley cover and valley pan area.
- Remove Drive-By-Wire Throttle Body: Unbolt the electronic throttle body.
-
Phase 2: Installing New Carbureted Components
Tools Needed for Installation:
-
-
- Torque wrench (essential for manifold mounting)
- Gasket scraper or plastic scraper
- High-quality RTV sealant (for oil pan sealing, if necessary)
- New gaskets for the manifold
- Clean Mating Surfaces: Thoroughly clean the cylinder head mounting surfaces where the new intake will sit. Ensure no old gasket material remains.
- Install the Carburetor Intake Manifold: Apply RTV sealant to the front and rear sealing areas (the “China walls”) as directed by the manifold manufacturer. Install the new intake manifold, carefully torquing the bolts in the correct sequence and to the specified torque settings. This step is crucial for preventing vacuum leaks.
- Mount the Carburetor: Place the carburetor onto the new intake, typically using a phenolic spacer between the carb and the manifold to reduce heat soak (which causes fuel percolation). Secure it with the provided mounting nuts.
- Install Fuel Pump and Regulator: Mount the new low-pressure mechanical fuel pump. Run the new fuel lines (feed and return) from the tank area to the pump and then to the carburetor inlet(s). Install the regulator near the carburetor and set its pressure.
- Set Up Ignition: Install your chosen ignition method (distributor or standalone trigger setup). Wire the coils to the new ignition control box, ensuring you have proper power and ground. Connect the crank trigger signal.
- Wiring Simplification (The Basics): You only need power for the coils, the fuel pump, and potentially the tachometer. Keep these connections clean and fused.
- Initial Firing Check: Double-check all fluid levels, ensure the fuel lines are tight, and verify the timing base setting (if applicable). Crank the engine briefly without starting it to check fuel pump function and pressure. Once satisfied, attempt to start the engine.
-
Tuning and Fine-Tuning Your Carbureted LS
Once running, a carbureted engine needs tuning. This is where the fun (and learning!) begins. Unlike EFI, where the computer learns, you manually adjust the carburetor.
Tuning the Fuel Mixture (Idle and Low Speed)
The idle mixture screws control how much fuel enters the engine at idle and very low throttle openings. These are crucial for smooth starts and avoiding stalling.
-
-
- Warm Up: Let the engine reach full operating temperature.
- Initial Setting: Gently turn both idle mixture screws inward until they lightly seat, then back them out exactly 1.5 turns. This is your starting baseline.
- Adjusting: Turn one screw clockwise (leaning the mixture) until the engine RPM drops slightly. Then, turn it counter-clockwise (enriching the mixture) until you find the highest, smoothest idle speed. Repeat this process for the other screw.
- Final Idle Speed: Use the throttle stop screw to set the final desired idle speed.
-
Tuning the Main Circuit (WOT Performance)
The main circuit is controlled by the main jets, which determine the fuel flow at wide-open throttle (WOT).
-
-
- If the engine bogs or smokes black at WOT, it is running too rich—install smaller main jets.
- If the engine stumbles, hesitates, or runs lean at WOT, install larger main jets.
-
This often requires testing on a dyno or a long stretch of road where you can safely monitor spark plug color after a hard pull. Always aim for a light tan or grayish-brown plug reading for optimal power and safety.
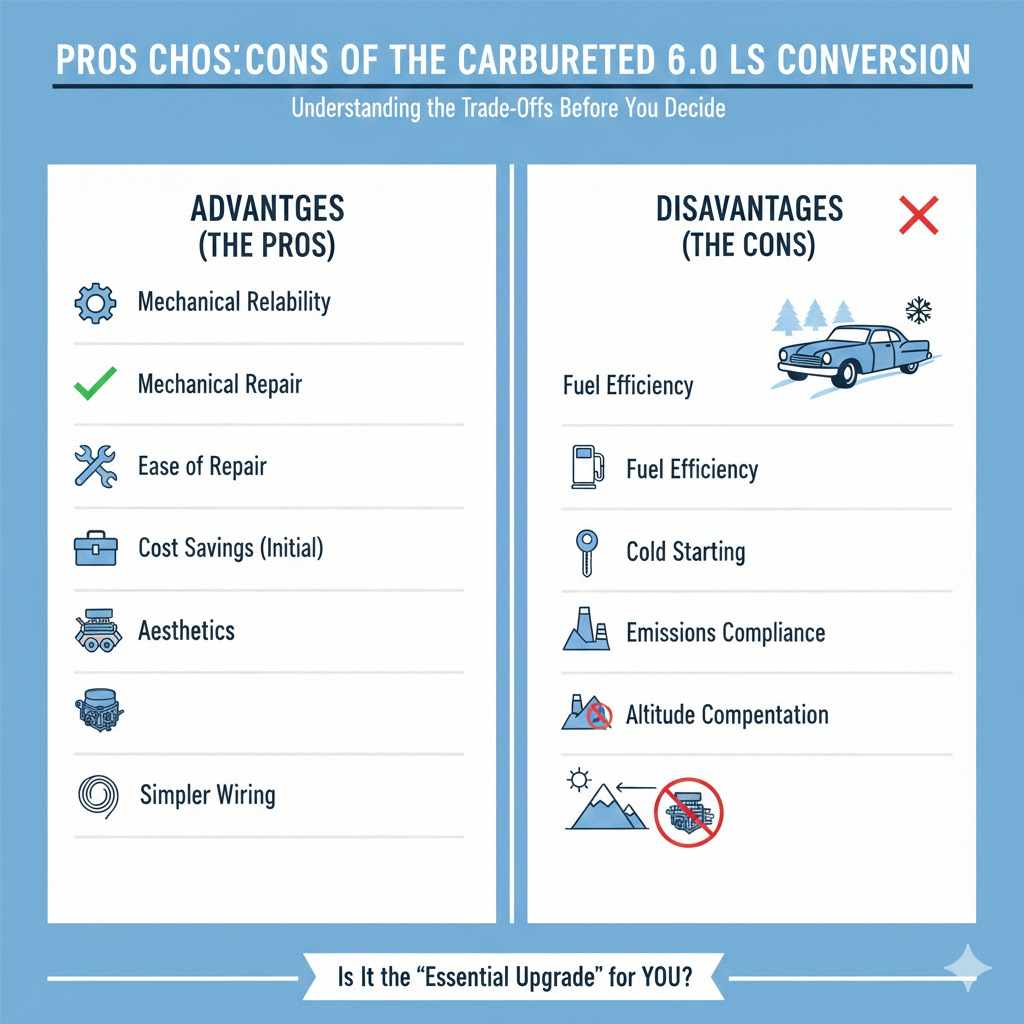
Pros and Cons of the Carbureted 6.0 LS Conversion
Making any major engine change involves trade-offs. Understanding these clearly helps you decide if this conversion is truly the “essential upgrade” for your specific goal.
Advantages (The Pros)
-
-
- Mechanical Reliability: Fewer points of electronic failure mean a more robust system for dedicated use.
- Ease of Repair: Carburetors can usually be rebuilt or repaired with basic tools and spare parts carried in the trunk.
- Cost Savings (Initial): While quality parts add up, you avoid the high cost of professional EFI tuning sessions.
- Aesthetics: A large carburetor sitting atop an LS intake looks fantastic in vintage builds.
- Simpler Wiring: Massive reduction in harness complexity.
-
Disadvantages (The Cons)
-
-
- Fuel Efficiency: Carburetors cannot match the fuel mapping precision of modern EFI, leading to lower MPG.
- Cold Starting: Requires manual choke operation (or an electric choke setup) and can be trickier in extremely cold weather.
- Emissions Compliance: Often impossible or very difficult to make street-legal in modern emission-controlled states.
- Altitude Compensation: Carburetors do not automatically adjust for changes in air density at different altitudes; manual jet changes are needed.
-
Frequently Asked Questions (FAQ) about Carbureted LS Swaps
Q1: Can I use my stock 6.0 LS fuel tank with this conversion?
A: Yes, but you must ensure the factory high-pressure pump is disabled or removed. You will need to install a low-pressure mechanical pump on the engine and run new lines, or use an external high-volume, low-pressure electric pump inside the tank assembly if you prefer to keep the tank intact.
Q2: Do I need a new cam for this swap?
A: Not strictly, but an aftermarket camshaft designed for better low-end torque and running carburetor vacuum characteristics will significantly improve drivability compared to using the stock EFI-optimized cam.
Q3: How do I set the timing on a carb’d LS without the ECU?
A: You must use a dedicated ignition controller. This controller reads the factory crank sensor signal (or uses a distributor trigger) and manages the ignition module to deliver spark at the correct time. You typically set the base timing using a timing light, much like older V8 engines.
Q4: Is this swap cheaper than keeping the EFI?
A: Usually not, if you buy all the high-quality conversion parts new. The initial cost of a good carb, manifold, fuel system, and ignition controller can be high. However, if you count the avoidance of costly professional EFI tuning sessions and potential future EFI sensor failures, some builders find long-term savings.
Q5: What happens to the VVT (Variable Valve Timing) system?
A: On the 6.0L engine (LQ4/LQ9), VVT is controlled by the factory ECU. When you remove the ECU, you must effectively lock out the VVT system. This is done by installing a delete plug or locking gear on the cam gear to prevent the cam timing from advancing or retarding, which simplifies the setup immensely.
Q6: Can I still use my factory LS coil packs with a carburetor?
A: Absolutely, and you should! The LS coil packs are excellent. Most conversion kits rely on keeping the stock coils but feeding them timing signals from a standalone ignition module, maximizing the factory reliability of the spark system.
Conclusion: Building Confidence with Mechanical Power
Converting your 6.0L LS engine to carburetion is a fantastic project that strips away the electronic complexity inherent in modern engines. It is a definitive way to achieve simplicity, robust reliability, and excellent low-end power delivery for hot rods, drag cars, and custom projects where tuning flexibility outweighs peak efficiency.
While it requires careful component matching—especially concerning the intake manifold, fuel pressure, and ignition timing control—the steps are logical and achievable for the dedicated DIY mechanic. By focusing on quality parts, following installation sequences carefully, and taking the time to tune the carburetor properly, you will unlock the raw, mechanical potential of your powerful LS engine. You are no longer reliant on diagnostic software; you are in control, building confidence one turn of a jet wrench at a time!