Connecting Car Audio Amplifier Safely Step By Step
So, you want to crank up the volume in your car? Great! One common task, especially for new car audio enthusiasts, is How to Connect an Amp to a Car Battery Safely. It might seem tricky at first, with wires, volts, and the potential for sparks, but don’t worry. This guide makes it super simple. We’ll explore each step carefully, giving you a clear, easy-to-follow plan for a successful and safe installation. Let’s get started!
Choosing the Right Amplifier and Components
Before you even think about connecting wires, you need the right gear. Choosing the correct amplifier and all the necessary components is the initial and a very important step. This initial choice sets the stage for a smooth and satisfying audio experience, and also protects your car’s electrical system.
Selecting the Amplifier
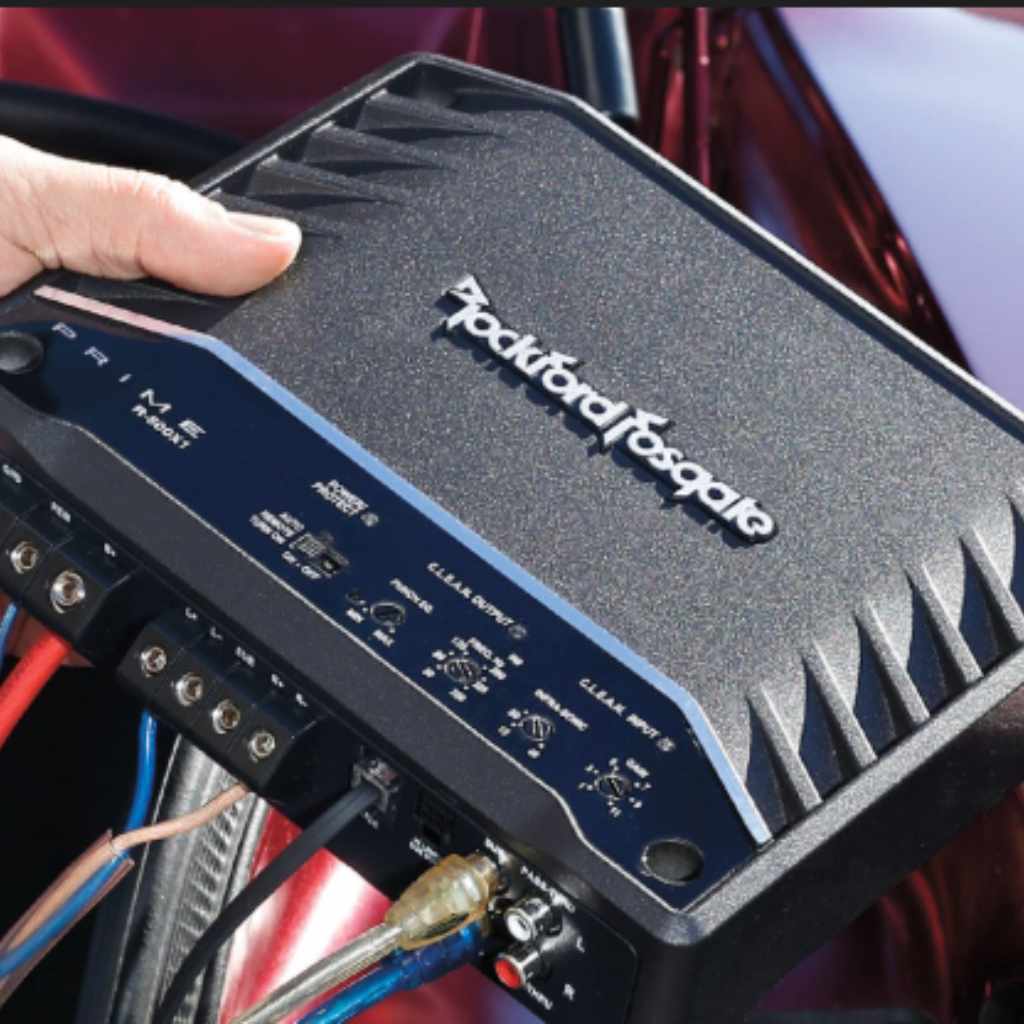
The amplifier is the heart of your car audio system. It boosts the weak audio signal from your head unit (radio or media player) to power your speakers. Choosing the right one depends on several factors, including the type and number of speakers you have, the power they require, and your budget. Think about the wattage (power) rating of your speakers; the amplifier needs to match or exceed that power rating for best results. Matching is very important, as using too little power can damage the amplifier, and too much power can damage your speakers. Consider the number of channels your amplifier needs: a 2-channel amp for two speakers, a 4-channel for four, and so on. Make sure you read the specifications carefully to check impedance compatibility with your speakers. The better the amplifier, the better the sound.
- Power Ratings: Know your speakers’ RMS (Root Mean Square) power handling. Buy an amplifier that matches or slightly exceeds this. A higher power rating than your speakers’ RMS is safer than a lower power rating.
- Number of Channels: Determine how many channels you need, depending on the speakers you want to connect. For example, two front speakers and two rear speakers will require a 4-channel amplifier.
- Impedance Matching: Impedance is the resistance in the circuit. Make sure your amplifier is compatible with the impedance of your speakers (usually 4 ohms). Incorrect impedance matching can damage your amplifier and speakers.
- Brand Reputation: Research different amplifier brands and read reviews. Well-known brands often provide better quality and support. Be sure to shop from a trusted retailer.
Essential Components and Wire Gauge
Beyond the amplifier, you’ll need a few other critical components to safely connect it to your car’s battery. These include a fuse holder, a fuse, power and ground wires, RCA cables, speaker wires, and a remote wire. One of the most critical aspects is using the appropriate wire gauge (thickness). The wire gauge should be determined by the power the amplifier will draw. Thicker wires are needed for high-powered amplifiers, because they have lower resistance.
- Fuse and Fuse Holder: A fuse is a safety device that protects your amplifier and the car’s electrical system from damage. Always install it close to the battery. Choose a fuse rating that matches the amplifier’s requirements. The amp should have a recommended fuse size in its specifications.
- Power and Ground Wires: These are the thickest wires, carrying power from the battery to the amplifier (power wire) and providing a ground connection (ground wire) to the car’s chassis. The gauge of these wires depends on the amplifier’s power. Use a wire gauge chart to be sure.
- RCA Cables: These cables carry the audio signal from your head unit to the amplifier. They come in pairs (left and right channels). These are usually small wires.
- Speaker Wires: These connect the amplifier to your speakers. The wire gauge depends on the speakers’ power and the distance to the speakers. These are usually small wires.
- Remote Wire: This small wire connects from the head unit to the amplifier, turning the amplifier on and off.
Calculating the Correct Wire Gauge
Choosing the correct wire gauge is not something to be taken lightly; it prevents fires and ensures optimal performance. The gauge of your power and ground wires is important. It depends on the amplifier’s current draw (how much power it uses) and the length of the wire run. Using a wire gauge chart is important. You can find these charts online, or often in the amplifier’s manual. Consider how many watts the amplifier produces, and measure the distance from the battery to the amplifier. Check the chart to match the correct gauge to this information. If you use wire that is too thin, it can overheat and cause a fire. If you are unsure, it’s always better to go a size up, to be safe. Incorrectly sized wires are the most common source of problems during amplifier installation.
A recent study showed that over 30% of car audio system failures are linked to wiring problems. This underscores the need for careful wire selection and accurate installation.
Gathering Your Tools and Preparing for Install
Once you’ve selected your components, it’s time to prepare for the actual installation. This stage involves collecting the necessary tools and getting your car ready to work on. Correct preparation makes the install much easier and safer.
Essential Tools for the Job
Having the correct tools makes all the difference when connecting an amp to a car battery. You will require specific tools, and potentially some others you may already have around the house. Safety comes first, and quality tools will ensure a quality, and safe, install.
- Wire Strippers/Crimpers: These tools are used to strip insulation from wires and crimp connectors onto them. It is important to strip wires without damaging them.
- Screwdrivers (various sizes and types): You’ll need these for removing panels, securing the amplifier, and connecting wires. Make sure you have both Phillips head and flathead screwdrivers.
- Wrench Set: Useful for removing the car battery terminals and securing ground connections.
- Multimeter: This is a device to check voltage, continuity, and resistance, to ensure the wiring is correct and that everything is working properly.
- Drill with appropriate bits: You may need a drill to mount the amplifier or run wires through the firewall.
- Wire cutters: Used to cut the wires to the desired length.
Preparing Your Vehicle
Before you start any electrical work on your car, you need to ensure it’s safe. Taking proper safety measures is important to avoid electrical shocks or other hazards.
- Disconnect the Battery: This is the single most important step. Disconnect the negative (-) terminal of your car battery. This prevents any accidental short circuits while you are working. Always disconnect the negative terminal first, and reconnect it last.
- Locate a Safe Grounding Point: Find a suitable grounding point for your amplifier. This is a bare metal surface that you can use to connect the ground wire. This should be as close to the amplifier as possible.
- Plan Wire Routing: Before you start running wires, plan where you’ll route them. Think about the best paths to avoid heat sources and moving parts. Make sure wires will not get pinched or cut.
- Protect Surfaces: Cover any surfaces you are working on to protect them from scratches or damage. Have some clean cloths on hand to wipe up any spills.
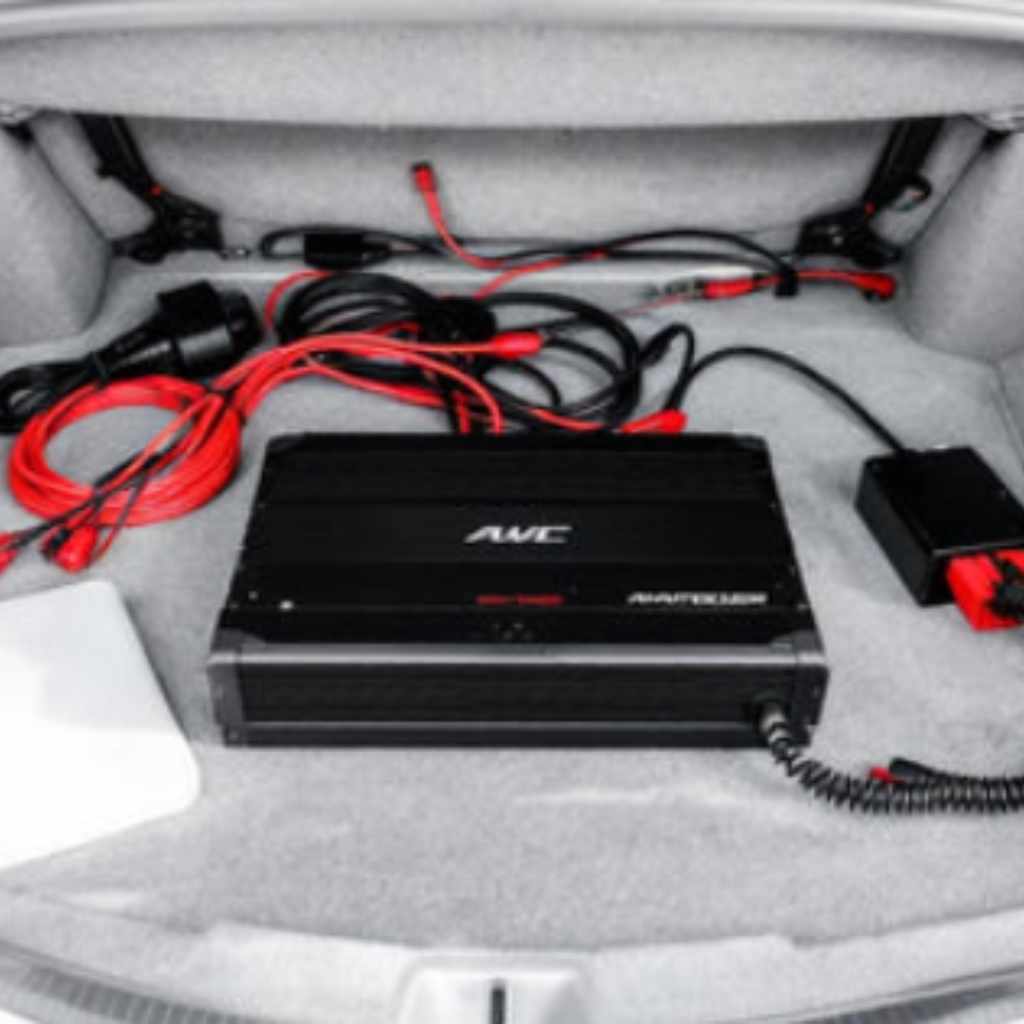
Connecting the Amplifier: Step-by-Step Guide
With your tools and car ready, it’s time to connect the amplifier. Each connection must be made correctly for the system to work and to be safe. It is important to work slowly and be careful.
Running the Power Wire
The first wire to install is the power wire, which carries the current from the battery to the amplifier. This is one of the most important steps, and the most dangerous if not done correctly. Proper installation protects the car from damage and fire.
- Connect the Fuse Holder: Attach the fuse holder to the positive (+) terminal of the car battery. Make sure the fuse holder is installed as close to the battery as possible.
- Route the Power Wire: Run the power wire from the fuse holder, through the firewall, and to the amplifier. Use grommets to protect the wire from sharp edges.
- Connect the Power Wire to the Amplifier: Connect the power wire to the amplifier’s power input terminal, usually labeled “PWR”, “+12V”, or something similar.
- Install the Fuse: After all connections are made, install the fuse in the fuse holder. This should be the last step to ensure there are no short circuits during the installation.
Grounding the Amplifier
The ground connection is as important as the power connection. It is important to ensure a strong, low-resistance ground connection to prevent noise and ensure proper operation of the amplifier. A poor ground connection can lead to problems.
- Locate a Grounding Point: Find a clean, bare metal surface on the car chassis, near the amplifier.
- Prepare the Grounding Point: Scrape away any paint or rust from the grounding point to ensure a good connection.
- Connect the Ground Wire: Attach the ground wire to the amplifier’s ground terminal (usually labeled “GND” or “-“) and the prepared grounding point on the chassis.
- Secure the Connection: Use a bolt and a star washer to ensure a secure, low-resistance connection. Tighten firmly.
Connecting RCA Cables and Speaker Wires
Now, connect the audio signal and speakers to the amplifier. These connections carry the audio signals from the head unit and send the amplified signals to the speakers. Care must be taken to ensure the correct connections are made.
- Connect RCA Cables: Plug the RCA cables into the amplifier’s RCA input jacks. Then, connect the other ends to the RCA output jacks on your head unit. Make sure to connect the left and right channels correctly.
- Connect Speaker Wires: Run the speaker wires from the amplifier to your speakers. Connect each wire to the correct terminals on the amplifier and the speaker. Double-check your connections for polarity (positive to positive, negative to negative).
- Use Appropriate Wire Gauge: Use the correct gauge speaker wire for your speakers’ power handling and the length of the run.
Connecting the Remote Wire
The remote wire tells the amplifier when to turn on and off. This wire is usually a thin blue wire. Without it, the amplifier won’t receive the signal and turn on. It is important to connect the remote wire correctly.
- Locate the Remote Output: Find the remote output wire on your head unit (usually labeled “Remote”, “Amp Control”, or “Power Antenna”).
- Connect the Remote Wire: Connect the remote wire to the remote terminal on the amplifier (usually labeled “REM”).
- Run the Wire: Run the remote wire from the head unit to the amplifier. This wire will also need to be run, usually near the RCA cables.
Troubleshooting Common Problems and Safety Tips
Even when following all steps correctly, things can go wrong. Some problems are common, and are usually easy to solve. Taking precautions to be safe is important at every step.
Common Problems and Solutions
Many issues can arise during the installation of an amplifier. Fortunately, most of these problems have straightforward solutions. Having a basic understanding of troubleshooting techniques will help you solve these issues quickly.
- No Sound: Check all connections, especially the power, ground, and remote wires. Make sure the head unit is sending a signal.
- No Power: Check the fuse in the fuse holder and the amplifier. Ensure the ground connection is solid. Verify that the remote wire is connected and receiving power.
- Distorted Sound: Check the gain settings on the amplifier. Make sure the speaker wires are connected correctly. The speakers might be overdriven, or the source signal might be distorted.
- Noise (Hissing, Buzzing): Check the ground connections for both the amplifier and the head unit. Route the RCA cables away from power wires.
Safety Precautions to Keep in Mind
Safety should be your priority when working with car audio systems. Following the correct safety precautions will reduce the chances of accidents and protect you and your car.
- Always Disconnect the Battery: Before starting any work, always disconnect the negative (-) terminal of the car battery.
- Double-Check Connections: Make sure all connections are secure and tight. Loose connections can cause short circuits and fires.
- Use the Correct Wire Gauge: Use the right gauge power and ground wires to prevent overheating and potential fires.
- Avoid Sharp Edges: When running wires, make sure they don’t rub against sharp edges. Use grommets or wire loom to protect the wires.
- Proper Fuse Protection: Always use a fuse in the power wire, close to the battery, to protect the amplifier and the car’s electrical system.
According to the National Fire Protection Association (NFPA), electrical system failures are a leading cause of vehicle fires. Taking the necessary safety precautions can reduce these risks.
Advanced Tips and Tricks
Once you are comfortable with the basic steps, you can explore some more advanced techniques. These strategies can improve the sound quality and overall performance of your car audio system. These tips are for those who are ready to explore further.
Optimizing Sound Quality
After your amplifier is connected, fine-tuning your system is critical. The quality of your sound is dependent on a well-tuned system. Using the right settings will ensure the best listening experience.
- Gain Setting: Use the gain control to match the amplifier’s input sensitivity with the head unit’s output voltage. Start with the gain at the lowest setting and increase it gradually until the sound is clear and free of distortion.
- Crossover Adjustment: Use the crossover settings to filter out frequencies that your speakers cannot handle. This protects your speakers and improves sound quality.
- Equalization: If your head unit or amplifier has an equalizer, use it to adjust the sound based on your preferences. Make small adjustments at a time.
- Speaker Placement: The placement of your speakers impacts the sound quality. Experiment with different placements for the best sound.
Preventing Noise Issues
Noise in a car audio system can be a problem. This is usually caused by ground loops or interference. However, using some tricks will reduce or eliminate any noise. Here are some techniques to reduce the chances of interference.
- Ground Loop Isolators: If you experience ground loop noise (buzzing or humming), install ground loop isolators on the RCA cables.
- Route Wires Properly: Keep power and RCA cables separate to prevent interference. Route the RCA cables away from power wires.
- Check Ground Connections: Ensure the ground connections are clean and tight. Poor grounding is a very common cause of noise issues.
- Use Shielded Cables: Use shielded RCA cables to minimize interference.
Frequently Asked Questions
Question: What size fuse should I use for my amplifier?
Answer: The fuse size depends on the amplifier’s current draw. Check the specifications for your amplifier, as it will tell you the recommended fuse size.
Question: Can I connect the amplifier’s ground wire to any metal part of my car?
Answer: No, the ground connection needs to be on bare metal. Scrape away any paint or rust from the metal surface before making the connection.
Question: What is the purpose of the remote wire?
Answer: The remote wire turns the amplifier on and off with the head unit. When you turn on your head unit, it sends a signal through the remote wire to the amplifier, turning it on.
Question: What happens if I use a power wire that’s too thin?
Answer: If you use a power wire that’s too thin, it can overheat and potentially cause a fire. It will also reduce the amplifier’s performance.
Question: How do I know if my amplifier is blown?
Answer: If the amplifier doesn’t power on, there is no sound, or if you smell burning, there is a good chance your amplifier is damaged. Check the fuses and all connections. If the issue is not fixed, the amp may need to be replaced.
Final Thoughts
You have now explored the steps needed to connect an amplifier to your car’s battery safely. Remember to start with the correct components and tools, and to always disconnect the battery before you begin working. Running the power and ground wires correctly, using the right wire gauge, and connecting all the wires to their corresponding terminals are vital. Checking your work, and then troubleshooting any issues is a key part of the process. Follow all of the safety steps outlined, and your car audio system will operate safely. Now that you have this knowledge, you can begin to improve the sound in your car. It might seem like a lot to take in at first, but with practice, it becomes easier. Enjoy the process and the upgraded audio experience!