Honda Civic Stereo Wiring Diagram: Color Codes and Installation Guide
You bought a new stereo, pulled the old one out of your Civic, and now you’re staring at a bundle of wires with no idea which one does what. That moment stops a lot of installs cold. The factory wiring colors look like a code you weren’t given the key to.
This guide walks you through the Honda Civic stereo wiring diagram for the most common generations, explains what each wire does, and shows you how to connect a new head unit without splicing into the factory harness. You’ll leave knowing which wire is power, which is ground, and why the dimmer wire often gets left unconnected.
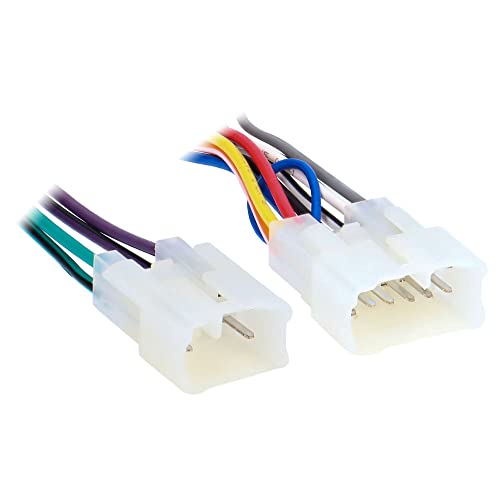
Metra
Metra 70-1761 Radio Wiring Harness Fits Select…
- Plugs Into Car Harness At Radio
- Powers 4 Speakers
- Great For All Your Needs
I’ve installed stereos in several Civics over the years, from a 1998 DX to a 2026 Si. The wiring stayed remarkably consistent across those years, which makes this easier than you might think.
Before you touch a single wire, grab a wiring harness adapter like the Metra 70-1761. It plugs directly into the car’s factory connector on one end and gives you bare wires on the other. You connect those to your new stereo’s harness, and you never cut a single factory wire. That keeps your car original if you ever sell it or want to revert.
Understanding the Factory Wire Colors
Honda has used a fairly standard color scheme for decades. The wires you care about most are the ones carrying power and audio signals. Here’s the breakdown for the 1992 through 2026 Civics, which covers the EG, EK, EM, EP, FA, and FB chassis codes.
The constant 12V wire is usually yellow. This one keeps your clock and radio presets alive when the ignition is off. The switched 12V wire is usually red, and it only gets power when the key is in the ACC or ON position. The ground wire is black, and it connects to the metal chassis of the car.
Speaker wires come in pairs. The front left positive is usually white, with white with a black stripe for the negative. Front right positive is gray, with gray with a black stripe for the negative. Rear left is green, and rear right is purple. Each has a corresponding striped wire for the negative side.
One thing that trips people up: the illumination or dimmer wire. It’s usually orange or orange with a white stripe. This wire tells the stereo when the headlights are on so it can dim the display. Many aftermarket stereos don’t use it, and leaving it disconnected won’t hurt anything. You’ll just have a bright screen at night.
Step-by-Step Installation for Most Civic Models
You don’t need to be an electrician to do this. You need a wire stripper, some crimp connectors or solder, electrical tape, and about an hour of patience. The process breaks down into a few clear steps.
- Disconnect the battery. Negative terminal first. This prevents any short circuits while you’re working.
- Remove the factory stereo. On most Civics, you’ll need a panel removal tool or a couple of flathead screwdrivers wrapped in tape to pop off the trim bezel. Then remove the four screws holding the radio in place.
- Unplug the factory harness. There are usually two connectors: one for power and speakers, and a smaller one for the antenna. The antenna might be stuck, so give it a gentle wiggle.
- Connect the Metra 70-1761 adapter. Plug it into the car’s factory connector. Now you have a set of bare wires to work with.
- Match the wires. The adapter’s wires are color-coded to match your new stereo’s harness. Yellow to yellow, red to red, black to black. Speaker wires match by position, not always by color, so check both harnesses carefully.
- Crimp or solder each connection. Crimp connectors are faster and don’t require a soldering iron. If you solder, use heat shrink tubing over each joint to prevent shorts.
- Test everything before reassembly. Reconnect the battery, turn the key to ACC, and check the stereo works. Test all four speakers by adjusting the fader and balance.
- Button it up. Tuck the wiring into the dash, slide the stereo in, and reinstall the trim.
The most common mistake I see is swapping the constant and switched power wires. If you mix them up, your stereo will turn on and off with the key, but you’ll lose your presets every time. Or it’ll stay on all the time and drain your battery overnight. Double-check the yellow and red wires before you crimp.
Dealing with Amplified Systems and Special Cases
Some Civics, particularly the Si trims and models with the premium audio package, have a factory amplifier. If your car has one, the wiring diagram looks a bit different. The speaker wires from the head unit go to the amp, and the amp powers the speakers. You can’t just wire a new stereo directly to those same wires.
You have two options. The first is to bypass the factory amp entirely. That means running new speaker wires from the stereo to each speaker. It’s more work, but it gives you a clean signal path. The second option is to use a line output converter, which taps into the speaker wires and sends a low-level signal to the factory amp. This works, but the sound quality depends on the amp’s quality, which varies.
If you’re working on a 2026 or newer Civic, you might also run into the issue of the dash kit. The double-DIN opening is standard, but the mounting brackets are not. You’ll need a specific dash kit for your model year. The wiring itself is still the same colors, though.
Older Civics from the 1980s, like the third and fourth generations, used a slightly different scheme. The constant power was often a white wire with a blue stripe, and the switched power was yellow. If you have one of these, find a diagram specific to your year before cutting anything.
Comparing Wiring Harness Options
You’ve got a few ways to connect your new stereo. Each has its pros and cons, and the right choice depends on your budget and how comfortable you are with electrical work.
| Method | Difficulty | Time | Pros | Cons |
|---|---|---|---|---|
| Harness adapter (Metra 70-1761) | Easy | 30-60 min | Plugs straight into the factory connector, no cutting, reversible | Costs a few dollars, need to match wires to your stereo’s harness |
| Hardwiring (splice directly) | Moderate | 45-90 min | No adapter to buy, direct connections | Cuts factory wires, harder to revert, risk of damaging the car’s harness |
| Line output converter (for amplified systems) | Moderate | 60-90 min | Keeps factory amp, less wiring work | Sound quality depends on the amp, extra component to hide |
| Professional installation | None | 1-2 hours | Done right the first time, no guesswork | Costs $50-$150 for labor |
The harness adapter is the way to go for most people. It’s cheap, it’s fast, and it doesn’t permanently alter the car. The only time I’d skip it is if you have a very old Civic with a non-standard connector and the adapter doesn’t fit.
Frequently Asked Questions
What are the common wire colors for a Honda Civic stereo?
Yellow is constant 12V power, red is switched 12V power, and black is ground. Speaker wires are white (front left), gray (front right), green (rear left), and purple (rear right), each paired with a striped negative wire. The orange or orange/white wire is for illumination.
Do I need a wiring harness adapter?
No, but you should use one. The adapter plugs into the factory connector and gives you a clean set of wires to connect to your new stereo. It costs a few dollars and saves you from cutting into the car’s original wiring. That means you can put the factory radio back in later without a mess.
Why does my stereo work but I have no sound from one speaker?
That’s almost always a wiring issue at the speaker or at the harness. Check the connection for that specific speaker first. If it’s solid, test the speaker itself with a 9V battery by touching the leads to the terminals. If the speaker cone moves, the speaker is fine and the problem is in the wire run.
Can I install a stereo in a Civic with a factory amplifier?
Yes, but you need to either bypass the amp or use a line output converter. Bypassing means running new wires to each speaker. Using a converter taps into the existing signal path. The converter is easier, but the sound quality depends on the factory amp’s condition.
What should I do if my new stereo doesn’t have a dimmer wire?
Leave the car’s dimmer wire unconnected. The stereo will just stay at full brightness when you turn on the headlights. It’s not a safety issue, just a minor annoyance. Many aftermarket units don’t support dimming anyway.
What to Remember Before You Start
- Disconnect the negative battery terminal first. No exceptions.
- Use a harness adapter to keep your factory wiring intact.
- Match yellow to yellow and red to red. Swapping them causes dead batteries or lost presets.
- Test all four speakers with the fader and balance controls before putting the dash back together.
- Leave the dimmer wire unconnected if your new stereo doesn’t support it.
- If your Civic has a factory amp, plan for a bypass or a line output converter.
- Take a photo of the factory wiring before unplugging anything. It’s a free reference if you get confused.
You’ve got the color codes and the steps. The actual install is straightforward, and the most difficult part is usually just removing the trim without scratching it. Take your time, double-check each connection, and you’ll have a working stereo in about an hour.
Products related to this article
Sponsored / affiliate links. As an Amazon Associate I earn from qualifying purchases. I may earn additional commission from eligible campaigns.