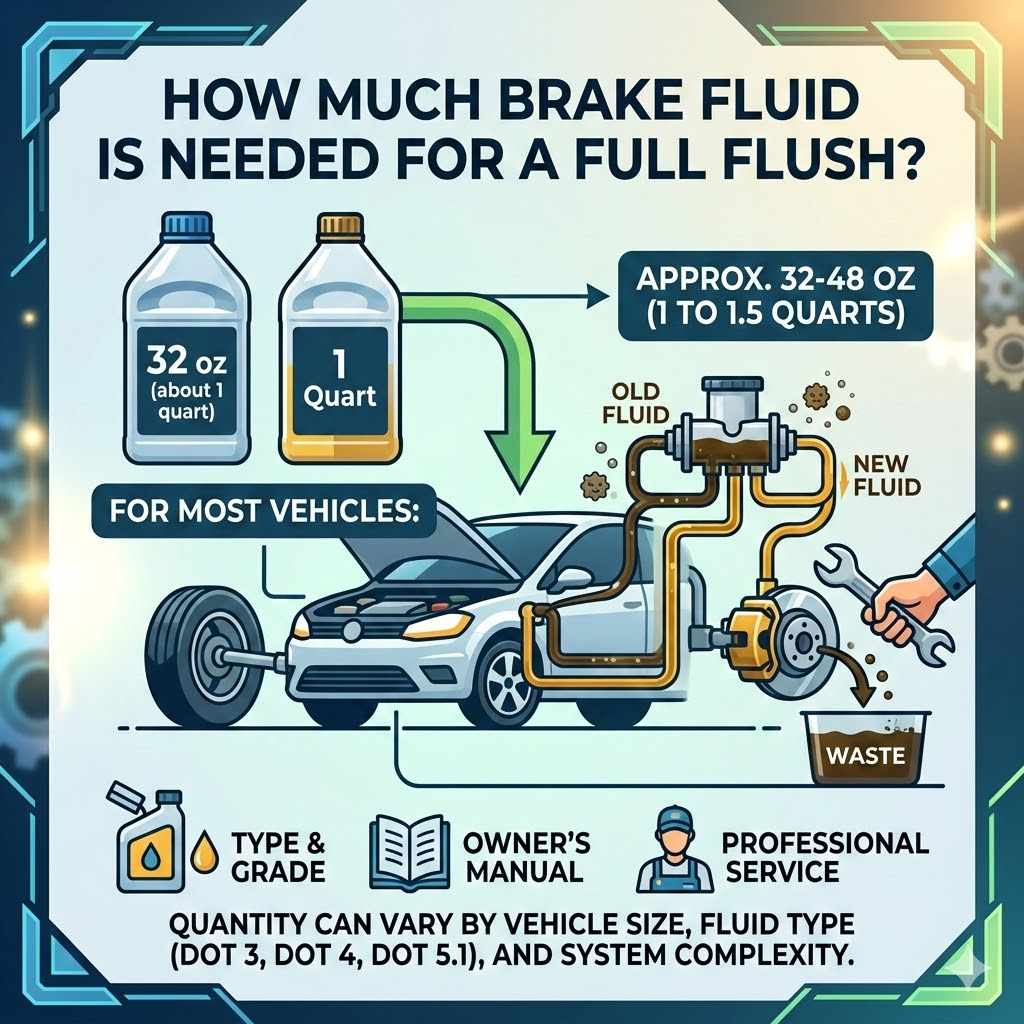
How Much Brake Fluid Is Needed for a Full Flush
Figuring out how much brake fluid is needed for a full flush can feel a bit tricky at first. Many people wonder if they should buy just one bottle or a whole case. It’s a common question, and we’re here to make it super simple. You don’t need to be a car expert to get this right. We’ll walk you through everything step-by-step, so you’ll know exactly what to grab at the auto parts store. Let’s get your car’s brakes in top shape without any confusion!
Determining How Much Brake Fluid Is Needed for a Full Flush
Understanding how much brake fluid is needed for a full flush is important for a successful brake system service. A full flush means you are completely replacing the old fluid with new fluid. This process is vital for maintaining the safety and performance of your vehicle’s braking system. If the fluid is old or contaminated, it can lead to spongy brakes, reduced stopping power, and costly damage over time.
Knowing the right quantity prevents you from running out mid-job or buying far too much, which can be wasteful. This section will guide you through the factors that influence the amount needed and give you a clear answer.
Brake System Capacity and Fluid Volume
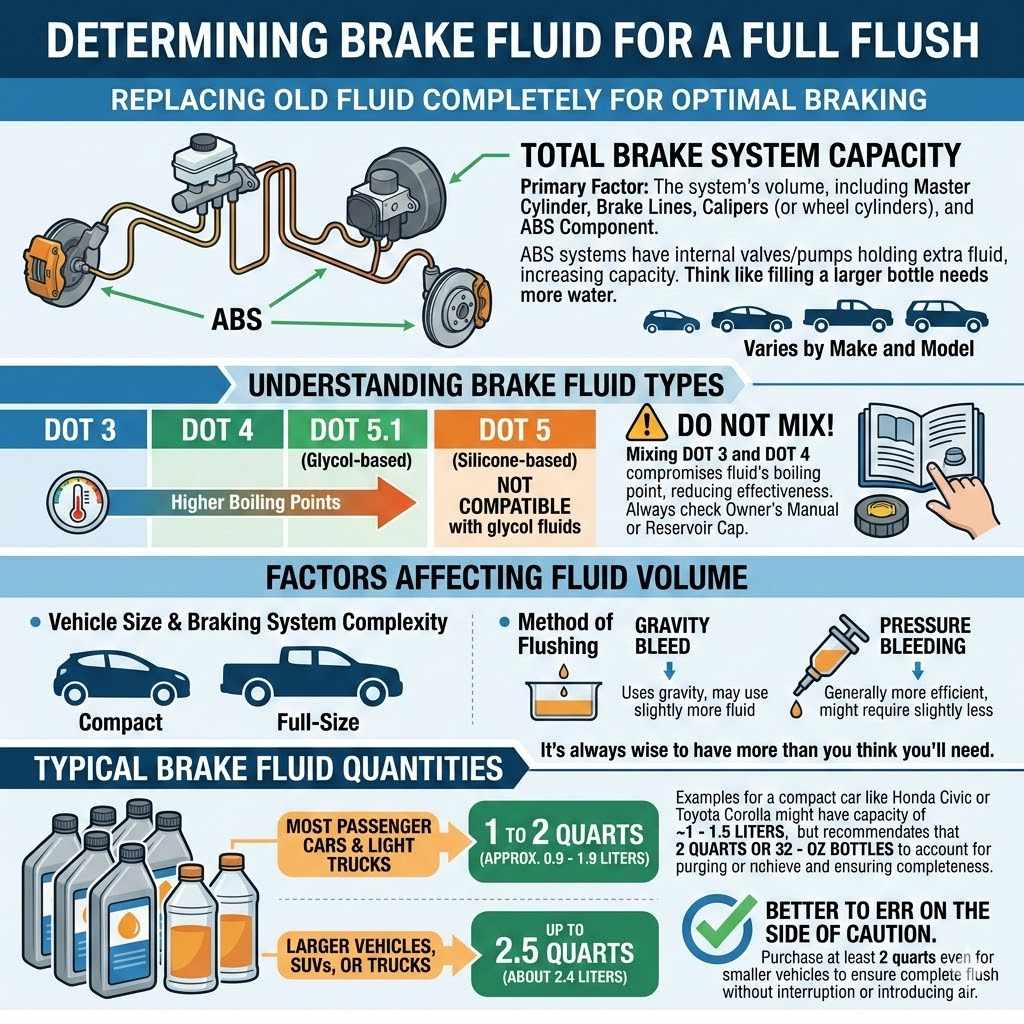
The primary factor determining how much brake fluid is needed for a full flush is the total volume your vehicle’s brake system can hold. This capacity varies significantly between different makes and models of cars, trucks, and SUVs. Think of it like filling a water bottle; a larger bottle needs more water.
Similarly, vehicles with larger brake systems, more complex ABS modules, or longer brake lines will generally require more fluid to achieve a complete flush. Manufacturers design these systems with a specific fluid capacity in mind to ensure optimal operation.
Understanding Brake Fluid Types
Brake fluid is not a one-size-fits-all product. There are several common types, each with different properties. Using the wrong type can damage your brake system. The most common types are DOT 3, DOT 4, and DOT 5.1. DOT 5 uses a silicone base and is not compatible with systems designed for DOT 3 or DOT 4. DOT 3, DOT 4, and DOT 5.1 are glycol-based fluids. DOT 4 has a higher boiling point than DOT 3, which is beneficial for performance driving or vehicles that experience heavy braking.
Always check your vehicle’s owner’s manual or the cap on your brake fluid reservoir to determine the correct type.
A common mistake is mixing DOT 3 and DOT 4 fluid. While they share a similar base, their performance characteristics differ. Mixing them might not cause immediate catastrophic failure, but it can compromise the fluid’s boiling point and reduce its effectiveness, especially under extreme conditions.
For example, a high-performance vehicle that often experiences spirited driving might rely on the higher boiling point of DOT 4 to prevent brake fade. Using DOT 3 in such a scenario could lead to a dangerous situation where the brakes become less responsive.
Factors Affecting Fluid Volume Requirements
Several factors influence the exact amount of brake fluid required for a flush. The most significant is the total volume of your vehicle’s brake system. This includes the master cylinder, brake lines, calipers (or wheel cylinders in drum brakes), and any associated ABS (Anti-lock Braking System) components. ABS systems, in particular, have internal valves and pumps that hold extra fluid, increasing the overall capacity.
Another consideration is the method of flushing. If you are performing a gravity bleed, you might use slightly more fluid as it relies on gravity to push old fluid out. Pressure bleeding, which forces new fluid in, is generally more efficient and might require a bit less fluid to purge all the old fluid. However, it’s always wise to have more than you think you’ll need to ensure a complete and successful flush without interruption.
Typical Brake Fluid Quantities
For most passenger cars and light trucks, a full brake fluid flush typically requires between 1 to 2 quarts (approximately 0.9 to 1.9 liters) of new brake fluid. However, some larger vehicles, SUVs, or trucks with more extensive braking systems might need slightly more, potentially up to 2.5 quarts (about 2.4 liters).
It’s always better to err on the side of caution and purchase at least 2 quarts, even if your vehicle is on the smaller side. Having a little extra ensures you can complete the flush without needing to stop and buy more, which can introduce air into the system.
A common scenario is a compact car like a Honda Civic or Toyota Corolla. These vehicles typically have a brake system capacity of around 1 to 1.5 liters. Therefore, purchasing a single 32-ounce (1 quart or 0.946 liter) bottle of brake fluid might seem sufficient.
However, to account for potential spills, a small amount left in the bottom of the old fluid container, and ensuring all old fluid is purged from the lines and ABS unit, it’s wise to have a second, smaller container or a second full quart available.
Performing a Full Brake Fluid Flush
Completing a full brake fluid flush yourself can save money and give you a great sense of accomplishment. The process involves systematically removing all the old, contaminated fluid from the brake system and replacing it with fresh fluid. This ensures optimal braking performance and prevents potential damage to components like the ABS module or master cylinder. This section will break down the steps involved in a thorough brake fluid flush.
Gathering Necessary Tools and Supplies
Before you begin, ensure you have all the right tools and supplies. This preparation is key to a smooth and efficient brake fluid flush. Having everything ready means you won’t have to stop midway to search for a forgotten item, which could compromise the process. The right tools also ensure you can perform the job safely and effectively.
Essential Tools for Brake Flushing
You will need a few specific tools to perform a brake fluid flush. A brake bleeder kit is highly recommended. These kits come in various forms, including vacuum bleeders, pressure bleeders, and simple one-way valves that attach to the bleeder screws. A wrench set to remove the bleeder screw caps is also necessary.
You’ll also need a clean container to catch the old fluid. A turkey baster or syringe can be useful for removing fluid from the reservoir. Safety glasses and gloves are a must for protecting yourself from brake fluid, which can irritate skin and eyes.
A common and effective tool is a vacuum bleeder. This device attaches to the bleeder screw and uses suction to pull the old fluid out as you add new fluid to the reservoir. It’s a one-person job with a vacuum bleeder. A pressure bleeder works by pressurizing the master cylinder reservoir, forcing the old fluid out through the bleeder screws. This is also a highly efficient method. For those on a budget, a simple one-way valve bleeder kit can work, but it often requires a second person to pump the brake pedal.
Supplies You’ll Need
Beyond tools, you’ll need the correct type and quantity of brake fluid. As discussed, check your vehicle’s manual for the specific DOT rating (e.g., DOT 3, DOT 4). It’s always best to buy a name-brand fluid from a reputable manufacturer.
You’ll also need clean rags or shop towels to wipe up any spills. Some people use a small amount of brake cleaner to clean up minor spills, but be careful not to spray it directly into any brake components as it can damage seals. Lastly, you’ll need a way to dispose of the old brake fluid responsibly. Many auto parts stores accept used automotive fluids for recycling.
Preparing Your Vehicle
Before starting the flush, park your vehicle on a level surface. Engage the parking brake securely. Locate the brake fluid reservoir, usually a translucent plastic container under the hood, near the firewall. You may need to remove a plastic cover to access it. Open the hood and identify the reservoir. It will have a cap with the DOT rating for the appropriate brake fluid printed on it.
Carefully remove the cap from the brake fluid reservoir. If there’s any debris around the cap, clean it off first to prevent it from falling into the reservoir. Use a turkey baster or syringe to remove as much of the old fluid as possible from the reservoir. Dispose of this old fluid properly. Then, fill the reservoir to the “MAX” line with fresh brake fluid of the correct DOT rating.
The Brake Fluid Flush Procedure Explained
The actual process of flushing the brake fluid involves working at each wheel’s bleeder screw. It’s a systematic approach to ensure every bit of old fluid is replaced. The key is to maintain a continuous flow of fresh fluid into the system while pushing the old fluid out. Air is the enemy of a good brake fluid flush, so vigilance is important.
Step-by-Step Flushing Process
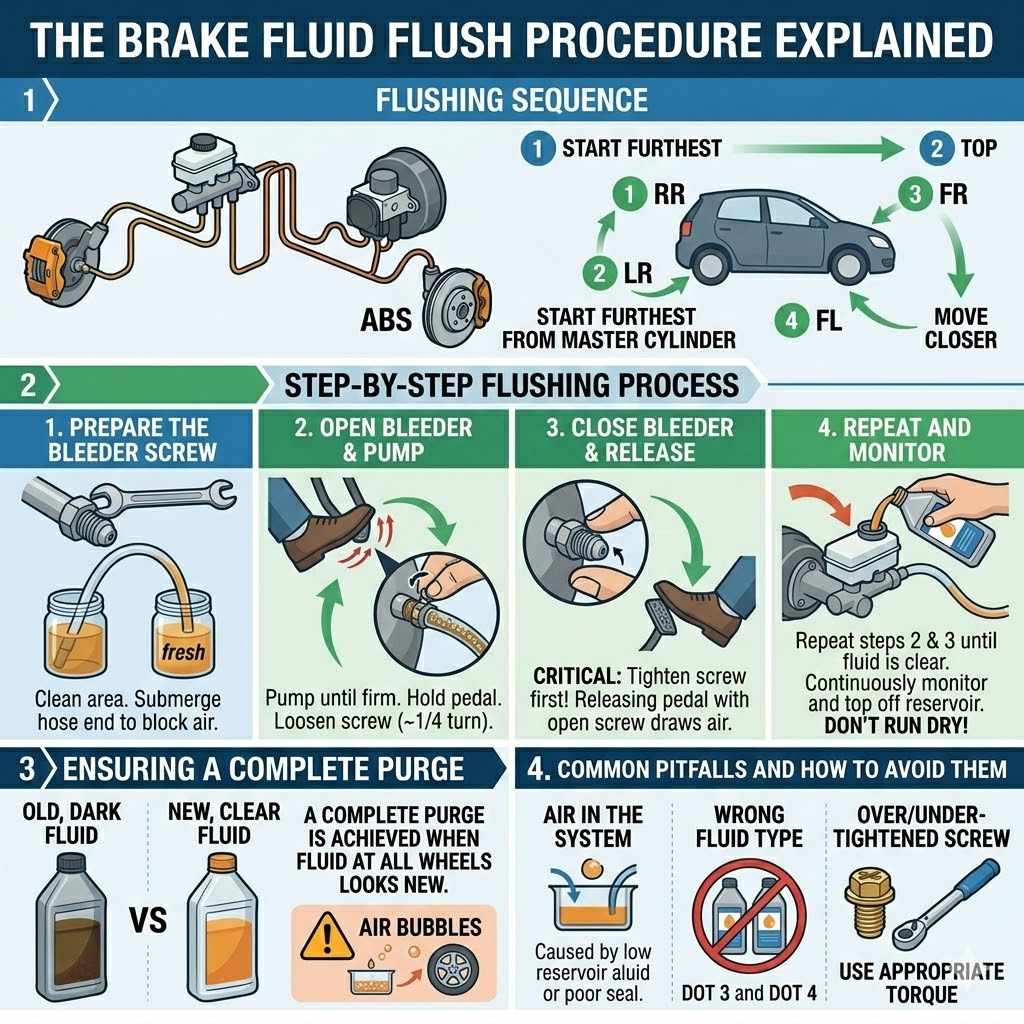
Start with the wheel furthest from the master cylinder and work your way closer. This is typically the rear passenger side wheel, followed by the rear driver’s side, front passenger side, and finally the front driver’s side. This sequence helps ensure that air is pushed out efficiently and that the master cylinder remains filled with fresh fluid throughout the process.
1. Prepare the Bleeder Screw: Locate the bleeder screw on the brake caliper (for disc brakes) or wheel cylinder (for drum brakes) at the wheel you are working on. It’s usually a small nipple-like fitting. Clean the area around the bleeder screw to prevent dirt from entering the system. Attach one end of your bleeder hose to the bleeder screw. Submerge the other end of the hose into your collection container filled with a small amount of fresh brake fluid. This prevents air from being drawn back into the system if the bleeder screw is not fully sealed.
2. Open the Bleeder Screw and Pump the Brakes: Have a helper pump the brake pedal slowly several times until it feels firm. While they hold the pedal down, slightly loosen the bleeder screw with your wrench (about a quarter to half a turn). Old fluid will begin to flow out through the hose. The fluid may appear dark or discolored.
3. Close the Bleeder Screw and Release the Brakes: Before the helper releases the brake pedal, tighten the bleeder screw securely. Then, have your helper release the brake pedal. This sequence is critical. Releasing the pedal with the bleeder screw open will suck air into the system.
4. Repeat and Monitor Fluid Level: Repeat steps 2 and 3 until clear, fresh fluid is flowing through the hose. Continuously monitor the brake fluid reservoir and top it off with fresh fluid as needed to prevent it from running dry. If the reservoir runs dry, you will introduce air into the system, and you’ll have to start over.
5. Move to the Next Wheel: Once you have a clean stream of fluid from the current wheel, close the bleeder screw and move to the next wheel in the sequence (rear driver’s side, then front passenger, then front driver’s). Repeat the entire process at each wheel.
A common mistake is forgetting to check the reservoir level frequently. Imagine you are bleeding the rear passenger side, and your helper pumps the pedal. You see fluid coming out. You tighten the screw. They release the pedal. You then realize the reservoir is almost empty. If you don’t refill it quickly, air will rush in. This is why using a bleeder kit with a collection bottle that has a one-way valve, or ensuring the end of the bleeder hose stays submerged in fluid, is so important. It acts as a safety net.
Ensuring a Complete Purge
To ensure a complete purge, you want to see a steady stream of clear fluid exiting each bleeder screw. The color of brake fluid changes over time as it absorbs moisture and contaminants. New brake fluid is usually amber or clear. Old fluid can be dark brown, black, or even have a milky appearance if water contamination is severe. When the fluid exiting the bleeder screw looks just like the new fluid you are adding, you know you have successfully replaced all the old fluid.
Pay close attention to the appearance of the fluid. If you see any air bubbles in the fluid flowing through the bleeder hose, it means air has entered the system. This can happen if the bleeder screw wasn’t fully tightened, the hose wasn’t properly sealed, or the reservoir ran dry. If air bubbles are present, you will need to continue bleeding that specific caliper or wheel cylinder until they disappear.
Common Pitfalls and How to Avoid Them
One of the most common pitfalls is introducing air into the brake lines. This happens if the brake fluid reservoir runs dry during the bleeding process or if the bleeder screw is not properly sealed. Always keep the reservoir topped off. Ensure the bleeder hose creates a good seal on the bleeder screw and is submerged in fluid. Another issue can be over-tightening or under-tightening the bleeder screw, leading to leaks or difficulty in bleeding. Bleeder screws are typically made of brass or steel and can strip easily, so use appropriate torque.
Another mistake is using the wrong type of brake fluid. This can cause seals to swell or degrade, leading to leaks and costly repairs. Always verify the correct DOT rating for your vehicle. Lastly, mixing old and new fluid carelessly can also lead to contamination. Always use fresh fluid from a sealed container.
How Much Brake Fluid Is Needed for a Full Flush FAQs
Question: How much brake fluid do I need for a basic brake fluid flush on a sedan?
Answer: For most sedans, you will need approximately 1 to 2 quarts (0.9 to 1.9 liters) of brake fluid for a full flush. It is always a good idea to have a little extra on hand to ensure you don’t run out during the process.
Question: Can I reuse leftover brake fluid from a previous flush?
Answer: No, you should never reuse leftover brake fluid. Brake fluid is hygroscopic, meaning it absorbs moisture from the air. Even sealed containers can absorb moisture over time, and opened containers are even more susceptible.
Old or contaminated fluid can damage your braking system.
Question: What happens if I don’t use enough brake fluid during a flush?
Answer: If you don’t use enough brake fluid, you risk introducing air into the brake system. Air in the lines will make your brake pedal feel spongy and significantly reduce braking performance, compromising safety. You may have to repeat the entire bleeding process.
Question: How often should I perform a brake fluid flush?
Answer: It is generally recommended to flush and replace your brake fluid every 2 to 3 years, or every 30,000 to 60,000 miles, whichever comes first. Your vehicle’s owner’s manual will provide the most accurate recommendation for your specific car.
Question: What is the difference between bleeding and flushing brake fluid?
Answer: Brake bleeding is a process to remove air bubbles from the brake lines, which often happens after brake component
Summary
Knowing how much brake fluid is needed for a full flush boils down to understanding your vehicle’s system capacity. For most cars, 1 to 2 quarts is sufficient. Always get the correct DOT rating and a little extra. This simple fluid exchange keeps your brakes working safely and effectively. You can confidently tackle this maintenance task with the right preparation and a clear plan.