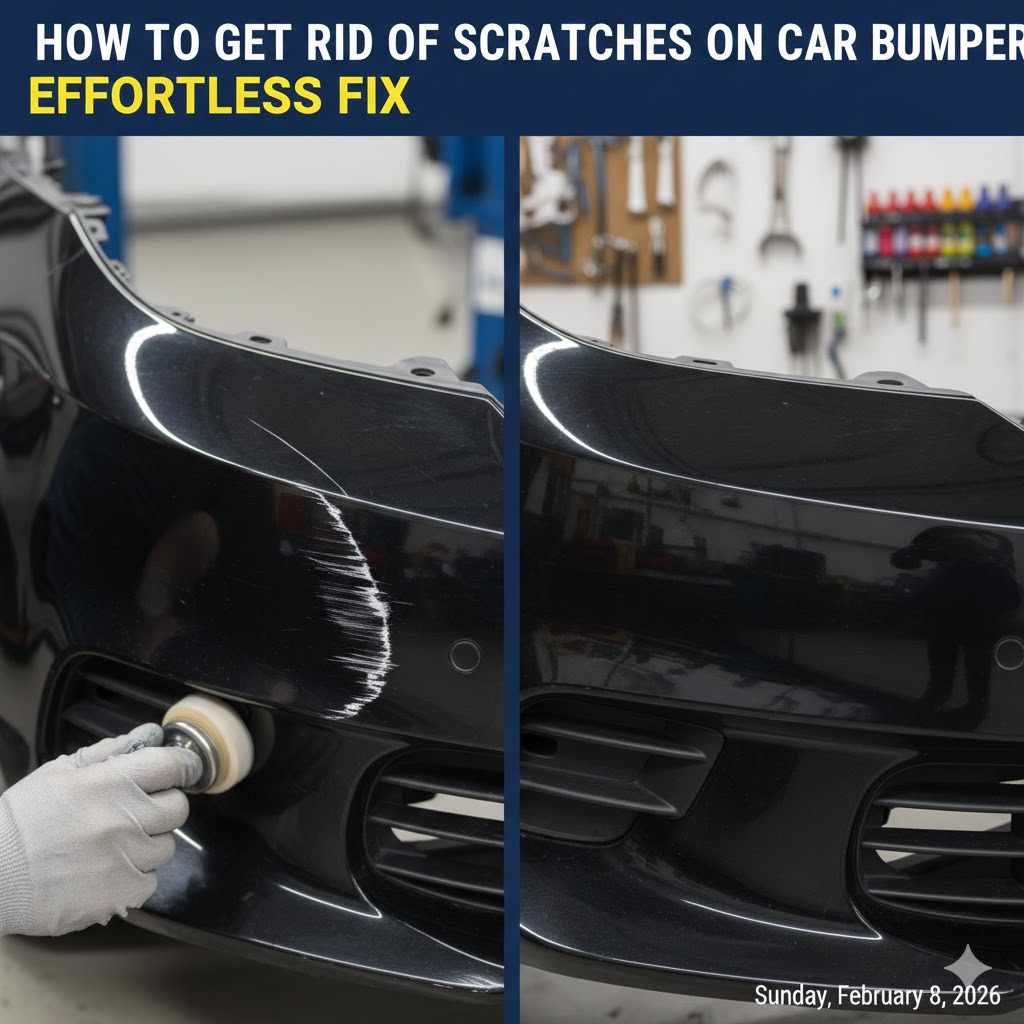
How to Get Rid of Scratches on Car Bumper: Effortless Fix
To get rid of light scratches on a car bumper, first wash and dry the area completely. Next, apply a small amount of a quality scratch removal compound to a microfiber cloth and rub it into the scratch using gentle, circular motions. Finally, wipe away the excess with a clean cloth and apply a coat of wax to protect the finish.
Hello there! It’s Md Meraj, your friendly guide to all things automotive. Seeing a new scratch on your car’s bumper can be frustrating. It feels like a small blemish that stands out a mile away. You might immediately think about expensive body shops and complicated repairs. But what if I told you that fixing many of those annoying scuffs and scratches is easier than you think?
You don’t need to be a professional mechanic to make your bumper look great again. In this guide, I’ll walk you through the simple, step-by-step process to fix those scratches right in your own driveway. Let’s get started and restore your car’s pristine look together!
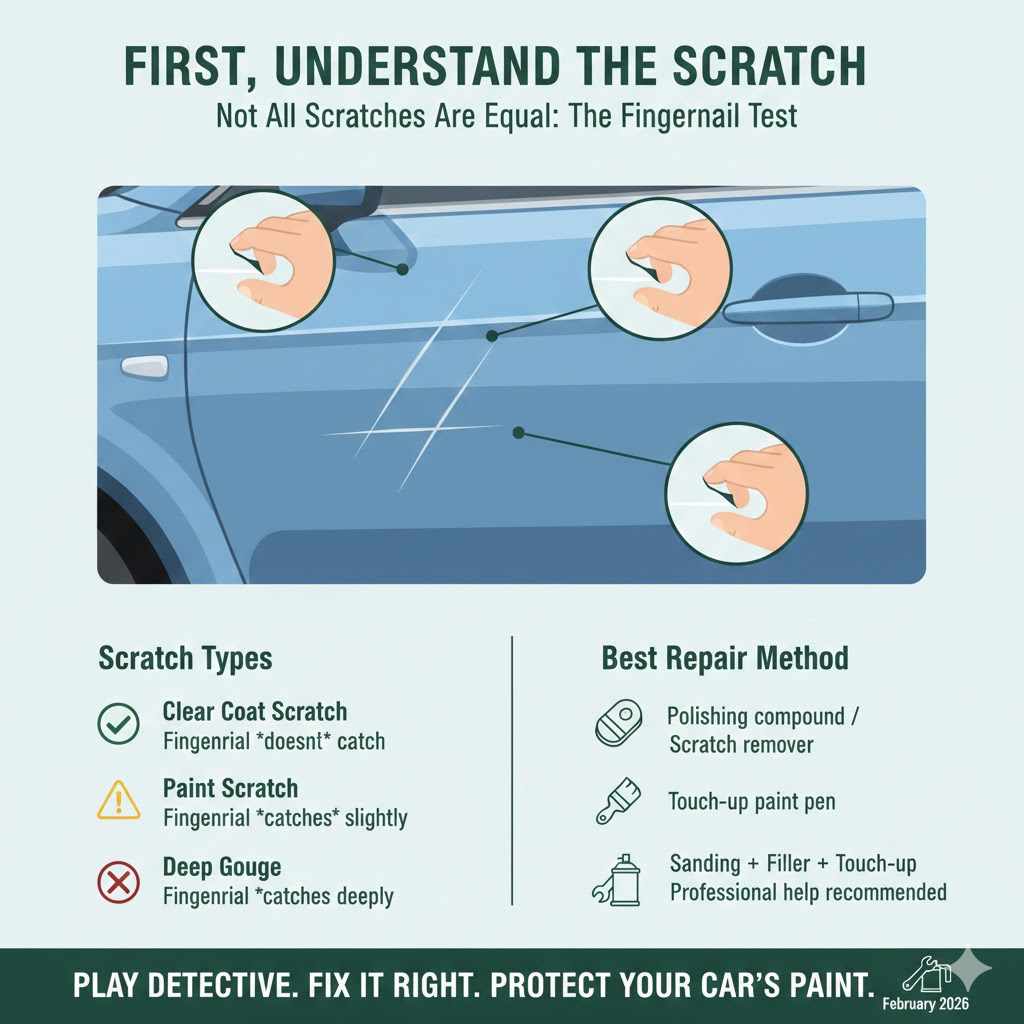
First, Understand the Scratch: Not All Scratches Are Equal
Before you grab any tools, the most important step is to figure out what kind of scratch you’re dealing with. The type of scratch determines the repair method. Running your fingernail gently over the scratch is a simple and effective test.
- Clear Coat Scratch: If your fingernail doesn’t catch on the scratch, it’s likely just in the top clear coat layer. These are the easiest to fix. They often look like faint white lines.
- Paint Scratch: If your fingernail catches slightly, the scratch has gone through the clear coat and into the paint layer. You might see the color of the primer (often gray or white) underneath. These require a bit more work.
- Deep Scratch (Down to the Plastic): If the scratch is very deep and your nail sinks into it, it has likely gone through all layers of paint and reached the plastic bumper itself. These are the most challenging to fix at home but are still manageable.
Here’s a simple table to help you identify your scratch type and the best approach:
| Scratch Type | How it Looks & Feels | Best Repair Method |
|---|---|---|
| Clear Coat Scratch | A faint white line. Your fingernail does not catch on it. | Polishing compound or scratch remover. |
| Paint Scratch | Deeper than a clear coat scratch. Your fingernail catches slightly. You may see the primer layer. | Touch-up paint pen or kit. |
| Deep Gouge | A very deep groove. You can clearly see the black or gray plastic of the bumper. | Sanding, filler, primer, and touch-up paint. May require a professional for a perfect finish. |
Gather Your Supplies: Everything You’ll Need for the Job
Having the right tools ready makes the job smooth and effortless. You don’t need a professional-grade workshop, just a few key items. I’ve broken them down based on the scratch depth.
For Light Clear Coat Scratches:
- Car Wash Soap: A gentle soap designed for cars to avoid damaging the paint.
- Two Buckets: One for soapy water and one for clean rinse water to prevent spreading dirt.
- Microfiber Towels: Several clean, soft towels for washing, drying, and buffing.
- Scratch & Swirl Remover Compound: A quality polishing compound is your best friend here. Brands like Meguiar’s or 3M offer excellent options.
- Applicator Pad or Microfiber Cloth: For applying the compound.
- Car Wax: To protect the repaired area after you’re done.
For Deeper Paint Scratches (You’ll Need the Above, Plus):
- Automotive Touch-Up Paint Kit: This is crucial. You need a kit that matches your car’s exact color code. You can find this code on a sticker inside your driver’s side door jamb, in the glove box, or in your owner’s manual.
- Fine-Grit Sandpaper: 2000 to 3000-grit sandpaper for smoothing the area.
- Automotive Masking Tape: To protect the surrounding paint.
- Rubbing Alcohol or Prep Solvent: To ensure the surface is perfectly clean before painting.
- Touch-Up Primer: This helps the new paint stick properly.
- Touch-Up Clear Coat: To seal the paint and match the factory shine.
How to Get Rid of Scratches on Car Bumper: A Step-by-Step Guide
Now for the fun part! Let’s walk through the process. We’ll start with the simplest fix for light scratches and then move on to the more involved repair for deeper ones.
Method 1: Fixing Light Scratches (Clear Coat Scuffs)
This method is perfect for those frustratingly light scuffs you get from shopping carts or a light brush against a hedge. It’s quick, easy, and incredibly effective.
Step 1: Clean the Bumper Like a Pro
You can’t fix what you can’t see clearly. Any dirt or grime left on the bumper can create more scratches when you start buffing. Wash the entire bumper area with car soap and water. Use the two-bucket method to ensure you’re always using clean water. Rinse thoroughly and dry the area completely with a clean microfiber towel.
Step 2: Apply the Scratch Remover
Squeeze a small, pea-sized amount of scratch remover compound onto a microfiber applicator pad or a folded microfiber cloth. You don’t need a lot; a little goes a long way. Dab it directly onto the scratch and the immediate surrounding area.
Step 3: Buff the Scratch Away
Using firm but gentle pressure, rub the compound into the scratch. Use overlapping circular motions. Think of it like waxing a table. You’ll start to see the scratch fade and disappear. Continue buffing for about a minute. The fine abrasives in the compound are gently smoothing the edges of the scratch in the clear coat, making it invisible.
Step 4: Wipe and Inspect
Use a separate, clean microfiber towel to wipe away the excess compound residue. Inspect the area from different angles in good light. Is the scratch gone? If you can still see it faintly, repeat steps 2 and 3. Most light scratches will vanish after one or two applications.
Step 5: Wax and Protect
The scratch remover has polished the clear coat, but it has also removed any existing wax protection. To protect your newly flawless finish, apply a thin layer of car wax to the area you just repaired. Let it haze over, then buff it off with another clean microfiber towel. This seals the deal and restores the shine.
Method 2: Tackling Deeper Scratches (Down to the Paint or Primer)
If your fingernail caught on the scratch, it’s time for a more thorough repair using a touch-up paint kit. Don’t be intimidated! It’s just a few extra steps. The key is patience and taking your time.
Step 1: Clean and Prep the Area
Just like before, wash and dry the area thoroughly. After it’s dry, use automotive masking tape to tape off a small square or rectangle around the scratch. This protects the surrounding paint from any accidental sanding or painting. Then, wipe the scratched area inside the tape with a bit of rubbing alcohol on a microfiber cloth to remove any leftover wax or oils.
Step 2: Gently Sand the Scratch (If Necessary)
This step is for scratches with rough or raised edges. If the scratch is a clean line, you can often skip this. If not, take a small piece of 2000-grit sandpaper, dip it in water (this is called wet sanding), and very lightly sand the scratch. The goal is just to smooth out the edges, not to remove a lot of paint. Use gentle, straight-line motions along the scratch. Wipe the area clean with a damp cloth and dry it.
Step 3: Apply the Primer
Your touch-up kit may come with a small bottle of primer. If the scratch is deep enough to show the dark plastic underneath, applying primer is essential. It helps the paint adhere better and prevents the dark color from showing through. Shake the primer bottle well and use the small applicator brush to apply a very thin layer directly into the scratch. Let it dry completely. This might take 30 minutes to an hour, so check the product instructions.
Step 4: Apply the Color-Matched Paint
Now it’s time for the color. Shake your touch-up paint bottle vigorously for at least a minute to mix the pigments properly. Open it and wipe off any excess paint from the brush on the inside of the bottle. Carefully apply a thin, even layer of paint inside the scratch. The goal is to build up thin layers, not to apply one thick glob.
Let the first layer dry for about 30-60 minutes. You may need two or three thin layers to build the paint up until it’s level with the surrounding surface. Let the final coat dry for several hours, or even overnight, to ensure it’s fully cured.
Step 5: Apply the Clear Coat
Once the color coat is completely dry, it’s time to protect it with the clear coat. The clear coat provides shine and protection from the elements. Just like the paint, apply one or two very thin layers of clear coat over the repaired area. Be careful to stay within the lines of the scratch. The clear coat will often look a bit raised when first applied, which is normal. Let it dry completely, which can take several hours. Refer to your kit’s instructions for specific drying times.
Step 6: Polish and Finish
After the clear coat has cured for at least 24 hours, you can blend the repair. If the touch-up spot feels a bit raised, you can very gently wet sand it with 3000-grit sandpaper to level it. Then, use a polishing compound (like the scratch remover from Method 1) on the area to restore the shine and blend the new paint seamlessly with the old. Finally, remove your masking tape and apply a coat of wax over the entire bumper for a uniform, protected finish. Your repair is complete!
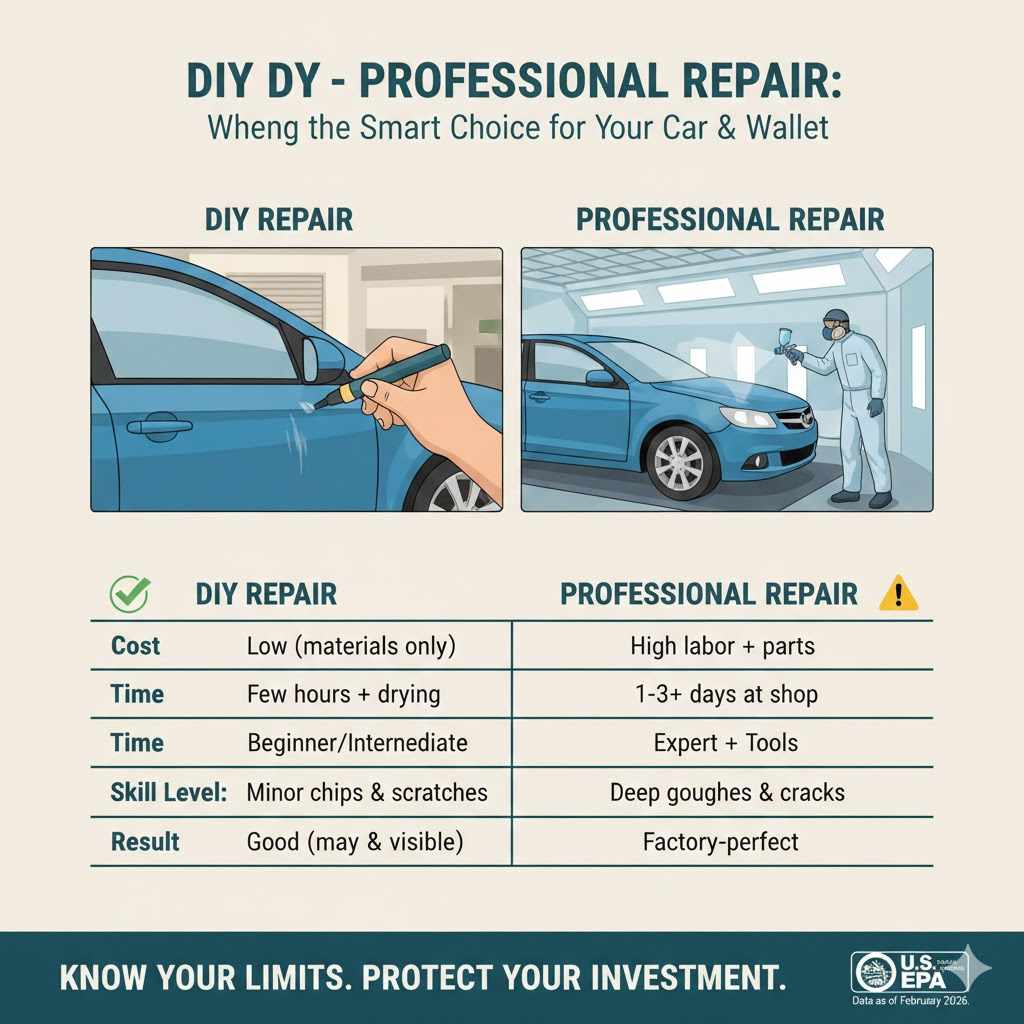
DIY vs. Professional Repair: When to Call for Help
While fixing scratches yourself is empowering and cost-effective, it’s also important to know your limits. For very large, deep gouges or cracked bumpers, a professional body shop has the specialized tools and experience to achieve a factory-perfect result. Here is a helpful guide to help you decide.
| Factor | DIY Repair | Professional Repair |
|---|---|---|
| Cost | Low (cost of materials, typically under $50). | High (can range from $150 to over $1,000 depending on damage). |
| Time | A few hours of your time, plus drying time. | Usually requires leaving your car at the shop for 1-3 days. |
| Skill Level | Beginner to intermediate. Requires patience and attention to detail. | Requires expert-level skills, specialized tools, and a controlled environment. |
| Best For | Light scuffs, small chips, and minor to moderate paint scratches. | Deep gouges, cracks, large areas of damage, or if you want a guaranteed perfect finish. |
| Result Quality | Good to great for minor repairs. May be noticeable up close if not done carefully. | Seamless and often indistinguishable from the factory finish. |
For more information on when a repair might impact vehicle safety systems, which are often housed in modern bumpers, you can consult resources from the National Highway Traffic Safety Administration (NHTSA), which provides valuable information on vehicle integrity.
Frequently Asked Questions (FAQ)
Can I use toothpaste to fix scratches on my car bumper?
While you might see this “hack” online, it’s not recommended. Toothpaste is a mild abrasive, but it’s not designed for automotive clear coats. It can create a hazy finish or even cause more fine scratches, making the problem worse. It’s always best to use a product specifically designed for car paint.
How do I find the exact paint color code for my car?
Your car’s paint code is usually on a sticker located on the driver’s side door jamb. It might also be in your glove compartment, under the hood, or in the trunk. The code is typically a short combination of letters and numbers. You can also give your Vehicle Identification Number (VIN) to your dealership or an auto parts store to get the exact match.
What’s the difference between polishing and waxing?
Polishing is a corrective step. A polishing compound contains fine abrasives that remove a microscopic layer of the clear coat to smooth out imperfections like light scratches. Waxing is a protective step. Wax adds a layer of protection on top of your paint to shield it from UV rays, rain, and dirt, while also adding shine.
How long will a touch-up paint repair last?
If done correctly—with proper prep, primer, paint, and clear coat—a touch-up repair can last for the life of the car. The key is ensuring the area is perfectly clean before you start and allowing each layer to cure completely before moving to the next step.
Can I fix a cracked bumper myself?
Fixing a cracked plastic bumper is a more advanced DIY project. It often involves using a plastic welding kit or a strong epoxy designed for bumpers. For beginners, it’s usually best to leave cracked bumper repairs to a professional, as a poor repair can compromise the bumper’s structural integrity.
Is it worth fixing small scratches on an older car?
Absolutely! Fixing scratches isn’t just about looks. A scratch that goes down to the primer or plastic can expose the underlying material to the elements. While a plastic bumper won’t rust, keeping it sealed protects its integrity and prevents the surrounding paint from chipping or peeling over time. It also greatly improves the car’s appearance and resale value.
What if I make the scratch look worse?
Don’t panic! The most common mistake is being too aggressive with sanding or rubbing. If you create new fine scratches with a compound, they can usually be polished out. If you apply touch-up paint unevenly, you can often let it dry, sand it smooth, and try again. The key is to start with the least aggressive method first and always work slowly and gently.
Conclusion: Take Pride in Your Work!
There you have it—a simple, straightforward guide to making those ugly bumper scratches a thing of the past. Whether it’s a minor scuff or a deeper scratch, you now have the knowledge and confidence to tackle the job yourself. By taking the time to properly identify the scratch and follow the steps carefully, you can achieve a professional-looking repair without the professional price tag.
Remember, car care is a journey, and every small repair you do builds your skills and confidence. Not only will you save money, but you’ll also feel a great sense of accomplishment every time you look at your beautifully restored bumper. So roll up your sleeves, gather your supplies, and give your car the attention it deserves. Happy fixing!