How to Install Tint on a Car Window: Step-by-Step Guide
Imagine cruising down the road with a sleek, tinted car window that adds an extra flair to your vehicle while protecting you from the harsh sun. Sounds appealing, right?
Whether you’re looking for privacy, protection, or simply a stylish upgrade, learning how to install tint on a car window is a skill that can transform your driving experience. You might think it’s a task best left to professionals, but with the right guidance, you can do it yourself and save some cash.
In this guide, we’re going to walk you through each step, giving you the confidence and know-how to achieve a flawless finish. By the end of this article, you’ll be ready to transform your car into a more comfortable and visually striking ride. Keep reading to discover the secrets behind a perfect tint job that will have you wondering why you didn’t try it sooner.
Necessary Tools And Materials
Gather all your tools and materialsfirst. You will need a tint filmand a squeegee. Don’t forget a spray bottlewith water. A utility knifeis important for cutting. You also need a heat gun. A clean clothhelps keep things tidy. Finally, a ruleris useful for measuring.
Make sure everything is ready. Check your tools. Are they working? Is your tint film correct size? This saves time.
Choosing The Right Tint
Picking the best car window tint is important. Think about shade and privacy. Darker tints provide more privacy. Lighter tints keep your view clear. Consider the local laws. Some places limit tint darkness. Safety is key. Tints reduce glare from the sun. UV protection can shield your car interior. This helps keep seats and dashboard safe. Durability matters too. Good tints last longer without fading. Choose a tint you like and that fits your needs. Discuss options with a tint professional. They can guide you well.
Preparing Your Workspace
Choose a clean and flat space. A garage or driveway works well. Make sure there’s enough light. Natural light is best. Gather all necessary tools before starting. You will need a squeegee, soap solution, and a cutting knife. Have a spray bottle ready. This helps with the application. Lay out the tint film flat. Keep it away from dirt and dust.
Ensure your car windows are thoroughly clean. Dirt or dust can cause bubbles. Use a mild cleaner to wipe them down. Let them dry completely before proceeding. Organize your materials nearby for easy access. This setup saves time and prevents mistakes. It makes the tinting process smoother and more efficient.
Cleaning The Windows
First, gather all the cleaning tools. You will need a spray bottle, water, and soap. A soft cloth or squeegee will help too. Use the spray bottle to wet the window. Add a few drops of soap to the water. Mix it well. Spray the soap water on the glass. Wipe the window with a soft cloth. Make sure it is very clean. No dust or dirt should remain. Rinse the window with clean water. Use the squeegee to remove the water. Dry the edges with a cloth. Check if the window is clear and shiny. Repeat if there is still dirt. Clean windows help the tint stick better. Now, you are ready for the next step.
Measuring And Cutting The Tint
Begin by cleaning the car window. Dust and dirt can cause bubbles. Use a clean cloth and mild soap. Dry the window completely. Next, roll out the tint film on a flat surface. Ensure it’s big enough to cover the window. Measure the window carefully. Take the height and width. Use a tape measure for accuracy. Mark the measurements on the tint film. Use a pencil or marker. Cut the tint with a sharp blade. Follow the marked lines closely. Be precise to avoid waste. Leave an extra inch on each side. This helps during application. Double-check the cut piece. It should match the window size. A perfect fit is key for a smooth look.
Credit: www.familyhandyman.com
Applying The Tint To The Window
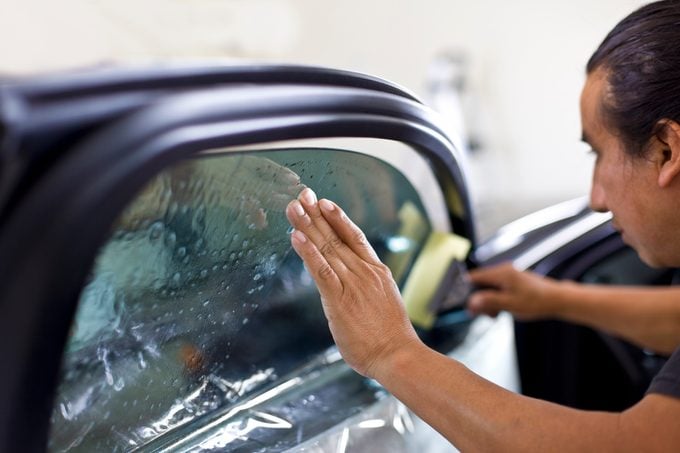
Positioning the Tintis important. Start by cleaning the window thoroughly. Measure the window size. Cut the tint film slightly larger. Place the tint on the window carefully. Use a squeegee to smooth it out.
Removing Air Bubblesis crucial. Use a squeegee to press firmly. Start from the center. Move toward the edges. Don’t rush; take your time. Check for bubbles with good lighting. Reapply pressure if needed.
Trimming Excess Tintrequires precision. Use a sharp blade for clean cuts. Cut along the window edges. Hold the blade at an angle. Trim slowly to avoid mistakes. Ensure smooth and neat edges. Dispose of the excess tint properly.
Drying And Setting The Tint
Drying the tint is a crucial step. Use a heat gun or hairdryer. Hold it 6 inches away from the tint. Move it back and forth slowly. This will help the tint stick well to the window. Avoid keeping the heat in one spot. This can cause bubbles or damage. A squeegee can help remove bubbles.
After heating, let the tint set for a day. Do not roll down the windows. The tint needs time to cure. Keep the car in a cool, dry place. This helps the tint set properly. A well-set tint looks smooth and clear.

Credit: www.raynofilm.com
Caring For Tinted Windows
Clean tinted windows with a soft cloth. Avoid using rough materials. They can scratch the surface. Use a gentle cleaner without ammonia. Ammonia can damage the tint. Spray the cleaner on the cloth, not the window. This prevents streaks and spots. Wipe gently in a circular motion. Keep the windows dry after cleaning. Moisture can weaken the tint. Park your car in the shade when possible. Direct sunlight can fade the tint. Check the tint regularly for any damage. Small tears can grow bigger over time.
Do not roll down the windows for a few days. This helps the tint to settle. Avoid placing sharp objects near the windows. They can cause scratches. Keep the car interior cool. High heat can cause bubbles in the tint. Remember these tips to maintain your tinted windows. Proper care keeps them looking nice and new.
Common Mistakes To Avoid
Many people make mistakes installing car window tint. One mistake is not cleaning the window. Dirt can make the tint stick poorly. Another mistake is rushing the job. Tint needs time to set. Some cut the tint too small. This leaves gaps. Others cut it too big. Wrinkles can form. Bubbling is common with improper smoothing. Use a squeegee to avoid bubbles. Some forget to check laws. Dark tints are illegal in some places. Always check rules first. Lastly, using cheap tint can be bad. Cheap tint fades quickly. Always pick good quality tint. These tips can help you avoid common tint mistakes.
Frequently Asked Questions
How Do I Prepare Windows For Tinting?
Start by cleaning the windows thoroughly with a glass cleaner to remove dirt and debris. Ensure no residue is left behind. Next, dry the windows completely using a microfiber cloth. This preparation ensures the tint adheres smoothly without bubbles, resulting in a professional finish.
What Tools Are Needed For Window Tinting?
You’ll need a squeegee, utility knife, heat gun, and application solution. A squeegee helps smooth the tint film onto the window. A utility knife trims excess film accurately. The heat gun aids in shaping the film and removing bubbles. The application solution ensures proper adhesion and flexibility during installation.
How Long Does Tint Installation Take?
Tint installation typically takes 2-4 hours, depending on your experience and vehicle size. Larger vehicles may require more time due to additional windows. Proper preparation and careful application are crucial for a seamless finish. Rushing the process can lead to errors, so patience is key for a professional outcome.
Can I Remove Old Window Tint Myself?
Yes, you can remove old tint using a heat gun and razor blade. Start by heating the tint to loosen the adhesive. Carefully peel off the film using the razor blade. Ensure to remove all adhesive residue to prevent future tinting issues.
Patience and caution are essential for a clean removal.
Conclusion
Tinting car windows is a simple DIY project. Just follow the steps. Start with cleaning the windows thoroughly. Measure and cut the tint film carefully. Apply it slowly to avoid bubbles. Use a squeegee to smooth the surface. Let the tint dry completely.
This ensures a great finish. With patience and attention, your car will look sleek. Plus, you’ll have extra privacy and UV protection. Enjoy your newly tinted windows. Feel proud of your handiwork!