How to Paint Cars in Car Mechanic Simulator 2021 Step-by-Step
So, you’re trying to figure out How to Paint Cars in Car Mechanic Simulator 2021? It’s a common challenge for new players. The painting process can feel tricky at first, with a bunch of options and tools. Don’t worry, though! It’s easier than it looks. This guide will walk you through each step, making sure you get a cool paint job every time. We’ll start with the basics, then get into the cool stuff. Ready to transform those rusty wrecks into shining beauties? Let’s get started!
Getting Started with Painting
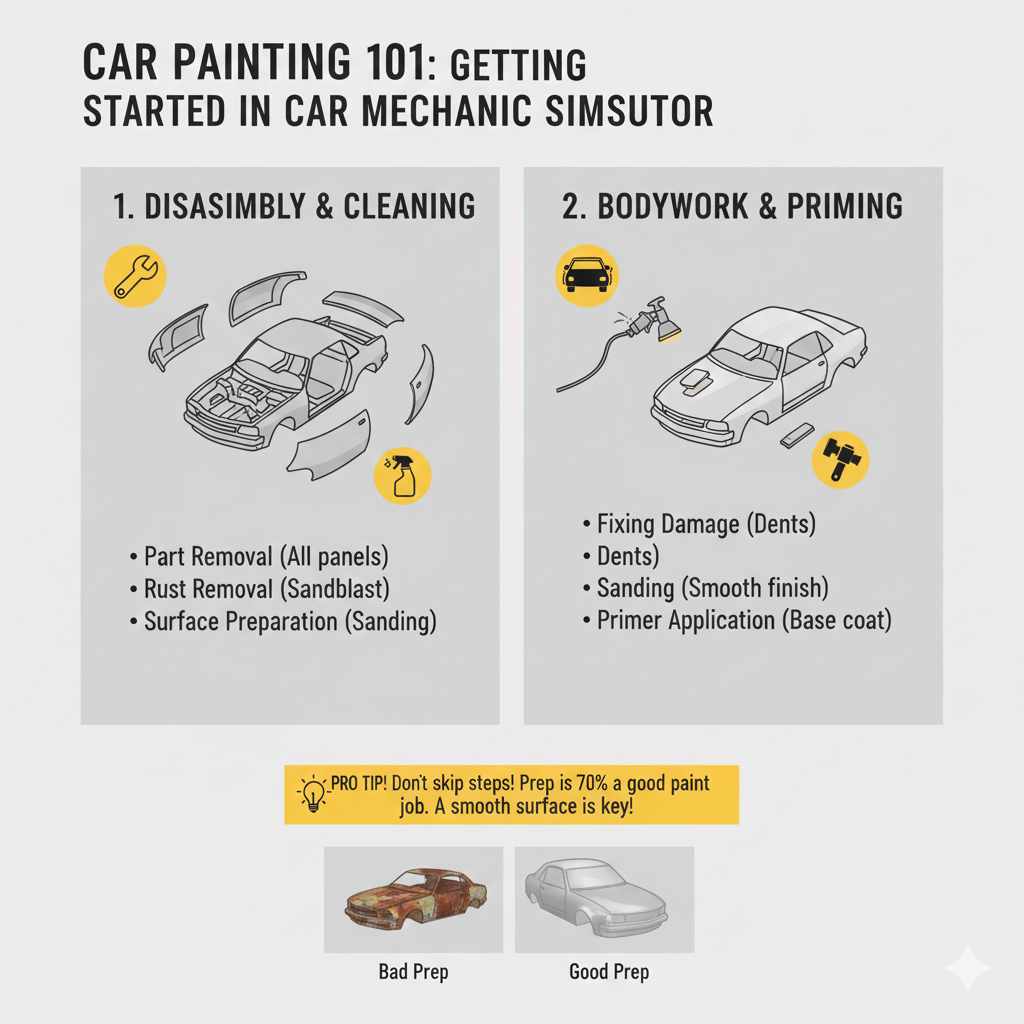
Before you even think about spray guns and paint booths, you need to prep your car. This is the stage where you take everything apart, remove rust, and ensure you have a clean surface for your fresh coat. You won’t be able to paint directly on rusted metal or dirty panels. This preparation is a large part of what makes a good paint job in the simulator. Think of it like building a house: you wouldn’t start putting up walls before you have a solid foundation. That foundation, in this case, is a clean car body ready for paint. We’ll start by taking the car apart.
Disassembly and Cleaning
The first thing you will do is disassemble your car. Remove all the parts, like bumpers, doors, hood, trunk, and any other removable panels. You need access to the bare metal surfaces. This step is key for a proper paint job. Make sure every part is off the chassis and the chassis is empty, with only the bare frame remaining. This might seem tedious, but it is necessary for a high-quality finish. Then, you’ll need to clean the body. Any dirt or debris will cause imperfections in the new paint. You can use the tools available in the game to clean off rust and grease.
Part Removal: Take every component off the car – bumpers, fenders, doors, and anything else that’s attached to the body. This opens up the entire car body for paint.
Removing all the panels is necessary for a consistent paint job. Missing a spot means a color difference, which doesn’t look great.
Rust Removal: Use the game tools to get rid of rust. This could involve sandblasting or using other cleaning tools, depending on the game. Rust prevents paint from sticking properly, making it vital to eliminate it.
Rust eats away at the metal and prevents the paint from adhering properly, so taking care of this is a must.
Surface Preparation: After removing rust, make sure the surface is smooth. Use sandpaper or other tools in the game to even out any imperfections.
A smooth surface ensures the paint looks good. Uneven surfaces lead to problems that will show in the final coat.
Bodywork and Priming
Once the car is clean, and the body panels are ready, any damage to the car’s body should be repaired. This involves fixing dents or filling holes. These imperfections will be visible if they are not fixed before painting. After bodywork, the next step is priming. Priming creates a base coat that helps the paint stick better to the metal and provides a smooth surface. Without a good primer coat, the paint may not stick to the bare metal correctly. Also, the primer evens out small imperfections and helps the final coat look even.
Fixing Damage: Repair any dents, scratches, or holes in the car body. You can use tools within the game to help you with this.
Make sure the body is as close to perfect as possible so it looks great after the paint job.
Sanding: After fixing damage, sand down the surfaces to make them smooth. This is key for a good paint job.
A smooth surface is essential for a professional look.
Primer Application: Use the spray gun to apply a primer coat. This coat prepares the surface for the paint.
Primer fills tiny imperfections and helps the paint adhere. Without it, the paint might chip or not look even.
Choosing Your Paint and Tools
With the car body prepped, it’s time to choose the color and tools. You’ll find a range of paint types and colors in the game. It’s a good idea to experiment to find the colors you like. You will also need to get familiar with the spray booth and painting tools. Understanding your tools will significantly help your painting efforts. The right color, combined with good technique, will take your paint jobs to the next level. Let’s delve into what you’ll need to paint.
Paint Selection
The game likely offers a range of paint types, such as metallic, matte, and pearl. Each type will give a different look to your car. Metallic paints sparkle in the light, while matte paints provide a flat finish. Pearl paints have a special, shimmering effect. You should also choose the color, of course. Consider your personal style and what fits the car’s design. Don’t be afraid to experiment with different shades. Sometimes, mixing colors can create a unique, custom look for your vehicle.
Paint Types: Choose the finish. Metallic, matte, or pearl paints offer different visual styles. Metallic paint has small flecks that give a sparkle effect. Matte paint is flat and doesn’t reflect light much. Pearl paint has a special shimmer.
Paint type can change the final result. Consider what look you want.
Color Selection: Pick your color. The simulator lets you explore a wide variety of colors. Decide whether you prefer something classic or modern, bright or dark.
Pick a color that suits the car’s design and your personal taste.
Color Mixing: The game might let you mix colors to create unique shades. Experiment with this option to get a custom look.
Color mixing is a chance to make something completely your own.
Using the Spray Booth
The spray booth is where you will apply the paint to the car’s body. The simulator’s spray booth will simulate a professional environment. Inside, you have control over the paint application. The booth controls help you apply the paint evenly. The aim is to get a smooth, consistent finish. Practice with different settings to see how they impact the outcome.
Booth Setup: Place the prepared car body parts inside the spray booth. Make sure everything is in place for easy painting.
Make sure the parts are accessible in the booth.
Spray Gun Control: Use the spray gun. Learn the right distance and speed. Too close, and you get drips; too far, and the paint is uneven.
Practice makes perfect when using the spray gun.
Multiple Coats: Usually, you need multiple coats of paint for a good result. Apply each coat evenly and let it dry properly before applying the next one.
Multiple coats ensure full coverage and a consistent appearance.
Applying Paint: Step by Step
Now it’s time to get the paint onto the car. This part requires care and patience. You must apply the paint correctly to get a good result. It will take time to get used to the spray gun and the environment, but it’s not overly difficult. Follow this step-by-step process, and your car will shine.
Applying the Base Coat
The base coat is the first layer of paint. It will be the main color you picked. The goal is to apply an even layer over the entire car surface. Avoid drips or runs by keeping the spray gun at the right distance. Remember, a light, even application is better than trying to do it all in one coat. Multiple thin coats are better than one thick coat. Don’t rush this process; take your time.
First Pass: Start with a thin, even coat. Don’t try to cover everything in one go.
The first pass is about getting the base down.
Coverage: Make sure you have good coverage. Aim to cover all surfaces, even hard-to-reach areas.
Full coverage prevents any parts of the car from being visible.
Drying Time: Let the base coat dry before the next step.
Drying is an essential part of the process.
Applying Clear Coat and Details
After the base coat has dried, you can apply a clear coat. This is a transparent layer that protects the color and gives it a glossy finish. The clear coat makes the paint look shiny and protects it from scratches and other damage. You might also add details, like stripes or decals, at this stage. It’s time to make it shine.
Clear Coat Application: Apply one or two coats of clear coat. This protects and adds shine.
The clear coat is key for the final look.
Decals and Stripes: If you want details, this is where you add them. Make sure the clear coat is fully dried before applying decals or stripes.
Decals or stripes can change the appearance and add a personal touch.
Drying and Curing: Allow the clear coat to fully cure. This is important for durability.
Full curing makes the paint strong and durable.
Final Touches and Reassembly
Once the paint is dry, it’s time to polish and reassemble the car. Polishing removes any small imperfections in the clear coat, making the paint look smoother and glossier. Then, you can put all the parts back onto the car.
Polishing: Use the tools available in the game to polish the paint. This gives it a smooth, glossy finish.
Polishing improves the look of the paint job.
Reassembly: Put all the parts back on the car. This includes bumpers, doors, and anything else you removed.
Reassembling the car is the final step.
Final Inspection: Check the entire car for any problems or issues. Make sure everything looks good.
Carefully inspect the finished product.
Tips and Tricks
Want to improve your skills? Here are some extra tips. These will help you improve your painting skills.
Avoiding Common Mistakes
Even experienced players face problems. Some common errors to watch out for include uneven coats and drips. It’s common for paint to run down the car’s sides if you apply too much at once. Imperfect surface preparation also causes problems. Poor surface prep, like not removing rust, affects the final look.
Uneven Coverage: Make sure the paint is even across the whole surface. Avoid thin spots where the primer shows.
Uneven coverage will ruin the finish.
Drips and Runs: Avoid putting on too much paint. This causes drips.
Drips and runs make the paint look bad.
Surface Preparation: Take the time to get the surface ready. Clean and smooth before you paint.
Good prep makes the paint job much better.
Improving Your Skills
Practice makes perfect. The more you paint, the better you will become. Try different paint types and colors. Don’t be afraid to experiment with paint techniques. With practice, you can get better results.
Practice: Keep painting. Practice different techniques and try new things.
Keep painting to learn and get better.
Experimentation: Try different colors and finishes. See what works.
Experimentation is how you find what you like.
Learn from Mistakes: If something goes wrong, learn from it. Try to understand what went wrong.
Learn from mistakes to improve.
Advanced Techniques
Once you are confident with the basics, you can try some advanced techniques. These include things like custom paint jobs. Learn how to add stripes, graphics, or multiple colors. The simulator might allow for blending colors together.
Custom Paint Jobs: Experiment with two-tone paint jobs, stripes, and decals. This will allow for more customization.
Custom paint jobs can help you stand out.
Color Blending: See if you can blend colors. This allows for a smooth transition from one color to another.
Color blending can add depth and interest.
Masking Techniques: Learn how to mask areas. This is needed for complex designs.
Masking makes complex designs possible.

Frequently Asked Questions
Question: How do I remove rust?
Answer: Use the rust removal tools provided in the game, such as sandblasters or cleaning solvents.
Question: What do I do if I get drips in my paint?
Answer: Let the paint dry completely. Then, you can sand down the drips carefully and reapply the clear coat.
Question: How many coats of paint should I apply?
Answer: Usually, apply two to three base coats and two coats of clear coat, allowing each to dry properly.
Question: What’s the best way to prepare the car before painting?
Answer: Disassemble the car, remove all rust, and smooth the surface with sandpaper.
Question: Can I change colors on the parts like the doors or hood individually?
Answer: Yes, in many games you can paint individual panels different colors.
Final Thoughts
So there you have it – a clear guide on How to Paint Cars in Car Mechanic Simulator 2021. It’s about preparation, choosing your paints and tools, and then applying them. Remember, success comes from patience and practice. Start by taking apart the car and removing all of the old parts. Clean the body, remove the rust, and then make sure the surfaces are smooth and ready for paint. Picking the right color and the right tools is also key. Then, master the spray gun in the paint booth to apply even coats. You have the tools to make some amazing-looking cars. By following these steps and practicing, you’ll be creating awesome paint jobs in no time. Get ready to turn those virtual wrecks into stunning masterpieces!