How To Pump Air In A Car Tire: Essential Guide
Pumping air in a car tire is simple! Check your car’s recommended tire pressure, get a tire inflator or air compressor, unscrew the valve cap, attach the inflator, and add air until the gauge reads the correct PSI. It’s a vital, easy maintenance step to ensure safety and save fuel.
Hello there! As your go-to guide for all things automotive, I’m Md Meraj, and I’m here to make car care less daunting. Many drivers feel a little unsure when it comes to something as basic as adding air to their tires. It’s a common concern, and honestly, it’s one of the simplest yet most important maintenance tasks you can do. Underinflated tires can be a safety hazard, affect your car’s handling, and even cost you more at the gas pump. But don’t worry! This guide will walk you through, step-by-step, how to pump air in your car tires with confidence. We’ll cover everything you need to know to get it done right, safely, and efficiently.
Why Proper Tire Inflation Matters More Than You Think
Before we dive into the “how-to,” let’s quickly touch on why this is so crucial. Think of your tires as the only connection between your car and the road. When they have the right amount of air, they perform at their best. Underinflation is like trying to run a marathon with floppy shoes – it’s inefficient and can lead to problems. Overinflation isn’t ideal either; it can make your ride bumpy and reduce the tire’s grip.
Here’s a quick breakdown of the benefits of correctly inflated tires:
- Enhanced Safety: Properly inflated tires provide better traction, steering response, and braking. This is critical for avoiding accidents, especially in sudden maneuvers or bad weather.
- Improved Fuel Efficiency: When tires are underinflated, they create more friction with the road. This means your engine has to work harder to move the car, burning more fuel. Maintaining the correct pressure can significantly improve your miles per gallon (MPG).
- Extended Tire Lifespan: Incorrect inflation causes uneven wear. Underinflated tires wear out on the edges, while overinflated ones wear out in the center. Correct pressure ensures the tire tread wears down evenly, making your tires last much longer.
- Smoother Ride: Properly inflated tires help absorb road imperfections, contributing to a more comfortable driving experience.
- Preventing Tire Damage: Underinflated tires are more susceptible to damage from potholes, curbs, and general road debris. They can also overheat, increasing the risk of a blowout.

Where to Find Your Car’s Recommended Tire Pressure
This is the most important first step. Over the years, I’ve seen people guess or just pump air until it “looks right.” That’s a recipe for trouble! Your car manufacturer knows best when it comes to the ideal air pressure for your specific vehicle. You’ll find this information in a few key places:
- Driver’s Side Doorjamb: This is the most common spot. Look for a sticker on the frame of the driver’s door when it’s open.
- Owner’s Manual: Your car’s manual is a treasure trove of information, and tire pressure recommendations are always included.
- Glove Compartment: Some manufacturers also place a sticker here.
Important Note: The recommended tire pressure is usually listed in Pounds per Square Inch (PSI). You’ll see something like “32 PSI” or “35 PSI.” This is the target pressure for your tires when they are cold. Tire pressure increases as tires heat up from driving, so it’s best to check them when your car hasn’t been driven for a few hours.
You might also see a maximum PSI rating on the tire sidewall itself. This is NOT the recommended pressure for your car. It’s the maximum pressure the tire can safely handle, usually for heavier loads or extreme conditions. Always refer to the sticker on your car, not the tire sidewall, for your daily driving pressure.
To get a better understanding of PSI and how it relates to your tires, you can often find detailed information on official government resources. For instance, the National Highway Traffic Safety Administration (NHTSA) in the United States offers valuable insights into tire safety and maintenance, including the importance of proper inflation.
Tools You’ll Need
Fortunately, pumping air into your tires doesn’t require a mechanic’s workshop. You’ll only need a few simple items:
- Tire Pressure Gauge: Crucial for accurately measuring the air in your tires. They are inexpensive and can be found at auto parts stores or even some gas stations. Digital gauges are very easy to read.
-
Air Source: This can be:
- A Portable Tire Inflator: These are compact devices that plug into your car’s 12-volt outlet (cigarette lighter) and usually have a built-in gauge. They are very convenient for on-the-go use.
- An Air Compressor: Found at most gas stations or tire shops. Many have built-in gauges, but it’s wise to have your own reliable gauge to double-check. Some station compressors have a dial you set to your desired PSI, and they automatically shut off.
- Valve Cap Tool (Optional but Handy): Sometimes the valve caps can be a bit tight. A small tool or even a flathead screwdriver can help loosen them if needed.
Step-by-Step: How to Pump Air In a Car Tire
Alright, let’s get our hands dirty – or rather, our hands ready to be precise! Follow these steps carefully, and you’ll be an air-pumping pro in no time.
Step 1: Check Your Tire Pressure (When Cold)
As mentioned, it’s best to check your tires first thing in the morning, or after your car has been parked for at least three hours. This ensures you’re getting an accurate reading. You’ll need your tire pressure gauge for this.
- Remove the valve cap: Locate the small valve stem on each tire. It’s a short, black or metal protrusion. Unscrew the small cap covering the tip of the valve stem. Keep these caps somewhere safe, like your pocket, so you don’t lose them!
- Attach the gauge: Firmly press the tire pressure gauge onto the end of the valve stem. You might hear a brief hiss of air; this is normal. Press down until the hissing stops.
- Read the pressure: The gauge will display the current PSI. If it’s a dial gauge, the needle will point to a number. If it’s a digital gauge, the number will appear on the screen.
- Record the reading: Note down the PSI for each tire.
- Repeat for all tires: Go around your car and check the pressure of all four tires. Don’t forget your spare tire, if your car has one! It’s often overlooked but is essential in an emergency.
Step 2: Compare to Recommended Pressure
Now, compare the PSI readings you just took with the recommended pressure listed on your car’s doorjamb sticker or in the owner’s manual.
Here’s a simple table to help you see the difference:
| Tire Location | Current PSI (Example) | Recommended PSI (Example) | Action Needed |
|---|---|---|---|
| Front Left | 28 PSI | 32 PSI | Add Air |
| Front Right | 30 PSI | 32 PSI | Add Air |
| Rear Left | 33 PSI | 32 PSI | Release Air (if needed) |
| Rear Right | 32 PSI | 32 PSI | Good |
If a tire is below the recommended PSI, you’ll need to add air. If it’s significantly over, you’ll need to let some air out. If it’s at or very close to the recommended PSI, you can leave it alone.
Step 3: Add Air to Underinflated Tires
This is where your air source comes into play. Let’s assume you’re using a portable tire inflator that plugs into your car’s 12V outlet, as it’s a common and convenient option.
- Connect the inflator: Unscrew the valve cap from the tire that needs air. Attach the hose from your tire inflator securely to the valve stem. Most inflators have a clamp or a twist-on mechanism.
- Turn on the inflator: Plug your inflator into the 12V outlet and switch it on. Many inflators will show the current PSI on their display as they start working.
- Monitor the pressure: Keep a close eye on the gauge. If your inflator has a preset feature, you can set it to your desired PSI, and it will shut off automatically. If not, you’ll need to manually turn off the inflator when you reach the target pressure.
- Add air in short bursts: It’s better to add air for short periods (e.g., 10-20 seconds), then detach the inflator to check the pressure with your gauge. This prevents overinflation.
- Check and repeat: After adding some air, detach the inflator and check the pressure with your gauge. If it’s still low, reattach the inflator and repeat the process. Patience is key here.
If you are using an air compressor at a gas station:
- Attach the hose: Connect the compressor’s hose to the tire valve stem.
- Check the gauge: Look at the compressor’s gauge. If it has a dial you can set, set it to your desired PSI.
- Add air: Squeeze the trigger or turn on the compressor. Listen for the air filling the tire.
- Read and adjust: Stop periodically to check your own gauge or watch the compressor gauge. Many modern compressors will shut off automatically when the set PSI is reached.
Step 4: Release Air if Overinflated
Most tire pressure gauges have a small button or lever that allows you to release air. If a tire is overinflated (e.g., 35 PSI when it should be 32 PSI):
- Attach the gauge: Press your tire pressure gauge onto the valve stem.
- Press the release button: While the gauge is attached, press the small button on the side of the gauge (or use the designated air release lever on some gauges). You’ll hear air being released.
- Release in short bursts: Let out a little air at a time, then remove the gauge to check the pressure. Repeat until you reach the recommended PSI.
Step 5: Replace the Valve Cap
Once you’ve achieved the correct tire pressure for a tire, screw the valve cap back on tightly. This little cap is important – it prevents dirt, moisture, and debris from getting into the valve stem, which could cause it to leak.
Step 6: Repeat for All Tires
Go through steps 1-5 for all the tires that need air. Remember to check and adjust your spare tire as well, if applicable. It’s a good habit to get into checking all tires every time.
How Often Should You Check Your Tire Pressure?
Consistency is key to maintaining optimal tire health and safety. General recommendations are:
- Monthly: Aim to check your tire pressure at least once a month. This is a good routine to establish.
- Before Long Trips: Always check your tire pressure before embarking on a significant road trip. Temperature changes during travel can affect pressure.
- After Significant Temperature Changes: A sudden drop in outside temperature can lead to a drop in tire pressure. Similarly, extreme heat can increase it. Keeping an eye on pressure during these shifts is wise.
You can also find extensive information on tire maintenance, including inflation, on resources like Fuel economy.gov, which highlights how proper maintenance like tire inflation contributes to better gas mileage.
Troubleshooting Common Tire Inflation Issues
Even with the best intentions, you might run into a snag. Here are a few common issues and how to handle them:
Problem: The Tire Pressure Gauge Won’t Read
- Cause: The gauge isn’t seated properly on the valve stem, or there might be debris in the valve stem.
- Solution: Remove the gauge and try to reattach it, ensuring a firm, straight seal. If you suspect debris, you can use a small tool to gently clear the valve stem opening (with the valve cap removed, or repress the valve core briefly to clear it).
Problem: Air is Leaking Constantly When Trying to Add Air
- Cause: The valve core inside the valve stem might be loose or damaged.
- Solution: You can try tightening the valve core slightly with a valve core tool. If it’s damaged, it may need to be replaced by a professional. For most DIYers, a constant leak from the valve core is a sign to visit a tire shop.
Problem: The Portable Inflator Isn’t Working
- Cause: It might not be plugged in correctly, the car’s 12V outlet might not be powered (try a different outlet or ensure the car is in the “accessory” or “on” position), or the inflator itself might be faulty.
- Solution: Double-check the connection. Try a different 12V accessory. If it still doesn’t work, the inflator might need repair or replacement.
Problem: Overinflating the Tire
- Cause: Not monitoring the gauge closely enough while adding air.
- Solution: This is easily fixed by releasing air using your gauge or the air source’s release function (as described in Step 4). It’s a common mistake, so don’t stress!
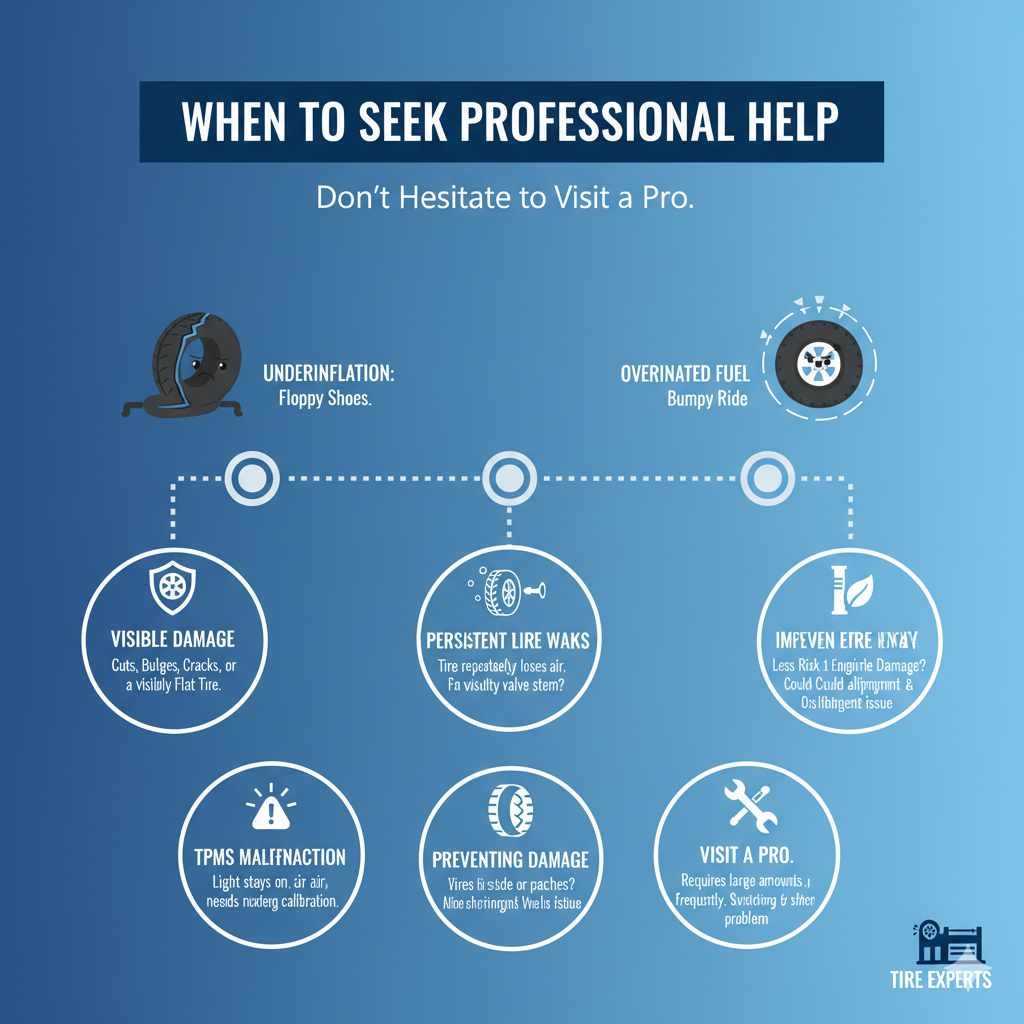
When to Seek Professional Help
While pumping air is a straightforward DIY task, there are times when it’s best to let the experts handle it. If you notice any of the following, it’s time to visit a tire shop or mechanic:
- Visible Tire Damage: Cuts, bulges, cracks, or a visibly flat and damaged tire.
- Persistent Leaks: If a tire repeatedly loses air pressure even after you’ve checked and topped it up, there might be a puncture or a faulty valve stem.
- Uneven Tire Wear: If your tires are wearing out significantly on one side or in patches, it could indicate an alignment issue as well as improper inflation.
- TPMS Malfunction: If your car’s Tire Pressure Monitoring System (TPMS) light is on and doesn’t turn off after you’ve adjusted tire pressures, the system itself might need calibration or repair.
- Major Pressure Fluctuations: If you find your tires consistently require significant amounts of air, there could be an underlying problem with the tire or wheel.
Frequently Asked Questions (FAQ)
What is PSI, and why is it on my tire?
PSI stands for “Pounds per Square Inch.” It’s a unit of measurement for air pressure. Your car manufacturer specifies the ideal PSI for your tires to ensure optimal safety, performance, and fuel efficiency. This recommended PSI is crucial for how your tires interact with the road.
Can I just put any amount of air in my tires?
No, it’s highly recommended to use the PSI specified by your car manufacturer, typically found on a sticker on the driver’s side doorjamb or in your owner’s manual. Over- or under-inflating can compromise safety, wear out your tires faster, and reduce fuel economy.
How much air can a tire hold?
A tire has a maximum PSI rating molded onto its sidewall. This is the limit for safe inflation under normal conditions and is usually higher than the recommended PSI for daily driving. You should never inflate your tires beyond this maximum limit. Always refer to your vehicle’s recommended pressure for everyday use.
My car has a Tire Pressure Monitoring System (TPMS) light. Do I still need to check my tires manually?
Yes, absolutely. The TPMS light indicates when a tire is significantly underinflated. However, it doesn’t always read minor pressure drops or uneven inflation across all tires. Manually checking your tire pressure with a gauge at least once a month is still essential for accurate monitoring and optimal tire health.
Is it bad to pump air into hot tires?
It’s best to check and inflate your tires when they are “cold,” meaning after your car has been parked for at least three hours or driven less than a mile at moderate speed. Tires heat up as you drive, increasing the air pressure inside them. Inflating hot tires to the recommended PSI might mean they are overinflated once they cool down. If you must add air when tires are hot, add a few PSI less than recommended and re-check when cold.
How long does it take to pump air into a tire?
It varies depending on the air source. A gas station air compressor might fill a tire in 1-2 minutes. A portable 12V inflator might take 5-15 minutes per tire, depending on how low it is and the power of the inflator. It’s better to add air gradually and check pressure often with a portable inflator to avoid overfilling.
Do all tires need the same air pressure?
Typically, yes, the front tires and rear tires require the same PSI for normal driving. However, some vehicles might have slightly different recommendations for front and rear tires, or for different load conditions (e.g., when carrying heavy cargo or passengers). Always consult your vehicle’s specific sticker or manual for the correct pressures for your situation.
Conclusion
See? Pumping air into your car tires is a straightforward and incredibly beneficial maintenance task. By understanding your car’s recommended tire pressure, having the right (and simple!) tools, and following these step-by-step instructions, you can confidently ensure your tires are always properly inflated. This small effort goes a long way in keeping you safe on the road, saving you money on fuel and tire replacements, and providing a smoother, more reliable ride. Make it a habit to check your tires monthly, and you’ll be amazed at the difference it makes. Happy driving, and keep those tires in tip-top shape!