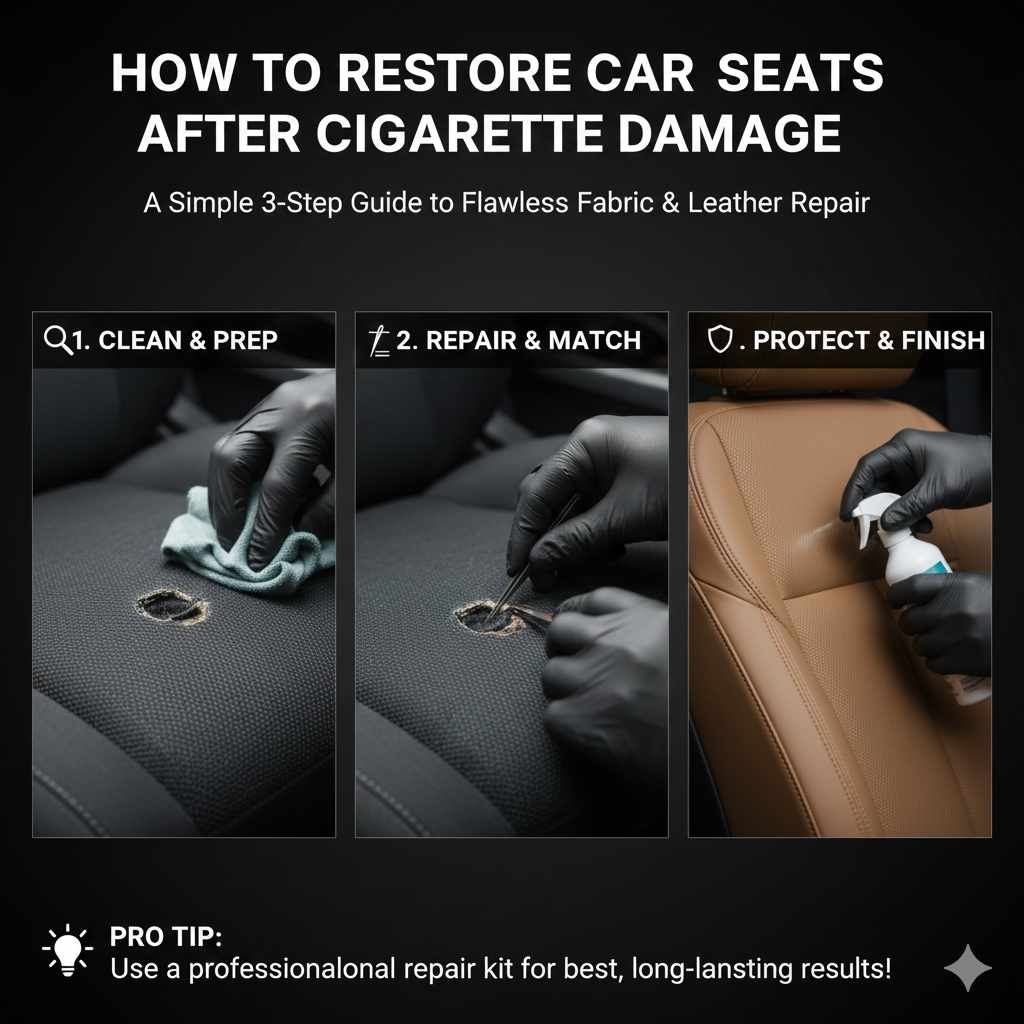
How to Restore Car Seats After Cigarette Damage
Dealing with a cigarette burn in your car seat can be frustrating. Many people find the task of figuring out How to Fix Cigarette Burns in Car Seats a bit tricky when they begin. Don’t worry, you are not alone! It’s actually a common problem. Plus, repairing these burns is totally doable with the right steps. This guide will walk you through a simple, step-by-step process. Let’s get started!
Evaluating the Damage From the Burn
Before you even think about patching up your car seat, it is important to figure out how bad the damage is. This involves checking the size of the burn, what your car seat is made of, and the specific location of the damage. Accurate assessment will assist in choosing the right repair method. It’s like being a detective, except instead of finding clues, you’re gathering information to repair your car seat. This will help you choose the correct approach.
Types of Car Seat Materials
The material of your car seat will greatly influence the best fix. Materials react differently to heat, and some are more sensitive than others. Knowing what you’re working with will help you pick the right repair products and techniques. Take a peek at your car’s manual or do a quick online search to identify the seat’s covering. The common materials that you need to know about are fabric, vinyl, and leather.
Fabric: Fabric car seats are common and often the easiest to repair. Fabric, such as cloth, absorbs liquid, which can complicate the repair. It’s often simple to patch or re-dye small burns in fabric seats.
Think of fabric as being similar to your favorite t-shirt. It has a woven structure that allows air and liquid to pass through. When a cigarette hits fabric, it often creates a small hole or a singed area. This is because the heat burns the fibers directly.
Vinyl: Vinyl seats are a good alternative to leather. They are known for being waterproof and less expensive. Vinyl is often a good option for car seats because it is simple to clean, and it’s less prone to staining.
Vinyl seats often melt and leave behind a melted or distorted area when burned. These melts are typically not as easy to repair as a simple hole in a fabric seat. With patience and the right products, the results are typically satisfactory.
Leather: Leather car seats give a luxurious feel. However, they can be more challenging to fix. Leather is known for its durability, but it’s also prone to cracking and aging.
Leather is a natural material, so burns can cause the leather to shrink and harden. Repairing leather often involves filling the hole or damage, then recoloring and texturing it to match the original seat. It can be a lengthy process.
Burn Size and Location
The size and location are important to figure out what type of approach you should take. A tiny burn might only need a quick patch or a bit of filler. But, a bigger burn in a noticeable spot could require a more thorough repair, maybe even a new piece of material. The position of the burn impacts how visible the repair will be.
Small Burns: These are minor blemishes, often the size of a pinhead or smaller.
Smaller burns are typically easier to repair. They often need a simple filling or patching procedure. It is like fixing a small tear in your jeans. With the right tools and materials, you can restore the seat to near-original condition. These repairs can often be done with a small repair kit.
Medium Burns: These are noticeable and range from a dime to a quarter in size.
Medium burns require more work. You might need to use a patch or more filler. Matching the color and texture of the seat is more vital here to make sure that the fix looks good. Because more work is involved, take your time so you don’t mess anything up.
Large Burns: These are serious damages, bigger than a quarter, maybe even spreading across a whole section of the car seat.
Large burns often need skilled repair work or even parts of the seat to be replaced. These sorts of fixes might need you to seek out a professional. It’s similar to fixing a big hole in a wall: you will need more than just a little spackle.
Location: Burns in obvious locations are more noticeable.
A cigarette burn located where it can be seen easily requires a precise repair job. You’ll want to take extra care to make sure the fix blends well. A hidden burn, like one on the side of the seat or at the bottom, can be less of a worry because it is easier to hide.

Gathering Your Repair Tools
Once you’ve taken stock of the damage and chosen a method, you will need the correct tools and materials. Having everything you need ready makes the whole process smoother. It’s like baking a cake – you wouldn’t start without having all the ingredients. Some tools are vital for any kind of repair. Other tools and materials are unique to certain repair methods. It is helpful to purchase a car seat repair kit. These kits have the supplies that you will need to fix a car seat.
Essential Tools and Materials
Whether you’re dealing with a fabric, vinyl, or leather seat, you’ll need some standard supplies. These items will form the foundation of your repair process. You might already have a few of these lying around the house. Having these basics on hand will save you time and energy as you start to fix your seats.
Cleaning Supplies: Soap, water, and a microfiber cloth are essential.
Before any repair, you need to make sure the area is clean. Get rid of any dirt or debris that could mess with the fix. Mild soap and water are often great for preparing the area. A microfiber cloth ensures that you do not damage the car seat’s surface. A clean area is also a very important thing for getting the best results.
Scissors or a Razor Blade: Needed for trimming and removing damaged material.
You may need these for cutting away any burned or damaged material around the burn. Be careful when cutting the material to avoid more damage. Scissors and a razor blade are helpful when you start prepping the area for repair. This gives a clean space to work on and create a better look.
Needle and Thread or Glue: For attaching patches or reinforcing repairs.
Depending on the type of seat and damage, you’ll need the right adhesive. For patches, a needle and thread can be used on fabric seats for extra durability. Strong glue is often ideal for vinyl or leather. This will assist you in putting things back together properly.
Filler Compound or Patch Material: For filling holes or covering the burn.
Filler is great for patching. It helps to rebuild the damaged area. A patch is a piece of matching material. It is used to cover holes or burns. Select the correct type depending on what kind of car seat you have. You want to match the appearance as closely as possible.
Coloring Agents: Dye, paint, or color-matching pens.
These will aid you in hiding the repair by making the area blend in better with the car seat. For leather, you may want to use leather dye. For vinyl or fabric, use a color-matching pen or paint. These colorants can make the repair job look almost invisible.
Specialized Tools for Different Materials
Some tools and materials are specific to certain types of car seats. You will need to take into account what your car seat is made of. The items will make your repair process a lot easier. It’s like having the right screwdriver for the right screw. Using the right tools will make your task a lot easier and give you better results.
For Fabric Seats: Fabric patches or matching fabric scraps.
Matching fabric patches help cover burns or holes. Use the same material or a similar type to make the fix less visible. Get a piece of fabric that is the same color and texture. You can then glue or sew it onto the damaged area.
For Vinyl Seats: Vinyl repair kit with filler, colorants, and a heat tool.
A vinyl repair kit typically comes with filler to fill in holes and cracks. It also includes colorants to match the original color of the seat. The heat tool helps soften and blend the repair material. The goal is to make the fix seamless. This gives you a better chance of good results.
For Leather Seats: Leather filler, leather dye, and a graining tool.
Leather filler helps to fill holes and cracks. Leather dye allows you to match the original color. The graining tool helps to mimic the texture of the leather. This gives the repaired area a realistic look. This lets you make sure that the repair will match the rest of the seat.
Step-by-Step Repair Guide: How to Fix Cigarette Burns in Car Seats
Now, let’s explore how to actually repair those annoying cigarette burns. Here’s a detailed, step-by-step approach to help you fix your car seats, no matter the material. Remember, patience is key. The more careful you are, the better your results will be. Think of it like a paint-by-numbers project, where each step leads you closer to a finished product.
Fabric Seat Repair
Fabric seats often need the simplest fix. The goal is to fill the hole or cover the burn with something that blends in. The next few steps will walk you through fixing a burn in a fabric seat. Take your time, and soon you’ll have a seat that looks a lot better.
-
- Clean the Area: Start by cleaning the damaged area. Use soap and water to get rid of any dirt or debris. Let it dry completely.
Cleaning is essential. It preps the area for the fix. Soap and water are usually enough to clean the area. This makes sure that the patch will stay in place. Allow the area to dry to remove any moisture from the seat.
-
- Trim the Damaged Fibers: Carefully trim away any loose or burned fibers with scissors or a sharp blade.
Remove any damaged material. Trim the area so you have a clean surface to work with. Be careful when trimming so you don’t make the hole bigger.
-
- Apply Filler (Optional): If the burn has caused a hole, use a fabric filler to fill the hole.
Filler can help to restore the original shape of the seat. This gives a more even surface to put the patch on. It will ensure that the seat looks good when it is done.
-
- Apply the Patch: Cut a patch from matching fabric. Apply glue to the patch and attach it over the hole, or sew it in place.
Place the patch. Then apply the glue or thread. Use a patch that is the same color. Make sure the patch fits snuggly. This will help hide the repair.
-
- Color Match (If Needed): Use fabric dye or a color-matching pen to blend the patch with the rest of the seat.
Color matching can help the repair blend better. If the patch looks different, use dye or a pen to make it look the same. You want the repair to be less noticeable.
Vinyl Seat Repair
Vinyl seats are more sensitive to heat. This means you will want to approach repairs with a little extra care. It is a bit more involved than fabric repairs, but the final result can be very nice. The following steps will guide you through fixing a burn in a vinyl seat. Taking your time, you can have a seat that is almost as good as new.
-
- Clean the Area: Clean the area to remove any dirt or debris with soap and water. Let it dry completely.
Cleaning is a must. A clean surface makes for a better repair. Soap and water will get the job done. Let the surface dry completely before going on to the next step.
-
- Prepare the Burned Area: Use a razor blade to gently trim away any melted or damaged vinyl.
Carefully get rid of any damaged material. Be gentle to prevent further damage. The goal is to get a smooth, clean surface for the repair.
-
- Apply Filler: Use a vinyl repair filler to fill the hole or melted area.
Apply the filler. Follow the instructions on the package to ensure it sets correctly. This helps rebuild the original shape of the seat.
-
- Heat the Filler (If Required): Some vinyl repair kits include a heat tool. Use this to blend the filler with the surrounding vinyl.
If your kit has a heat tool, use it to make sure the filler blends in. Heat softens the filler. This helps it mesh with the rest of the seat.
-
- Color Match: Use the colorants provided in your vinyl repair kit. Blend the repair with the surrounding seat.
Use the included colorants to blend the repair with the rest of the seat. The goal is to make the fix unnoticeable. Patience will help you achieve the best outcome.
Leather Seat Repair
Leather repairs can be more complicated. But the results can be really satisfying. With the right tools and steps, you can restore your leather seats to their former glory. Here’s how to fix a burn on a leather seat.
-
- Clean the Area: Gently clean the area with a leather cleaner. Dry completely.
Clean the area with a cleaner made for leather. Get rid of dirt and debris. This preps the surface for the repair. Allow the area to dry before going on.
-
- Prepare the Burn: Lightly sand around the burn to get rid of any rough edges.
This creates a smooth area to work with. Be gentle when sanding. You want to smooth it out, not damage it.
-
- Apply Leather Filler: Fill the hole or damaged area with leather filler, leveling it with the surrounding leather.
Leather filler helps to restore the original shape of the seat. Make sure the filler is even with the surrounding leather. This creates a good surface for the next steps.
-
- Apply Texture (If Necessary): Use a graining tool to match the texture of the leather.
This step will make the fix blend in perfectly. If your leather has a grain, make sure to use a tool to replicate it.
-
- Color Matching: Use leather dye to match the color of the original leather.
This step allows the repaired area to blend seamlessly. It’s important to match the color perfectly for the best outcome. Applying the dye is very important in this situation.
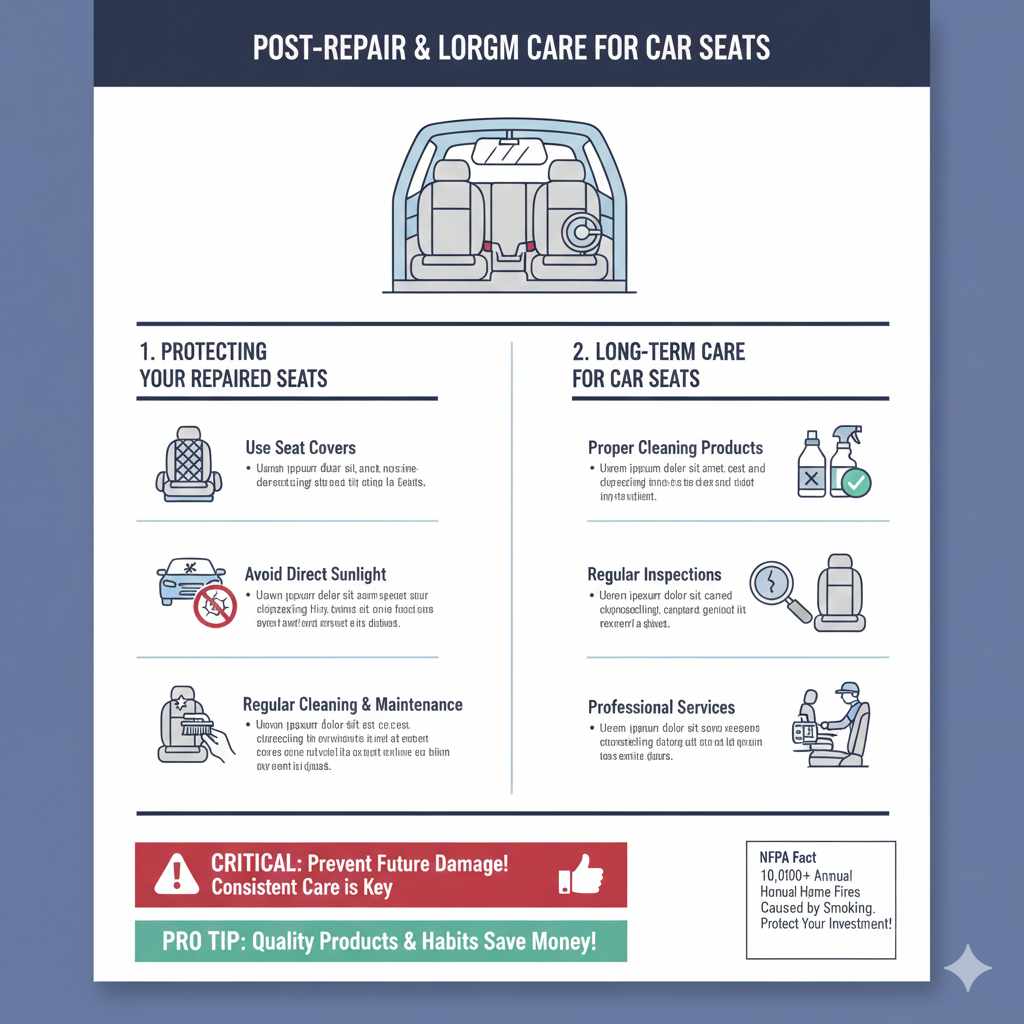
Post-Repair and Maintenance
You have fixed the burn! But your work doesn’t stop there. How you treat your seats after the fix will impact how long the repair lasts. By taking care of your seats, you can keep them looking good for a long time. It’s like taking care of your favorite shirt: the better you treat it, the longer it will last. Here is the last phase of the project: maintenance.
Protecting Your Repaired Seats
The repairs you have made are only as good as the care you provide. You must take steps to keep the fixes in good shape and stop future damage. Think of it like putting a protective coating on your car to stop scratches. These steps will keep your seats looking good for a long time.
Use Seat Covers: Add seat covers to protect your seats from further damage.
Seat covers provide an extra layer of protection from spills, wear and tear, and burns. Seat covers are a simple way to guard against daily damage. There are seat covers for every car. You will be able to find one for your car without much difficulty.
Avoid Direct Sunlight: Park in shaded areas or use a sunshade to reduce sun damage.
Sunlight can fade and damage your car seats. It is even worse for leather seats. By reducing sun exposure, you can prolong the life of your repair and protect the original material.
Regular Cleaning and Maintenance: Clean your seats regularly with the right products to stop dirt from setting in.
Regular cleaning is important to keep your car seats in great shape. Clean them with the right products and avoid things that can hurt the material. This will preserve your repair and keep your seats looking their best.
Long-Term Care for Car Seats
Car seats are an investment, and taking care of them will pay off. Following a few simple steps will keep your seats looking great. Think about it like investing in your car to increase its value. With consistent care, your car seats will stay in good shape for years.
Proper Cleaning Products: Use cleaners made for your seat’s material. Avoid harsh chemicals.
Make sure to use the right cleaners for your car seats. Avoid harsh chemicals that could damage the material. Choosing the right products will help keep your seats clean. This also helps stop damage.
Regular Inspections: Regularly check your seats for wear and tear, or any new damage.
Doing regular inspections can help you find small problems before they become big issues. It’s like doing regular check-ups on your body. Early action can prevent bigger problems in the future.
Professional Services: Get professional cleaning or repairs if needed.
Don’t be afraid to get help from professionals. They may be able to give a better repair. Professionals have the tools and experience to take care of tough damage. It is a good thing to get help from experts when needed.
According to the National Fire Protection Association (NFPA), cigarette fires are a leading cause of home fires. Similarly, cigarette-related car fires are also a significant concern, although data is less frequently compiled. These figures show the significance of the damage that cigarettes can cause.
| Category | Statistic |
|---|---|
| Annual Home Fires Caused by Smoking | Approximately 10,000 |
| Deaths Caused by Smoking-Related Fires | Around 600 |
Frequently Asked Questions
Question: Can I use super glue to fix a cigarette burn?
Answer: It’s best to use materials designed for the job. Super glue may damage the car seat’s material or create a stiff patch.
Question: Is it possible to completely remove the cigarette smell from my car seats?
Answer: It can be tough, but cleaning, airing out the car, and using an odor-absorbing product can really help.
Question: Should I call a professional, or can I repair the burn myself?
Answer: For small burns, you can typically fix them yourself. For extensive damage, a professional might be better.
Question: How can I prevent cigarette burns in the future?
Answer: Never smoke in the car, or use an ashtray and be super careful when you do smoke.
Question: What if the colors don’t match after I repair the burn?
Answer: Use color-matching products from a car seat repair kit. They’ll assist you in getting the best blend.
Final Thoughts
You have made it to the end! Fixing cigarette burns in car seats doesn’t have to be a nightmare. With the right steps and a little patience, you can bring your car seats back to life. You now have the knowledge to fix fabric, vinyl, or leather seats. From evaluating the damage to selecting the correct tools, and following the repair process, you can solve the problem. Remember, the key is preparation, using the right materials, and taking your time. By using the knowledge you have gained, you can now enjoy a car with seats that look like new. So, grab your kit, take a deep breath, and get started! Your car will thank you for it. If you need it, reach out to an expert. But start with what you learned, and feel confident!