How to Steam Clean Car Seats: The Best Proven Method
To steam clean car seats, first vacuum the seats thoroughly. Then, pre-treat any tough stains. Set up your steam cleaner with a brush attachment and test a hidden spot. Work in small sections, steaming from top to bottom and immediately wiping the loosened dirt with a clean microfiber towel. Finally, allow the seats to air dry completely with the windows open.
Spills happen. Whether it’s a morning coffee mishap, a snack-time disaster from the kids, or just the everyday grime that builds up over time, your car seats can take a beating. It can be frustrating to see them looking stained and smelling less than fresh. But don’t worry, you don’t need to spend a fortune on professional detailing. You can get amazing results right in your own driveway.
I’m here to show you a simple, powerful, and proven method to bring your car seats back to life. Steam cleaning is one of the best ways to deep clean your car’s interior. It uses hot vapor to lift dirt, kill germs, and get rid of odors without harsh chemicals. In this guide, I’ll walk you through every step, making it easy for anyone to follow. Let’s get your car looking and feeling brand new again!
Why Steam Cleaning is a Game-Changer for Your Car’s Interior
You might wonder why you should choose steam cleaning over a simple scrub with soap and water. The answer is simple: steam is incredibly effective. It’s more than just cleaning; it’s a deep sanitizing treatment for your car. The high temperature of the steam provides several key benefits that other methods can’t match.
Here’s what makes steam so special:
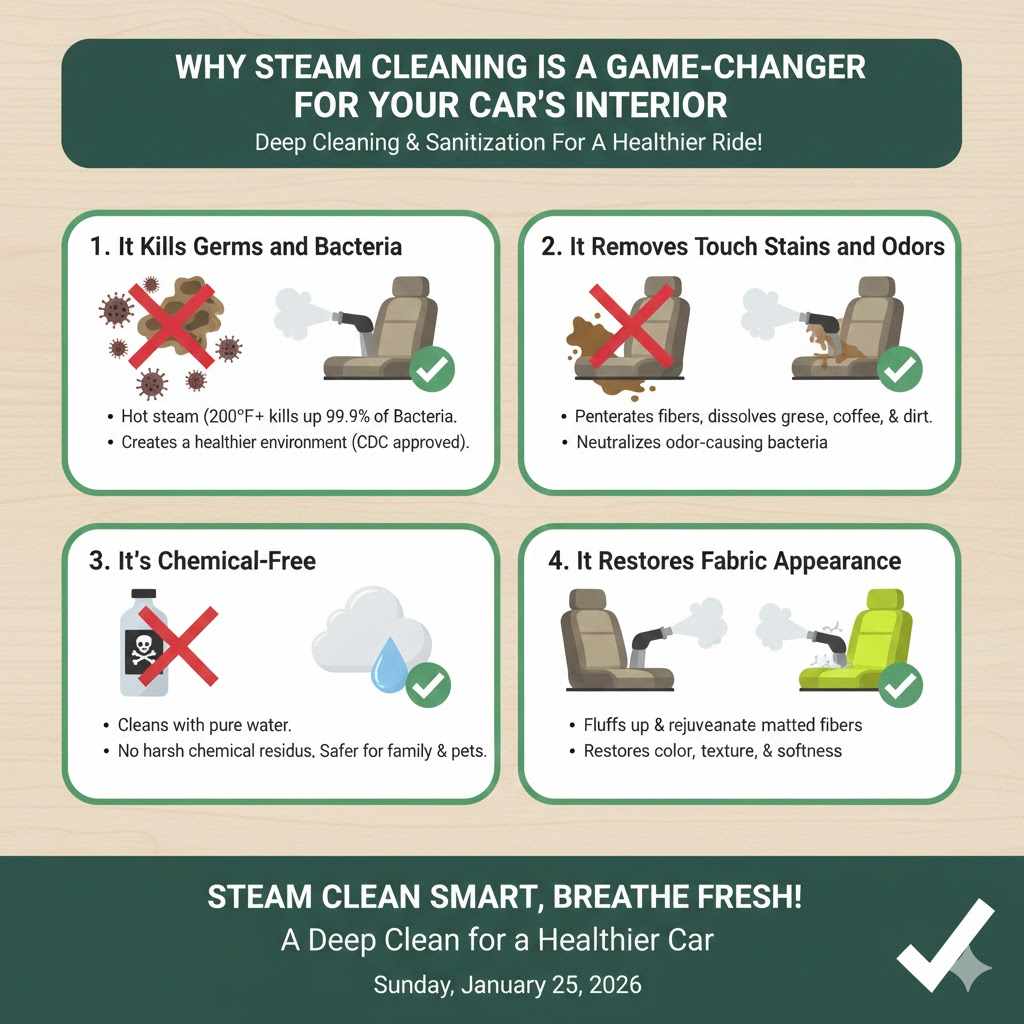
- It Kills Germs and Bacteria: The hot steam, typically over 200°F (93°C), is a natural disinfectant. It can kill up to 99.9% of germs, bacteria, and viruses on contact. This is especially great if you have kids or pets, as it helps create a healthier environment inside your car. According to the Centers for Disease Control and Prevention (CDC), steam sterilization is a highly effective method for killing microorganisms.
- It Removes Tough Stains and Odors: Steam penetrates deep into the fabric fibers. This allows it to loosen and dissolve stubborn stains like grease, coffee, and ground-in dirt that other cleaners leave behind. It also neutralizes odor-causing bacteria, eliminating smells instead of just masking them.
- It’s Chemical-Free: One of the biggest advantages is that you’re cleaning with pure water. This means no harsh chemical residues are left on your seats, which is safer for you, your family, and the environment. It’s an excellent choice for people with allergies or sensitivities.
- It Restores Fabric Appearance: The steam helps to fluff up and rejuvenate matted-down fabric fibers. This can make your seats look brighter, feel softer, and restore some of their original texture and color.
Before You Start: Gathering Your Tools and Supplies
Having everything ready before you begin makes the job go much smoother. You don’t need a garage full of professional equipment. Most of these items are easy to find, and you may already have some of them at home. Think of this as your car-cleaning toolkit.
Here is a simple list of what you’ll need to get the job done right:
- A Steam Cleaner: This is your main tool. A quality handheld or canister steam cleaner with various attachments works best. Look for one with a fabric brush or upholstery tool.
- Vacuum Cleaner: A good vacuum with a crevice tool and brush attachment is essential for the first step. A shop-vac is great, but your home vacuum will work too.
- Microfiber Towels: You’ll need several clean, dry microfiber towels. They are great for wiping away the dirt and moisture that the steam lifts from the seats.
- Upholstery Pre-Treatment Spray (Optional): For very stubborn or old stains, an enzyme-based upholstery cleaner can help break them down before you steam.
- Detailing Brushes: A few soft-bristled brushes can help you work the pre-treatment spray into tough stains without damaging the fabric.
- Distilled Water: Using distilled water in your steam cleaner is highly recommended. It prevents mineral buildup (scale) inside the machine, which can clog it and shorten its life.
- Extension Cord: This will give you the freedom to move around your vehicle easily without being limited by the steamer’s cord length.
Safety First! Important Precautions for Steam Cleaning
Steam is powerful, which is why it works so well. But that also means we need to be careful. The steam coming out of the machine is extremely hot and can cause serious burns. Your safety is always the top priority. Follow these simple rules to make sure your cleaning project is safe and successful.
- Read the Manual: Every steam cleaner is a little different. Take a few minutes to read the instruction manual for your specific model. It will tell you how to fill it, operate it, and use the attachments safely.
- Wear Protective Gear: It’s a good idea to wear gloves to protect your hands from the hot steam and the grime you’ll be cleaning. Safety glasses are also recommended to protect your eyes from any hot water splatter.
- Never Point the Steamer at People or Pets: This is the most important rule. Treat the steam cleaner like the hot tool it is. Always keep the nozzle pointed away from yourself and others.
- Keep the Area Ventilated: Open your car doors and, if you’re in a garage, open the garage door too. Good airflow helps the steam dissipate and allows the seats to dry faster.
- Don’t Overfill the Steamer: Follow the manufacturer’s instructions for filling the water tank. Overfilling can cause hot water to spit out of the nozzle.
- Allow it to Cool Down: When you’re finished, let the steam cleaner cool down completely before you open the water tank or store it away.
Step-by-Step Guide: How to Steam Clean Your Car Seats
Alright, you’ve gathered your tools and reviewed the safety tips. Now it’s time for the fun part! We’re going to tackle this one step at a time. Follow this process, and you’ll be amazed at the results. Don’t rush—patience is key to a deep, satisfying clean.
Step 1: Prepare Your Car and Seats
First things first, we need to get the seats ready for their deep clean. This initial prep work makes a huge difference. You can’t clean a surface that’s covered in crumbs and dust.
Start by removing everything from your car. Take out floor mats, car seats for children, and any personal items. Now, grab your vacuum cleaner. Using the crevice tool, vacuum every single nook and cranny of your seats. Get deep into the seams, between the seat and the center console, and under the headrests. Then, switch to the brush attachment and go over the entire surface of the seats. This will lift away all the loose dirt, dust, pet hair, and crumbs.
Step 2: Test a Small, Hidden Spot
This step is crucial and should never be skipped. Car seat fabrics can be sensitive to heat. We need to make sure the steam won’t cause any discoloration or damage. Find a small, out-of-the-way area on one of your seats. A good spot is the underside of the seat or a small patch on the back.
Apply a short burst of steam to this hidden area and wipe it with a microfiber towel. Let it dry for a few minutes. Check for any changes in color or texture. If everything looks good, you’re ready to move on to the rest of the seat.
Step 3: Pre-Treat Tough Stains
Take a close look at your seats. Do you see any dark spots from spilled soda, grease marks, or old, set-in stains? Now is the time to give them some extra attention. If your seats are just generally dirty, you can skip this step. But for specific problem spots, a pre-treatment can work wonders.
Lightly spray your upholstery cleaner or stain remover directly onto the stain. Don’t soak the area. Just a light mist is enough. Use a soft-bristled detailing brush to gently work the cleaner into the fabric in a circular motion. This helps to break down the stain before the steam even touches it. Let the cleaner sit for 5-10 minutes, as recommended on the product label.
Step 4: Time to Steam! The Correct Technique
Now, let’s bring in the steam. Fill your steam cleaner with distilled water and turn it on. Wait for it to heat up completely. Attach the upholstery brush or a similar fabric tool to the nozzle.
The best technique is to work in small, manageable sections, about one square foot at a time. Start at the top of the seat and work your way down. This prevents dirty water from dripping onto areas you’ve already cleaned. Hold the steamer nozzle about an inch or two away from the fabric. Slowly move the steam tool across the section, pressing the trigger to release a steady flow of steam. Keep the tool moving at a consistent pace. Don’t hold it in one spot for too long, as this can over-saturate the fabric.
Step 5: Wipe Away the Grime
This step happens immediately after steaming a section. As the hot steam loosens the dirt, you need to wipe it away before it settles back into the fabric. As soon as you finish steaming a small section, put the steamer down and grab a clean, dry microfiber towel.
Firmly wipe the steamed area. You’ll be shocked to see how much dirt comes off onto the towel! This action physically removes the grime that the steam has lifted to the surface. Fold your towel to a clean side as you move to the next section to avoid spreading dirt around.
Step 6: Repeat as Needed
Move to the next section of the seat and repeat the process: steam slowly, then wipe immediately. Continue this pattern—steam, wipe, steam, wipe—until you have cleaned the entire seat. Work methodically from top to bottom, and then from the backrest to the seat bottom.
For very dirty seats, you may need to go over some areas a second time. If your microfiber towel becomes too dirty or damp, switch to a fresh, clean one. Using a clean towel is key to lifting the dirt away effectively.
Step 7: Let It Dry Completely
Once you’ve finished steaming all the seats, the final step is to let them dry. This is very important, as leaving seats damp can lead to mold or mildew growth. The best way to dry them is with natural airflow.
Leave all your car doors or windows open for several hours. If you’re in a sunny, low-humidity location, this will happen relatively quickly. If it’s humid or cold, it may take longer. You can also use a fan inside the car to speed up the process. The seats should feel completely dry to the touch before you close up the car. This can take anywhere from 2 to 8 hours, depending on the conditions.
Dealing with Different Types of Car Seats
Not all car seats are made from the same material. The type of upholstery you have—fabric, leather, or vinyl—will determine the best approach. While steam is versatile, you need to adjust your technique for each material to avoid causing damage.
Here’s a quick guide to help you out:
| Material Type | Steam Suitability | Key Tips & Technique |
|---|---|---|
| Cloth/Fabric | Excellent | This is what steam cleaning is perfect for. You can follow the standard method described above. Use the brush attachment and don’t be afraid to pre-treat tough stains. |
| Leather | Use with Caution | High heat can dry out and damage leather. Keep the steamer moving quickly and hold it further away from the surface (4-6 inches). Wrap the nozzle in a microfiber towel to soften the heat. After steaming, apply a quality leather conditioner to restore moisture. |
| Vinyl/Faux Leather | Good | Vinyl is more durable than leather and handles steam well. Use a lower steam setting if possible and keep the nozzle moving. Wipe dry immediately to prevent water spots. No conditioning is needed after. |
Common Mistakes to Avoid When Steam Cleaning
Steam cleaning is straightforward, but a few common mistakes can lead to less-than-perfect results or even damage your seats. I want you to feel confident, so let’s review what not to do.
- Skipping the Vacuuming Step: If you don’t vacuum first, you’ll just turn loose dirt into mud and push it deeper into the fabric. Always start with a thorough vacuum.
- Oversaturating the Seats: Using too much steam in one spot can soak the foam padding underneath the fabric. This can lead to very long drying times and potentially mildew. Keep the steamer moving!
- Forgetting to Test a Spot: You never know how a specific fabric will react to heat. Skipping the spot test is a gamble that could lead to permanent discoloration.
- Using a Dirty Towel: Once your microfiber towel is saturated with dirt, it stops absorbing grime and starts spreading it around. Switch to a fresh towel frequently.
- Closing the Car Up Too Soon: Patience is a virtue, especially when it comes to drying. Trapping moisture in a closed car is a recipe for a musty smell. Make sure the seats are 100% dry before you shut the doors.

Frequently Asked Questions (FAQ)
Can I use a clothes steamer on my car seats?
While a clothes steamer does produce steam, it’s not designed for deep cleaning. It lacks the pressure and specialized attachments needed to effectively lift dirt from upholstery. For the best results, it’s worth using a steam cleaner made for cleaning tasks.
How long does it take for car seats to dry after steam cleaning?
Drying time can vary from 2 to 8 hours. It depends on how much steam you used, the humidity in the air, and the temperature. To speed it up, ensure good ventilation by opening all car doors and using a fan if possible.
Is it safe to steam clean leather car seats?
Yes, but with extreme caution. You must keep the steamer moving and hold it several inches away from the surface to avoid overheating the leather. It’s also vital to apply a high-quality leather conditioner afterward to restore moisture and prevent cracking.
Do I need to use any special cleaning solution with the steamer?
No, and that’s one of the best parts! Most steam cleaners are designed to be used with just water. Distilled water is recommended to prevent mineral buildup. The power comes from the heat and pressure of the steam itself, not from chemicals.
Can I rent a steam cleaner instead of buying one?
Absolutely. Many home improvement stores and even some grocery stores offer steam cleaner rentals. This is a great, cost-effective option if you don’t plan on using it frequently. Just make sure it comes with an upholstery attachment.
Will steam cleaning remove all stains?
Steam cleaning is highly effective on a wide range of stains, especially from food, drinks, and general grime. However, some very old or stubborn stains (like ink or permanent marker) may not be completely removed. Pre-treating these spots gives you the best chance of success.
How often should I steam clean my car seats?
For most drivers, a deep steam clean once or twice a year is plenty to keep the seats fresh and sanitized. If you have pets, small children, or frequently eat in your car, you might want to do it more often, perhaps every 3-4 months.
Your Car Deserves a Fresh Start
And there you have it! You now have the knowledge and the step-by-step plan to steam clean your car seats like a pro. It’s a simple process that delivers incredible results, transforming your car’s interior from dingy and dirty to fresh, clean, and sanitized.
Taking care of your car yourself doesn’t have to be intimidating. By following these steps, you’ve not only saved money on professional detailing, but you’ve also gained the confidence to tackle another aspect of your car’s maintenance. There’s a special kind of pride that comes from doing the job yourself and seeing the amazing results of your hard work.
So the next time you get in your car, take a deep breath and enjoy that clean, fresh feeling. You earned it. Happy driving!