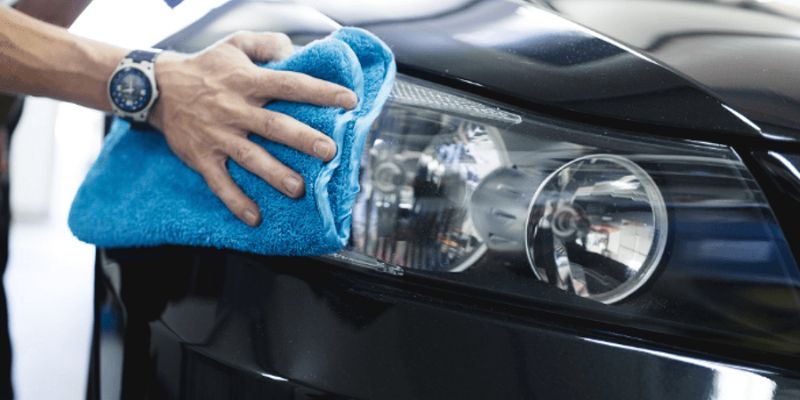
How to Wash Car Headlights for a Crystal-Clear Shine
Hey there! If you’ve ever noticed your car’s headlights looking foggy, yellow, or just plain dull, you’re not alone. I’ve been there, staring at my car’s cloudy headlights and wondering how they got so bad. Learning how to wash car headlights properly is a game-changer; it not only makes your car look sharper but also keeps you safer on the road.
As someone who’s spent time figuring out the best ways to clean headlights, I’m excited to share what I’ve learned with you. Picture us sitting together, chatting about how to get those headlights sparkling like new. Whether you’re a car enthusiast or just want to save a few bucks on maintenance, this guide will walk you through everything you need to know. Let’s dive in and bring that crystal-clear shine back to your headlights!
Why Clean Headlights Matter
You might think dirty headlights are just a cosmetic issue, but they’re a big deal for safety, too. Foggy or yellowed headlights can cut down how far your lights shine at night. That’s not good when you’re driving on a dark road. I remember driving home one evening and realizing I could barely see the road signs because my headlights were so hazy. It was a wake-up call.
Cloudy headlights happen because the plastic lens gets oxidized over time. Sunlight, road grime, and weather wear down the protective coating on your headlights, making them yellow or foggy. This doesn’t just make your car look old, it reduces visibility, which can be dangerous. Plus, clear headlights make your car look polished and well-cared-for, which is always a nice bonus. Cleaning them regularly can save you from pricey replacements, too. Let’s talk about how to spot when your headlights need some love.
Signs Your Headlights Need Cleaning
Before you start scrubbing, it’s good to know if your headlights need it. Here are some signs I’ve learned to look for:
- Yellow or Cloudy Appearance: If your headlights look yellowish or hazy, oxidation is likely the culprit. Hold a flashlight up to the lens. If it looks foggy inside, it’s time to clean.
- Dim Light Output: If your headlights don’t light up the road like they used to, dirt or oxidation is probably blocking the light. I noticed this when my headlights barely reached the stop sign down my street.
- Scratches or Pitting: Tiny scratches or rough spots on the lens can trap dirt, making the headlights look dull.
- Fading at Night: If you’re squinting to see at night or other drivers are flashing you, thinking your lights are off, it’s a sign the lenses need attention.
If you’re seeing any of these, don’t worry. Cleaning your headlights is easier than you think, and you don’t need fancy tools to get started.
Tools and Supplies You’ll Need
I love how you don’t need a ton of stuff to clean headlights. Most of these items are probably already in your garage or are easy to grab at a store. Here’s what I use when I clean mine:
- Mild Dish Soap: A gentle soap like Dawn works great for cutting through grime.
- Microfiber Cloths: These are soft and won’t scratch the lens. I always keep a few handy.
- Painter’s Tape: This protects your car’s paint around the headlights.
- Bucket of Water: For mixing soap and rinsing cloths.
- Sandpaper (Optional): Fine-grit sandpaper (800, 1200, and 2000 grit) for stubborn oxidation.
- Rubbing Alcohol: Helps clean off residue.
- Headlight Restoration Kit (Optional): Kits like 3M or Meguiar’s come with polish and sanding pads.
- UV Sealant or Wax: This protects the lens after cleaning.
- Gloves and Safety Glasses: If you’re sanding or using chemicals, these keep you safe.
You can start with just soap, water, and a cloth for light cleaning. If your headlights are really bad, a restoration kit or sandpaper might be worth the investment. I’ve tried both the simple and advanced methods, and both can work wonders.
Step-by-Step Guide to Cleaning Headlights
Alright, let’s get to the fun part: cleaning those headlights! I’ve done this a bunch of times, and I’ll walk you through the steps I follow. It’s like giving your car a mini makeover.
Step 1: Wash the Headlights with Soap and Water
Start by giving your headlights a good wash. Mix some mild dish soap with water in a bucket. Dip a microfiber cloth in the soapy water and scrub the headlights gently. I focus on getting rid of dirt, bugs, and grime stuck to the surface. Rinse with clean water and dry with a fresh microfiber cloth. This step alone can make a difference if your headlights aren’t too bad.
Step 2: Tape Around the Headlights
Before you get into deeper cleaning, put painter’s tape around the edges of the headlights. This protects your car’s paint from scratches or chemicals. I learned this the hard way when I accidentally scuffed my bumper with sandpaper. Take a minute to tape off the area it’s worth it.
Step 3: Sand the Headlights (For Heavy Oxidation)
If your headlights are still cloudy after washing, it’s time to sand them. Wet a piece of 800-grit sandpaper and gently sand the lens in small, circular motions. Keep the sandpaper wet to avoid scratching too hard. I usually spend a couple of minutes per headlight. Then, move to 1200-grit and finally 2000-grit to smooth it out. Rinse the headlights after each grit and check your progress. This step can feel tedious, but it’s amazing how clear the lenses start to look.
Step 4: Polish for a Crystal Shine
After sanding (or if you skipped sanding), apply a polishing compound. I use a headlight restoration kit or even toothpaste for light haze, it’s a cheap hack that works! Rub the polish onto the lens with a microfiber cloth in circular motions. I put some elbow grease into it for about 5 minutes per headlight. Wipe off the polish with a clean cloth and rinse the lens. You’ll start to see that foggy layer disappear.
Step 5: Clean with Rubbing Alcohol
To get rid of any leftover residue, wipe the headlights with rubbing alcohol and a microfiber cloth. This step makes sure the lens is squeaky clean before sealing. I’ve skipped this before and regretted it because the sealant didn’t stick as well.
Step 6: Apply a UV Sealant or Wax
This is the key to keeping your headlights clear for longer. Oxidation comes back fast without protection. Apply a UV sealant from a restoration kit or a car wax to the lens. I use a thin layer and buff it in with a microfiber cloth. This creates a barrier against UV rays and grime. I’ve found that reapplying sealant every few months keeps my headlights looking brand-new.
Step 7: Inspect and Test
Once you’re done, check the headlights for any missed spots. Turn on your car’s lights to see how bright they are. I like to do this at dusk to see the difference. If they’re still dim, you might need to replace the bulbs, but cleaning usually does the trick.
Household Hacks for Headlight Cleaning
If you don’t have a restoration kit, don’t worry. I’ve tried some household items that work surprisingly well for light cleaning. Here are my favorites:
- Toothpaste: Non-gel toothpaste with baking soda is mildly abrasive and great for light haze. Rub it on with a cloth, scrub, and rinse.
- Baking Soda and Vinegar: Mix baking soda with a splash of vinegar to make a paste. Scrub it onto the headlights, let it sit for a minute, and rinse. It’s cheap and effective.
- WD-40: Spray a little WD-40 on a cloth and wipe the headlights. It cuts through grime but needs a good rinse afterward.
These hacks are great for quick fixes, but for heavily oxidized headlights, a restoration kit or sanding is better. I’ve used toothpaste on my old sedan, and it was like magic for light cloudiness.
How Often Should You Clean Your Headlights?
How often you clean your headlights depends on where you live and how you drive. If you’re in a sunny state like Florida or Arizona, UV rays can oxidize your headlights faster. I live in a sunny area, so I clean mine every 6 months to keep them clear. If you drive on dusty roads or park outside, you might need to clean them more often, maybe every 3-4 months.
For maintenance, a quick soap-and-water wash every month can prevent buildup. I also reapply UV sealant every few months to protect the lenses. If you notice your headlights getting hazy again, don’t wait to clean them right away to avoid heavier sanding later.
Common Mistakes to Avoid
I’ve made plenty of mistakes cleaning headlights, so let me save you some trouble. Here are things to watch out for:
- Skipping the Tape: Not taping around the headlights can lead to scratched paint. I learned this after nicking my car’s bumper.
- Using Harsh Chemicals: Avoid cleaners like acetone they can damage the plastic lens. Stick to mild soap or polishing compounds.
- Sanding Too Hard: Pressing too hard with sandpaper can leave deep scratches. Keep it gentle and wet.
- Forgetting the Sealant: Without a UV sealant, your headlights will get cloudy again fast. I skipped this once, and my headlights were hazy again for weeks.
- Ignoring Bulbs: If your headlights are still dim after cleaning, the bulbs might be old. I replaced mine after cleaning and was amazed at the difference.
Take your time and follow the steps carefully. It’s not hard, but rushing can lead to mistakes.
When to Call a Professional
Most headlight cleaning jobs are DIY-friendly, but sometimes it’s worth calling a pro. If your headlights are heavily pitted or cracked, sanding might not be enough. I had a friend whose headlights were so bad that professional restoration was the only way to go. Pros use heavy-duty tools like wet sanders and high-grade sealants that can get better results.
You might also consider a pro if you don’t have the time or tools. Most auto shops charge $50-$100 to restore headlights, which is cheaper than replacing them (which can cost $200-$500 per headlight). If you’re unsure, get a quote from a local shop.
Benefits of Clear Headlights
Cleaning your headlights does more than just make your car look good. Here’s why I love keeping mine sparkling:
- Better Night Driving: Clear headlights improve visibility, making night drives safer. I noticed a huge difference after cleaning mine.
- Improved Car Value: Clean headlights make your car look newer, which can boost its resale value.
- Cost Savings: Restoring headlights is way cheaper than replacing them. I saved hundreds by doing it myself.
- Enhanced Appearance: Shiny headlights give your car a polished, cared-for look. It’s like a facelift for your ride!
Maintenance Tips to Keep Headlights Clear
Once your headlights are clean, you want them to stay that way. Here are some tricks I use to keep mine in top shape:
- Wash Regularly: Clean your headlights with soap and water during every car wash to prevent grime buildup.
- Park in the Shade: UV rays are the enemy. If you can, park in a garage or under a tree to protect your headlights.
- Reapply Sealant: Every 3-6 months, add a fresh layer of UV sealant or wax to keep oxidation at bay.
- Check Bulbs: Dim bulbs can make clean headlights seem dull. Replace them every couple of years for the best light output.
I’ve found that a little maintenance goes a long way. It’s like brushing your teeth; do it regularly, and you’ll avoid bigger problems.
Conclusion
There you go, friend! Cleaning your car’s headlights is easier than it sounds, and the results are worth it. Whether you’re using a simple toothpaste hack or going all-in with a restoration kit, you can bring back that crystal-clear shine in no time. I’ve been amazed at how much brighter my headlights are after a good cleaning, it’s like giving my car a new set of eyes. Not only does it make your car look sharp, but it also keeps you safer on the road. So, grab your supplies, follow these steps, and enjoy the glow of those sparkling headlights. Here’s to safe drives and a car that looks like a million bucks!
FAQs
How often should I clean my car’s headlights?
It depends on where you live, but every 6 months is a good rule of thumb. If you’re in a sunny or dusty area, you might need to clean them every 3-4 months.
Can I use toothpaste to clean my headlights?
Yes! Non-gel toothpaste with baking soda works great for light haze. Rub it on with a cloth, scrub, and rinse for a quick fix.
Do I need a restoration kit to clean headlights?
Not always. For light cleaning, soap, water, or household items like toothpaste can work. For heavy oxidation, a restoration kit or sandpaper is better.
Will cleaning my headlights make them brighter?
Yes, removing haze and dirt lets more light shine through. If they’re still dim, you might need to replace the bulbs.
Can I clean headlights without sanding?
Yes, if the haze is light, soap, water, or toothpaste can do the job. Sanding is only needed for heavy oxidation.
How do I keep my headlights clear after cleaning?
Apply a UV sealant or car wax every few months. Wash them regularly and park in the shade to slow down oxidation.
When should I replace my headlights instead of cleaning them?
If the lenses are cracked, heavily pitted, or damaged inside, cleaning might not help. A professional can tell you if a replacement is needed.