How to Charge Capacitor: **Proven** & **Effortless** Method
Charging a car audio capacitor is a safe and crucial step for optimal performance. The proven, effortless method involves using a simple light bulb as a current limiter and a multimeter for monitoring, ensuring a gentle and controlled charge that protects your capacitor and audio system. Follow these easy steps for a reliable power boost.
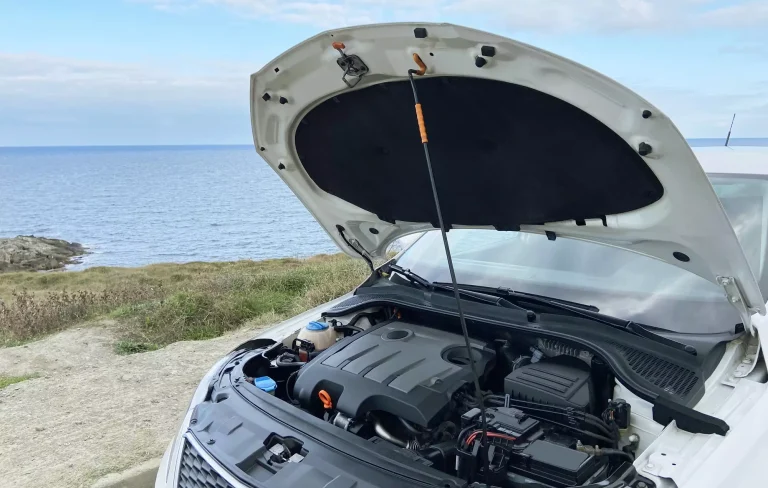
In the world of car audio, adding a capacitor can make a big difference in sound quality. But before it can do its magic, it needs to be charged. Charging a capacitor might sound a bit technical, and for some it can be a bit daunting. You might worry about damaging your new capacitor or even your car’s electrical system. Don’t let that thought worry you! I’m here to guide you through a super simple and safe way to get your capacitor powered up and ready to go. We’ll break it down step-by-step, using tools you likely already have or can easily get. Get ready to boost your audio system with confidence!
Why Does a Car Audio Capacitor Need Charging?
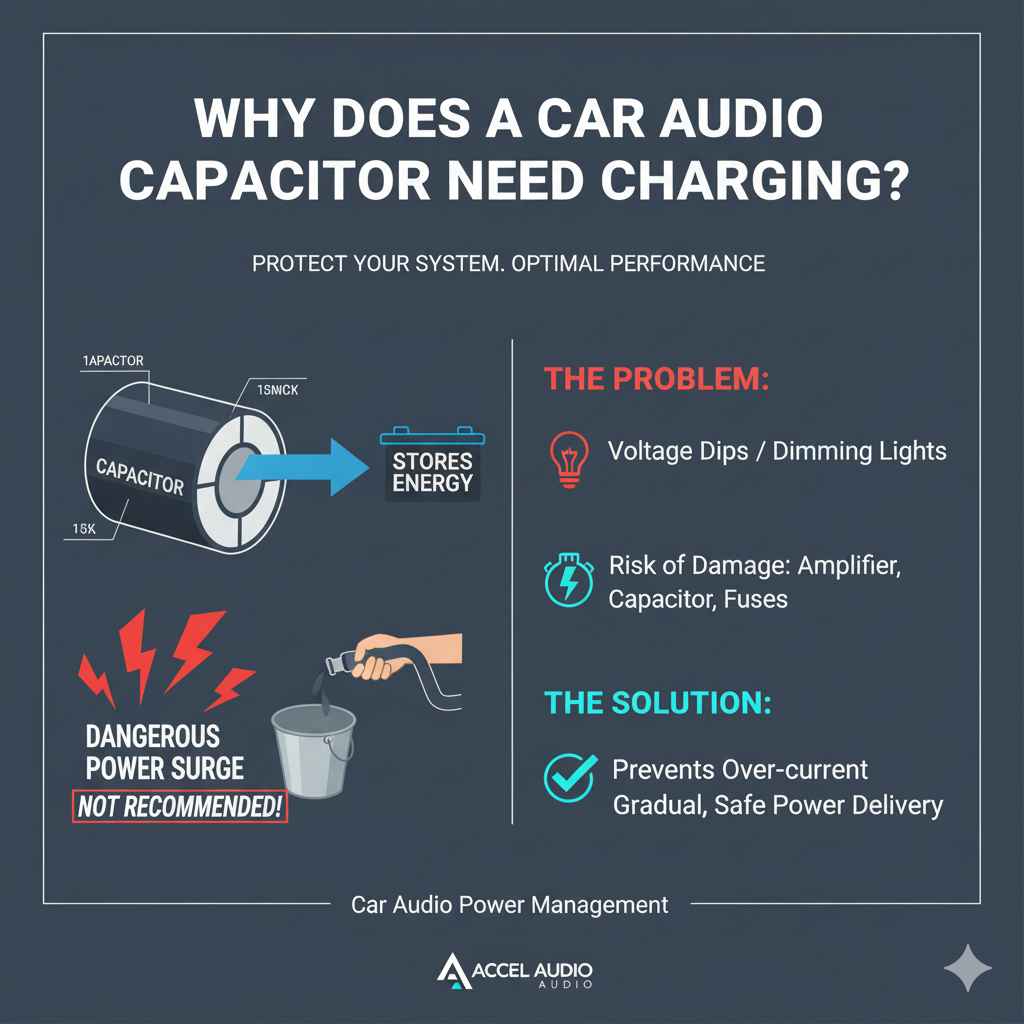
A car audio capacitor, often called a power capacitor, is like a quick-release battery for your amplifier. It stores electrical energy and delivers it instantly when your bass notes hit hard. This prevents voltage dips, which can cause your lights to dim and your audio quality to suffer. However, capacitors start in an uncharged state. Connecting a fully uncharged capacitor directly to your car’s power system can cause a massive, sudden surge of current. This surge is like a tiny lightning strike and can be damaging.
It can overload your amplifier’s power supply, damage the capacitor itself, or even blow fuses. Think of it like trying to fill a bucket with a firehose – it’s too much, too fast! Charging it properly, however, controls this current flow, allowing the capacitor to fill up gradually and safely. This ensures your investment is protected and your audio system performs at its best.
Understanding Capacitors: The Basics
Before we dive into charging, let’s quickly touch on what a capacitor is and why it’s important in a car audio setup. A capacitor is an electronic component that stores electrical energy in an electric field. In simpler terms, imagine it as a rechargeable battery, but one that can charge and discharge much, much faster. This speed is key for audio systems. When your music plays, especially songs with heavy bass, your amplifier might need more power than your car’s alternator can supply at that exact moment.
This sudden demand can cause the voltage from your car battery to drop. Your amplifier then struggles, leading to distorted sound or dimming lights. A charged capacitor acts as a buffer. It’s always “brimming” with energy, ready to supplement the power your amplifier needs instantly. This keeps the voltage stable, allowing your amplifier to perform without strain and your audio to sound clean and powerful.
The Importance of Safe Charging: Avoiding Common Pitfalls
Many beginners might think they can just connect a capacitor directly to the battery and be done with it. This is where things can go wrong, and it’s a common mistake I see. As I mentioned, connecting an uncharged capacitor directly creates a short circuit momentarily. This surge of current can:
- Damage the Capacitor: It can overheat, potentially leading to internal damage or even premature failure. Some capacitors might even pop or vent if subjected to extreme surges.
- Damage Your Amplifier: The sudden current spike can overwhelm the sensitive power supply of your amplifier, leading to blown fuses or, in severe cases, permanent damage to the amplifier’s components.
- Blow Fuses: Your car’s electrical system relies on fuses to protect components. A massive current surge will almost certainly blow the fuse protecting the capacitor or amplifier circuit.
- Damage Your Vehicle’s Electrical System: While less common, extreme surges can, in rare cases, affect other sensitive electronics in your vehicle.
Therefore, a controlled charging process is not just recommended; it’s essential for the longevity and reliable performance of your entire audio system. This is why we use methods that limit the initial rush of current, ensuring a safe and steady fill-up.
Tools You’ll Need for Effortless Charging
You don’t need a professional car audio installation shop to charge your capacitor. Here’s a straightforward list of tools that will make the job easy and safe. Most of these are standard items for anyone tinkering with their car’s electronics:
- Car Audio Capacitor: Obviously! Make sure it’s the right size for your amplifier’s power needs.
- Insulated Tools: Wrenches and screwdrivers with rubber or plastic handles are crucial. This prevents accidental shorts if a tool touches metal accidentally.
- 12V Incandescent Light Bulb: This is your secret weapon and acts as a current limiter. A common headlight bulb (around 50-100 watts) or a simple dashboard indicator bulb works well. We’ll explain why this is so effective shortly.
- Jumper Wires/Strips of Wire: You’ll need a couple of short lengths of sturdy wire to make connections. Ensure they are long enough to reach comfortably from your power source to the capacitor terminals.
- Multimeter: This is essential for checking voltage and confirming when the capacitor is fully charged. You need to know how to use a multimeter to read DC voltage.
- Safety Glasses: Always protect your eyes when working with car electronics.
- Owner’s Manuals: For both your car and your capacitor to confirm terminal layouts and specifications.
The Proven Method: Charging with a Light Bulb (The “Effortless” Way)
This is the most recommended and beginner-friendly method. It’s called the “light bulb method,” and it’s incredibly effective because the light bulb acts as a resistor in a controlled way. When the capacitor is empty, it draws a lot of current. The light bulb, being a resistor, limits this current. As the capacitor charges, it requires less current, and the light bulb glows dimmer, eventually going out when the capacitor is fully charged and has reached the same voltage as your car’s electrical system. It’s a visual indicator of the charging process!
Step-by-Step Guide to Charging Your Capacitor
Let’s get your capacitor charged up. Remember to work safely and take your time. If you feel unsure at any point, it’s always best to consult a professional or a more experienced friend.
Step 1: Prepare Your Work Area and Disconnect Power
Ensure you have good lighting and clear access to where you’ll be installing the capacitor. Double-check that your car’s engine is OFF and the ignition is in the LOCK or OFF position. Disconnect the negative terminal from your car’s main battery. This ensures there’s no accidental power flowing while you’re setting things up and prevents any unexpected electrical events.
Step 2: Locate Capacitor Terminals and Identify Polarity
Capacitors have two terminals, usually marked with ‘+’ and ‘-‘ symbols, or sometimes labeled ‘V+’ (Voltage) and ‘GND’ (Ground). It is absolutely critical to connect the positive side of the capacitor to the positive (12V) side of your car’s electrical system and the negative side to the ground. Reversing polarity can permanently damage the capacitor.
Step 3: Plan Your Wiring
You’ll need to run a wire from the positive terminal of your car’s battery (or a fused power distribution block) to one end of your light bulb. Then, you’ll need another wire from the other end of the light bulb to the positive terminal of your capacitor. Finally, you’ll need a wire to connect the negative terminal of your capacitor directly to a good chassis ground point in your vehicle. This chassis ground should be the same place where your amplifier’s negative power wire will eventually connect.
Step 4: Connect the Wiring (The Charging Sequence)
This is the crucial step where the light bulb comes into play. Make sure your car battery’s negative terminal is still disconnected.
- Connect the Ground Wire: First, connect a wire from the negative terminal of your capacitor to a solid chassis ground point. A good ground is essential for proper operation.
- Connect the Positive Power Wire: Take a jumper wire and connect it to the positive terminal of your car’s battery (or your chosen 12V power source).
- Incorporate the Light Bulb: Have your light bulb ready. Connect one of the jumper wires (the one coming from the positive battery terminal) to one terminal of the 12V incandescent light bulb.
- Connect to the Capacitor: Now, take another jumper wire and connect one end to the other terminal of the light bulb. Connect the other end of this second jumper wire to the positive terminal of your capacitor.
At this point, you have the capacitor’s negative terminal grounded, and its positive terminal connected through the light bulb to the car’s supposed positive power source. The battery’s negative terminal is still disconnected.
Let’s review the circuit visually. It looks like this:
Car Battery (+) → Jumper Wire 1 → Light Bulb Terminal 1 → Light Bulb → Light Bulb Terminal 2 → Jumper Wire 2 → Capacitor (+) → Capacitor (-) → Chassis Ground → (Ultimately back to) Car Battery (-)
Step 5: Initiate the Charge and Monitor the Light Bulb
Now, with the capacitor connected through the light bulb, it’s time to introduce power. Connect the negative terminal of your car’s battery. As soon as you reconnect the battery’s negative terminal, observe the light bulb. It should light up, perhaps quite brightly at first. This indicates current is flowing from the battery, through the light bulb, and into the capacitor.
Watch the bulb carefully. As the capacitor charges, the current draw will decrease, and the light bulb will start to dim. Be patient; this process can take anywhere from a few minutes to 10-15 minutes, depending on the size of your capacitor and its current state of discharge.
Step 6: Confirm the Charge with a Multimeter
Once the light bulb has dimmed significantly, or has gone out completely, it’s a strong indication that the capacitor is nearing full charge. To be absolutely sure, you’ll use your multimeter.
- Set Your Multimeter: Set your multimeter to measure DC voltage. You’ll want to measure in a range that can handle your car’s voltage, typically 20V or a higher DC setting.
- Measure Voltage: Carefully connect the positive probe of your multimeter to the positive terminal of the capacitor and the negative probe to the negative terminal (or chassis ground alongside the capacitor’s negative terminal).
- Check for Full Charge: The voltage reading should be very close to your car’s battery voltage (typically around 13.8V to 14.4V when the engine is running, or around 12.6V with the engine off but battery connected). If the reading is stable and matches your car’s voltage, the capacitor is fully charged.
If after a significant amount of time (15-20 minutes), the bulb is still bright and the voltage hasn’t risen much, there might be an issue. Double-check all your connections, ensure the light bulb is working, and that your car battery has sufficient charge. For more information on safe electrical practices, you can refer to resources like Penn State’s Electrical Safety Guidelines, which cover general safe electrical handling principles.
Step 7: Finalize Connections (Remove the Bulb)
Once you’ve confirmed the capacitor is fully charged via the multimeter, it’s time to make the final, direct connection. This is where you remove the light bulb from the circuit. With the battery still connected (and the bulb now out!), carefully disconnect the jumper wires around the light bulb. Immediately connect a direct jumper wire from the positive power source (e.g., your battery’s positive terminal or distribution block) directly to the positive terminal of the capacitor. Ensure this connection is secure. Your capacitor is now safely and fully charged, and ready to be directly connected to your audio system’s amplifier.
When the Light Bulb Method Isn’t Possible (Alternative Considerations)
While the light bulb excels for its simplicity and visual feedback, there are a few scenarios where you might consider alternatives or need to be aware of limitations. For very large capacitors (over 5 Farads or supercapacitors), the initial surge might still be significant enough to dim the bulb considerably or require a longer charging time. In such cases, a dedicated resistor (like a 25-50 Ohm, 5-watt resistor) can be used instead of a bulb. However, the bulb is generally preferred for car audio capacitors due to its reliable visual indication and lower risk of being forgotten in the circuit.
For enthusiasts using high-tech, low-ESR (Equivalent Series Resistance) capacitors, the charging characteristics can be slightly different. However, the light bulb method remains a universally safe and effective approach for most common car audio capacitors.
Connecting Your Charged Capacitor to the Amplifier
Now that your capacitor is charged, the final step is integrating it into your car audio system. This involves connecting it to your amplifier.
First, ensure your amplifier is turned OFF and has its power supply disconnected. You will typically run two wires:
- Positive Wire: Connect a wire from the positive terminal of the capacitor directly to the power input terminal on your amplifier that is designated for the capacitor (often labeled “CAP” or similar). If your capacitor has a fused power wire running to the battery, ensure that connection is made and the fuse is installed.
- Negative Wire: Connect a wire from the negative terminal of the capacitor directly to the same ground point in your vehicle that your amplifier’s negative power wire is connected to. This should be a clean, bare metal point on the chassis.
It is crucial that these connections are made securely using appropriate connectors (like ring terminals or spade connectors) and crimped properly. Loose connections can cause all sorts of electrical problems, from intermittent audio to equipment failure.
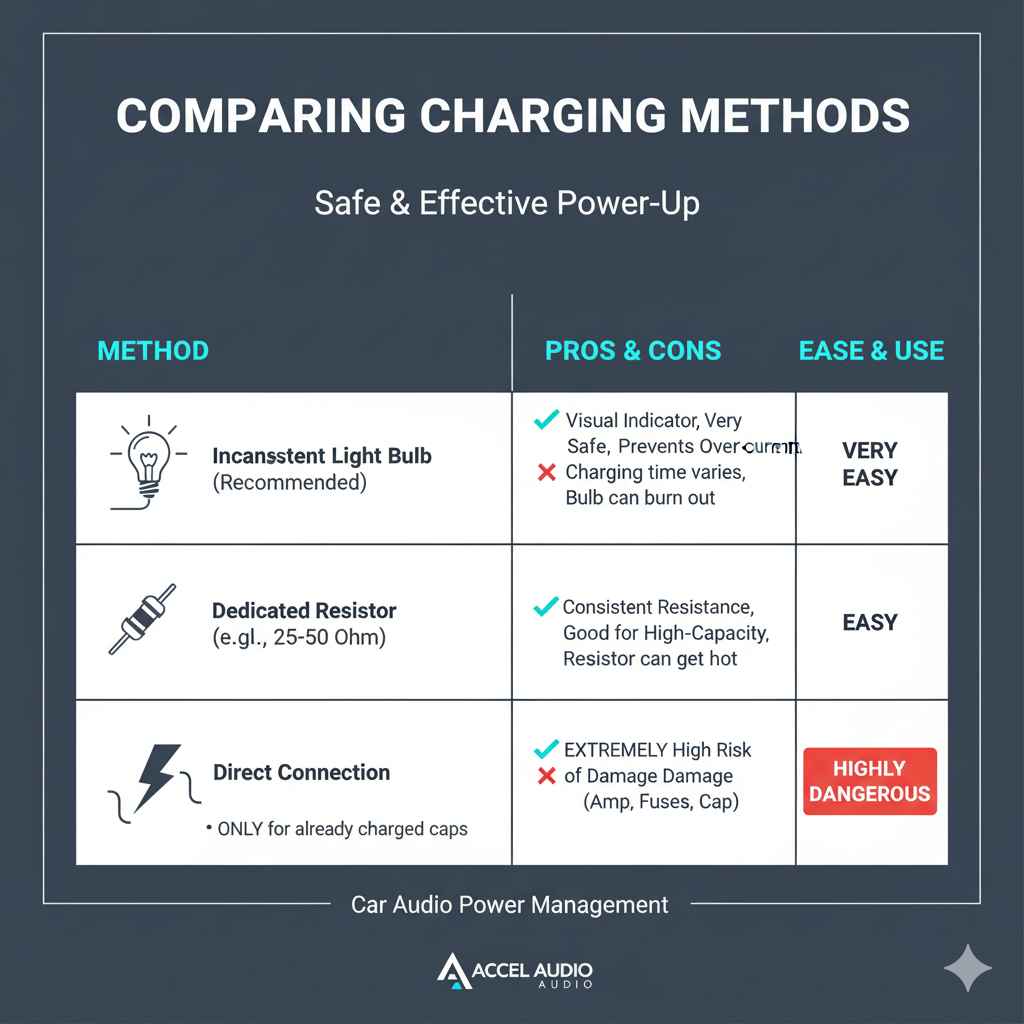
Table: Comparing Charging Methods
Here’s a quick look at the popular methods for charging a car audio capacitor:
| Method | Pros | Cons | Ease of Use for Beginners |
|---|---|---|---|
| Incandescent Light Bulb (Recommended) | Visual indicator of charge level, very safe, readily available parts. Prevents over-current. | Charging time varies, bulb can burn out if used repeatedly over time. | Very Easy |
| Dedicated Resistor (e.g., 25-50 Ohm) | Consistent resistance, good for high-capacity caps, less visual cues than bulb. | No visual feedback on charge level, requires purchasing a specific component. Resistor can get hot. | Easy |
| Direct Connection (NOT RECOMMENDED for uncharged caps) | Fastest possible “charge” (instant connection), no extra parts needed. | Extremely high risk of damage to capacitor, amplifier, fuses, and vehicle electronics. ONLY for already charged or trickle-charged caps. | (Not Applicable – Highly Dangerous) |
Frequently Asked Questions (FAQ) about Charging Capacitors
Q1: How long does it take to charge a car audio capacitor?
A1: Charging time varies based on the capacitor’s size (Farad rating) and how discharged it is. It can range from a few minutes to about 15-20 minutes using the light bulb method. Patience is key!
Q2: Can I directly connect a charged capacitor without a light bulb?
A2: Yes, once a capacitor is fully charged (meaning its voltage matches your car’s system voltage), you can make a direct connection to your amplifier. The light bulb or resistor is ONLY used to bridge the gap from an uncharged state to a charged state.
Q3: What happens if I connect the capacitor backwards (wrong polarity)?
A3: Connecting a capacitor with reversed polarity can cause permanent damage. The capacitor might swell, leak, or even explode. It will likely be rendered non-functional. Always double-check the ‘+’ and ‘-‘ terminals!
Q4: My light bulb didn’t light up at all. What’s wrong?
A4: If the bulb doesn’t light, double-check your connections. Ensure the car battery negative terminal is reconnected, the light bulb itself is functional, and that there’s a positive voltage source. A lack of light could indicate a break in the circuit or a faulty component.
Q5: Can I use an LED bulb instead of an incandescent one?
A5: No, an LED bulb typically has a higher forward voltage and a very low current draw. It wouldn’t serve as an effective current limiter for charging a capacitor, as it won’t light up until it receives a certain voltage, potentially allowing a dangerous initial surge.