How to Clean Car Floor Mats: Best Tips
You can easily clean car floor mats by removing loose dirt, vacuuming thoroughly, washing with mild soap and water, or using specialized cleaners for tougher stains. Allow them to dry completely before re-installing for a fresh, clean car interior.
Hello there, fellow car enthusiasts! Md Meraj here, your go-to guide for making car care simple and stress-free. We’ve all been there – that moment you look down and realize your car’s floor mats have seen better days. Spilled coffee, muddy footprints, crumbs from that spontaneous road trip snack… it happens to the best of us! These everyday messes can really detract from your car’s overall appeal and even lead to lingering odors. But don’t worry, getting your floor mats back to looking and smelling their best is totally achievable, even if you’re new to car maintenance. This guide will walk you through simple, effective steps to tackle dirt, grime, and stains, making your car’s interior feel fresh and inviting again. Let’s dive in and restore that pristine look!
Why Cleaning Your Car Floor Mats Matters
Keeping your car floor mats clean goes beyond just aesthetics. Think of them as the first line of defense against dirt, moisture, and wear and tear for your car’s carpeting. Regularly cleaning them prevents grime from becoming deeply embedded, which can damage the mat material itself and eventually seep into your car’s original flooring.
Beyond protection, clean mats contribute significantly to your car’s overall atmosphere. Odors can easily get trapped in dirty mats, affecting the air you breathe during your commute. A clean interior also makes for a more pleasant driving experience, whether you’re on a short trip to the grocery store or embarking on a long road adventure. Plus, maintaining a clean car can even help preserve its resale value down the road.
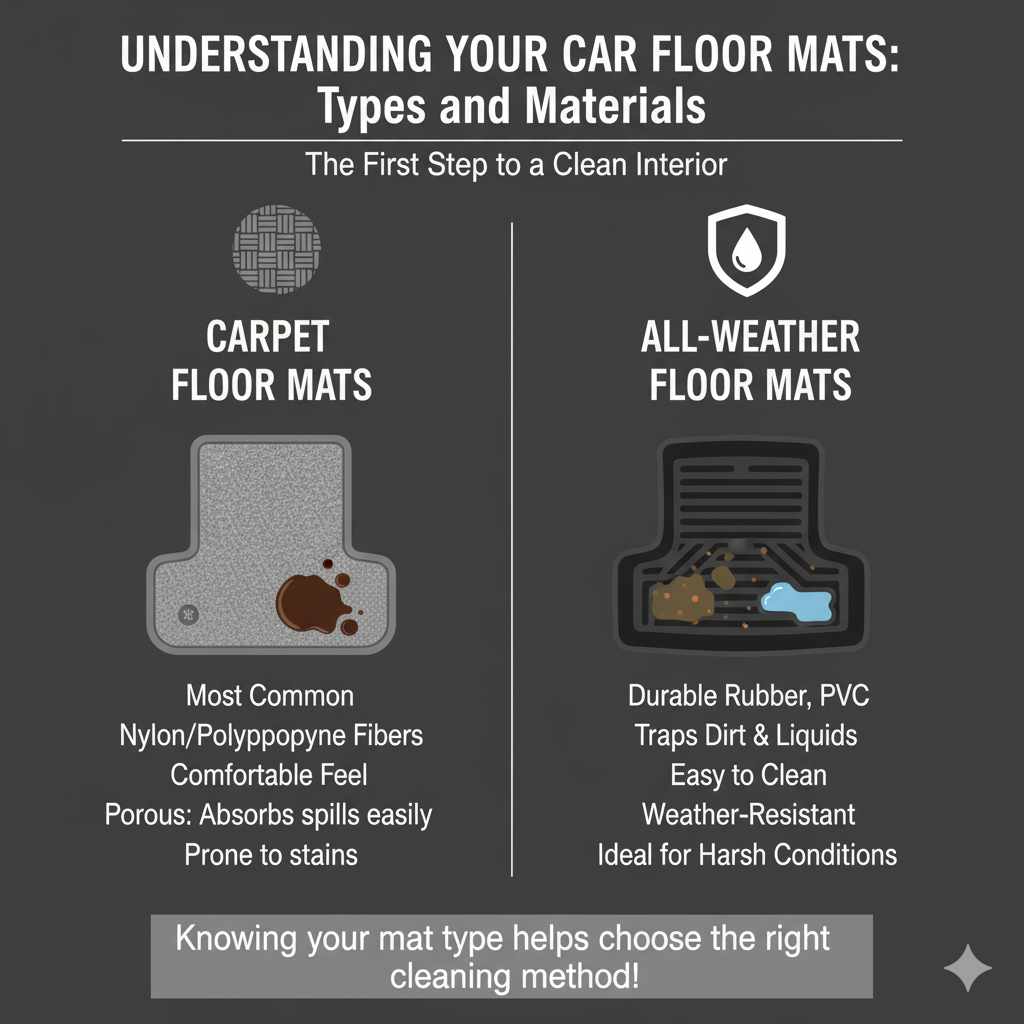
Understanding Your Car Floor Mats: Types and Materials
Before you start scrubbing, it’s helpful to know what kind of mats you have. This will help you choose the right cleaning method and products. Most car floor mats fall into two main categories:
- Carpet Floor Mats: These are the most common. They’re usually made of nylon or polypropylene fibers attached to a rubber backing. They offer comfort and a softer feel underfoot but can absorb spills and stains more readily.
- All-Weather Rubber or All-Weather Floor Liners: These are typically made of durable rubber, PVC, or a similar synthetic material. They are designed to withstand harsh conditions, trap dirt and liquids in their deep channels or raised edges, and are generally easier to clean than carpet mats.
Knowing your mat type is the first step to a successful cleaning session.
Essential Tools and Supplies You’ll Need
Gathering the right tools makes the cleaning process smoother and more effective. You don’t need a lot of fancy equipment; most of these items are probably already around your house or easily accessible.
For a Basic Clean (Suitable for Most Mats):
- Vacuum cleaner: With hose attachment and crevice tool.
- Stiff-bristled brush: For scrubbing stubborn dirt.
- Microfiber towels: For wiping and drying.
- Mild soap or detergent: Like dish soap or a dedicated car wash soap.
- Bucket: For mixing cleaning solutions.
- Water hose: For rinsing.
For Deeper Cleaning or Tougher Stains:
- Carpet cleaner solution or upholstery cleaner: Specifically designed for fabric stains.
- All-purpose cleaner (APC): For rubber mats or tough grime.
- Tire or rubber cleaner: For restoring the shine on rubber mats.
- Spot stain remover: For specific spills like oil, ink, or grease.
- Pressure washer (optional): For very durable mats, use with caution.
- Wet/dry vacuum (optional): Excellent for extracting moisture and dirt.
- Gloves: To protect your hands.
Having these items ready will ensure you can handle whatever your floor mats throw at you!
Step-by-Step Guide: How to Clean Carpet Car Floor Mats
Carpet floor mats are fantastic for comfort but can trap a lot of dirt. Here’s how to get them looking like new:
Step 1: Remove and Inspect
Gently pull each mat out of your car. Give them a good shake to dislodge any loose debris like leaves, dirt, or small pebbles. Inspect them for any specific stains or heavily soiled areas that will need extra attention.
Step 2: Vacuum Thoroughly
Lay the mats flat on the ground (a driveway or garage floor works well). Use your vacuum cleaner, starting with the hose attachment, to go over the entire surface. Pay close attention to the seams and edges. For ingrained dirt, use the crevice tool to get into the deeper fibers. A thorough vacuuming now will make washing much easier and more effective.
Step 3: Pre-Treat Stains (If Necessary)
For any stubborn stains (think coffee, soda, mud), apply a pre-treatment. You can use a dedicated carpet stain remover or a small amount of your mild cleaning solution directly onto the stain. Gently work it into the fibers with a brush or your fingers, and let it sit for 5-10 minutes according to the product’s instructions.
Step 4: Prepare Your Cleaning Solution
In your bucket, mix a generous amount of mild soap (like a few drops of dish soap) or a dedicated carpet shampoo with warm water. You want a good lather, but avoid using too much soap, as it can be hard to rinse out.
Step 5: Scrub the Mats
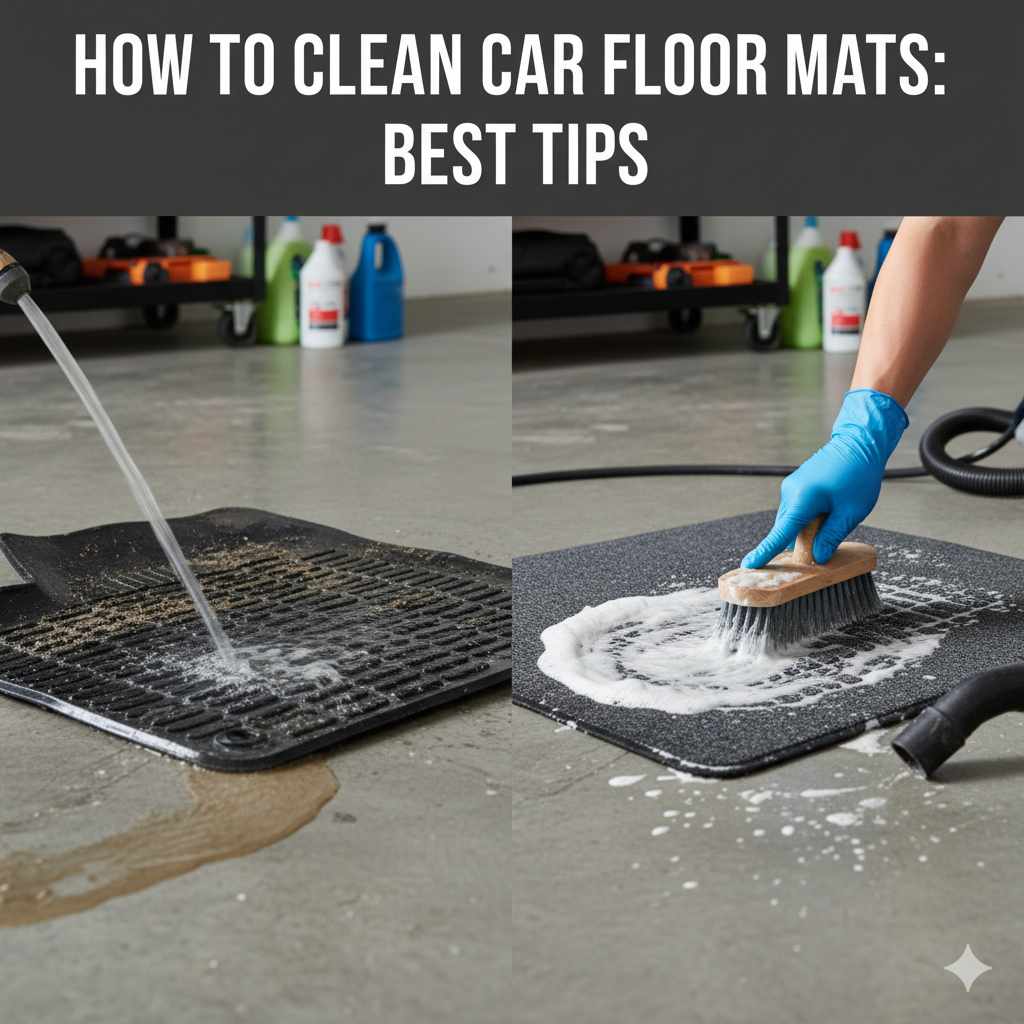
Dampen the mats slightly with water from your hose. Dip your stiff-bristled brush into the soapy water and start scrubbing the mats in a back-and-forth or circular motion. Work your way across the entire surface, focusing more pressure on the dirtier areas. For tough grime, you might need to go over an area a couple of times.
Step 6: Rinse Thoroughly
Once you’ve scrubbed the mats, it’s time to rinse. Use your garden hose to wash away all the soap and loosened dirt. Make sure to rinse from all angles to ensure no soap residue is left behind. Soap residue can attract more dirt later and make the mats feel stiff. Repeat rinsing until the water runs clear.
Step 7: Dry Completely
This is a crucial step. Hang the mats up or lean them against a wall in a well-ventilated area, preferably in the sun if weather permits. Allow them to dry completely. This can take several hours, depending on the humidity and temperature. Do NOT put them back in your car if they are even slightly damp, as this can lead to mildew and unpleasant odors. You can speed up drying by blotting with clean microfiber towels or using a wet/dry vacuum to extract excess water.
| Step Number | Action | Why It’s Important |
|---|---|---|
| 1 | Remove & Inspect | Identify loose debris and target problem areas. |
| 2 | Vacuum Thoroughly | Removes surface dirt ahead of washing. |
| 3 | Pre-Treat Stains | Loosens tough stains for easier removal. |
| 4 | Prepare Solution | Creates the cleaning agent. |
| 5 | Scrub Mats | Lifts embedded dirt and grime. |
| 6 | Rinse Thoroughly | Removes all soap and dirt residue. |
| 7 | Dry Completely | Prevents mold, mildew, and odors. |
Step-by-Step Guide: How to Clean All-Weather Rubber or Vinyl Floor Mats
Rubber and vinyl mats are built for toughness, making them a breeze to clean. Their durable nature means they can handle a bit more aggressive cleaning.
Step 1: Remove and Initial Clean
Take the mats out of your car. Give them a good shake to get rid of loose dirt and debris. Since they are waterproof, you can usually hose them down right away to knock off the worst of the dirt.
Step 2: Scrub with Soap and Water
Mix a bucket of warm water with a good automotive soap, dish soap, or even a gentle all-purpose cleaner. Use a stiff brush (a scrub brush or even an old toothbrush for crevices) to scrub down the mats. Get into all the channels and textured surfaces. For very stubborn mud or grime, you might need to let the soapy water sit for a few minutes before scrubbing.
Step 3: Rinse Thoroughly
Use your garden hose to rinse off all the soap and dirt. Make sure you get into the grooves to flush out any remaining residue.
Step 4: Tackle Tough Stains or Scuffs
If you have any persistent marks, like scuff marks from shoes or grease spots, you can use a stronger cleaner. An all-purpose cleaner (APC) works well for rubber. For stubborn scuffs, a magic eraser or a dedicated rubber cleaner can be effective. For really tough grime, you might consider using a pressure washer on a low setting, but be careful not to blast the mat material too hard, especially if it’s older.
For a restoration effect and to help repel future dirt, you can use a tire shine product or a dedicated plastic and rubber protectant after cleaning. This also helps keep them looking sleek. Avoid silicone-based products if you find they make the mats too slippery.
Step 5: Dry the Mats
Similar to carpet mats, thorough drying is important. You can let them air dry in the sun, or wipe them down with microfiber towels. Since they are rubber, they dry much faster than carpet mats and are less prone to mildew. Shake off any excess water before placing them back.
A quick tip: If your rubber mats aren’t fitting perfectly after cleaning, ensure they are fully dry. Sometimes, a little residual moisture can make them feel less rigid.
Specialized Cleaning Tips for Difficult Stains
Sometimes, life happens, and your floor mats end up with spills that are tougher than everyday dirt. Here’s how to tackle common culprits:
- Grease and Oil: For carpeted mats, blot up as much as possible with paper towels. Then, sprinkle baking soda or cornstarch on the spot, let it absorb the oil for a few hours, and vacuum it up. Follow with a carpet cleaner. For rubber mats, an all-purpose cleaner designed for automotive use or a degreaser will usually do the trick.
- Mud: Let it dry first! Once dry, it will be much easier to brush or vacuum off. Then proceed with regular washing.
- Chewing Gum: Try freezing it. Place a bag of ice on the gum until it hardens, then carefully scrape it off with a dull knife or plastic scraper. Clean the residue with a carpet cleaner.
- Ink or Dye Stains: For carpet mats, try a solution of rubbing alcohol and water (50/50 mix) or a specialized automotive upholstery cleaner. Test in an inconspicuous area first.
- Salt Stains (Winter): A mixture of white vinegar and water (1:1 ratio) can help break down salt residue. Apply it to the stain, let it sit for a few minutes, then scrub and rinse. A dedicated carpet cleaner formulated for salt stains is also effective. You can find more on dealing with winter road salts on automotive surfaces from the U.S. Environmental Protection Agency, which offers advice on greener car care practices.
Always remember to test any cleaning product on a small, hidden area of the mat first to ensure it doesn’t cause discoloration or damage.
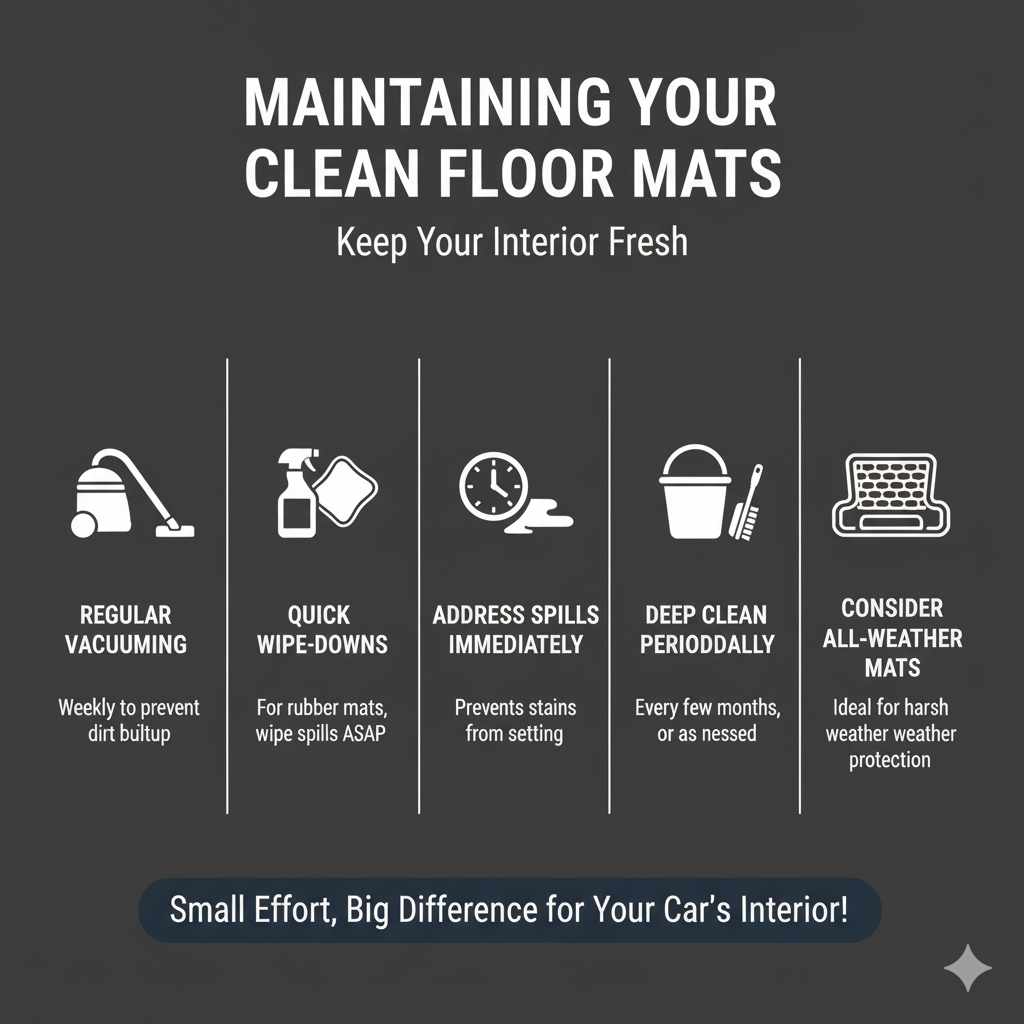
Maintaining Your Clean Floor Mats
Once your floor mats are sparkling clean, you’ll want to keep them that way! Regular maintenance is key to extending their life and keeping your car interior looking its best.
- Regular Vacuuming: Make it a habit to vacuum your car’s floor mats at least once a week, or more often if you live in a dusty or muddy area. This prevents dirt from building up.
- Quick Wipe-Downs: For rubber mats, a quick wipe with a damp cloth or spray of all-purpose cleaner as needed can prevent dirt from settling.
- Address Spills Immediately: The sooner you tackle a spill, the easier it will be to remove. Keep a small cleaning kit in your car with some microfiber cloths and a mild interior cleaner for on-the-go emergencies.
- Deep Clean Periodically: Even with regular care, a deeper cleaning is necessary every few months, or as needed. Follow the steps outlined in this guide.
- Consider All-Weather Mats: If you live in an area with harsh weather (heavy rain, snow, mud), investing in a good set of all-weather rubber floor liners can be a game-changer. They’re much easier to clean and offer superior protection.
Maintaining clean floor mats is a small effort that makes a big difference in your car’s comfort and appearance.
Frequently Asked Questions (FAQ)
Q1: How often should I clean my car floor mats?
For the best results, aim for a light vacuuming weekly and a thorough wash every 1-3 months, or more frequently if they get particularly dirty from weather or spills.
Q2: Can I use a pressure washer on my floor mats?
Rubber or heavy-duty all-weather mats can typically withstand a gentle pressure wash. For carpeted mats, it’s best to avoid high pressure, as it can damage the fibers and backing. Always use the lowest setting and keep the wand a safe distance away.
Q3: What’s the best way to remove pet hair from floor mats?
A stiff-bristled brush can help loosen pet hair, making it easier to vacuum. Specialized pet hair removal tools or rubber gloves rubbed over the mat surface can also effectively gather hair. For carpet mats, using an upholstery attachment on your vacuum is also very helpful.
Q4: Will cleaning my mats make them slippery?
If you use too much soap or don’t rinse properly, residue can make them slick. For rubber mats, avoid overly greasy or silicone-based protectants if you notice them becoming slippery. Always ensure they are completely dry before putting them back in the car.
Q5: Can I use household cleaners like bleach on my floor mats?
It’s generally not recommended to use harsh chemicals like bleach on car floor mats, especially carpeted ones. Bleach can damage fibers, cause discoloration, and weaken the material. Always opt for mild soaps, car-specific cleaners, or tested upholstery/all-purpose cleaners.
Q6: My carpet mats have a permanent stain. What can I do?
For stubborn stains that pre-treatment and scrubbing don’t remove, consider using a dedicated automotive carpet stain remover. If the stain is very old or deep, it might be permanent. Sometimes, a professional auto detailing service can offer more advanced stain removal techniques.
Q7: How can I dry my mats quickly if I need to use my car soon?
While complete air drying is best, you can speed things up by using a wet/dry vacuum to suck out as much moisture as possible. You can also blot them with absorbent microfiber towels. If it’s warm and sunny, placing them in direct sunlight outdoors will help them dry faster. Just ensure they are not damp enough to cause mildew.
Conclusion
There you have it! Cleaning your car floor mats doesn’t have to be a dreaded chore. By following these straightforward steps, you can effectively tackle dirt, stains, and odors, giving your car’s interior a fresh, clean feel.
Whether you’re dealing with the everyday grime on carpet mats or the mud and salt on durable rubber liners, you now have the knowledge and methods to restore them to their former glory. Remember, a little regular care goes a long way in protecting your car and ensuring a more enjoyable driving experience.
So grab your cleaning supplies, head out to your car, and give those floor mats the attention they deserve. You’ll be amazed at the difference a clean interior makes!