How to Clean Fabric Seats in Car: Proven Effortless Guide
Easily clean your car’s fabric seats using a simple DIY approach. This guide covers everything from removing stains to a deep clean, using common household items and affordable cleaners. Get your car’s interior looking and smelling fresh without expensive detailing services.
Car fabric seats can take a beating, collecting dust, spills, and that “lived-in” smell. It’s easy to feel overwhelmed by the thought of tackling them, wondering if you’ll just make things worse. But cleaning your car’s fabric seats doesn’t have to be a chore or cost a fortune. With a few simple steps and some common items you likely already have at home, you can restore that fresh, clean feeling to your car’s interior. This guide will walk you through everything, making it easy and effective. Let’s get your seats looking like new!
Why Cleaning Your Car’s Fabric Seats Matters
Keeping your car’s fabric seats clean is about more than just appearances. It’s about maintaining a healthier environment inside your vehicle and preserving the value of your car. Dirty seats can harbor dust mites, allergens, and bacteria, which can affect air quality and even your health, especially if you spend a lot of time in your car. Moreover, food stains, drink spills, and accumulated dirt can become permanent if left untreated, leading to unsightly marks and odors that are difficult to remove later. Regular cleaning also prevents fabric wear and tear, extending the life of your seats and keeping your car looking its best for longer.
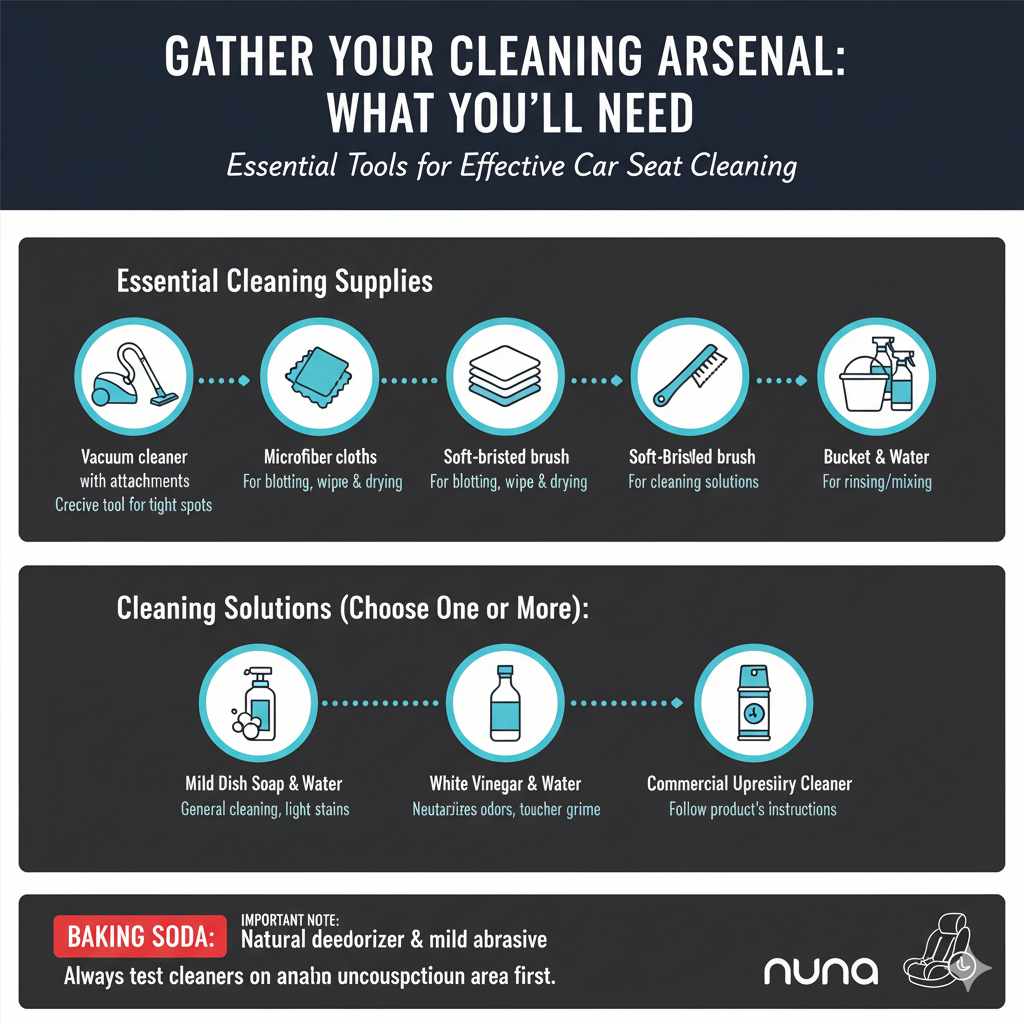
Gather Your Cleaning Arsenal: What You’ll Need
Before you start, let’s make sure you have everything you need to make the cleaning process smooth and effective. You don’t need specialized, expensive tools. Most of what you’ll need can be found around your house or at your local grocery store.
Essential Cleaning Supplies:
- Vacuum cleaner with attachments: A crevice tool is invaluable for tight spots.
- Microfiber cloths: Several are needed for blotting, wiping, and drying. Microfiber is gentle and won’t leave lint behind.
- Soft-bristled brush: An upholstery brush or even a clean, soft scrub brush will do. Avoid stiff bristles that can damage fabric.
- Spray bottles: For your cleaning solutions.
- Bucket: For rinsing cloths or mixing solutions if needed.
- Water: Clean, cool water is your best friend for rinsing.
Cleaning Solutions (Choose One or More):
- Mild Dish Soap and Water: A classic and effective solution for general cleaning and light stains. Mix a few drops of mild dish soap with warm water and put it in a spray bottle.
- White Vinegar and Water: Excellent for neutralizing odors and tackling tougher grime. Mix equal parts white vinegar and water in a spray bottle. Don’t worry, the vinegar smell dissipates as it dries.
- Commercial Upholstery Cleaner: Many affordable options are available at auto parts stores. Always follow the product’s instructions carefully.
- Baking Soda: A fantastic natural deodorizer and mild abrasive for stains.
Choosing the right tools and supplies beforehand ensures you can move from one step to the next without interruption, making the whole process much easier and more efficient.
Step-by-Step Guide to Cleaning Fabric Car Seats
Cleaning your car’s fabric seats can be broken down into simple, manageable steps. Follow this guide, and you’ll be enjoying a fresh, clean interior in no time.
Step 1: Prepare the Area and Remove Loose Debris
Start by clearing out your car completely. Remove all personal items, floor mats, and trash from the seats and floor. This gives you unobstructed access to all areas you need to clean. Open all the car doors to allow for good ventilation, which is important as you’ll be using cleaning solutions.
Step 2: Vacuum Thoroughly
This is a crucial step that many skip, but it’s essential for a deep clean. Use your vacuum cleaner with the crevice tool to get into all the seams, folds, and between the seat cushions. Go over the entire seat surface multiple times, in different directions. This removes loose dirt, crumbs, pet hair, and dust that can otherwise get ground into the fabric when you start wet cleaning.
Pro Tip: For stubborn pet hair, you can use a rubber glove or a squeegee to “scrub” the hair towards your vacuum nozzle. The friction will help lift it from the fabric fibers.
Step 3: Pre-Treat Stains
Address any visible stains before you clean the entire seat. The best approach for stains depends on the type of stain, but acting quickly is key. For most common stains like coffee, sauce, or ink, you can gently blot the area with a clean microfiber cloth dampened with water and a tiny bit of mild dish soap or your chosen cleaner. Always blot from the outside of the stain inward to avoid spreading it. For tougher stains, consider a specialized stain remover or a paste made from baking soda and water.
Common Stain Treatments:
Here’s a quick reference for common stains:
| Stain Type | Recommended Treatment | Method |
|---|---|---|
| Food/Drink Spills (Coffee, Juice, Soda) | Mild Dish Soap Solution or Upholstery Cleaner | Blot gently with a damp cloth, then rinse with a clean, damp cloth. |
| Grease/Oil | Baking Soda Paste or Degreaser | Apply baking soda paste, let it sit to absorb grease, then vacuum. For tougher grease, use a specialized automotive degreaser sparingly. |
| Ink | Rubbing Alcohol (Isopropyl Alcohol) | Apply a small amount to a cloth and dab the stain. Work from the outside in. Test in an inconspicuous spot first. |
| Mud | Let it dry completely first! | Once dry, vacuum up as much as possible, then treat any remaining discoloration with a mild cleaner. |
Step 4: Clean the Fabric (Spot Cleaning or Full Seat)
Now it’s time for the main cleaning. You have two main approaches: spot cleaning for specific soiled areas or a full-seat clean for a refreshed look.
Option A: Spot Cleaning Specific Areas
If only certain areas are dirty or stained, you can focus your efforts there. Spray your chosen cleaning solution (dish soap and water, vinegar and water, or commercial cleaner) lightly onto the soiled area. Don’t oversaturate the fabric, as excessive moisture can lead to mold or mildew. Gently agitate the area with your soft-bristled brush, working the solution into the fabric. Then, take a clean, damp microfiber cloth and blot the area to lift the dirt and cleaning solution. Rinse the cloth frequently in clean water.
Option B: Full Seat Cleaning
This method is great when the entire seat needs a refresh. Work on one seat at a time. Lightly mist the entire surface of the seat with your cleaning solution. Avoid soaking the fabric; a light, even mist is best. Gently scrub the entire seat surface with your soft-bristled brush, using consistent strokes. This helps loosen embedded dirt and revitalizes the fabric fibers. Immediately after scrubbing, use a clean, damp microfiber cloth to wipe down the seat, removing the loosened dirt and cleaner. Again, wring out your cloth frequently.
Important: When using commercial cleaners, always test them on an inconspicuous area first (like the underside of the seat or a hidden seam) to ensure they don’t cause discoloration or damage.
Step 5: Rinse Thoroughly
Rinsing is critical to remove not only the dirt but also any residue from the cleaning solution. Leftover soap can attract more dirt and leave a sticky feeling on the fabric. Use a clean microfiber cloth dampened with plain water to wipe down the entire cleaned section of the seat. You may need to rinse your cloth and repeat this process several times for each seat to ensure all detergent is removed. Gently blotting rather than aggressive wiping will help preserve the fabric’s texture.
Step 6: Dry the Seats
Proper drying is essential to prevent mildew and odors. The best way to dry your fabric seats is by allowing them to air dry completely. Leave your car doors open in a dry, well-ventilated area. If you need to speed up the process, you can use a clean, dry microfiber towel to blot up as much moisture as possible. You can also use a fan angled towards the seats. Avoid using heat guns or high heat from a hairdryer, as this can damage or shrink certain fabric types. Ensure the seats are completely dry before closing up the car or using it.
Step 7: Deodorize (Optional but Recommended)
Once clean and dry, your seats might smell fresh, but for an extra boost, consider deodorizing. Sprinkle a generous amount of baking soda over the dry fabric seats. Let it sit for at least 15-30 minutes, or even a few hours for tougher odors. Baking soda is a natural odor absorber. After it has had time to work, vacuum it up thoroughly using your vacuum cleaner. For persistent odors, you can also use a car-specific odor eliminator spray, following the product’s instructions.
Step 8: Final Inspection and Reassembly
After everything is dry and deodorized, do a final visual inspection. Check for any missed spots or remaining stains. If you find any, you can repeat the relevant cleaning steps. Once you’re satisfied, replace your floor mats and any items you removed from the car. You’ll be amazed at the difference!
Tips for Maintaining Clean Fabric Seats
Keeping your fabric seats clean long-term is much easier than deep cleaning them repeatedly. Here are some simple habits:
- Clean Spills Immediately: The sooner you address a spill, the less likely it is to become a permanent stain. Keep a small cleaning kit with microfiber cloths and a travel-sized upholstery cleaner or wipes in your car.
- Regular Vacuuming: Vacuum your car’s interior at least once a month to remove dust, dirt, and debris before it gets ground into the fabric.
- Use Seat Covers: For maximum protection, especially for high-traffic vehicles or if you have pets or children, consider using fabric seat covers. They are much easier to remove and wash.
- Avoid Eating/Drinking in the Car: If possible, limit food and drink consumption inside your vehicle.
- Address Odors Promptly: Use air fresheners or odor absorbers regularly to prevent them from settling into the fabric.
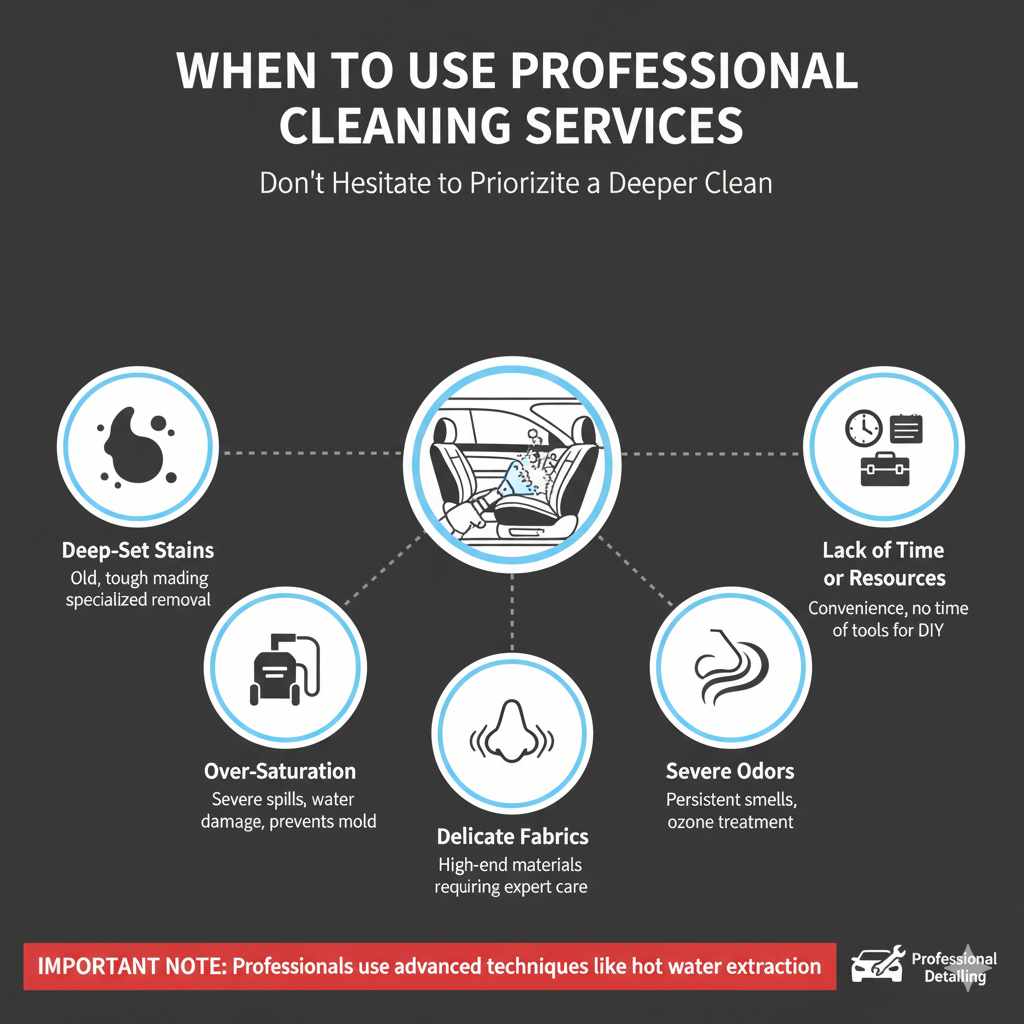
When to Use Professional Cleaning Services
While DIY cleaning is effective for most situations, there are times when professional help is the best option:
- Deep-Set Stains: Some stains, especially old ones or those from unusual substances, may require specialized equipment and stronger cleaning agents that professionals have.
- Over-Saturation: If your seats have been severely soaked by a spill or water intrusion, a professional can use powerful extractors to remove excess moisture, preventing mold and mildew.
- Delicate Fabrics: Certain high-end or delicate fabric types in luxury vehicles might be best handled by professionals who understand how to clean them without causing damage.
- Severe Odors: Persistent, strong odors that DIY methods can’t tackle might need professional ozone treatments or deep cleaning techniques.
- Lack of Time or Resources: If you don’t have the time, space, or necessary tools, hiring a professional detailer is a convenient solution.
Professional car detailing services use advanced techniques like hot water extraction (steam cleaning) and specialized chemicals that can achieve a deeper clean and better results for heavily soiled interiors. You can learn more about professional auto detailing standards from organizations like the International Carwash Association.
Frequently Asked Questions (FAQ)
Q1: How often should I clean my car’s fabric seats?
For most drivers, a thorough vacuuming every 1-2 months is sufficient. A deep clean or spot treatment for spills should be done as needed, or at least every 6 months to keep them fresh and prevent permanent stains.
Q2: Can I use home cleaning products like detergent or laundry soap?
It’s best to use mild dish soap or a dedicated upholstery cleaner. Harsh detergents can strip the fabric’s protective qualities or leave residue that attracts more dirt. Always test any product in an inconspicuous area first.
Q3: How do I prevent water marks after cleaning?
Water marks can happen if residue is left behind or if the fabric dries unevenly. Ensure you rinse thoroughly with a damp cloth after cleaning and blot excess moisture. Drying evenly by leaving doors open or using fans helps prevent distinct drying lines.
Q4: What’s the best way to remove that musty smell from car seats?
Baking soda is excellent. Sprinkle it liberally on dry seats, let it sit for several hours or overnight, then vacuum it up completely. For more intense odors, consider an automotive odor-eliminating spray or professional treatment.
Q5: Can I use a carpet cleaner on my car seats?
Generally, yes. Car upholstery is similar to carpet. However, always check the carpet cleaner’s label to ensure it’s safe for automotive fabrics and test it in a hidden spot first. Some carpet cleaners might be too aggressive for car upholstery.
Q6: How do I deal with pet hair on fabric seats?
Vacuum with a good brush attachment is your first step. For stubborn hair, a rubber glove (damp or dry) or a window squeegee can be used to gather hair into piles, which you can then vacuum. Specialized pet hair removal tools are also available.
Conclusion
Keeping your car’s fabric seats clean and fresh is a rewarding DIY task that significantly enhances your driving experience and preserves your vehicle’s interior. By following these straightforward steps—from thorough vacuuming and targeted stain treatment to gentle cleaning and proper drying—you can achieve professional-looking results without the high cost. Remember that regular maintenance, like immediate spill cleanup and consistent vacuuming, is key to preventing future problems and keeping your seats in top condition. With the right approach and a little effort, your car seats will feel comfortable, look great, and contribute to a healthier, more enjoyable ride for a long time to come.