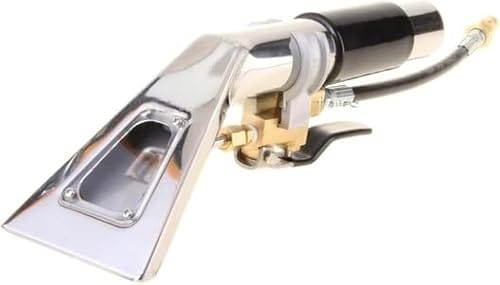
Best Car Upholstery Cleaning Tools: Build a System That Actually Works
You spill coffee on the passenger seat, and suddenly the whole car smells like a diner floor. Or the kids leave a cracker crumb situation that’s become a science experiment. You grab a spray bottle and a rag, scrub for twenty minutes, and the stain just… spreads. Sound familiar?
The problem isn’t effort. It’s that most people use the wrong tools. A spray and a rag only move dirt around on the surface. To actually get grime out of foam padding and woven fabric, you need suction, agitation, and the right chemicals. This guide walks you through the best car upholstery cleaning tools on the market, explains why each one matters, and helps you assemble a modular kit that fits your car, your budget, and your tolerance for elbow grease. You’ll learn when a $30 brush beats a $200 machine, and when you really do need the machine.
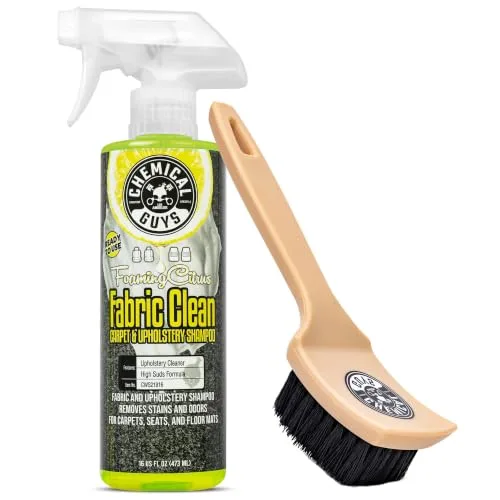
Chemical Guys
Chemical Guys, Citrus Fabric & Carpet Cleaner…
- WILL IT LEAVE MY CARPET SOAKING WET: No – this car carpet cleaner has a low-moisture foaming formula, is detergent-free, and finis…
- FABRIC CLEAN SPRAYABLE AND NIFTY BRUSH KIT (HOL463): 16 oz ready-to-use fabric cleaner and car upholstery cleaner with Induro 7 He…
- READY-TO-USE SPRAY FORMAT FOR IMMEDIATE USE: This Fabric Clean Sprayable car interior cleaner comes pre-diluted in a spray bottle…
Let’s get one thing straight first: no single tool does everything. A professional detailer’s van is full of equipment because different stains and fabrics demand different approaches. Your goal is to build a small arsenal that covers the most common scenarios without bankrupting you.
For quick spot cleans between deep sessions, keep a dedicated spray cleaner and a stiff brush within reach. The Chemical Guys Citrus Fabric & Carpet Cleaner Spray with Brush Kit pairs a low-moisture foaming cleaner with a heavy-duty Nifty brush, so you can agitate dirt loose without soaking the seat cushion. It’s a solid first line of defense for coffee drips and mud smears.
The Core Decision: Hand Tools vs. Extraction Machines
Before spending a dime, decide where you fall on the spectrum. A handheld extractor pulls dirty water out of the fabric. A brush just loosens it. One is a deep clean; the other is surface maintenance. Most people need both, but your primary investment depends on your situation.
Ask yourself three questions. How big is the vehicle? A compact coupe is easier to manage with a small spot cleaner than a three-row SUV. How often do you clean? If you tackle stains monthly, a machine pays for itself. If you’re doing a one-time revival of a used car, maybe not. And what’s the mess level? Pet hair, mud, and spilled milk require extraction. Light dust and crumbs just need a good vacuum.
Here’s a comparison to help you pick your starting point:
| Approach | Best For | Suction Power | Cost Per Use | Physical Effort |
|---|---|---|---|---|
| Hand Brush + Spray Cleaner | Spot stains, light soiling, quick touch-ups | None (relies on absorption) | Low ($2-$5 per session) | High scrubbing effort |
| Portable Spot Cleaner | Regular maintenance, small cars, pet messes | Moderate (8-15 inches of water lift) | Medium ($1-$3 per session) | Moderate; machine does the work |
| Full-Size Extractor | Heavy soiling, large vehicles, detailing side work | High (50+ inches of water lift) | Low ($0.50-$1 per session) | Low for cleaning, high for setup |
| Professional Detailer | One-time deep clean, severe stains, time crunch | Professional grade | High ($100-$300 per session) | None |
The math changes fast. If you pay a detailer $150 twice a year, that’s $300 annually. A solid portable extractor costs about the same upfront and lasts for years. For most owners, the portable spot cleaner is the sweet spot. It’s the difference between cleaning a stain when it happens versus letting it set for weeks.
Top Extraction Machines Worth Your Money
These are the workhorses. They spray a cleaning solution into the fabric, then use suction to pull it back out along with the dissolved dirt. The key metric is suction power, measured in inches of water lift. More is better, but portability matters too.
Best Overall: Bissell Little Green Series
The Bissell Little Green has been the default recommendation for years, and for good reason. The 14-foot hose reaches the rear footwells without moving the unit. The 48-ounce tank is big enough to do both front seats and a bench seat in one fill. It’s not the most powerful machine on the market, but it balances suction strength with maneuverability in a way that works for cars.
One thing to watch: the included tools are basic. The standard nozzle is fine for flat surfaces, but you’ll want the crevice tool for seat seams. It’s a separate purchase, which is annoying, but the machine itself is reliable.
Best for Pet Owners: Hoover CleanSlate Plus
Pet owners face a different problem than coffee spillers. Hair embeds in the weave, and accidents soak into the padding. The Hoover CleanSlate Plus has a wider nozzle than the Bissell, which helps cover more ground on large surfaces like rear bench seats. It also has a separate clean water tank, so you don’t have to dump dirty water mid-session.
Its hose is shorter than the Bissell’s, so you’ll move it around more. But the suction is comparable, and the wider path makes it faster on big jobs. If you’re cleaning a dog hair disaster zone every weekend, this is the one.
Best Budget Pick: Vacmaster Portable Spot Cleaner
The Vacmaster is the value play. It costs less than the big names and does 80% of the job. Suction is adequate for light to moderate soiling, and the 5.5-amp motor is enough for most interior work. The build quality feels cheaper, and the hose attachment clips are finicky, but it gets the job done.
Skip this one if you’re dealing with deeply embedded grime or heavy pet accidents. Rent a full-size extractor from a big-box store for those jobs. But for routine maintenance, this machine saves you money without sacrificing results.
The Essential Hand Tools and Attachments
Machines do the heavy lifting, but hand tools win the details. A good brush and a steam cleaner handle the spots a machine can’t reach. These are the tools that separate a mediocre interior from a fresh one.
The Power of the Drill Brush
A drill brush is a game-changer for carpet and heavy fabric. You attach it to a cordless drill, set the speed to low, and let the bristles dig into the fibers. The agitation loosens dirt that a hand brush can’t touch. It’s especially effective on floor mats and heavily soiled cargo areas.
Buy a set with different bristle types. Soft white bristles for delicate upholstery, medium blue for general carpet, and stiff black for floor mats. Never use the stiff brush on seat fabric, or you’ll scratch the fibers. Test on a hidden spot first.
The trade-off is control. A drill brush spins fast, and if you press too hard, you can distort the fabric pile. Keep the drill speed under 1500 RPM and let the brush do the work. It takes a few minutes to get a feel for it, but once you do, you’ll wonder how you cleaned without it.
Why You Need a Steam Cleaner (and When to Skip It)
Steam cleaning uses heat to break down oils and sanitize surfaces without chemicals. It’s excellent for removing stubborn odors and for cleaning perforated leather where dirt gets trapped in the holes. A handheld steam cleaner with a brush attachment is a versatile addition to your kit.
But here’s the catch: steam adds moisture. If you steam clean a seat and don’t extract the moisture out, you’re inviting mold. Always follow steam with a dry extraction pass or a microfiber towel to pull up the excess. Also, skip steam on Alcantara. The heat can damage the synthetic suede’s texture.
For most people, a steam cleaner is a nice-to-have, not a necessity. If you’re building a kit on a budget, put your money into an extractor first. Add steam later if you find yourself fighting odors or cleaning leather frequently.
Choosing the Right Cleaning Chemicals
This is where people mess up. They grab the nearest all-purpose cleaner, spray it on a seat, and wonder why the stain won’t budge. Different fabrics and stains require different chemistry. Using the wrong product can set a stain permanently or damage the fabric.
Fabric-Safe Solutions vs. Solvent Degreasers
Water-based fabric cleaners are the default for most upholstery. They’re safe on cotton, polyester blends, and nylon. Look for a pH-neutral formula or one specifically labeled for auto interiors. These lift water-soluble stains like coffee, soda, and mud.
Solvent-based degreasers are for oil and grease. Think fast food drips, sunscreen, or makeup. These solvents dissolve oils that water can’t touch. But they’re harsh. Never use them on Alcantara or other synthetic suedes, and always test on a hidden area first. They can strip dyes and leave a residue that attracts more dirt.
For leather, use a dedicated leather cleaner that’s pH-balanced. Perforated leather needs extra care, because the holes trap grime. A mild cleaner and a soft brush work better than a harsh chemical that dries out the leather.
Here’s the colorfastness test: dampen a white cloth with your cleaner, press it onto the fabric in a hidden spot (under the seat or inside a seam), and rub gently. If color transfers to the cloth, stop. That fabric will bleed. Find a different product or call a professional.
The Complete Step-by-Step Cleaning Process
Cleaning car upholstery isn’t complicated, but order matters. Follow this sequence for best results.
- Vacuum first. Loose dirt and crumbs are abrasive. If you scrub them into the fabric, you’re sandpapering the fibers. Use a crevice tool to get into seat seams and along the center console. A cleaning putty works well for dust in tight vents and corners.
- Pre-treat stains. Spray your chosen cleaner directly on the stain and let it sit for 3-5 minutes. This gives the chemicals time to break the bond between dirt and fiber. Don’t let it dry out.
- Agitate. Use a soft brush or drill brush to work the cleaner into the fabric. You’ll see the dirt start to lift and the foam turn brown. This is the step people skip, and it’s the reason their stains come back.
- Extract. Use your spot cleaner to rinse the area with clean water and suction it out. Work in small sections, about a foot square at a time. Overlap your passes to avoid leaving a wet ring.
- Dry. Open the doors and let air circulate. A small fan aimed at the seats speeds this up dramatically. For stubborn moisture, use a wet/dry vacuum with a squeegee attachment to pull more water out.
This process takes about an hour for a full interior. The first time you do it, it’ll take longer. But you’ll see the difference immediately, especially in high-traffic areas like the driver’s seat bolster.
How to Avoid Over-Wetting and Mold Growth
Mold is the silent killer of car interiors. It grows in the foam padding under the fabric, and once it’s there, you can’t get it out without replacing the seat. The cause is almost always over-wetting during cleaning.
Your extractor should pull out more water than it puts in. If the fabric feels damp to the touch after cleaning, you didn’t extract enough. You should be able to press a dry paper towel onto the fabric and have it come back dry or barely damp.
If you’re cleaning a stubborn stain and the fabric is saturated, stop. Use a wet/dry vacuum to pull out as much water as possible, then let it dry completely before trying again. Adding more solution to an already-soaked seat just pushes dirt deeper into the foam.
Drying time varies. In warm, dry weather with the windows down, a seat can dry in 4-6 hours. In humid conditions, it can take 24 hours or more. Use a fan or a portable heater to speed things up. Never put a wet seat back in the sun and walk away; the heat can cause the dye to fade unevenly.
For the best cleaning products for car interior, look for low-moisture formulas. The Chemical Guys Citrus cleaner mentioned earlier is a good example. Its foaming action lifts dirt without soaking the padding, which reduces drying time and mold risk.
Maintenance and Longevity of Your Tools
Your tools need care too. An extractor with a clogged nozzle or a smelly tank is useless. Here’s how to keep them working.
After each use, empty the dirty water tank and rinse it out. Clean the nozzle and hose with warm water. Let everything air dry completely before storing. Residual moisture in the hose is a breeding ground for mold, and you don’t want to spray that onto your seats next time.
Drill brushes need less maintenance, but they do wear out. The bristles flatten and lose their stiffness over time. Replace them when they stop agitating effectively, usually after a year of regular use. Wash them with soapy water and let them dry to extend their life.
Check your chemical supply. Solvent-based cleaners evaporate and thicken over time. If a bottle has been sitting for six months, give it a shake and test it on a hidden spot before using it on a visible area. Replace any product that has separated or changed color.
Store everything in a dry place. A garage shelf is fine, but avoid leaving tools in the car itself. Temperature swings and moisture in the car can damage plastics and rubber seals.
Frequently Asked Questions
Can I use a home carpet cleaner on my car seats?
You can, but it’s not ideal. Full-size carpet cleaners are heavy and have hoses that are too short for car use. You’ll end up dragging the machine across your paint or trying to balance it on the door sill. A portable spot cleaner is lighter and has a longer hose, making it much easier to reach the floor wells and rear seats. If you only have a full-size machine, use it with the hose attachment and be prepared for a workout.
How often should I deep clean my car upholstery?
For a daily driver, twice a year is a good baseline. If you have pets, kids, or eat in the car, bump that to four times a year. The key is to spot-clean spills immediately. A stain that’s been sitting for a week is much harder to remove than one you hit with a spray and brush right away.
Is steam cleaning safe for all car fabrics?
No. Steam is great for cotton and polyester blends, but it can damage heat-sensitive materials like Alcantara and some vinyls. The high heat can melt the fibers or cause the backing to delaminate. Always check the manufacturer’s label and test on a hidden spot first. For leather, use steam sparingly and always condition the leather afterward to replace lost moisture.
What’s the difference between a spot cleaner and an extractor?
They’re essentially the same thing. Spot cleaner is the marketing term for smaller, portable units. Extractor is the generic term for any machine that sprays and vacuums. The difference is usually scale. A portable spot cleaner has a smaller tank and less suction than a professional extractor. For car interiors, a portable spot cleaner is the right size. A full-size extractor is overkill and hard to maneuver.
Can I clean car upholstery without a machine?
Yes, but it takes more effort and the results aren’t as deep. A brush and a low-moisture cleaner like the Chemical Guys product can handle light stains. You spray, scrub, and then blot with a dry microfiber towel to absorb the dirt. This works for surface dirt but won’t reach deep into the foam padding. For that, you need suction. If you’re cleaning a car before selling it, a professional detail is worth the money. If you’re maintaining your own car, the machine pays for itself.
Build Your Perfect Kit
You don’t need everything on the market. You need a system. Here’s what that looks like at different levels.
- Starter kit (under $50): A spray cleaner with a brush, a pack of microfiber towels, and a stiff detailing brush. This handles light stains and weekly touch-ups.
- Intermediate kit (under $150): Add a portable spot cleaner and a drill brush set. This covers deep cleaning for most cars and handles pet messes.
- Prosumer kit (under $300): Add a handheld steam cleaner and a small wet/dry vacuum. This gives you full control over moisture levels and handles leather and Alcantara safely.
- Professional setup (over $500): A full-size extractor like a Mytee or a Durrmaid, multiple brushes, and a chemical arsenal for every stain type. Only go this far if you’re detailing for money.
Start with the intermediate kit. It covers 90% of situations, and you can add pieces as you find yourself needing them. Buy quality on the tools you use most, and save money on the ones you use rarely.
Pair your cleaning tools with the right car cleaning cloths for detailing to avoid scratching surfaces during the drying phase. A good microfiber towel is worth more than an expensive machine if you use it correctly.
The best car upholstery cleaning tools aren’t the most expensive ones. They’re the ones you actually use. A $30 brush that you grab weekly beats a $500 extractor that sits in the garage. Build your kit around your habits, not a marketing brochure. Your seats will thank you.
Products related to this article
Sponsored / affiliate links. As an Amazon Associate I earn from qualifying purchases. I may earn additional commission from eligible campaigns.