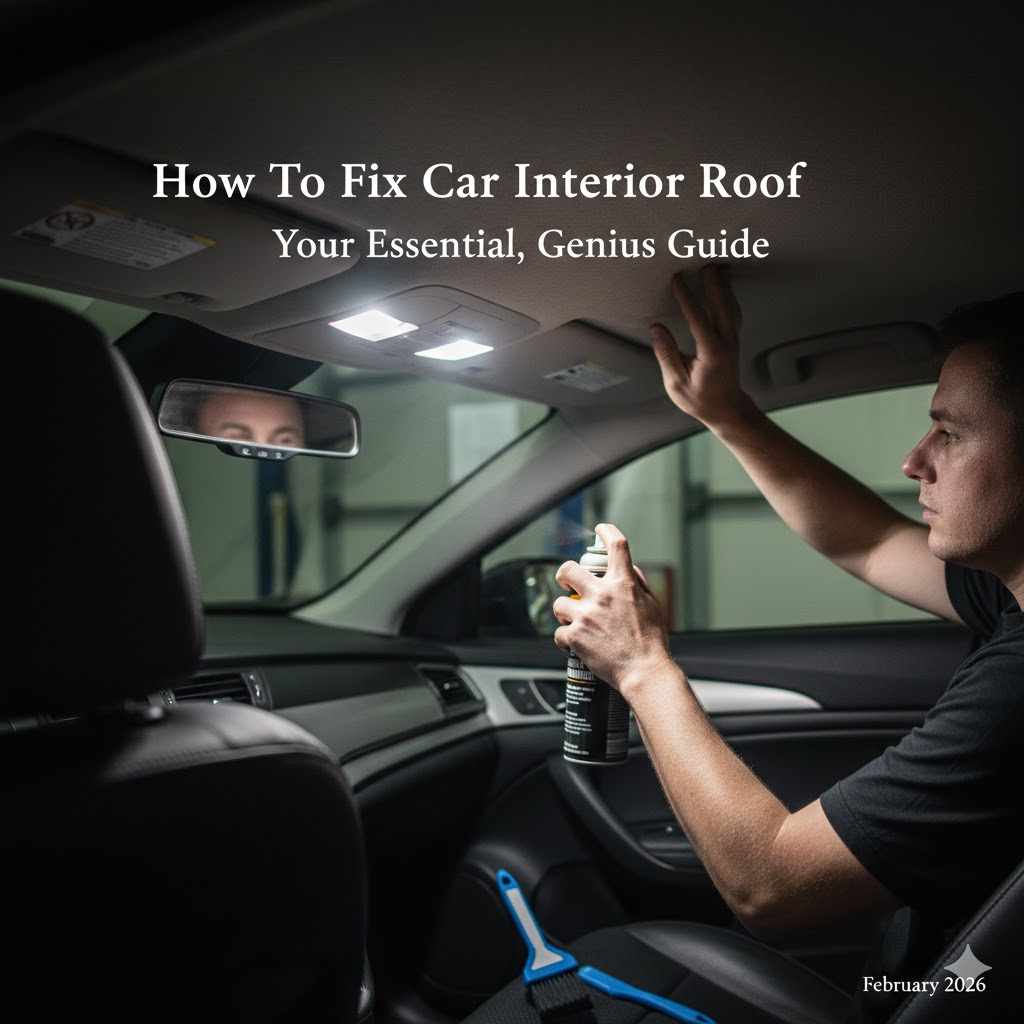
How To Fix Car Interior Roof: Your Essential, Genius Guide
To fix your car’s interior roof, you can use quick methods like headliner pins or adhesive spray for small sags. For a complete repair, you must remove the old headliner board, scrape off the decayed foam, and apply new foam-backed fabric using a high-temperature spray adhesive. This restores a factory-fresh look and prevents future sagging.
Does the roof lining in your car look like a sad, droopy tent? You’re not alone. A sagging car headliner is a common problem, especially in older vehicles. It can be distracting, messy, and just plain ugly. But don’t worry! This isn’t a repair that requires an expensive trip to the mechanic. You have the power to fix this yourself.
This guide is here to walk you through everything, step-by-step. We will cover the quick fixes for minor sags and the full replacement for a like-new finish. Get ready to feel proud of your car again!
Why Does Your Car’s Roof Lining Sag in the First Place?
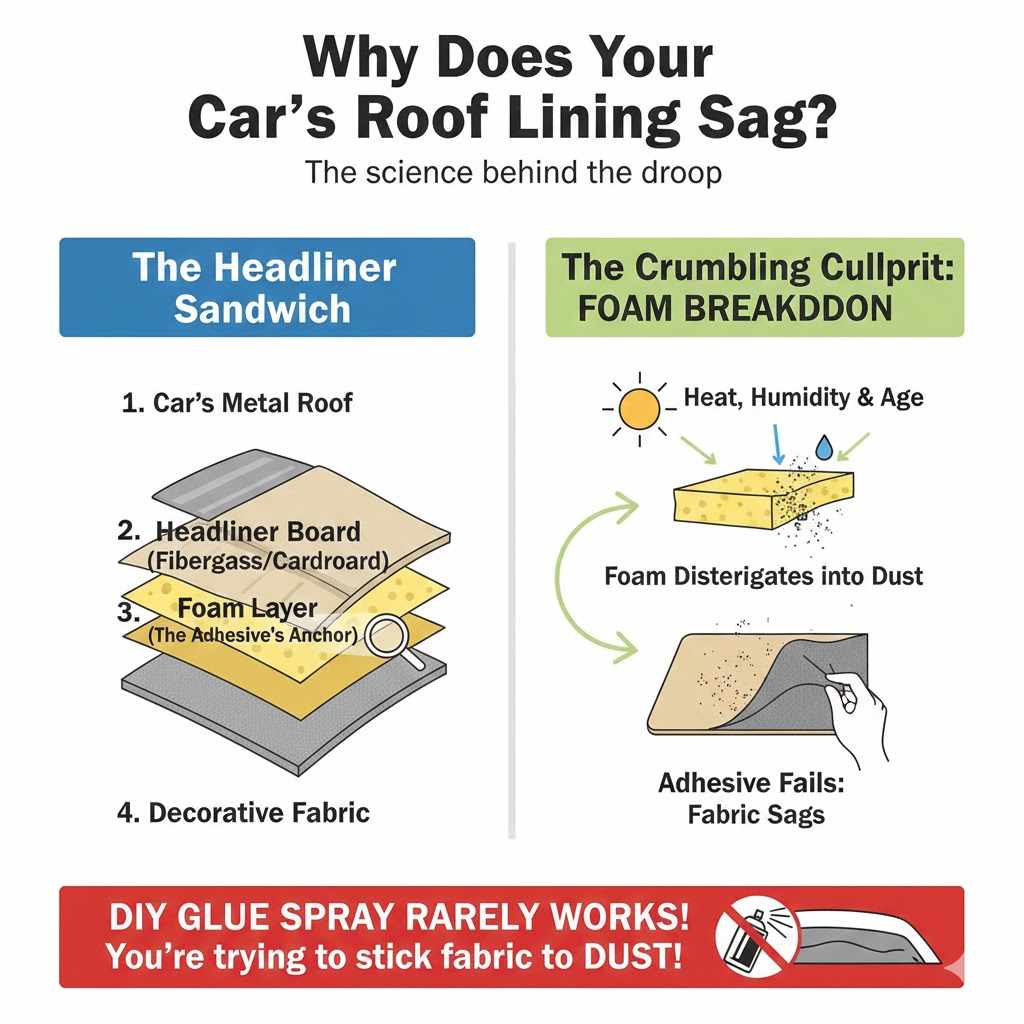
Before we jump into the fix, let’s understand the problem. Your car’s headliner isn’t just fabric glued to the metal roof. It’s a three-part sandwich:
The Headliner Board: A stiff, molded piece of fiberglass or pressed cardboard that fits the shape of your roof.
The Foam Layer: A thin layer of foam glued to the board. This gives the headliner its soft, plush feel.
The Fabric: The decorative cloth or vinyl you see on the inside of your car.
The real culprit behind a sagging headliner is the foam layer. Over time, heat, humidity, and age cause this foam to break down and disintegrate. It turns into a dusty, crumbly mess. When the foam decays, the adhesive holding the fabric has nothing left to stick to. Gravity then does its job, and the fabric begins to peel away and droop.
This is why simply trying to spray glue onto the sagging fabric from the outside rarely works. You’re trying to stick the fabric back to crumbling dust, which is a recipe for failure and a bigger mess.
First, Assess the Damage: Quick Fix or Full Replacement?
Take a good look at your headliner. The extent of the sagging will determine the best repair method. Be honest with your assessment to save time and frustration.
When to Use a Quick Fix:
Quick fixes are best for very small, localized issues. If you have:
- A tiny spot that has just started to come loose, maybe the size of your hand.
- A sagging section only along an edge or corner.
- A car you plan to sell soon and just need a temporary cosmetic fix.
When to Opt for a Full Replacement:
A full replacement is the only permanent, professional-looking solution. You should choose this route if:
- More than 25% of the headliner is sagging.
- The fabric is drooping in the middle of the roof.
- You’ve tried quick fixes and they failed.
- The fabric is stained, torn, or you just want a fresh look.
- You want a repair that will last for years.
Method 1: The Quick Fixes for Minor Sags
If you’ve decided a quick fix is right for you, here are three simple methods. These won’t last forever, but they can get the job done in a pinch.
Option 1: Headliner Pins or Tacks
This is the fastest and easiest method. Headliner pins look like little corkscrew tacks or decorative thumb tacks. You simply twist or push them through the sagging fabric and into the headliner board behind it.
How to do it:
- Buy a pack of automotive headliner pins (available online or at auto parts stores).
- Gently push the sagging fabric back toward the roof.
- Twist a pin through the fabric and into the board until it feels secure.
- Space the pins every few inches in a diamond or grid pattern for the best hold and a neat look.
Option 2: Headliner Spray Adhesive
This method can work for small areas, especially along the edges where the fabric has started to peel away from the board. The key is to use a dedicated headliner adhesive, not a generic craft glue.
How to do it:
- Buy a can of high-temperature headliner spray adhesive.
- Wear safety glasses and a mask, and ensure your car is well-ventilated. You can find excellent safety guidance on the OSHA website.
- Carefully spray the adhesive between the fabric and the headliner board. Use the small straw applicator that often comes with the can for better precision.
- Let the adhesive get tacky for a minute or two (check the can’s instructions).
- Gently press the fabric back into place, smoothing it out with your hand or a small roller.
- Hold it in place for a few minutes or use painters’ tape to secure it while it dries.
Important Note: Be careful not to spray too much glue, as it can soak through the fabric and leave a dark, ugly stain.
Option 3: The Steam and Roller Method
Sometimes, the original adhesive can be reactivated with heat. This method is a bit of a long shot and works best on newer cars where the foam hasn’t completely turned to dust.
How to do it:
- You’ll need a fabric steamer and a small, clean paint roller.
- Gently heat the sagging area with the fabric steamer. Don’t hold it in one place for too long to avoid damaging the fabric.
- Immediately after heating, use the roller to press the fabric firmly back against the headliner board.
- Work in small sections until you’ve re-adhered the loose area.
Comparing Quick Fix Methods
| Method | Pros | Cons | Best For |
|---|---|---|---|
| Headliner Pins | – Extremely fast and easy – Very cheap – No mess |
– Visible repair – Doesn’t fix the underlying issue – Fabric may still sag between pins |
A quick, temporary cosmetic fix on an older car. |
| Spray Adhesive | – Can be an invisible repair – Relatively inexpensive |
– Can be messy – Risk of staining fabric – May not hold if foam is decayed |
Small, loose edges or corners where the foam is still intact. |
| Steam and Roller | – No new materials needed – Invisible repair if successful |
– Often doesn’t work – Can damage fabric if overheated – Only works if original adhesive is viable |
A last-ditch effort on a very new car with a minor sag. |
Method 2: The Full Replacement for a Perfect, Lasting Fix
Ready to tackle the job like a pro? A full replacement is the most rewarding option and will leave your car’s interior looking brand new. It seems intimidating, but it’s just a series of simple steps. You’ve got this!
Step 1: Gather Your Tools and Materials
Having everything ready before you start makes the process smooth and stress-free. Here’s what you’ll need:
- New Headliner Fabric: Make sure to buy foam-backed headliner material. Measure your car’s roof and add about 6 inches to each dimension to be safe.
- High-Temperature Headliner Spray Adhesive: You will likely need 2-3 cans for a standard car. Don’t cheap out on this!
- Basic Hand Tools: A set of screwdrivers (Phillips and flathead), a socket set, and a trim removal tool kit.
- Stiff Bristle Brush or Scrub Brush: For removing the old foam.
- Utility Knife or Sharp Scissors: For trimming the new fabric.
- Safety Gear: Safety glasses, gloves, and a dust mask are essential.
- Optional but Helpful: A friend to help you maneuver the board, and a set of sawhorses or a large table to work on.
Step 2: Prepare Your Workspace
Choose a clean, dry, and well-ventilated area like a garage or a shady spot in your driveway. You’ll need enough space to fully open your car doors and remove the large headliner board. Lay down a drop cloth or old sheet to work on.
Step 3: Carefully Remove the Old Headliner Board
This is the most detailed part of the process, but don’t rush it. Every piece you remove, you’ll have to put back on.
- Disconnect the Battery: This is a crucial safety step, especially since you’ll be unplugging lights and other electrical components. Disconnect the negative terminal.
-
Remove Interior Trim Pieces: Start unscrewing and unclipping anything attached to the headliner. This includes:
- Sun visors and their clips.
- Grab handles (above the doors).
- The dome light and any map lights (carefully unplug their wire connectors).
- The clips holding the headliner board to the roof (if any).
- Remove Pillar Covers: The plastic trim on the pillars (A, B, and C pillars) often overlaps the headliner board. Use your trim removal tool to gently pry them off. They are usually held on by clips.
- Detach and Remove the Board: With everything removed, the headliner board should now be loose. Gently guide it down. Now comes the puzzle: getting it out of the car. For most sedans, the easiest way is to recline the front passenger seat all the way and carefully angle the board out through the passenger-side front door. On SUVs and hatchbacks, it’s much easier to take it out through the rear hatch. This is where a helper is very useful!
Step 4: Strip the Old Fabric and Foam
Now for the messy, but satisfying, part. Place the headliner board on your work surface.
- Peel off the old, saggy fabric. It should come off very easily.
- You will see the nasty, decayed foam layer left behind on the board. Put on your dust mask and gloves.
- Use your stiff bristle brush to scrub all of the old foam off the board. You want to get it down to the bare fiberglass or cardboard surface. The cleaner the surface, the better your new fabric will stick.
- Once you’ve scrubbed it all off, wipe the board down with a dry cloth or use compressed air to make sure it’s completely free of dust.
Step 5: Apply Your New Headliner Fabric
This is where the magic happens! Take your time for a wrinkle-free finish.
- Lay your new foam-backed fabric over the clean headliner board. Let it drape over the edges.
- Carefully fold back one half of the fabric, exposing half of the board and the back of the fabric.
- Following the instructions on your adhesive can, spray an even coat of adhesive onto the exposed half of the board. Then, spray an even coat onto the foam side of the folded-back fabric. A good quality adhesive like the ones from 3M is highly recommended.
- Wait for 3-5 minutes, or as directed by the can. The adhesive needs to become tacky to the touch, not wet. This is the secret to a strong bond without soak-through.
- Now, carefully and slowly roll the fabric back onto the board. Start from the center and work your way out, gently smoothing the fabric with your hand or a clean roller to prevent any wrinkles or air bubbles.
- Once the first half is done, fold back the other half and repeat the process.
- Pay special attention to any deep curves or contours in the board. Press the fabric firmly into these areas.
Step 6: Trim the Excess Fabric
Let the adhesive cure for at least 30 minutes. Then, flip the board over.
- Use your sharp utility knife or scissors to trim the excess fabric around the edges, leaving about half an inch to an inch of overlap.
- Spray a little adhesive on this overlap and wrap it around the back of the board for a clean, secure edge.
- Carefully find the holes for your visors, lights, and grab handles from the back. Use your knife to cut small “X”s in the fabric over these holes. This allows the screws and clips to pass through cleanly.
Step 7: Reinstall the Headliner Board
You’re on the home stretch! It’s time to put your beautiful, new headliner back in the car.
- Carefully maneuver the board back into the car the same way you took it out. Again, a helper makes this much easier.
- Gently lift the board into position against the roof.
- Work in reverse order of removal. Start by reinstalling the pillar covers, lights (don’t forget to plug them back in!), grab handles, and sun visors. These components will hold the board in place.
- Reconnect your car’s battery.
- Step back and admire your incredible work!
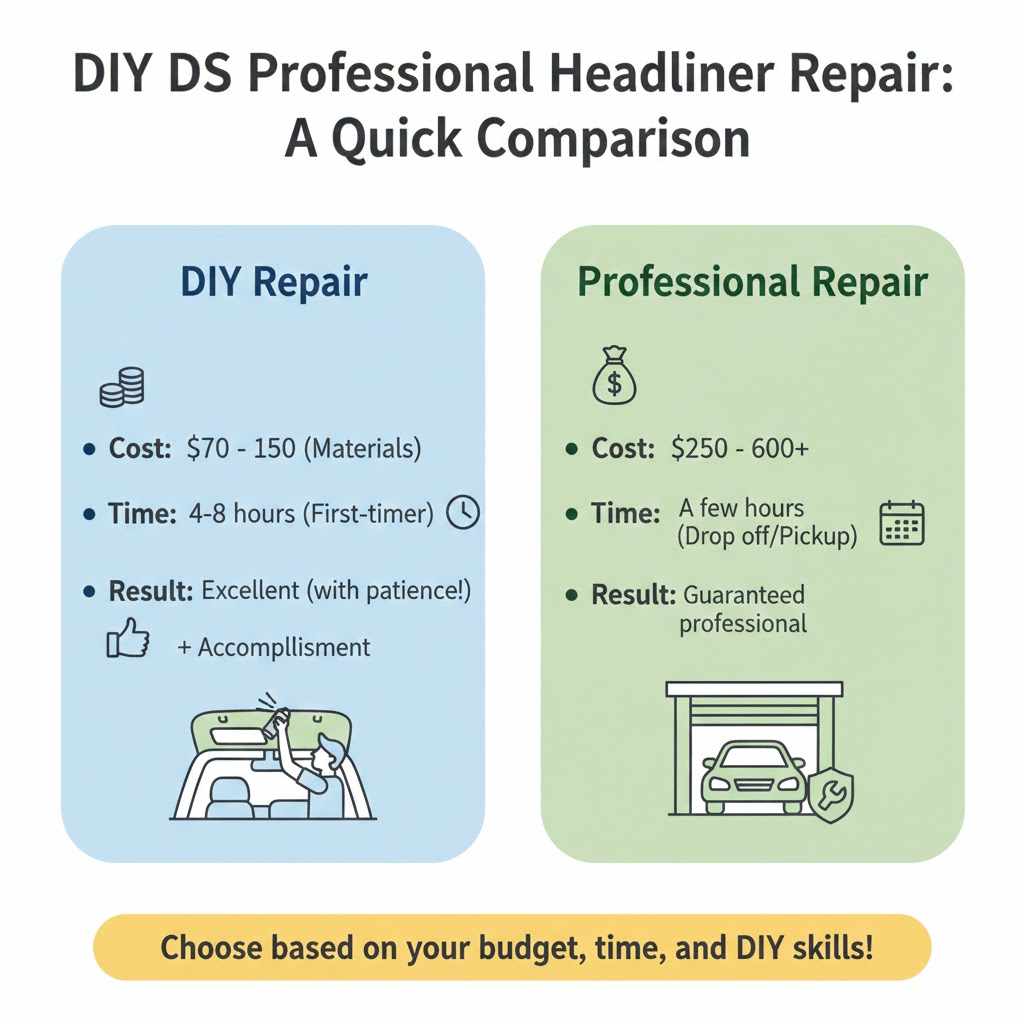
DIY vs. Professional Repair: A Quick Comparison
Still on the fence? Here’s a look at what you can expect in terms of cost and time for both options.
| Factor | DIY Repair | Professional Repair |
|---|---|---|
| Cost | $70 – $150 (for materials like fabric and adhesive) | $250 – $600+ (depending on car model and location) |
| Time | 4-8 hours (for a first-timer) | A few hours (drop off and pick up) |
| Result | Excellent, with patience and care. Plus, a huge sense of accomplishment! | Guaranteed professional result. |
| Skills Required | Basic hand tool use, patience, and attention to detail. | None. |
Frequently Asked Questions (FAQ)
1. Why did my car headliner start sagging?
The main reason is the breakdown of the thin foam layer between the fabric and the headliner board. Over time, heat and humidity cause this foam to decay, turning it to dust. The glue then has nothing to hold onto, causing the fabric to fall.
2. Can I just glue the sagging part back up?
You can try, but it’s usually not a permanent solution. If you spray glue directly onto the sagging fabric, you are trying to stick it to the decomposed foam dust, not the solid board. The repair often fails quickly and can leave ugly glue stains on your fabric.
3. How much does it cost to fix a car headliner professionally?
A professional repair can range from $250 for a simple sedan to over $600 for larger vehicles like SUVs or cars with sunroofs. The cost varies based on your vehicle’s make and model, as well as labor rates in your area.
4. What kind of glue should I use for a headliner?
You must use a dedicated, high-temperature headliner spray adhesive. Regular craft spray adhesive or all-purpose glue will fail quickly in the high heat that builds up inside a car. Look for products specifically labeled for automotive headliners.
5. How long does it take to replace a headliner?
For a first-time DIYer, plan for about 4 to 8 hours. This includes time for removing trim, cleaning the board, applying the new fabric, and reinstalling everything. Take your time—it’s not a race!
6. Is it hard to replace a car headliner yourself?
It’s more time-consuming than it is difficult. The steps themselves are quite simple. The key is to be patient, organized, and careful, especially when removing the plastic trim pieces so you don’t break any clips.
7. Can I use a different color or type of fabric for my new headliner?
Absolutely! This is a great opportunity to customize your car’s interior. You can choose different colors or even materials like suede or patterned fabric. Just make sure whatever you choose is “foam-backed” headliner material for a proper fit and finish.
Conclusion: You’ve Got This!
Fixing a sagging car interior roof might seem like a daunting task, but as you can see, it’s completely achievable for a beginner. Whether you choose a quick pin-up fix or go for a full, professional-looking replacement, you now have the knowledge to get the job done right.
By investing a little bit of your time, you can save hundreds of dollars and gain an incredible sense of pride every time you get in your car. No more droopy fabric blocking your view or embarrassing you in front of passengers. So, roll up your sleeves, gather your tools, and get ready to transform your car’s interior. Happy fixing!