How to Install Struts on a Car: A Step-by-Step Guide for Beginners
Hey there, friend! So, you’re curious about how to install struts on a car? I get it—when I first noticed my car bouncing like a trampoline on bumpy roads, I knew it was time to replace the struts. Doing it myself saved me a ton of money, and it felt awesome to get my hands dirty.
After tackling this job on my old Honda and learning from a few trial-and-error moments, I’ve got the full scoop to share. Picture us in your garage, tools spread out, chatting about how to get those new struts in place. Whether you’re a DIY newbie or a seasoned gearhead in the USA, this guide will walk you through every step to install struts like a pro. Let’s roll up our sleeves and give your car a smoother ride!
What Are Struts and Why Do They Matter?
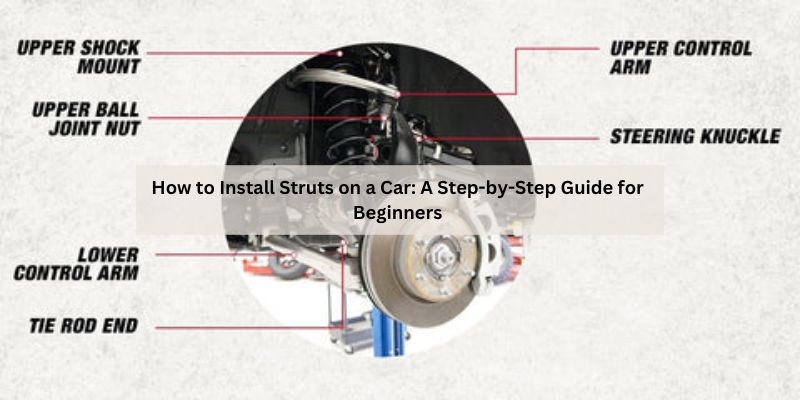
First, let’s talk about what struts are. Struts are part of your car’s suspension system. They help absorb shocks from the road, keeping your ride smooth and stable. I like to think of them as the car’s knees, cushioning every bump. They also support the car’s weight and help with steering and alignment.
When struts wear out, you’ll notice problems. My car started bouncing too much, and the tires wore unevenly. Bad struts can make your car harder to control, especially on rough roads. Replacing them restores comfort and safety. I felt a huge difference after installing new struts—my Honda handled like a dream again.
Signs You Need New Struts
How do you know it’s time to replace your struts? I learned to spot these signs after dealing with my car:
- Bouncy Ride: If your car keeps bouncing after hitting a bump, the struts aren’t absorbing shocks. I noticed this on a pothole-filled road.
- Nose Diving: When braking, does the front end dip sharply? That’s a bad strut. My car did this at stoplights.
- Uneven Tire Wear: Worn struts mess with alignment, causing tire wear. I saw bald spots on my front tires.
- Noisy Suspension: Clunking or knocking sounds over bumps mean trouble. I heard this under my car before replacing the struts.
- Leaking Fluid: Struts with hydraulic fluid might leak when worn. I checked mine and saw a small oily spot on one.
If you see these, it’s probably time for new struts. I replaced mine at around 80,000 miles, but it depends on your car and driving habits.
Tools and Supplies You’ll Need
Before we start, let’s gather what you need. I keep my tools organized to make the job easier. Here’s my list for installing struts:
- New Struts: Buy ones specific to your car’s make and model. I got mine from an auto parts store for $100 each.
- Socket Wrench Set: For loosening bolts. I used a 3/8-inch drive set.
- Torque Wrench: To tighten bolts to the right specs. I borrowed one from a friend.
- Spring Compressor: To compress the coil spring safely. I rented one for $20.
- Jack and Jack Stands: To lift and secure the car. I have a 2-ton jack.
- Lug Wrench: To remove the wheels. My car came with one.
- Pry Bar: For separating parts. I used a small one for leverage.
- Screwdrivers: Flathead and Phillips for small screws. I keep a set handy.
- Pliers: For stubborn clips or nuts. Needle-nose pliers worked best.
- Penetrating Oil: Like WD-40, for rusty bolts. I sprayed this on stuck nuts.
- Gloves and Safety Glasses: To stay safe. I always wear these.
- Shop Manual: For your car’s specs and torque values. I found mine online for $10.
- Clean Rags: For wiping grease and dirt. I used old T-shirts.
You can find these at auto stores or online. I spent about $250 total, including struts, which was way cheaper than the $800 a shop quoted me.
Preparing for the Job
Getting ready is half the battle. I learned to prep carefully to avoid headaches. Here’s how I set up:
- Check Your Struts: Make sure you have the right struts for your car. I double-checked my Honda’s model number.
- Read the Manual: Your car’s shop manual has torque specs and steps. I read mine to know what bolts to expect.
- Find a Flat Surface: Work on level ground, like a driveway. I used my garage floor.
- Gather Tools: Lay out everything you need. I put my tools on a workbench for easy access.
- Safety First: Engage the parking brake and chock the rear wheels. I used a brick to block my tires.
- Plan Your Time: This job takes 2-4 hours per strut for beginners. I set aside a Saturday morning.
I also told my neighbor I’d be working in case I needed a hand. Prep makes the job smoother, trust me.
Step-by-Step Guide to Installing Struts
Now, let’s get to the fun part—installing those struts! I’ll walk you through it like I did it on my Honda. Follow these steps, and you’ll be cruising smoothly in no time.
Step 1: Lift and Secure the Car
Start by loosening the lug nuts on the wheel you’re working on, but don’t remove them yet. I used a lug wrench and did this while the car was on the ground. Then, jack up the car using a floor jack under a strong point, like the frame. Place jack stands under the car for safety—I put mine under the pinch welds. Lower the car onto the stands and remove the jack. Take off the wheel by unscrewing the lug nuts completely. I set the wheel aside to keep my workspace clear.
Step 2: Remove the Old Strut Assembly
Locate the strut assembly—it’s the big spring and shock combo connected to the wheel hub. I started by spraying penetrating oil on all bolts to loosen rust. Use a socket wrench to remove the bolts connecting the strut to the steering knuckle—usually two big ones. I had to wiggle the knuckle free with a pry bar. Next, open the hood and find the strut tower (the top of the strut). Remove the three or four nuts holding it in place. Be careful—the strut is heavy. I held it with one hand while unscrewing with the other. Pull the strut assembly out through the wheel well.
Step 3: Compress the Coil Spring
The old strut has a coil spring that’s under a lot of pressure. I used a spring compressor to safely compress it. Attach the compressor to the spring, following its instructions, and tighten it evenly until the spring is loose. I did this slowly to avoid slipping. Once compressed, use a wrench to remove the top nut holding the strut mount. Take apart the assembly, keeping the mount, dust boot, and bumper for reuse. I laid out the parts to make reassembly easier.
Step 4: Assemble the New Strut
Now, put the new strut together. I started by placing the new strut into the compressed spring. Reattach the strut mount, dust boot, and bumper in the same order as the old setup. Tighten the top nut with a wrench, but don’t torque it yet. Release the spring compressor slowly, making sure the spring seats properly. I checked that everything was aligned before fully releasing. This part felt tricky, but taking my time made it safe.
Step 5: Install the New Strut Assembly
Slide the new strut assembly back into the wheel well, aligning the top with the strut tower. I hand-tightened the tower nuts to hold it in place. Then, reconnect the bottom of the strut to the steering knuckle, using the old bolts or new ones if provided. I tightened these with a socket wrench, then used a torque wrench to set them to the manual’s specs (mine was 80 ft-lbs). Go back to the strut tower and torque the top nuts (mine were 30 ft-lbs). Double-check all bolts for tightness.
Step 6: Reattach the Wheel
Put the wheel back on and hand-tighten the lug nuts. I lifted the car slightly with the jack to take it off the stands, then lowered it to the ground. Tighten the lug nuts in a star pattern with a torque wrench (mine needed 80 ft-lbs). I gave the wheel a shake to make sure it was secure.
Step 7: Repeat for Other Struts
If you’re replacing multiple struts, repeat these steps for each one. I did my front struts together since they wear out at the same rate. The second one went faster because I knew the process. Always replace struts in pairs (both fronts or both rears) to keep handling balanced.
Step 8: Test and Align
Take your car for a short test drive on a smooth road. I drove around my neighborhood to check for noises or weird handling. If it feels good, you’re almost done. After installing struts, your car’s alignment might be off. I took mine to a shop for a $70 alignment to ensure even tire wear. Don’t skip this—it’s worth it.
Safety Tips for Installing Struts
Working on struts can be risky if you’re not careful. I learned these safety tips to stay safe:
- Use Jack Stands: Never work under a car held only by a jack. I always use stands for security.
- Handle Springs Carefully: Compressed springs are dangerous if they pop loose. I double-checked that my compressor was secure.
- Wear Safety Gear: Gloves and glasses protect against grease and debris. I got a metal chip in my glove once—glad it wasn’t my hand.
- Follow Torque Specs: Over-tightening bolts can strip them. I used a torque wrench to be precise.
- Work Slowly: Rushing leads to mistakes. I took breaks to stay focused.
Safety first—it’s not worth getting hurt over a car job.
Common Mistakes to Avoid
I made a few blunders my first time, so let me save you some trouble:
- Wrong Struts: Double-check that they match your car. I almost bought struts for the wrong Honda model.
- Not Compressing Springs: Skipping this can be dangerous. I always use a compressor now.
- Loose Bolts: Forgetting to torque bolts can cause rattling. I check every bolt twice.
- Skipping Alignment: New struts can shift alignment. I learned this after my tires wore unevenly.
- Mixing Parts: Keep each strut’s parts separate. I mixed up mounts once and had to redo the job.
Take your time, and you’ll avoid these headaches. I felt like a pro after fixing my mistakes.
When to Replace Struts
Struts don’t last forever. I replace mine when I notice signs of wear, usually every 50,000-100,000 miles. Here’s what affects their lifespan:
- Driving Conditions: Rough roads wear struts faster. My city’s potholes killed my struts early.
- Load Weight: Carrying heavy loads stresses the struts. I haul camping gear, which didn’t help.
- Climate: Extreme heat or cold can damage seals. Colorado’s winters were tough on mine.
- Driving Style: Aggressive driving wears them out. I ease up on speed bumps now.
Check your car’s manual for recommendations. I replaced mine at 80,000 miles, but your car might be different.
DIY vs. Professional Installation
You might wonder if DIY is worth it or if you should hire a pro. I’ve done both, and here’s the breakdown:
- DIY: Saves money but takes time and effort. I spent $250 on parts and tools, compared to $800 at a shop. It took me 6 hours, but I learned a lot. Great for hands-on folks with basic skills.
- Professional: Faster and hassle-free, but pricey. A shop did my rear struts in 2 hours for $600. Perfect if you’re busy or not comfortable with tools.
I love DIY for the savings and satisfaction, but pros are great for complex jobs. I’d do fronts myself again, but might hire out for rears.
Cost of Installing Struts
Cost depends on whether you DIY or go pro. Here’s what I found:
| Method | Parts Cost | Labor/Tools Cost | Total | Notes |
|---|---|---|---|---|
| DIY | $100-$300 (pair) | $50-$100 (tools/rental) | $150-$400 | Cheaper but requires time and skill. |
| Professional | $100-$300 (pair) | $300-$600 (labor) | $400-$900 | Faster, includes warranty. |
I saved about $500 doing it myself, but shops offer convenience and expertise. Get quotes to compare.
Benefits of New Struts
New struts make a huge difference. Here’s why I love them:
- Smoother Ride: Bumps feel less jarring. My Honda glides over potholes now.
- Better Handling: Steering and braking are sharper. I feel safer on curves.
- Longer Tire Life: Proper alignment saves tires. My new tires are wearing evenly.
- Improved Safety: Stable suspension prevents skids. I trust my car in bad weather.
- Higher Resale Value: A smooth ride boosts value. My car’s worth more now.
It’s like giving your car a new lease on life. I wish I’d replaced mine sooner.
Maintaining Your Struts
To make struts last, I follow these tips:
- Drive Gently: Avoid potholes and speed bumps. I slow down on rough roads.
- Check Alignment: Misalignment stresses struts. I get an alignment yearly.
- Inspect Regularly: Look for leaks or noises. I check mine every oil change.
- Clean Debris: Dirt can damage seals. I rinse my undercarriage in winter.
These habits keep my struts in top shape. I plan to get 100,000 miles out of my new ones.
When to Call a Professional
DIY is great, but sometimes you need a pro. I called one when:
- Rusty Bolts: Stuck bolts can break. A shop has tools to handle them.
- Complex Suspension: Some cars have tricky setups. I’d hire out a luxury car.
- No Time: If you’re swamped, pros are faster. I used a shop for my rear struts.
- Safety Concerns: If you’re unsure about springs, don’t risk it. I watched a pro handle a tricky spring.
Shops charge $400-$900 but ensure the job’s done right. I found a good one through reviews.

Conclusion
There you go, friend! Now you know exactly how to install struts on a car and give your ride the smooth, safe handling it deserves. I’ll never forget the satisfaction of finishing my first strut job—my Honda felt like a brand-new car, and I saved a bundle doing it myself. From gathering tools to compressing springs and torquing bolts, every step is doable with a little patience and care. Whether you’re tackling this in your garage or deciding to call a pro, you’ve got the knowledge to make your car’s suspension shine. So, grab those tools, pop the hood, and let’s get your car back to gliding over the roads. Here’s to smooth drives and the pride of a job well done!
FAQs
How do I know if my car needs new struts?
Look for a bouncy ride, nose diving when braking, uneven tire wear, clunking noises, or fluid leaks around the struts.
Can I install Struts myself?
Yes, if you have basic tools, a spring compressor, and follow safety steps. It takes 2-4 hours per strut for beginners.
How much does it cost to install struts?
DIY costs $150-$400 for parts and tools. Professional installation runs $400-$900, including labor.
Do I need to replace all struts at once?
Replace them in pairs—both fronts or both rears—for balanced handling. I did my fronts together.
Is it safe to drive with bad struts?
Not for long. Bad struts reduce control, wear tires, and affect braking. I replaced mine ASAP.
Do I need an alignment after installing struts?
Yes, new struts can shift alignment. I got an alignment to prevent tire wear.
How long do struts last?
Typically 50,000-100,000 miles, depending on driving conditions and habits. Mine lasted 80,000 miles.