How To Make A Hail Proof Car Cover: A Genius, Essential DIY
To make a hail proof car cover, start with a heavy-duty, waterproof car cover as your base. Securely attach thick, impact-absorbing padding—like high-density foam, layered moving blankets, or pool noodles—to the top surfaces (hood, roof, trunk). Finally, add a durable outer layer like a tarp and extra tie-down straps for a snug, storm-ready fit.
Have you ever watched dark storm clouds roll in and felt that pit in your stomach? You’re not worried about the rain. You’re worried about hail. Those little ice pellets can cause hundreds or even thousands of dollars in damage in just a few minutes, turning your car’s smooth finish into a dimpled mess. It’s a frustrating and expensive problem.
But what if you could protect your car without a garage or a pricey, specialized cover? You can! I’m here to show you that with a little creativity and some common materials, you can build your own hail-proof car cover. This guide will walk you through every simple step, proving you don’t need to be a professional mechanic to protect your investment. Let’s get started!
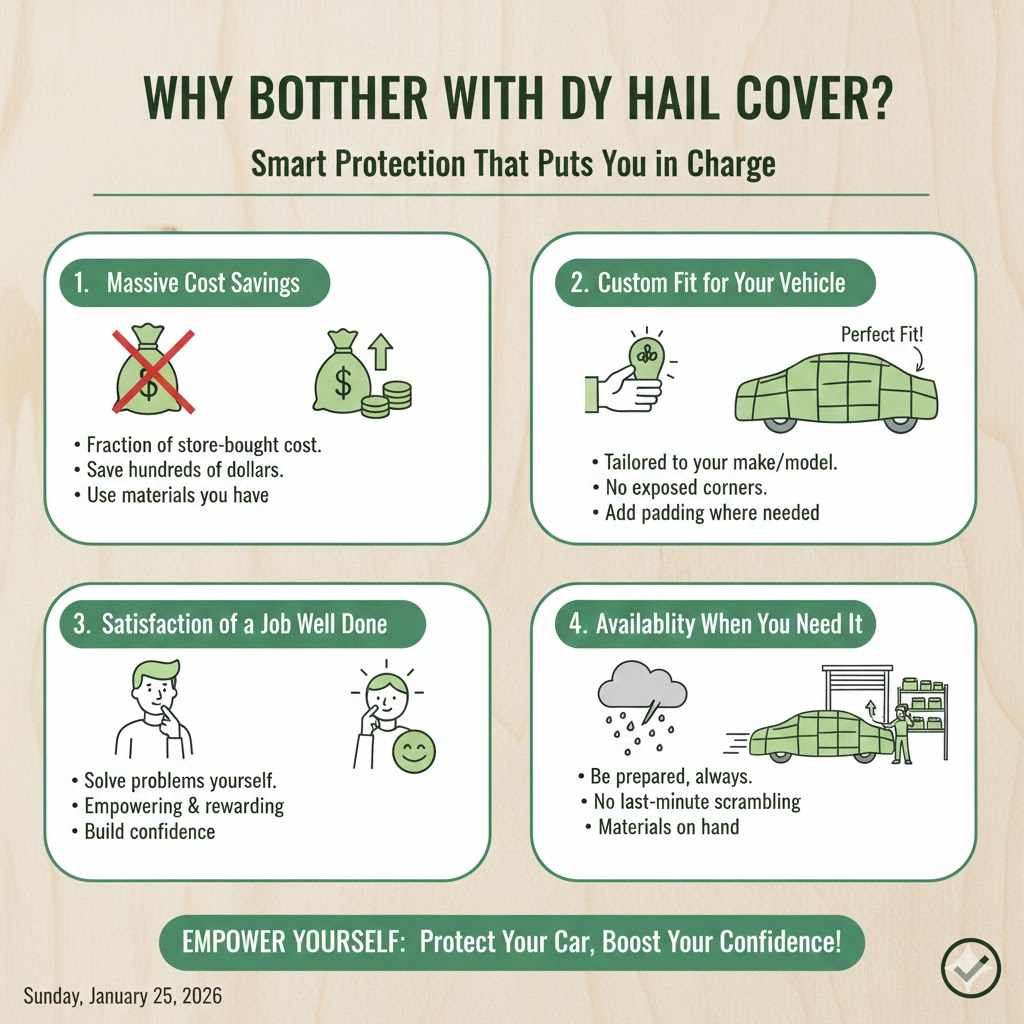
Why Bother with a DIY Hail Cover?
You might be thinking, “Can’t I just buy one?” Of course, you can. But commercial hail-proof covers can be incredibly expensive, often costing several hundred dollars. For many of us, that’s a tough expense to justify for something you might only use a few times a year. Building your own offers some fantastic benefits that put you in the driver’s seat.
- Massive Cost Savings: The biggest advantage is your wallet. You can often build a highly effective hail cover for a fraction of the cost of a store-bought one. You might even have some of the materials lying around your house already.
- Custom Fit for Your Vehicle: Every car is different. A DIY cover allows you to create a perfect fit for your specific make and model. No more saggy spots or exposed corners. You can add extra padding exactly where your car is most vulnerable.
- The Satisfaction of a Job Well Done: There’s a special kind of pride that comes from solving a problem with your own two hands. Building this cover not only saves you money but also empowers you, giving you the confidence to tackle other simple car care tasks.
- Availability When You Need It: When a hailstorm is in the forecast, specialty covers can sell out fast. By having the materials on hand or your cover already built, you’re always prepared and never have to scramble at the last minute.
Understanding What Makes a Cover Hail-Proof
Before we start building, let’s quickly talk about the science behind hail protection. A simple rain cover won’t do the trick. A true hail-proof cover isn’t about being waterproof; it’s about impact absorption. The goal is to create a cushioned barrier that can take the hit from a falling piece of ice, dispersing the force so it doesn’t dent the metal panels of your car.
Think of it like a football helmet. The hard outer shell provides the first line of defense, but it’s the thick padding inside that truly protects the player from impact. Our DIY cover will work on the same principle: a durable outer layer combined with a thick, soft, energy-absorbing inner layer.
The size of the hail determines the level of padding you need. According to the National Oceanic and Atmospheric Administration (NOAA), even small, pea-sized hail can cause minor damage. As the size increases, the threat becomes much more serious.
| Hail Size (Diameter) | Common Comparison | Potential for Damage |
|---|---|---|
| 0.25 inch | Pea | Minimal, but can scratch paint. |
| 0.75 inch | Penny | Can cause small, noticeable dings. |
| 1.00 inch | Quarter | Significant dents are very likely. |
| 1.75 inches | Golf Ball | Widespread, severe dents and possible glass cracks. |
| 2.75 inches | Baseball | Extreme damage, including shattered windows and large body dents. |
Our goal is to build a cover that can handle at least quarter-to-golf-ball-sized hail, which covers the most common damaging storms.
Gather Your Materials and Tools
Now for the fun part: gathering your supplies! This project is flexible, so you can adapt it based on what you have available or what you can easily find. Here’s a breakdown of what you’ll need, separated into categories.
Core Components
- A Base Car Cover: This is your foundation. Choose a standard, well-fitting car cover for your vehicle. A waterproof or water-resistant one is best, as it will help keep your padding dry. Make sure it has grommets or loops for straps.
- An Outer Shell (Optional but Recommended): A heavy-duty tarp that is larger than the top surface of your car. This adds another layer of water resistance and protects your padding from getting snagged or torn.
Padding Options: Choosing Your Armor
This is the most important part of your cover. You need something thick and resilient to absorb the impact of the hail. You can use one of these options or even a combination of them. Here’s a table to help you decide.
| Padding Material | Pros | Cons | Estimated Cost |
|---|---|---|---|
| High-Density Foam Pads | Excellent impact absorption, lightweight, easy to cut. | Can be more expensive, may need specialized adhesive. | $$$ |
| Moving Blankets | Affordable, readily available, soft on paint. | Bulky, can get heavy when wet if not protected. | $$ |
| Pool Noodles | Very cheap, extremely lightweight, great for curved surfaces. | Can be awkward to attach, may leave gaps if not placed carefully. | $ |
| Thick Bubble Wrap | Lightweight, cheap, surprisingly effective in layers. | Can be punctured easily, not very durable on its own. | $ |
| Old Comforters or Duvets | Often free (if you have old ones), very thick. | Extremely heavy when wet, can hold moisture against paint. | $ |
For a great balance of protection and cost, many people find success with two or three layers of thick moving blankets. High-density foam, like the kind used for gym flooring, is another top-tier choice if your budget allows.
Essential Tools
- Strong Adhesive: Depending on your padding, you might need heavy-duty fabric glue, construction adhesive, or even high-strength spray adhesive. Read the label to ensure it works with your chosen materials.
- Duct Tape or Gorilla Tape: A must-have for any DIY project! Use it for reinforcing seams and temporarily holding pieces in place.
- Heavy-Duty Scissors or a Utility Knife: For cutting your padding and tarp to size.
- Measuring Tape: To get accurate dimensions of your vehicle.
- Bungee Cords or Ratchet Straps: You’ll need these to secure the finished cover tightly to your car. Don’t rely solely on the thin elastic of the base cover.
- Zip Ties (Optional): Useful for attaching certain types of padding, like pool noodles.
- Marker or Chalk: For marking your cutting lines.
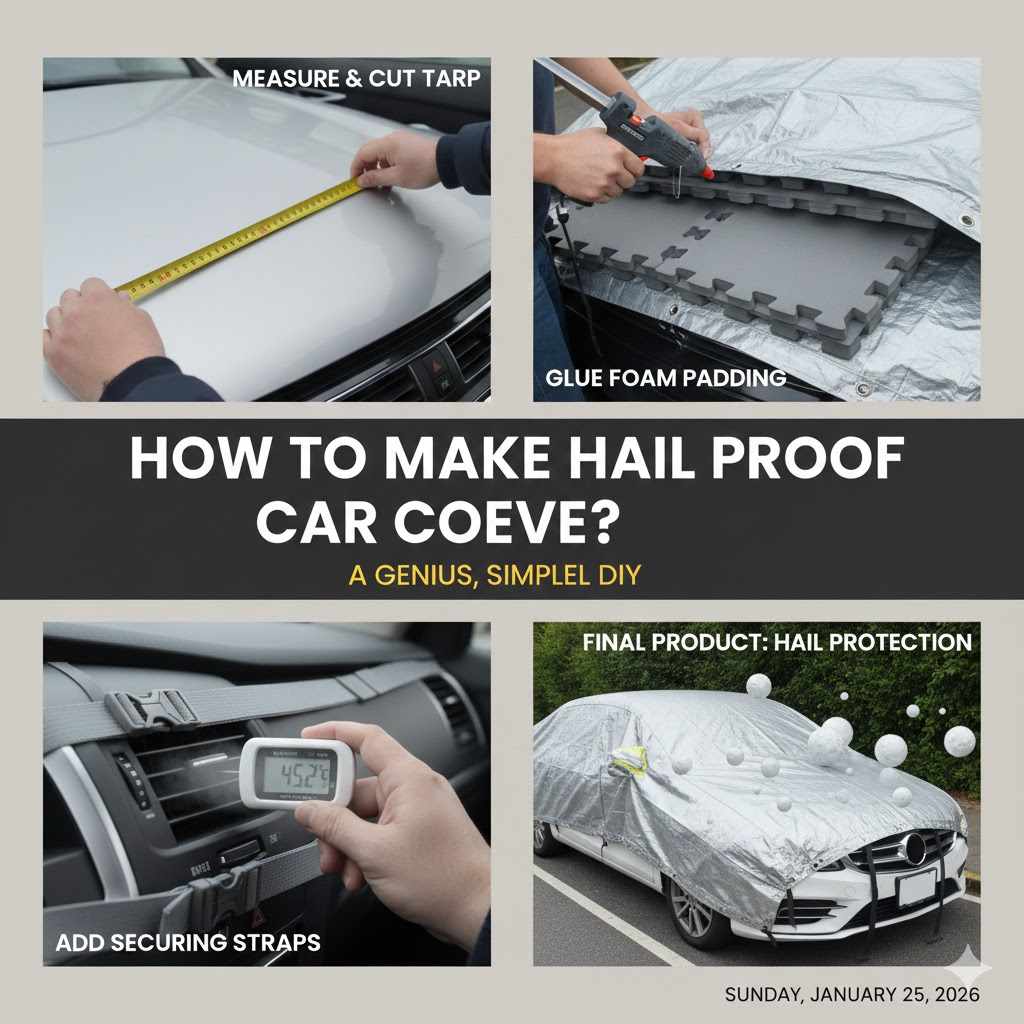
Step-by-Step Guide: Building Your Hail-Proof Car Cover
Alright, you’ve got your materials. Let’s build this thing! Follow these steps carefully, and take your time. Remember, the goal is a functional and durable cover, not a race to the finish line.
Step 1: Measure Your Vehicle Accurately
Before you make a single cut, you need good measurements. Use your measuring tape to measure the key areas you want to protect:
- The length and width of the hood.
- The length and width of the roof.
- The length and width of the trunk lid.
- The height of your side windows, if you want to add side protection.
Write these numbers down! Add a few extra inches to each measurement to ensure you have plenty of overlap.
Step 2: Prepare Your Base Layer
Lay your standard car cover over your vehicle. Smooth it out so it sits correctly. This will be your template. If the cover is new, it’s a good idea to let it air out for a bit. If it’s old, make sure it’s clean and dry before you start attaching things to it.
Step 3: Cut and Shape the Padding
Now, grab your padding material and your measurements. Using your marker and measuring tape, carefully draw the shapes of your hood, roof, and trunk onto the padding. If you’re using moving blankets, you might just need to fold them to get the right thickness and shape.
If you’re using high-density foam from a place like The Home Depot, a sharp utility knife will give you the cleanest cuts. For pool noodles, you can either lay them side-by-side to create a mat or cut them in half lengthwise to create a flatter surface. Be creative! The goal is to create padded panels that match the main surfaces of your car.
Step 4: Secure the Padding to the Cover
This is the most critical step. You need to attach your padding securely to the outside of your base car cover. Do not attach it to the inside, as the padding could be abrasive to your car’s paint.
- For Foam or Blankets: Apply your chosen adhesive generously to the back of the padding panel. Carefully press it onto the corresponding section of the car cover (hood section, roof section, etc.). Press down firmly and let it cure according to the adhesive’s instructions. You can place weights on it while it dries to ensure a strong bond.
- For Pool Noodles: This can be trickier. One great method is to use heavy-duty zip ties. Punch small holes in the car cover (reinforce them with duct tape first!) and thread the zip ties through the cover and around the pool noodle. Another option is to create a “net” of duct tape over the noodles to hold them in place on top of the cover.
Work one section at a time. Start with the roof, then the hood, then the trunk. Ensure everything is firmly attached before moving on.
Step 5: Add the Weatherproof Outer Layer (Optional)
Once your padding is securely attached and any adhesive is dry, lay your heavy-duty tarp over the top. This layer will protect your padding from rain and UV rays, making your cover last much longer. You can attach the tarp in a few ways:
- Adhesive: Apply adhesive around the edges of the padded sections and press the tarp down firmly.
- Duct Tape: Run long strips of high-quality duct tape along the seams where the tarp meets the car cover.
- Grommets: For the most secure fit, you can install a grommet kit on the tarp and use small bungee cords or zip ties to connect it to the grommets on your base car cover.
Step 6: Install Secure Straps and Buckles
The elastic band on a standard car cover is not strong enough to hold this heavy, modified cover in place during a windy storm. You must add extra securing straps.
Lay the completed cover on your car. Run two or three bungee cords or ratchet straps over the top of the entire cover, from one side of the car to the other, hooking them to the car’s frame or wheel wells. Make them snug, but not so tight that they could damage the vehicle. These straps will prevent the wind from lifting your cover off and leaving your car exposed.
Step 7: Test Your Fit and Make Adjustments
With the cover fully assembled and strapped down, take a step back and look. Does it cover all the critical areas? Are there any large gaps? Is it secure? If needed, add extra padding in vulnerable spots or tighten your straps. It’s better to find and fix any issues now, on a calm day, rather than during a storm.
Safety First: Important Precautions for Your DIY Project
This is a safe and straightforward project, but it’s always smart to keep safety in mind. Please follow these simple guidelines:
- Work in a Well-Ventilated Area: If you are using spray adhesives or strong glues, work outdoors or in an open garage to avoid inhaling fumes.
- Handle Cutting Tools with Care: Utility knives and heavy-duty scissors are sharp. Always cut away from your body and keep your fingers clear of the blade.
- Protect Your Car’s Paint: Make sure your car is clean before you test-fit the cover. Also, ensure that any straps or buckles you add won’t rub directly against the paint. You can use soft microfiber cloths as a buffer.
- Get a Helping Hand: This cover can get heavy and awkward. Ask a friend or family member to help you lift it on and off the car, especially the first few times.
Pro Tips for a Better, Stronger Hail Cover
Want to take your DIY cover to the next level? Here are a few extra tips from my experience:
- Label Your Cover: Use a permanent marker to write “Front” and “Back” on the inside of the cover. This will save you a lot of hassle when you’re trying to put it on in a hurry.
- Layer Different Materials: For the ultimate protection, use a combination of padding. For example, a base layer of moving blankets with a top layer of high-density foam offers both softness and rigidity.
- Think About the Windows: Hail can easily break car windows. Consider making padded panels that you can hang over your side windows, secured by the doors.
- Practice Deployment: Don’t wait for a storm to try putting your cover on for the first time. Practice a few times so you know exactly how to do it quickly and efficiently. Time is critical when a storm is approaching.
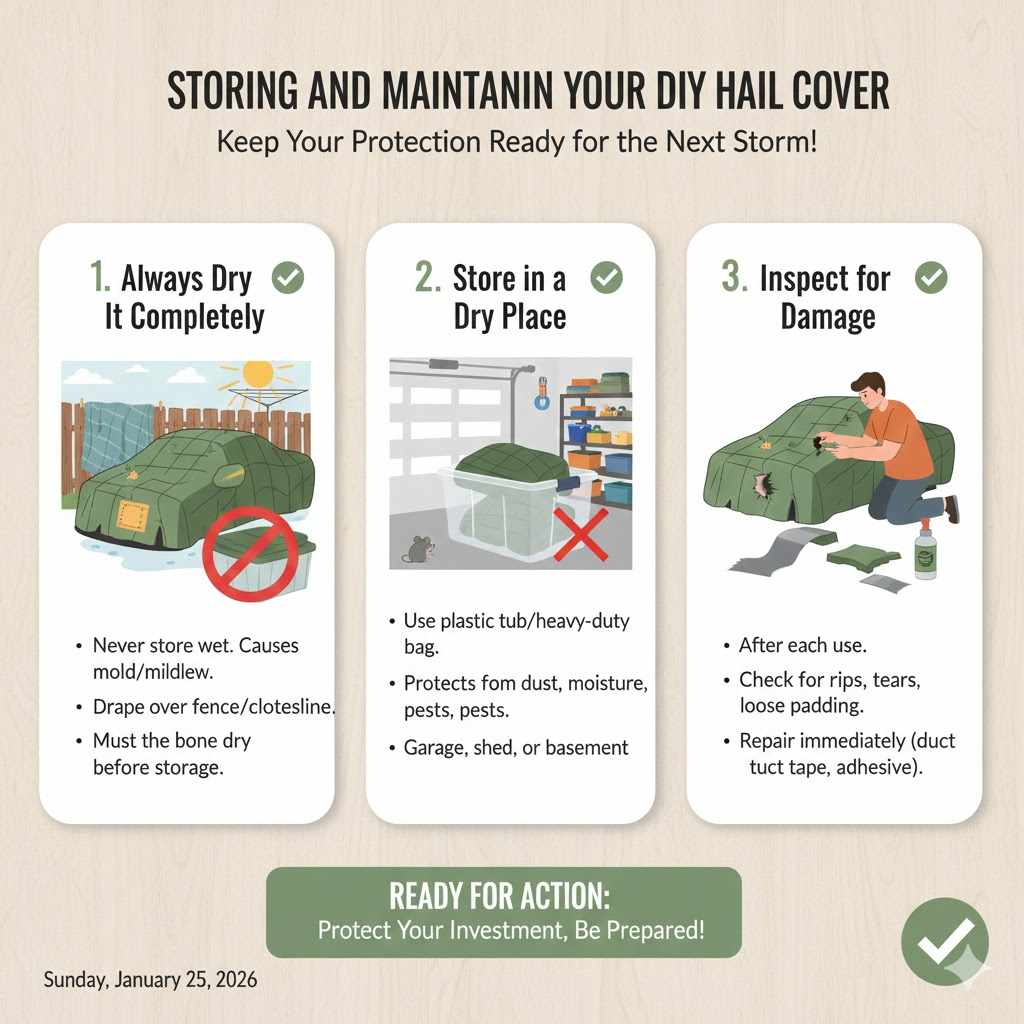
Storing and Maintaining Your DIY Hail Cover
Once the storm has passed, your job isn’t quite done. Proper storage and maintenance will ensure your cover is ready for the next time.
- Always Dry It Completely: Never, ever store your cover while it’s wet. This can lead to mold and mildew, which can damage the cover and even your car’s paint. Drape it over a fence or clothesline until it is bone dry.
- Store in a Dry Place: Keep the cover in a large plastic tub or a heavy-duty bag to protect it from dust, moisture, and pests. Store it in a garage, shed, or basement.
- Inspect for Damage: After each use, inspect the cover for any rips, tears, or areas where the padding has come loose. Make repairs immediately with duct tape or fresh adhesive.
Frequently Asked Questions (FAQ)
Is a DIY hail proof car cover really as effective as a store-bought one?
Yes, it absolutely can be! If you use thick, high-quality padding and secure it properly, a DIY cover can offer comparable or even superior protection. The key is using enough impact-absorbing material (at least 1-2 inches of padding) and ensuring the cover is tightly secured against wind.
How much will this project cost to make?
The cost can vary widely, but you can typically build a very effective cover for between $50 and $150. If you use materials you already have, like old comforters, the cost could be even lower. This is a significant saving compared to commercial covers that often cost $300-$600 or more.
How long does it take to build the hail cover?
For a first-timer, set aside a weekend afternoon. A realistic timeframe is about 3 to 5 hours from start to finish. This includes measuring, cutting, gluing, and test-fitting. The longest part is often waiting for the adhesive to fully dry and cure.
What’s the best padding material for a beginner to use?
Layered moving blankets are arguably the easiest and most forgiving material for a beginner. They are inexpensive, easy to handle, and don’t require precise cutting. They are also soft and won’t scratch your car’s paint. Securing them with a good fabric adhesive is very straightforward.
Can I use this cover for other things, like snow or sun?
Yes! While it’s designed for hail, the thick padding provides excellent insulation. It will help keep heavy snow off your car, making cleanup easier. It also provides a superior barrier against UV rays and heat, keeping your car’s interior cooler in the summer.
Will this heavy cover damage my car’s antenna?
That’s a great question. If you have a fixed mast antenna, you should remove it before putting the cover on. If it’s not removable, you can carefully cut a small slit in the cover, reinforce the hole with duct tape, and guide it over the antenna. For “shark fin” style antennas, make sure your padding has a cutout to go around it, preventing pressure and damage.
How do I know when a hailstorm is coming?
Stay informed by using a reliable weather app on your phone that provides severe weather alerts. You can also listen to your local news or a NOAA Weather Radio. Having advance notice is key to getting your cover on in time.
Conclusion: Your Car is Now Ready for the Storm
There you have it! You’ve successfully learned how to build a robust, custom-fit, and affordable hail-proof car cover. You’ve turned everyday materials into a suit of armor for your vehicle, protecting it from nature’s temper tantrums. You didn’t just save a lot of money; you gained a valuable skill and the peace of mind that comes with being prepared.
The next time those ominous clouds gather and the weather alerts start buzzing, you won’t feel that familiar sense of dread. Instead, you’ll feel confident and ready. You’ll be able to quickly deploy your homemade shield, knowing your car is safe and sound underneath. Give yourself a pat on the back—you’ve just taken a huge step in becoming a more self-reliant and savvy car owner.