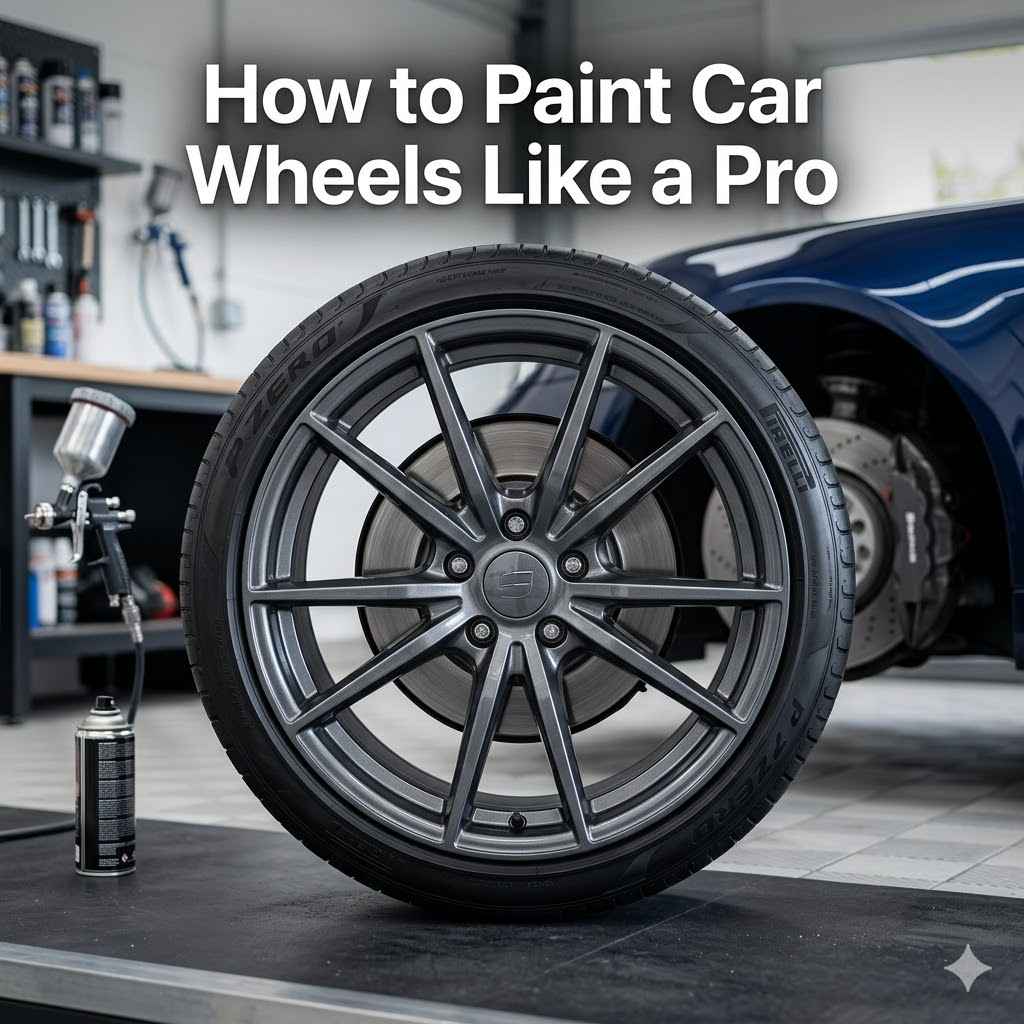
How to Paint Car Wheels Like a Pro
Painting your car wheels can really change how your car looks. It might seem tricky for folks just starting out. You might worry about making a mess or not getting that smooth finish.
But don’t worry! This guide makes How to Paint Car Wheels Like a Pro simple with easy steps. We will show you exactly what to do to get awesome results.
Let’s get your wheels looking fantastic.
Preparing Your Car Wheels for Painting
Getting your wheels ready is super important for paint to stick well. This part means cleaning and smoothing them out. If you skip this, your new paint might peel off or not look good.
We need to remove old paint, dirt, and any rust. This whole process sets the stage for a great looking paint job that lasts.
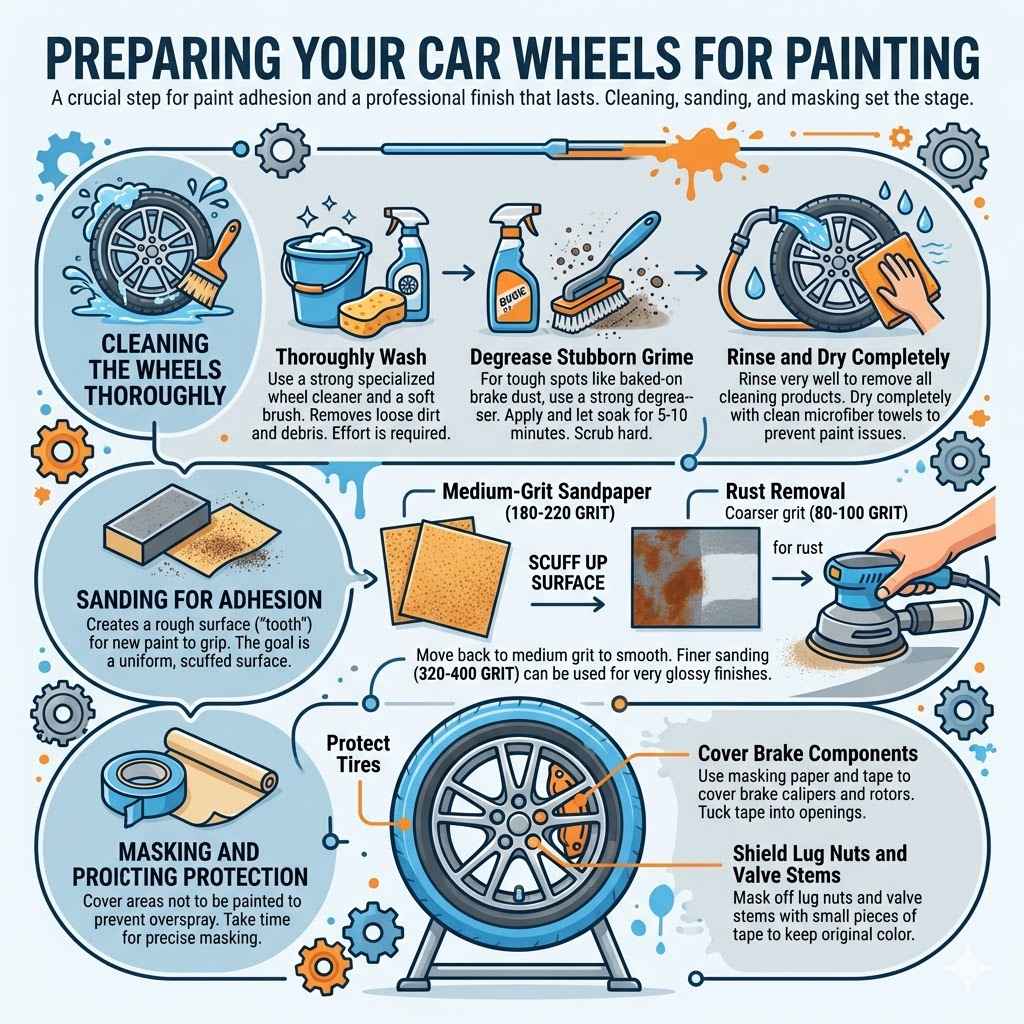
Cleaning the Wheels Thoroughly
Start by giving your wheels a good wash. Use a strong degreaser and a stiff brush. Get into all the nooks and crannies.
You want to remove all grease, brake dust, and road grime. This is not a quick rinse; it needs effort to be done right.
Brake dust is really stubborn. It’s made of tiny metal particles from your brake pads. It bakes onto the wheel surface from the heat of braking.
A regular car soap won’t cut through it. That’s why a specialized wheel cleaner or a strong degreaser is key. Spray it on, let it sit for a few minutes, then scrub hard.
- Thoroughly Wash: Always begin with a good wash. Use a wheel cleaner and a soft brush. This removes loose dirt and debris. It makes it easier to see imperfections you need to fix.
- Degrease Stubborn Grime: For tough spots like brake dust, use a strong degreaser. Apply it and let it soak in for about 5-10 minutes. Then, scrub those areas again. This step is vital for the paint to adhere properly.
- Rinse and Dry Completely: After cleaning and degreasing, rinse the wheels very well. Make sure no cleaning product is left behind. Then, dry them completely with clean microfiber towels. Water spots can cause paint issues later.
Sanding for Adhesion
Once your wheels are clean and dry, it’s time to sand. Sanding creates a rough surface. This “tooth” helps the new paint grip the wheel.
Start with a medium-grit sandpaper, around 180-220 grit. You just need to scuff up the surface, not remove all the old paint.
If there’s any rust, you’ll need to sand that away too. Use a coarser grit sandpaper for rust, maybe 80 or 100 grit. After removing the rust, move back to the medium grits to smooth the area.
The goal is a uniform surface that feels slightly rough to the touch.
After sanding with the medium grit, you might want to go a little finer. Sanding with 320-400 grit sandpaper can make the surface smoother. This helps if you are going for a very glossy finish.
A smoother surface means fewer bumps under the paint.
Masking and Protection
Now, cover up anything you don’t want painted. This includes the tires, brake calipers, and lug nuts. Use painter’s tape and masking paper.
Make sure the tape is applied smoothly. Any gaps can let paint get where you don’t want it.
Take your time with this step. It might seem boring, but it’s very important. Good masking prevents overspray.
Overspray is when paint lands on areas it shouldn’t. It can be very hard to remove once dry.
- Protect Tires: Use wide painter’s tape to cover the sidewalls of your tires. Ensure the tape goes all the way around the rim. This prevents paint from getting on the rubber.
- Cover Brake Components: Use masking paper and tape to cover your brake calipers and rotors. These parts often have specific finishes you want to keep. Carefully tuck the tape into any openings.
- Shield Lug Nuts and Valve Stems: Don’t forget to mask off the lug nuts and valve stems. You usually want these to remain their original color. Use small pieces of tape to cover them precisely.
Choosing the Right Paint and Primer
Picking the correct paint and primer is a big part of getting a professional look. Not all paints are made for wheels. Wheels face harsh conditions, like heat, dirt, and salt.
So, you need special paint designed for this.
Primer acts like glue. It helps the paint stick better to the wheel’s surface. It also fills in tiny scratches from sanding.
Using a good primer means your paint job will last much longer. It also helps achieve a more even color.
Understanding Paint Types for Wheels
For car wheels, you generally want a durable paint. Spray paints designed for automotive use are popular. Look for paints labeled “wheel paint” or “rim paint.” These are formulated to withstand heat, UV rays, and road chemicals.
Enamel paints offer good durability. They are also relatively easy to apply with a spray can. However, some people prefer urethane-based paints.
These are more durable and resistant to chips and scratches. They often require a spray gun for application, which is a bit more advanced.
Here’s a look at common paint types:
| Paint Type | Pros | Cons |
|---|---|---|
| Enamel Spray Paint | Easy to use, widely available, affordable. | May chip more easily than other types, less resistant to harsh chemicals. |
| Urethane Basecoat Clearcoat | Very durable, excellent chip and chemical resistance, high-gloss finish. | Requires a spray gun and more experience, can be more expensive. |
| Powder Coating | Extremely durable, chip and corrosion resistant, factory-like finish. | Requires professional application, wheels must be removed and sent out. |
The Importance of Primer
Primer is essential. It creates a bond between the metal wheel and the topcoat of paint. Without primer, the paint might not stick well.
This can lead to peeling or flaking later on.
There are different types of primers. Etching primers are good for bare metal. They create a strong bond.
High-build primers can help fill in minor imperfections. Choose a primer that is compatible with your chosen topcoat.
- Adhesion Promoter: Use a primer that specifically says it’s an adhesion promoter for metal. This ensures the paint grabs onto the wheel surface effectively.
- Corrosion Protection: Some primers offer rust inhibition. This is especially useful if you had to sand down to bare metal to remove rust. It adds an extra layer of protection.
- Uniform Base Color: Primer provides a consistent color base. This means your topcoat color will look more even and true. It prevents darker old paint from showing through lighter new paint.
Selecting the Right Color and Finish
The color and finish you choose will dramatically affect your car’s look. Black, silver, and gunmetal are popular choices. They offer a sleek and sporty appearance.
You can also go for bold colors to make a statement.
Consider the finish: gloss, satin, or matte. Gloss finishes are shiny and reflective. Satin finishes have a slight sheen.
Matte finishes are non-reflective and have a more subdued look. Think about your car’s current color and style.
Here are some ideas for color and finish combinations:
- Gloss Black: Classic and versatile. Looks great on almost any car color. Provides a sleek, premium look.
- Satin Gunmetal: A modern, sophisticated choice. Offers a subtle sheen that’s not too flashy. It hides brake dust better than gloss black.
- Matte Bronze: A bold and unique option. Stands out and adds a touch of personality. Pairs well with darker car colors or can create a striking contrast with lighter ones.
The Painting Process Step-by-Step
Now for the fun part – painting! This is where your preparation pays off. Work in a well-ventilated area.
Avoid windy or dusty conditions. Patience is key for a smooth, professional finish.
Always follow the instructions on your spray cans. Different brands might have slightly different drying times or application techniques. Taking your time and applying thin coats is better than one thick, messy coat.
Applying Primer Coats
Start with your primer. Shake the can well. Hold the can about 8-12 inches away from the wheel.
Apply light, even coats. Don’t try to cover everything in one go. It’s better to apply several thin coats.
Allow each coat to dry for the time recommended on the can. This is usually about 10-15 minutes. You want to build up a uniform layer of primer.
If you see any drips, you can gently sand them down after the primer is fully dry.
After applying the final primer coat, let it cure completely. Check the can for cure times. This might be a few hours or even overnight.
A fully cured primer ensures the best adhesion for your paint.
Applying Base Color Coats
Once the primer is dry and cured, you can start applying the color. Shake the paint can thoroughly. Again, hold the can 8-12 inches away from the wheel.
Apply the paint in light, even, sweeping motions. Overlap each pass by about 50%. Work your way around the wheel.
Do not stop in the middle of a panel, as this can create uneven lines.
Apply multiple thin coats. Let each coat dry for the recommended time, usually 15-30 minutes. This allows the paint to flash off and become tacky, ready for the next coat.
- Thin Coats are Key: Resist the urge to spray thick layers. Thin coats prevent runs and drips. They also build up a smooth, even finish over time.
- Consistent Motion: Keep the can moving at a steady speed. This ensures even paint distribution. Stop-and-start spraying creates uneven spots.
- Allow Drying Time: Patience is crucial here. Each coat needs to dry properly before the next is applied. Rushing this step can lead to a poor finish.
Applying Clear Coat for Protection and Shine
The clear coat is your protective layer. It adds shine and guards against scratches and UV damage. Apply it in the same way you applied the base color.
Make sure your base color has flashed off properly but is not fully cured. Check the paint can for recommended re-coat times. Apply 2-3 thin coats of clear coat for best results.
If you are going for a matte finish, you will use a matte clear coat. For a gloss finish, use a gloss clear coat. Ensure you use a clear coat compatible with your base paint.
Here is a sample application sequence:
- Apply first coat of clear coat evenly.
- Wait 15-20 minutes for it to become tacky.
- Apply second coat of clear coat.
- Wait another 15-20 minutes.
- Apply third and final coat of clear coat.
Curing and Reassembly
After painting, the wheels need to cure. This is when the paint hardens completely. Check the paint can for cure times.
This can take anywhere from 24 hours to several days. Avoid touching or driving on the wheels until they are fully cured.
Once cured, carefully remove all the painter’s tape and masking paper. Do this gently to avoid peeling any paint. Reinstall your wheels onto the car.
Torque the lug nuts to the manufacturer’s recommended setting.
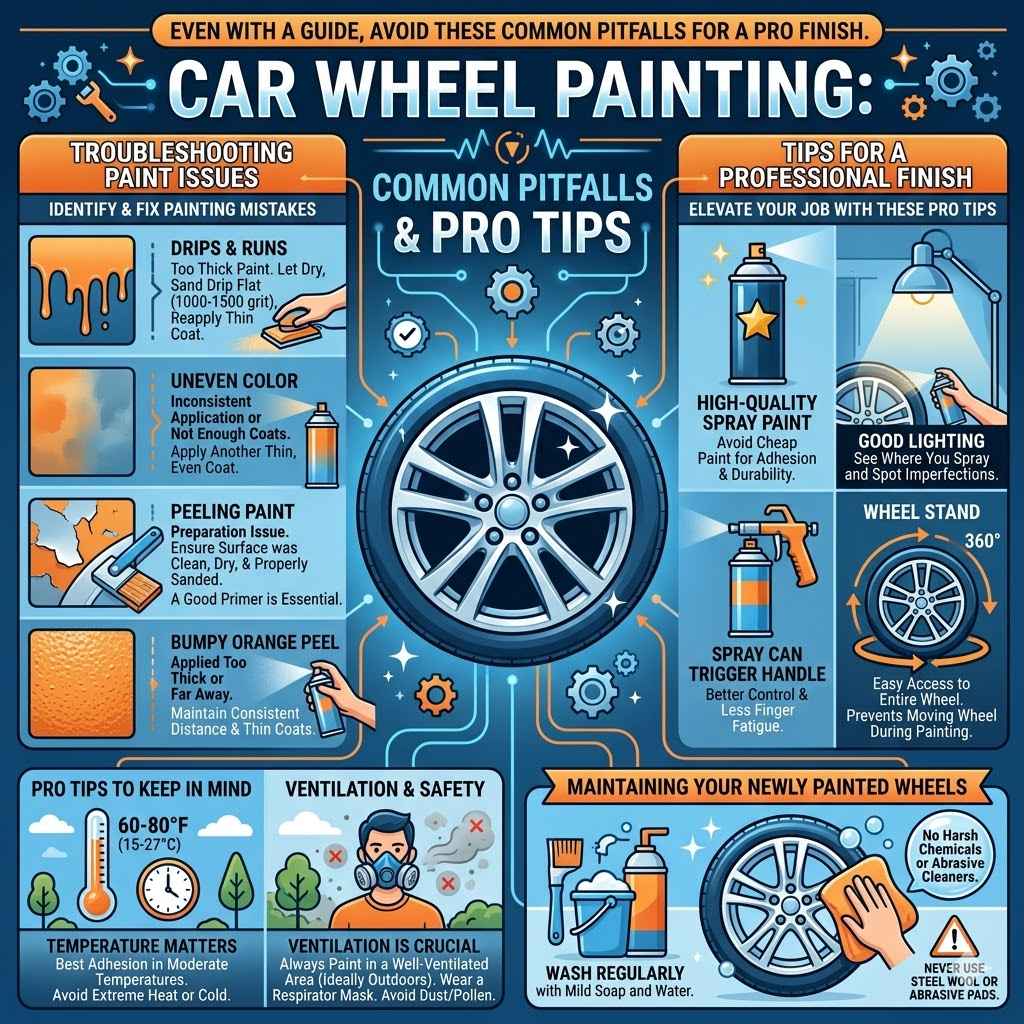
Common Pitfalls and Pro Tips
Even with a guide, things can go wrong. Knowing common problems can help you avoid them. These tips are what separate an amateur job from a pro finish.
A common mistake is not preparing the surface well enough. This leads to paint not sticking. Another is applying paint too thick.
This causes drips and an uneven look.
Troubleshooting Paint Issues
If you get drips, let the paint dry. Then, gently sand the drip smooth with fine-grit sandpaper (around 1000-1500 grit). Wipe clean and reapply a thin coat.
If the paint looks bumpy or orange peel like, it might be applied too thick or too far away. Try to maintain a consistent distance and apply thin coats.
- Uneven Color: If you notice patchy coverage, it might be due to not enough coats or inconsistent application. Apply another thin, even coat.
- Peeling Paint: This is usually a preparation issue. Ensure the surface was clean, dry, and properly sanded before painting. A good primer is also essential.
- Runs and Drips: These happen when paint is applied too thickly. Let it dry, sand the drip flat, and reapply a thin coat.
Tips for a Professional Finish
Use high-quality spray paint. Cheap paint often has poor adhesion and durability.
Work in good lighting. This helps you see where you are spraying and spot any imperfections.
Consider using a spray can trigger handle. This gives you better control and reduces finger fatigue.
Here are some pro tips to keep in mind:
- Use a Wheel Stand: If possible, place the wheel on a stand or bucket. This allows you to easily access the entire wheel surface, including the inner barrel. It prevents you from having to move the wheel during painting.
- Temperature Matters: Paint adheres best in moderate temperatures, usually between 60-80°F (15-27°C). Avoid painting in extreme heat or cold, as this affects drying and curing.
- Ventilation is Crucial: Always paint in a well-ventilated area, ideally outdoors. Wear a respirator mask to protect yourself from fumes. Ensure there’s no dust or pollen that can settle on the wet paint.
Maintaining Your Newly Painted Wheels
Once your wheels are painted and cured, take care of them. Wash them regularly with mild soap and water. Avoid harsh chemicals or abrasive cleaners.
This will help keep your paint looking great for a long time.
When cleaning, use a soft cloth or sponge. Never use steel wool or abrasive pads, as these can scratch the paint. Regular cleaning also helps you spot any potential damage early on.
Frequently Asked Questions
Question: How long does it take to paint car wheels?
Answer: The actual painting process might take a few hours, but with preparation, drying, and curing time, it can take 1-3 days. Allow at least 24 hours for the paint to fully cure before driving.
Question: Can I paint my car wheels without removing them?
Answer: Yes, you can paint wheels while they are on the car, but it’s much harder to get a good finish. Removing them allows for thorough preparation and even coating on all sides.
Question: What grit sandpaper should I use for painting wheels?
Answer: Start with a medium grit like 180-220 for scuffing the surface and removing imperfections. If you have rust, start coarser (80-100 grit) and then move to finer grits (320-400) for a smoother finish before priming.
Question: How many coats of paint do I need?
Answer: For both primer, base color, and clear coat, aim for 2-4 thin, even coats. This ensures good coverage and a durable finish without drips or runs.
Question: Can I paint over chrome or polished aluminum wheels?
Answer: Yes, but it requires careful preparation. You’ll need to sand the chrome or aluminum surface thoroughly and use an etching primer designed for smooth, non-porous surfaces to ensure paint adhesion.
Final Thoughts
Learning how to paint car wheels like a pro is achievable. It requires careful preparation, the right materials, and patience during application. By following these steps, you can transform your wheels and give your car a fresh new look that lasts.