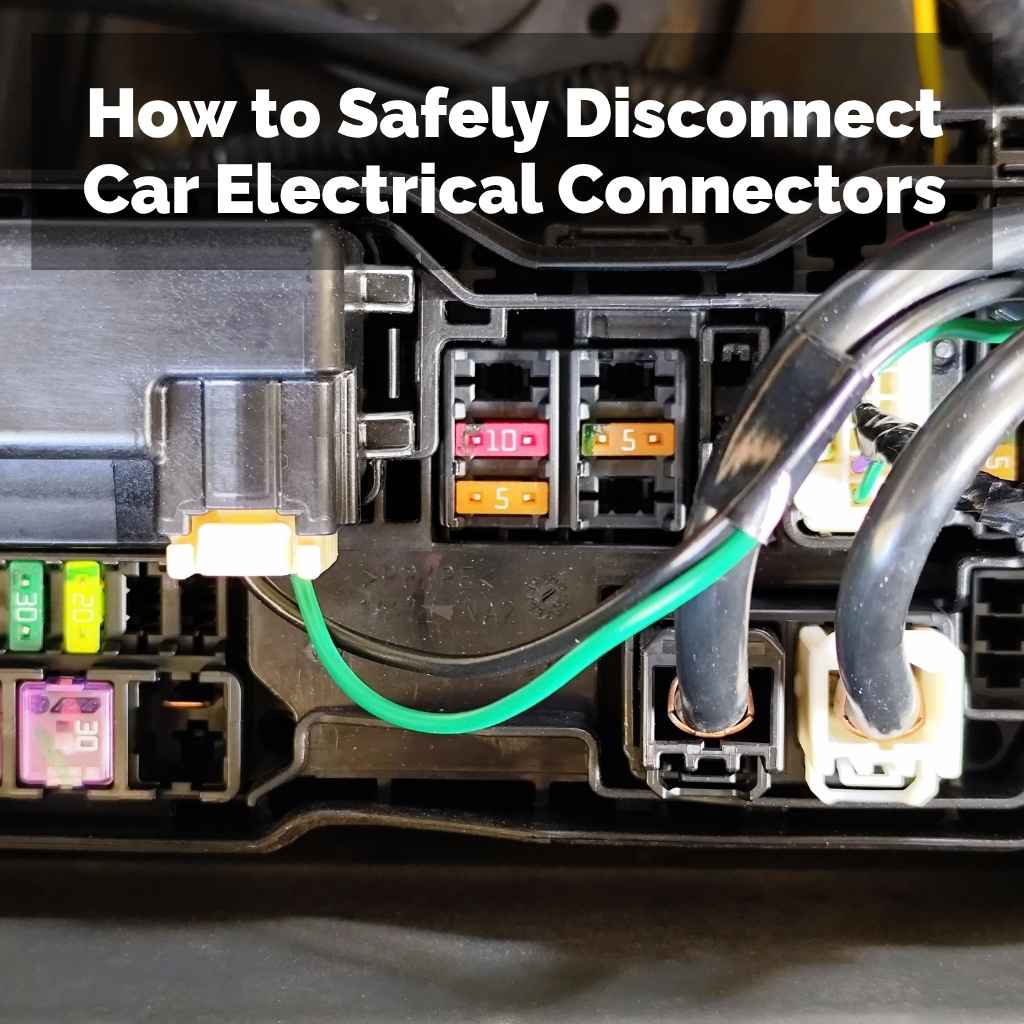
How to Safely Disconnect Car Electrical Connectors
Working on your car can be exciting, but sometimes dealing with wires and connectors can feel a bit tricky, especially if you’re new to it. Many people worry about damaging something important when they need to unplug a car electrical connector. It’s easy to feel unsure.
But don’t worry! This guide will walk you through How to Safely Disconnect Car Electrical Connectors with simple, easy-to-follow steps. We’ll make sure you know exactly what to do next.
Understanding Car Electrical Connectors
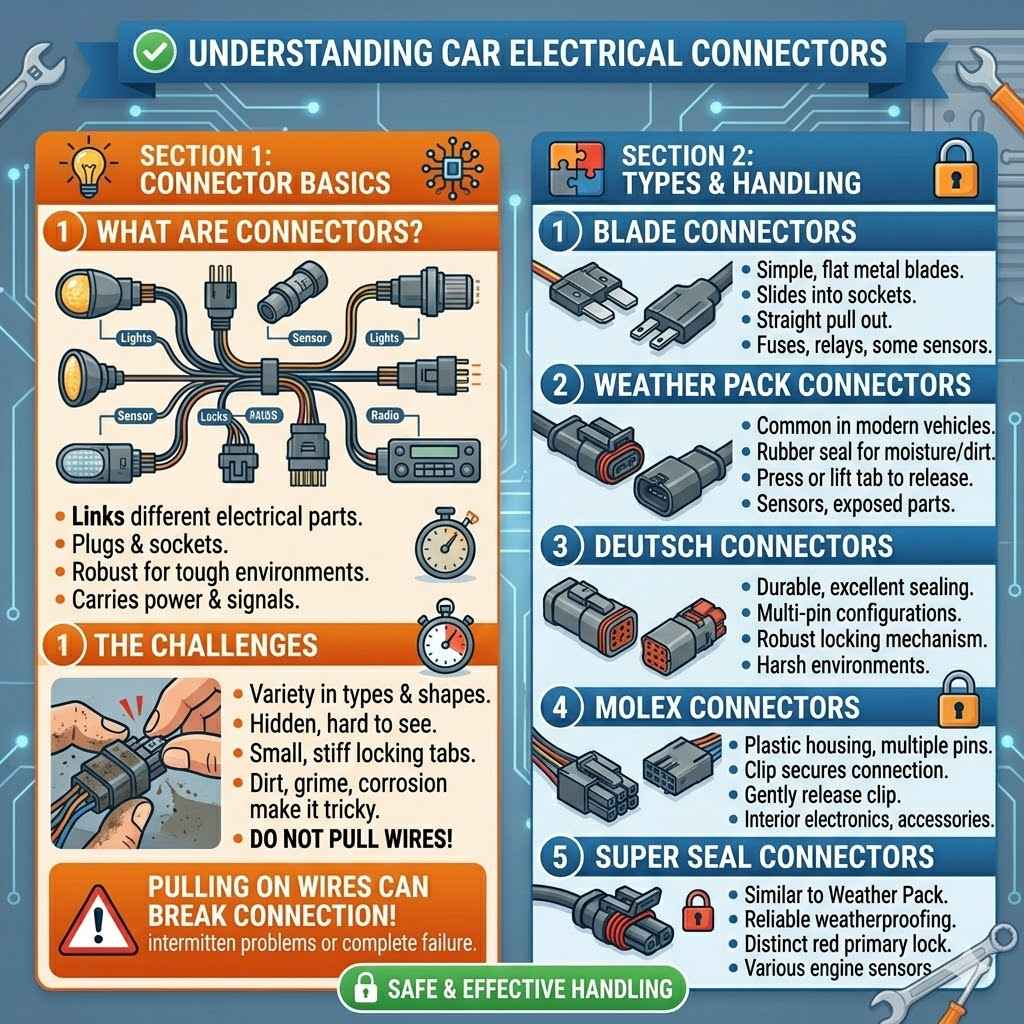
Car electrical connectors are the little plugs and sockets that link different parts of your car’s electrical system. Think of them like the plugs for your home appliances, but much more specialized and robust to handle the tough environment inside a vehicle. These connectors are designed to carry electrical power and signals from one component to another.
Without them, your car’s lights, radio, engine sensors, and all its electronic gadgets wouldn’t work. They are vital for the smooth operation of every system in your car.
The challenge for many beginners lies in their variety and the mechanisms used to secure them. Some connectors are simple push-in types, while others have locking tabs, retaining clips, or even small levers that need to be manipulated correctly. If you pull on the wires instead of the connector body, you can break the connection inside the wire or damage the connector itself.
This can lead to intermittent problems or complete electrical failure.
Common Types of Car Electrical Connectors
There are many types of electrical connectors used in cars. Knowing the basic ones can help you identify them and handle them with care. These connectors are designed to withstand vibration, moisture, and temperature changes.
They often have specific shapes and colors to indicate their purpose or voltage rating.
Some common examples include:
- Blade Connectors: These are simple, flat metal blades that slide into matching sockets. They are often used for fuses, relays, and some sensor connections. They usually don’t have complex locking mechanisms, but it’s still important to pull them straight out.
- Weather Pack Connectors: These are very common in modern vehicles, especially for sensors and components exposed to the elements. They have a rubber seal to keep out moisture and dirt, and a locking tab that needs to be pressed or lifted to release.
- Deutsch Connectors: Similar to Weather Pack connectors, Deutsch connectors are also designed for harsh environments and are known for their durability and sealing capabilities. They often feature multiple pins and robust locking mechanisms.
- Molex Connectors: While more common in computers, some automotive applications use Molex-style connectors. These usually have a plastic housing with multiple pins and a clip that secures them.
Each type of connector has a specific way it needs to be disconnected. Forcing the wrong method can easily break the small plastic tabs or release mechanisms, making future connections difficult or impossible. A little bit of knowledge about these common types goes a long way in preventing damage.
Why Disconnecting Can Be Tricky
Disconnecting car electrical connectors can seem straightforward, but many people run into issues. This is because connectors are often hidden away, making them hard to see and reach. The locking tabs can be small and stiff, sometimes requiring a bit of pressure or a specific tool to release.
Over time, dirt, grime, and corrosion can make these tabs even harder to work with, or they can break off entirely.
Another common pitfall is pulling on the wires instead of the connector housing itself. The wires are only crimped onto the metal pins inside the connector. If you pull the wires, you can weaken or break this connection, leading to a fault.
This can cause a variety of problems, from a warning light on your dashboard to a component that stops working altogether. Many DIY mechanics have learned this lesson the hard way, leading to frustrating and costly repairs.
When you need to remove a component for repair or replacement, disconnecting its electrical connectors is the first step. If done incorrectly, you might not be able to reassemble it properly, or worse, you could cause damage that wasn’t there before. The goal is always to preserve the integrity of both the connector and the wiring.
How to Safely Disconnect Car Electrical Connectors Step By Step
Learning how to safely disconnect car electrical connectors is a valuable skill for anyone working on their vehicle. It prevents damage to delicate electrical components and wiring, saving you time and money on repairs. Follow these steps carefully to ensure you disconnect connectors without issues.
Preparation and Safety First
Before you touch any electrical connector, safety is the absolute priority. Working with a car’s electrical system can be dangerous if you’re not careful. Always take a few moments to prepare and ensure a safe working environment.
This simple preparation can prevent shocks and damage.
- Disconnect the Battery: This is the most important safety step. Always disconnect the negative (-) battery terminal first. This prevents any accidental short circuits while you are working. You can use a wrench to loosen the nut on the negative terminal clamp and then lift the cable off the post. Ensure the cable doesn’t touch the battery post again.
- Wear Safety Glasses: Electrical components can sometimes spark or release small debris. Safety glasses protect your eyes from potential hazards.
- Work in a Well-Lit Area: Good lighting is crucial for seeing small connectors and their locking mechanisms clearly. If you’re working in a dimly lit garage, use a flashlight or headlamp.
- Keep Tools Organized: Have the necessary tools ready, such as a small flathead screwdriver, a pick set, or specialized plastic trim tools. Keep them within easy reach to avoid fumbling around.
Once these steps are completed, you can proceed to identify and disconnect the specific connector you need to work with. Remember, patience is key. Rushing can lead to mistakes and damage.
Identifying the Connector and Its Latch
Every electrical connector in a car has a way it’s secured. It’s usually a small tab or clip that prevents it from vibrating loose. You need to find this locking mechanism before attempting to disconnect it.
Often, these latches are made of plastic and can be brittle, especially in older vehicles.
Spend a moment to visually inspect the connector. Follow the body of the connector and look for any small levers, tabs, or buttons. They might be on the side, top, or bottom of the connector.
Some connectors have a dual-latch system, meaning you need to release two points simultaneously. Take your time to understand how it works before you apply any force.
If the connector is dirty or covered in grease, carefully clean it with a degreaser or electrical contact cleaner. This will make the locking tab more visible and easier to operate. Sometimes, a gentle wiggle can also help you locate the flexible part of the latch.
The Disconnection Process
Once you’ve found the locking tab, the actual disconnection process is usually quite simple, but it requires precision. The key is to disengage the lock before pulling the connector apart. Never just yank on the wires or the connector body hoping it will come apart.
This is where most damage occurs.
Here’s how to do it:
- Locate the Latch: As discussed, find the specific tab or lever that holds the connector in place.
- Engage the Latch: Most latches need to be pressed, squeezed, or lifted. Use your finger, a small flathead screwdriver, or a plastic trim tool to carefully operate the latch. For pressing tabs, a gentle push is usually all that’s needed. For squeeze-type latches, apply even pressure.
- Pull the Connectors Apart: While holding the latch in the disengaged position, gently pull the two halves of the connector straight apart. Wiggling them slightly might help if they are stuck. Always pull on the connector housings themselves, never on the wires coming out of them.
- Inspect for Damage: Once separated, check both the male and female ends of the connector for any bent pins, broken plastic, or corrosion.
If a connector seems stuck, don’t force it. Re-examine the latch mechanism. Sometimes, there’s a hidden tab or a second latch you might have missed.
Applying a small amount of dielectric grease to the connector seals upon reassembly can prevent future sticking.
Handling Stubborn Connectors
Sometimes, electrical connectors can be very difficult to disconnect. This is often due to age, corrosion, or dirt buildup. If you encounter a stubborn connector, it’s important to remain patient and use the right techniques to avoid causing damage.
Forcing can lead to broken tabs or even damage to the wires.
Here are some tips for dealing with stubborn connectors:
- Use a Release Tool: For many types of connectors, especially those with recessed latches, specialized plastic release tools can be very effective. These tools are designed to fit into tight spaces and apply pressure to the latch without damaging it. They are available in various shapes and sizes for different connector types.
- Apply Gentle Heat (with Caution): In some cases, a very small amount of heat can help loosen a stuck connector, especially if it’s made of plastic and has been exposed to extreme temperatures. Use a hairdryer on a low setting, not a heat gun, and apply heat briefly to the connector housing. Be extremely careful not to overheat or melt the plastic.
- Lubricate the Latch: A small amount of penetrating oil or a specialized electrical contact cleaner can sometimes help free up a stiff or corroded latch. Apply it directly to the latch mechanism and let it sit for a few minutes before attempting to operate it again.
- Work Both Sides: If the connector has multiple latching points, try to release them simultaneously or in quick succession. Sometimes, applying slight pressure to hold one side while releasing the other can work.
Remember, if a connector is really resistant, it might be best to seek advice from a professional mechanic. They have more experience and specialized tools that can help. The goal is to get the job done without creating a new problem.
Reconnecting Car Electrical Connectors
Reconnecting car electrical connectors is just as important as disconnecting them. A secure connection ensures proper electrical flow and prevents issues down the line. It also means your car’s systems will function correctly after your repair or maintenance work.
Ensuring Proper Alignment
When it’s time to reconnect, the first step is to make sure you are aligning the two halves of the connector correctly. Most connectors are keyed, meaning they only fit together in one specific orientation. Look for matching shapes or notches on both the male and female ends.
Trying to force a connector that isn’t aligned can bend pins or damage the housing.
Take a moment to compare the two parts. Ensure there are no obstructions, like dirt or debris, inside the connector or on the pins that could prevent a clean connection. If you find any, gently clean them out.
A clean connection is a strong connection.
Securing the Latch
After aligning the connector halves, gently push them together. You should feel them slide into place. Once they are fully seated, you will usually hear or feel a distinct “click” as the locking mechanism engages.
This click is your confirmation that the connector is securely fastened.
If you don’t hear or feel a click, do not assume it’s connected. Gently pull the connector apart and try pushing it together again, ensuring you’ve applied firm, even pressure. Sometimes, you might need to manually ensure the latch is fully engaged by pushing it back into its locked position after the connectors have mated.
This ensures the connector won’t come loose due to vibrations.
Testing the Connection
The final, crucial step is to test that your connection is working as expected. After reconnecting, you should always reattach the negative battery terminal, tighten it, and then test the component or system you were working on. For example, if you reconnected a headlight, turn on your headlights to see if they work.
If the component still isn’t working, or if a warning light comes on, the first thing to check is your electrical connection. It might not have been fully seated, the latch may not have engaged properly, or you might have accidentally damaged a wire or pin during the process. Double-check the connection and, if necessary, disconnect and reconnect it carefully.
Consider this scenario: You’ve replaced a faulty oxygen sensor. After reconnecting its electrical connector, you start the car. If the check engine light that was on previously is now off, and the engine runs smoothly, your connection is likely good.
If the light stays on or the engine still runs rough, re-inspect the connector and the sensor wiring.
Tools and Techniques for Handling Connectors
Having the right tools makes all the difference when you’re dealing with car electrical connectors. While you might be tempted to use a general-purpose tool, specialized instruments are often designed to prevent damage and make the job easier. Using the correct tools is an important part of knowing how to safely disconnect car electrical connectors.
Essential Tool Kit for Connectors
A small, well-chosen set of tools can significantly simplify working with electrical connectors. These tools are usually inexpensive and can save you a lot of frustration. Think of them as precision instruments for your car’s wiring.
- Plastic Trim Removal Tools: These are invaluable for prying apart plastic panels that might be covering connectors, without scratching or damaging the surrounding trim. They come in various shapes, including flat pry bars and spudgers.
- Electrical Contact Cleaner: This spray helps remove dirt, oil, and corrosion from electrical contacts and connector housings. It evaporates quickly and leaves no residue, ensuring a clean connection.
- Dielectric Grease: Applied to the seals and mating surfaces of connectors, dielectric grease protects against moisture and corrosion, making future disconnections easier and preventing electrical shorts.
- Pick Set: A set of small, fine picks (like those used for electronics or jewelry) can be very useful for gently lifting or manipulating small locking tabs that are hard to reach with fingers.
- Small Flathead Screwdrivers: Various sizes of small flathead screwdrivers can sometimes be used to carefully lever or press connector latches. However, be cautious, as metal screwdrivers can easily damage plastic tabs.
Having these items in your toolbox means you’re prepared for most common connector issues you might encounter during car maintenance or repairs.
Specialized Connector Release Tools
For many modern car connectors, especially sealed ones like Weather Pack or Deutsch connectors, specialized release tools are almost essential. These tools are designed to safely disengage the locking mechanisms without breaking them.
These tools work by reaching into the connector housing and actuating the internal locking pins or tabs. They often have specific shapes that fit precisely around the connector pins or slide into slots to release the locks. Using the wrong tool or technique can easily break the plastic retaining clips, making the connector difficult or impossible to secure properly later.
For example, a Weather Pack connector might require a tool that slides between the two halves to release the internal locking bar. Without this tool, trying to pry it apart can damage the bar or the housing. You can often find kits with a variety of tools for different common connector types used by major automotive manufacturers.
Best Practices to Avoid Damage
The primary goal when handling electrical connectors is to avoid damage. This ensures the electrical system remains reliable and prevents costly repairs. Simple, consistent practices can prevent most common problems.
- Never Pull on Wires: Always grasp the connector body itself when disconnecting. The wires are only attached to internal pins, and pulling them can break these connections.
- Identify the Latch First: Before applying any force, take the time to find and understand how the connector’s latching mechanism works.
- Use the Right Tool: If a latch is stiff or recessed, use a plastic trim tool or a specialized release tool rather than a metal screwdriver.
- Be Gentle: Most connector latches are made of plastic and can be brittle. Apply steady, gentle pressure rather than brute force.
- Inspect After Disconnecting: Always check both halves of the connector for any bent pins, broken tabs, or other damage.
- Clean Connectors: Dirt and corrosion can make connectors stick. Cleaning them with electrical contact cleaner can help.
Following these best practices will help you maintain the integrity of your car’s electrical system and make your DIY repairs much more successful. For instance, a study by the Automotive Aftermarket Suppliers Association found that improper connector handling is a leading cause of electrical faults after repair, contributing to an estimated 15% of comebacks.
Common Mistakes to Avoid
Even with the best intentions, it’s easy to make mistakes when disconnecting car electrical connectors. Being aware of these common pitfalls can help you steer clear of them and ensure a smooth repair process. Preventing these errors saves time and money.
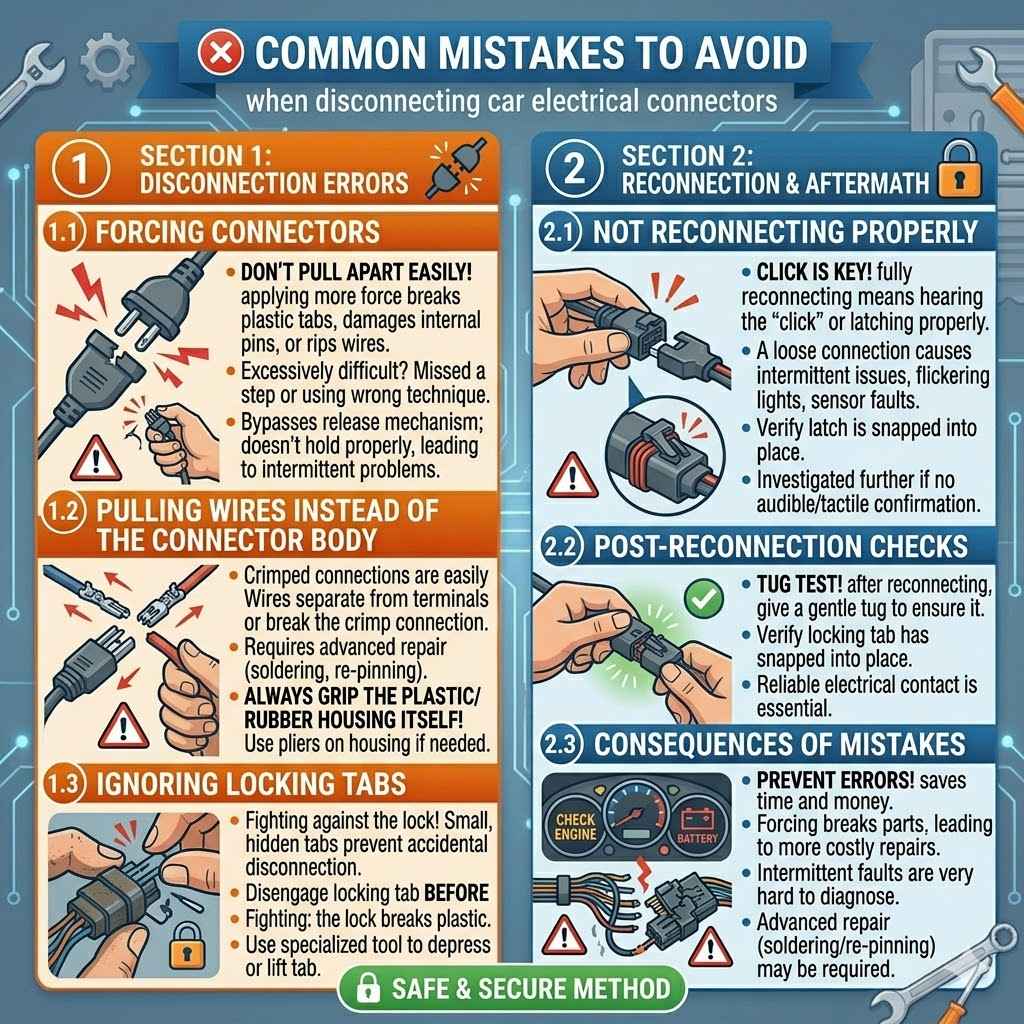
Forcing Connectors
This is perhaps the most common and damaging mistake. When a connector doesn’t pull apart easily, the instinct for some is to apply more force. This often results in broken plastic tabs, damaged internal pins, or even ripped wires.
Remember, if it feels excessively difficult, you are likely missing a step or using the wrong technique.
Most connectors are designed to release with a specific action. Forcing them bypasses this release mechanism. A connector that is supposed to click when secured will not hold properly if its latch is broken from being forced.
This can lead to intermittent electrical problems that are very hard to diagnose later.
Pulling Wires Instead of the Connector Body
The wires attached to electrical connectors are crimped onto metal terminals inside the connector housing. These crimps are strong for normal use but can be easily damaged by pulling on the wires. If you pull the wires, you might break the crimp connection, leaving the terminal behind in the connector or separating the wire from the terminal altogether.
This requires advanced repair techniques like soldering or re-pinning the connector.
Always grip the plastic or rubber housing of the connector itself. This part is designed to be handled. If the connector is difficult to grip with your fingers, use pliers carefully on the housing, or use a tool to gain better leverage.
The wire harness should always be left undisturbed.
Ignoring Locking Tabs
Many connectors have sophisticated locking tabs that prevent them from coming apart accidentally. These tabs are often small and can be hidden. If you don’t disengage the locking tab before pulling the connector apart, you are essentially fighting against the lock, which can lead to broken plastic.
This is where using a small pick or a specialized tool can be essential to depress or lift the tab correctly.
Some locking tabs are one-time use and must be fully released. Others are designed to be pressed and then can be pulled apart. Always visually inspect the connector to find these tabs.
They are the key to a safe disconnection.
Not Reconnecting Properly
The mistakes don’t end with disconnection. A common error is not fully reconnecting the connector. This means the “click” wasn’t heard, or the latch wasn’t re-engaged properly.
A loose connection can cause all sorts of intermittent issues, from a flickering light to a sensor that randomly throws a fault code. It’s crucial to ensure the connector is fully seated and the latch is securely locked.
After reconnecting, give the connector a gentle tug to make sure it’s secure. Verify that the locking tab has indeed snapped into place. If there’s no audible or tactile confirmation of a lock, it’s worth investigating further to ensure it’s properly secured.
A properly secured connector ensures reliable electrical contact.
Frequently Asked Questions
Question: What happens if I pull a car electrical connector too hard
Answer: If you pull a car electrical connector too hard, you risk breaking the plastic locking tabs, damaging the pins inside the connector, or even tearing the wires away from their terminals. This can lead to intermittent electrical problems or a complete failure of the component the connector serves.
Question: Do I need to disconnect the battery before unplugging any connector
Answer: While it is safest to disconnect the negative battery terminal before working on any electrical component to prevent short circuits, for very simple, low-voltage connectors like a radio plug, it might not be strictly necessary. However, for safety and to avoid potential damage to sensitive electronics, disconnecting the battery is always the recommended first step.
Question: Can I use pliers to pull off a car electrical connector
Answer: It is generally not recommended to use pliers directly on the connector housing unless absolutely necessary and done with extreme care. Pliers can easily crush or damage the plastic housing, especially on delicate connectors. It’s better to use your hands or specialized plastic trim tools.
Question: What is dielectric grease and why should I use it
Answer: Dielectric grease is a non-conductive silicone-based lubricant. It’s used on electrical connectors to seal them against moisture and corrosion, and it also helps lubricate the connector mating surfaces, making future disconnections easier. This protection is especially important for connectors exposed to the elements.
Question: How do I know if a connector is properly reconnected
Answer: Most electrical connectors will make an audible “click” when they are properly seated and the locking mechanism is engaged. You should also feel a firm connection when gently tugging on the connector. If you don’t hear or feel a click, try pushing them together again firmly.
Conclusion
Safely disconnecting and reconnecting car electrical connectors is a straightforward process when you know the right steps. Always prioritize safety by disconnecting the battery and use the correct tools to avoid damage. Identifying the locking mechanism and disengaging it before pulling is key.
Then, ensure a secure connection with a click when reconnecting. This knowledge empowers you to handle your car’s wiring with confidence.