How To Remove A Decal From Car: Proven, Effortless Guide
Easily remove car decals with heat and patience! This guide shares proven methods to lift stubborn stickers without damaging your paint, making your car look fresh and clean in no time.
Hey there, fellow car lovers! Md Meraj here. Ever look at your car and think, “That sticker has got to go?” Maybe it’s an old dealership sticker, a personalized decal you’ve outgrown, or just something that’s faded and peeling. Whatever the reason, removing a decal from your car can feel like a huge task. You worry about scratching the paint or leaving behind sticky residue. But don’t sweat it! With the right approach, it’s a surprisingly simple DIY job. We’ll walk through exactly how to do it, step-by-step, so you can give your car a clean, updated look without any stress. Let’s get your car looking its best!
Getting that stubborn decal off your car without leaving a mess or harming the paintwork is a common challenge for many car owners. Whether it’s a bumper sticker that’s seen better days, a window decal from a previous owner, or even just a faded graphic, knowing how to remove it properly can save you time and money on professional detailing. This guide is designed with you, the everyday driver, in mind. We’ll break down the process into easy-to-follow steps, using common household items or readily available tools. You don’t need to be a mechanic to do this; just a little patience and the right technique will have your car looking pristine again.
Why Removing Decals Is Important
Decals, while sometimes fun or informative, can become eyesores over time. They can:
- Fade and crack due to sun exposure, looking unsightly.
- Leave behind sticky residue that attracts dirt and grime.
- Peel unevenly, making the area look messy.
- Potentially harbor moisture underneath, which could lead to rust on older vehicles (though this is less common with modern car paints).
- Detract from the overall aesthetic you want for your car.
Removing them not only improves your car’s appearance but also maintains its value and protects the paint. This guide will show you how to achieve a smooth, decal-free finish.

Gathering Your Supplies
Before you start, having the right tools makes the job much easier and safer for your car’s paint. Here’s what you’ll need:
- Heat Source: A hairdryer on a medium to high setting is ideal. A heat gun on a low setting can also work, but be very careful not to overheat the paint.
- Scraping Tool: A plastic razor blade, a paint-safe decal remover tool, or even an old credit card can work. Avoid metal razor blades as they can easily scratch paint.
- Cleaning Solution: Isopropyl alcohol (rubbing alcohol), a dedicated car decal remover spray, or even a mixture of warm water and dish soap.
- Lubricant/Solvent: Goo Gone, WD-40, or olive oil can help break down stubborn adhesive.
- Soft Cloths: Microfiber towels are best for cleaning without scratching.
- Bucket of Warm Water: For rinsing or applying a soapy solution.
- Gloves (Optional but recommended): To protect your hands from solvents.
Step-by-Step Guide to Removing Car Decals
Follow these simple steps to remove almost any decal from your car’s surface.
Step 1: Prepare the Area
Start by washing the area around the decal with soap and water. This removes any dirt or grit that could scratch your paint during the removal process. Dry the area thoroughly with a clean microfiber towel.
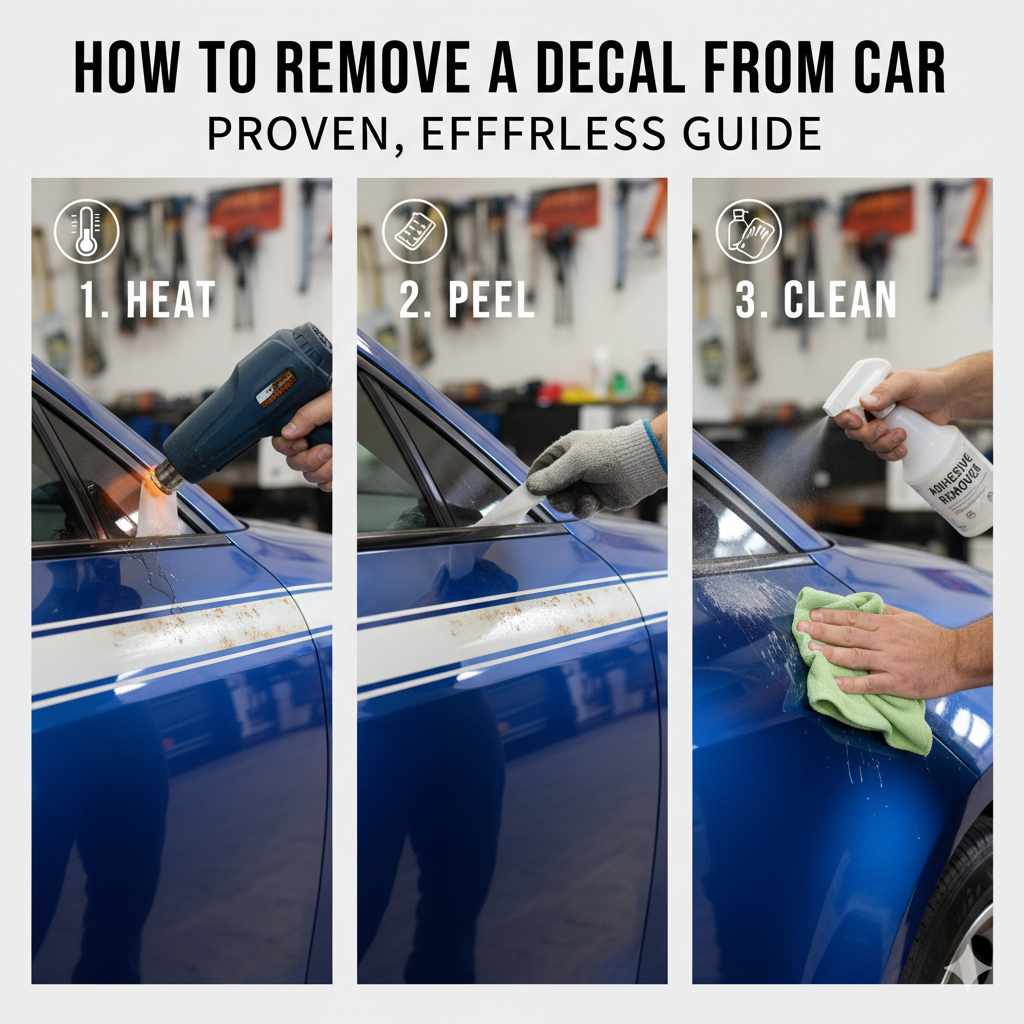
Step 2: Apply Heat to Loosen the Adhesive
This is the most crucial step. Most decals are held on by adhesive that softens when heated. Hold your hairdryer about 6-8 inches away from the decal. Move it back and forth over the entire surface of the decal for about 30-60 seconds. You want the decal to feel warm to the touch, not hot. Overheating can damage your car’s paint. Repeat this process if needed, heating sections of the decal incrementally.
Expert Tip: If using a heat gun, set it to the lowest setting and keep it moving constantly. Maintain a distance of at least 8-10 inches to prevent paint damage. Patience is key here – don’t try to rush the heating process.
Step 3: Begin Peeling or Scraping
Once the decal feels warm and pliable, try to lift an edge with your fingernail or the edge of your plastic razor blade/credit card. Once you get an edge up, try to peel the decal away slowly. Apply steady, gentle pressure. If the decal starts to tear or the adhesive is still too strong, apply more heat to that section and try again. Continue to peel at a low angle, working your way across the decal.
If peeling isn’t working or the decal is very brittle, use your plastic scraper. Hold it at a shallow angle (around 30 degrees) against the car’s surface. Gently push under the edge of the decal while applying heat. Work in small, controlled motions to avoid scratching the paint. You may need to reapply heat intermittently as you work.
Step 4: Tackle Stubborn Residue
After the main decal is removed, you’ll likely have some sticky adhesive residue left behind. This is where your cleaning solutions come in handy.
- Isopropyl Alcohol: Dampen a microfiber cloth or paper towel with isopropyl alcohol and rub the residue in a circular motion. It should start to break down and ball up.
- Specialty Removers: Products like Goo Gone or 3M Adhesive Remover are designed specifically for this. Apply the product according to its instructions, let it sit for a few minutes to work, and then gently rub the residue away with a cloth. For more information on common automotive cleaning products, the U.S. Consumer Product Safety Commission offers general safety tips for household products.
- WD-40 or Oil: These can also work as lubricants to break down adhesive. Spray a small amount onto the residue, let it sit, and then wipe away.
Continue applying heat if needed, especially for very old or tough adhesive. Work in small sections, applying your chosen solvent and gently rubbing with a clean cloth.
Step 5: Clean the Area Thoroughly
Once all the decal and residue are gone, wash the area again with car soap and water to remove any remaining solvent or cleaner. Rinse thoroughly and dry with a clean microfiber towel. You can then apply a coat of car wax to the area to protect the paint and restore its shine.
Different Types of Decals and How to Remove Them
While the heat and scrape method works for most decals, some may require slight adjustments.
| Decal Type | Best Removal Method | Considerations |
|---|---|---|
| Vinyl Decals (most common stickers) | Heat + Plastic Scraper + Adhesive Remover | Vinyl can melt if overheated. Be patient with the heating process. |
| Paper-based Stickers (e.g., old inspection stickers on windshields) | Soaking with warm, soapy water + Gentle Scraping | Paper can disintegrate. Avoid excessive scrubbing. May require soaking for a longer period. |
| Reflective Decals | Heat + Careful Scraping | The reflective layer can be fragile. Work slowly and avoid aggressive scraping. |
| Graphics/Wraps (large sections) | Professional Removal Recommended (or specialized tools) | These are complex and require specific techniques to avoid paint damage underneath. A DIY attempt can be risky. For DIY, follow the general steps but be extremely cautious and consult specific guides for wraps if you’re attempting it yourself. For large or complex graphics, think about professional help. The Environmental Protection Agency (EPA) has information on vehicle emissions and maintenance, which sometimes involves discussions around modifying vehicle exteriors, though not directly decal removal. |
Tips for Difficult Decals
Some decals or adhesives are tougher than others. Here are a few extra tips:
- Patience is Key: Don’t rush the process. If a part isn’t coming off, apply more heat or let the solvent work longer.
- Work in Sections: For large decals, tackle them in manageable sections rather than trying to remove the whole thing at once.
- Test Solvents: If you’re unsure how a cleaning solution will react with your car’s paint, test it on an inconspicuous area first, like the inside of the door jamb.
- Avoid Certain Products: Never use abrasive cleaners, steel wool, or metal razor blades on your car’s paint. These will cause permanent scratches.
- Cold Weather Removal: If it’s cold, the heat method might take longer. You might consider doing this on a warmer day or using a bit more heat (cautiously) over a longer period.
Preventing Damage During Removal
The biggest concern for most car owners is damaging the paint. Here’s how to avoid it:
- Always use plastic scrapers or blades: Metal WILL scratch.
- Never dry scrape: Always apply heat and/or solvent to lubricate the surface.
- Keep heat moving: Don’t let the hairdryer or heat gun sit in one spot for too long.
- Wash before and after: This removes debris and ensures a clean finish.
- Protect the paint: After removing the decal and residue, waxing the area is a great way to restore protection and shine. For information on automotive paint care, resources from automotive industry organizations often provide best practices.

Frequently Asked Questions About Removing Car Decals
Q1: Can I use a regular razor blade to remove a decal?
A: It’s strongly advised against using a metal razor blade. While it might seem effective, it has a very high risk of scratching or nicking your car’s paint, which can be a costly repair. Stick to plastic razor blades, credit cards, or specialized decal removal tools for safety.
Q2: How long should I apply heat to the decal?
A: Typically, 30-60 seconds of consistent heat from a hairdryer is enough to start softening the adhesive. You’ll want the decal to feel warm to the touch. Reapply heat as needed if the decal or adhesive starts to cool and harden during the removal process. Always keep the heat source moving to avoid concentrating heat on one spot.
Q3: What if the decal tears during removal?
A: This is common, especially with older decals. Don’t worry! Simply reapply heat to the torn section or the remaining part of the decal and continue to peel from a new edge, or carefully use your plastic scraper under the lifted area. You might need to go over the area multiple times to get it all off.
Q4: Will removing decals damage my car’s paint?
A: If you follow the steps carefully, especially by using heat and plastic tools, you should not damage your car’s paint. The biggest risk comes from using metal tools, excessive force, or harsh chemicals without testing. Always prioritize gentle methods and the right tools.
Q5: How do I remove sticker residue on tinted windows?
A: For tinted windows, be extra gentle. Use a mild solution of warm, soapy water and a soft cloth or sponge. If you need to scrape, use a plastic scraper very carefully. Avoid heat guns on tint, as excessive heat can damage the tint film. Isopropyl alcohol can be used sparingly, but always test in an inconspicuous area first. For tough residue, a dedicated glass cleaner might help, or you can try natural oils like olive oil, applied to a cloth.
Q6: Can I use nail polish remover to take off adhesive?
A: While nail polish remover (acetone) can break down adhesives, it’s generally too harsh for car paint and can dull or damage the clear coat. It’s best to stick with safer options like isopropyl alcohol, dedicated adhesive removers, or even cooking oils for stubborn residue.
Q7: What is the best way to remove a decal from clear coat?
A: The method described in this guide – using heat from a hairdryer, a plastic scraper, and a mild solvent like isopropyl alcohol or a Goo Gone-type product – is the best and safest way to remove a decal from clear coat. These methods are designed to soften the adhesive without harming the protective clear coat layer of your car’s paint. Always ensure the area is clean before starting and finished with a wax to re-seal the paint protection.
Conclusion
There you have it! Removing decals from your car doesn’t have to be a daunting task. By using a little heat, some gentle scraping, and the right cleaning agents, you can easily lift off stubborn stickers and adhesive residue without harming your car’s beautiful paint. Remember, patience and the correct tools are your best friends in this process. You’ve learned how to prepare the area, apply heat effectively, scrape safely, tackle sticky residue, and finish the job with a clean shine. Now you can confidently tackle any decal that needs removing, saving yourself a trip to the detailer and adding another valuable skill to your DIY car care repertoire. Your car will look refreshed and feel uniquely yours once again!