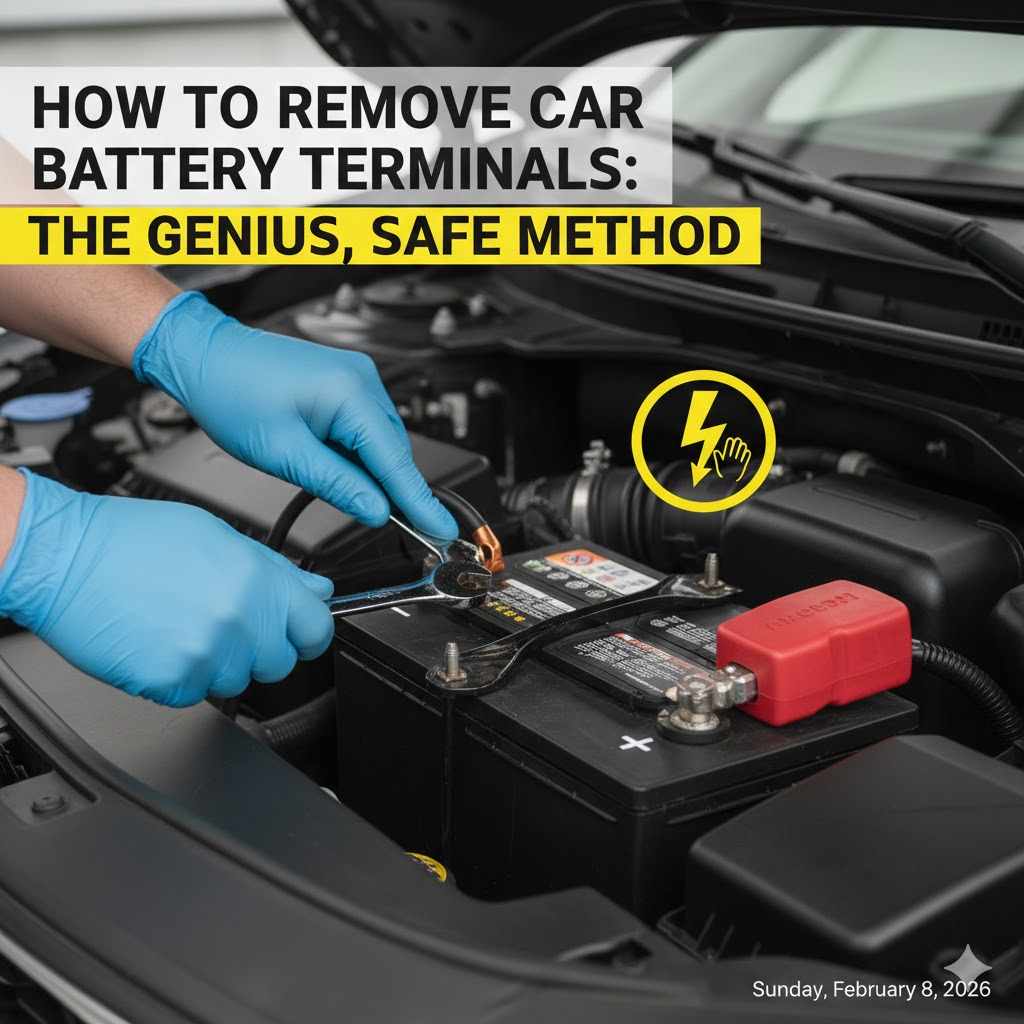
How to Remove Car Battery Terminals The Genius, Safe Method
To remove car battery terminals safely, first turn off the car and wear safety glasses and gloves. Always disconnect the negative (-) terminal first by loosening the nut with a wrench and gently wiggling the cable off. Then, repeat the process for the positive (+) terminal. This specific order prevents accidental electrical shorts.
Your car’s battery is the heart of its electrical system. But sometimes, you need to disconnect it. Maybe you’re cleaning away that crusty buildup, replacing the battery, or doing other repairs. It might look a little intimidating with all those wires, but I promise you, it’s a simple and safe job when you know the secret. You don’t need to be a mechanic to do this right.
Feeling a bit nervous? That’s perfectly normal! Many people are. The good news is that with a few simple rules and the right steps, you can handle this task with total confidence. In this guide, I’ll walk you through the entire process, step by step. We’ll cover the “why,” the “how,” and what to do if things get a little stuck. Let’s get you ready to tackle this like a pro.
Why You Need to Disconnect Your Car Battery Terminals
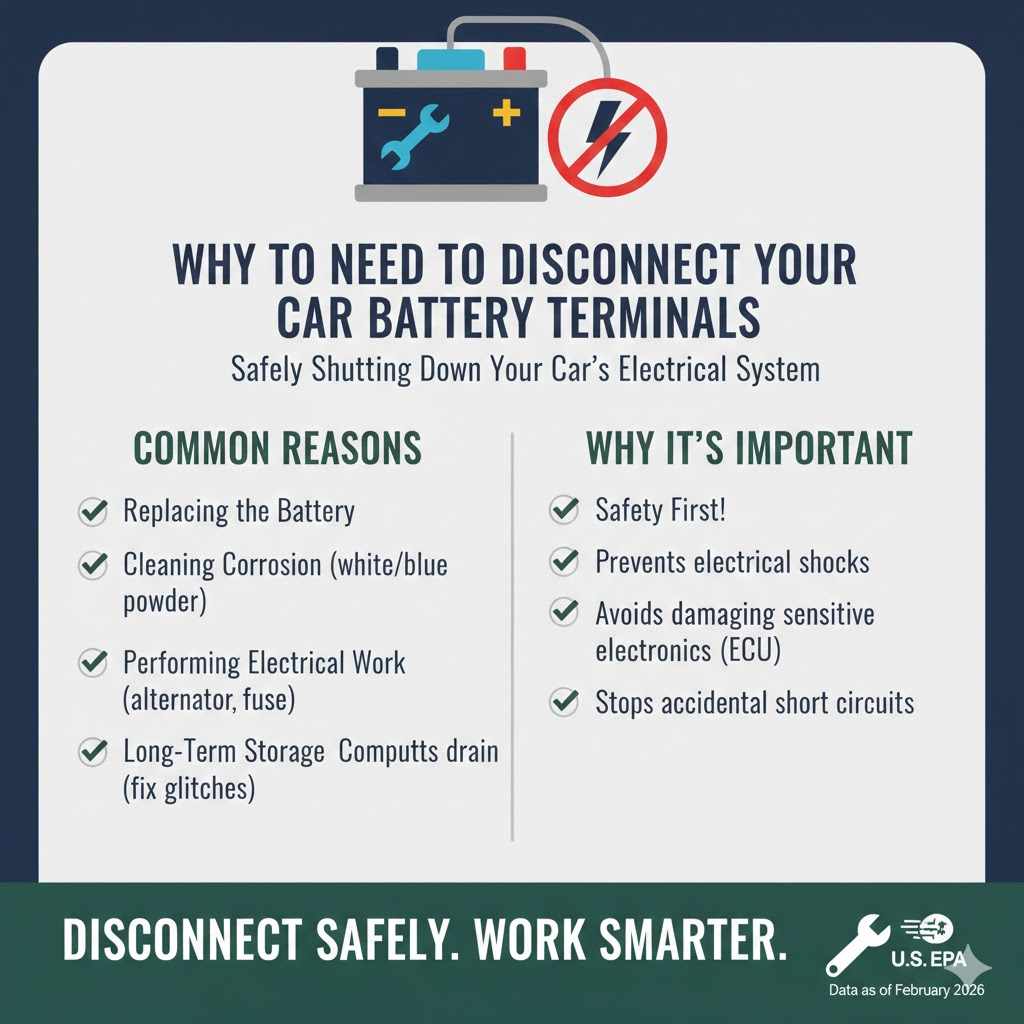
Before we grab our tools, let’s quickly cover why you might be doing this in the first place. Understanding the reason helps you appreciate why doing it safely is so important. You’re not just pulling off a cable; you’re temporarily shutting down your car’s entire electrical nervous system.
Common reasons include:
- Replacing the Battery: This is the most obvious one. When your battery reaches the end of its life, you have to disconnect the old one to install the new one.
- Cleaning Corrosion: Have you seen that white, blue, or greenish powder around the terminals? That’s corrosion, and it can prevent your car from starting. You need to disconnect the terminals to clean it properly.
- Performing Electrical Work: If you’re replacing an alternator, starter, or even just a fuse, it’s a critical safety step to disconnect the battery. This prevents accidental shocks or short circuits that could damage sensitive electronics.
- Long-Term Storage: Parking your car for a few weeks or months? Disconnecting the battery prevents it from slowly draining, so it will still have juice when you return.
- Resetting the Car’s Computer: Sometimes, a simple “reboot” can fix minor electronic glitches. Disconnecting the battery for a few minutes can reset the Engine Control Unit (ECU).
Safety First: The Golden Rules of Battery Handling
Your safety is the number one priority. Car batteries contain corrosive acid and can produce flammable hydrogen gas. They also hold enough electrical charge to create a big spark. But don’t worry! Following these simple rules makes the process incredibly safe.
The Most Important Rule: Negative First, Positive Last
If you remember only one thing from this guide, make it this: When disconnecting, always remove the NEGATIVE (-) terminal first.
Why is this so critical? Your car’s metal frame is connected to the negative terminal (it’s “grounded”). If you loosen the positive terminal first, your metal wrench could accidentally touch a piece of the car’s metal frame while it’s also touching the positive terminal. This would create a direct short circuit—a big spark, potential damage to your tools, the battery, or your car’s electronics.
By removing the negative cable first, you break the entire circuit. The path to the car’s frame is gone. After that, you can touch the positive terminal with a wrench and it won’t matter if the wrench touches the car’s frame, because the circuit is already incomplete.
Think of it like this: The negative terminal is the “off” switch for the whole car’s electrical system.
Your Personal Protective Equipment (PPE)
This isn’t a time to skip the safety gear. It only takes a second to protect yourself.
- Safety Glasses or Goggles: Battery acid is highly corrosive. You do not want a splash in your eyes. This is non-negotiable.
- Gloves: Nitrile or latex gloves will protect your hands from dirt, grease, and any battery acid residue.
Work Area Checklist
- Park on a flat, level surface.
- Turn the engine completely off and remove the keys from the ignition.
- Work in a well-ventilated area. Garages with the door open are great. This prevents any hydrogen gas from building up.
- No smoking, sparks, or open flames near the battery.
Gather Your Gear: The Right Tools for the Job
You don’t need a massive toolbox for this task. Most of the time, you only need a couple of common tools. Having them ready before you start makes the whole process smooth and frustration-free.
| Tool or Supply | Purpose | Pro Tip |
|---|---|---|
| Wrench Set or Ratchet & Socket Set | To loosen the nuts on the battery terminals. A 10mm wrench or socket is the most common size, but sizes can vary. | An adjustable wrench can work in a pinch, but a correctly sized box-end wrench or socket gives you a better grip and is less likely to strip the nut. |
| Battery Terminal Puller | The “genius” tool for removing stubborn, stuck-on terminals without damaging the battery. | This tool is inexpensive and a lifesaver. It prevents you from prying with a screwdriver, which can crack the battery case. |
| Battery Terminal Cleaning Brush | A small wire brush designed to clean the inside of the terminal clamp and the outside of the battery post. | These brushes are very cheap and do a much better job than an old toothbrush. |
| Baking Soda & Water | To make a paste that neutralizes battery acid and cleans corrosion safely. | A small bowl and an old toothbrush are perfect for mixing and applying the paste. |
| Clean, Dry Rags or Paper Towels | For wiping away cleaning solution and drying the terminals. | Keep a “dirty” rag for the initial wipe-down and a “clean” one for the final dry. |
How to Remove Car Battery Terminals: The Step-by-Step Guide
Alright, you’ve done your safety check and gathered your tools. Now for the main event! We’ll take this one simple step at a time. I’ll be right here with you.
Step 1: Prepare Your Car
First things first. Park your car on a level surface, put it in Park (or in gear for a manual), and engage the parking brake. Turn off the engine and remove the keys from the ignition. It’s also a good idea to turn off your headlights, radio, and any other accessories.
Step 2: Open the Hood and Locate the Battery
Pop the hood of your car. Your battery will be a rectangular box, usually located in one of the front corners of the engine bay. Some cars have a plastic cover over the battery that you may need to unclip or remove first.
Step 3: Put on Your Safety Gear
Now is the time. Put on your safety glasses and gloves. It might feel like overkill, but it’s a professional habit that ensures you’re always protected.
Step 4: Identify the Positive (+) and Negative (-) Terminals
Look closely at the battery. You will see two metal posts, called terminals.
- The Positive (+) terminal is usually marked with a “+” sign or a red plastic cover.
- The Negative (-) terminal is usually marked with a “-” sign or a black plastic cover.
The positive post is also typically slightly larger than the negative post. Take a moment to be 100% sure you know which is which.
Step 5: Disconnect the Negative (-) Terminal FIRST
This is the golden rule in action.
- Select the correct size wrench or socket (usually 10mm).
- Fit it onto the nut on the negative terminal clamp.
- Turn the nut counter-clockwise (lefty-loosey) just enough to loosen the clamp. You don’t need to remove the nut completely, just loosen it a few turns.
- Once it’s loose, gently grab the entire cable connector and give it a slight twist while pulling upward. It should pop right off the battery post.
Step 6: Disconnect the Positive (+) Terminal SECOND
Now that the negative cable is disconnected, the circuit is broken and it’s safe to remove the positive cable.
- Use the same wrench to loosen the nut on the positive terminal clamp.
- Again, turn it counter-clockwise a few times until the clamp is loose.
- Gently twist and pull upward to remove the cable from the positive post.
Step 7: Secure the Cables
Tuck both battery cables to the side of the battery. Make sure they cannot accidentally swing back and touch the battery posts. You can use a zip tie or a piece of cloth to hold them out of the way if needed.
That’s it! You have successfully and safely disconnected your car battery terminals. See? I told you that you could do it!
Oops, It’s Stuck! How to Handle a Stubborn Terminal
Sometimes, corrosion acts like glue, fusing the terminal clamp to the battery post. You can pull and wiggle, but it just won’t budge. Don’t reach for a screwdriver to pry it off! Prying can damage the soft lead terminal or even crack the battery case, causing a dangerous acid leak.
This is where our genius tool comes in: the Battery Terminal Puller.
How to Use a Battery Terminal Puller
A terminal puller is a simple tool that uses mechanical leverage to pull the terminal straight up and off the post, safely and easily.
- Loosen the Nut: First, make sure the terminal clamp’s nut is very loose.
- Position the Puller: The tool has two small “jaws” or “hooks.” Place these hooks underneath the base of the terminal clamp.
- Center the Screw: The center part of the puller is a screw with a small point. Tighten this screw by hand until the point rests directly on top of the battery post’s center bolt.
- Gently Tighten: Using a wrench, slowly turn the center screw clockwise. As you tighten it, the screw will push down on the post while the jaws pull up on the terminal. With very little effort, you will feel a “pop” as the terminal breaks free.
This little tool costs less than a fancy coffee and can save you a world of headache and potential damage. It’s a must-have for any DIY car owner’s toolkit.
A Clean Connection is a Happy Connection
With the terminals off, now is the perfect time to clean away any corrosion. That white or blue flaky stuff is sulfuric acid residue, and it’s a poor conductor of electricity. Cleaning it restores a solid connection and can solve many starting problems.
The Baking Soda Method
This is a safe and effective way to neutralize the acid and scrub away the buildup.
- Mix the Paste: In a small bowl, mix a few tablespoons of baking soda with a little bit of water to create a thick paste, similar to toothpaste.
- Apply the Paste: Use an old toothbrush or a small paintbrush to apply the paste generously to the battery posts and the inside of the terminal clamps. You’ll see it fizz and bubble as it neutralizes the acid. This is normal and safe.
- Scrub Gently: Use a battery terminal cleaning brush to scrub the posts and clamps. The brush has two parts: a female end for cleaning the posts and a male end for cleaning inside the clamps. If you don’t have one, the toothbrush will work.
- Rinse Carefully: Once clean, rinse the terminals and posts with a small amount of clean water. Be careful not to let the water run down into other parts of the engine bay. A spray bottle works well for this.
- Dry Completely: Use a clean rag or paper towel to dry everything thoroughly. A good connection requires a dry surface.
For more information on the importance of recycling old car batteries and handling them responsibly, the U.S. Environmental Protection Agency (EPA) provides excellent resources. Proper disposal is crucial for our environment.
Putting It All Back Together: Reconnecting Your Battery
Once your work is done or your terminals are clean and dry, it’s time to reconnect everything. To do this safely, we simply reverse the disconnection process.
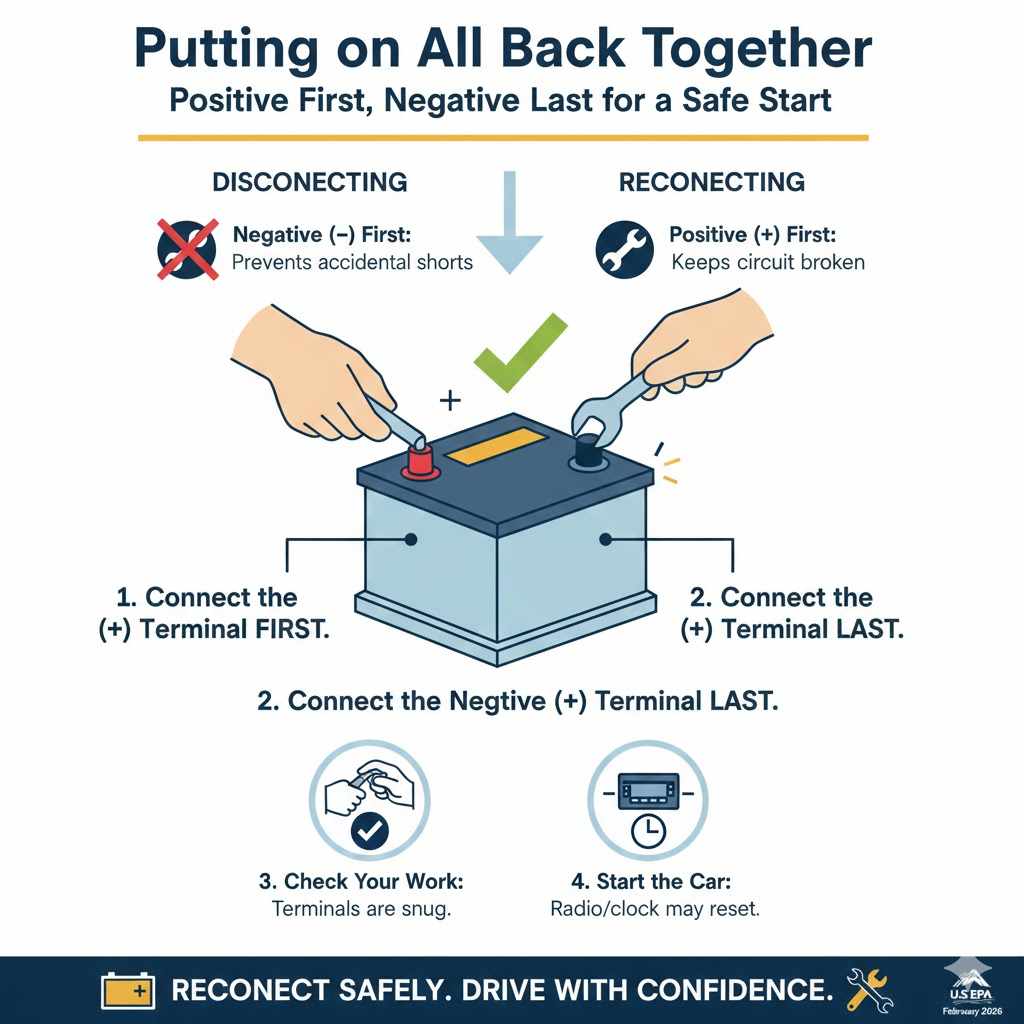
The Reconnection Rule: Positive First, Negative Last
Just as disconnecting the negative first was crucial, reconnecting the POSITIVE (+) first is now the most important rule.
Why? Because the negative cable is still disconnected, the car’s frame is not grounded. You can safely place the positive terminal on and tighten it without worrying about your wrench causing a spark if it touches metal.
| Action | The Rule | The Reason |
|---|---|---|
| Disconnecting | Negative (-) First | Instantly breaks the entire electrical circuit, preventing accidental shorts. |
| Reconnecting | Positive (+) First | Keeps the circuit broken until the very last connection is made, preventing accidental shorts. |
Step-by-Step Reconnection
- Connect the Positive (+) Terminal FIRST: Place the positive terminal clamp back onto the positive battery post. Push it down firmly so it sits all the way down. Tighten the nut with your wrench (clockwise, “righty-tighty”) until it’s snug. You don’t need to overtighten it—just make sure it won’t wiggle.
- Connect the Negative (-) Terminal LAST: Place the negative terminal clamp back onto the negative battery post. Push it down firmly. Tighten the nut until it is snug. You may see a tiny, harmless spark as you make this final connection. This is normal as the car’s electronics power up.
- Check Your Work: Gently try to wiggle both terminals. If they are secure and don’t move, you’ve done a great job.
- Replace Covers: Put any plastic covers back on the battery or terminals.
- Close the Hood and Start the Car: Your car should start right up. Note that your radio presets or clock might be reset, which is normal after a battery disconnect.
Frequently Asked Questions (FAQ)
Here are some quick answers to common questions I get about this process.
-
1. Why do I have to disconnect the negative terminal first?
-
Your car’s metal frame is grounded by the negative terminal. Removing it first breaks the circuit. If you remove the positive first and your metal wrench touches the positive post and the car’s frame at the same time, it will create a dangerous spark and a short circuit.
-
2. What happens if I disconnect the positive terminal first by mistake?
-
As long as your tool doesn’t create a bridge between the positive post and a metal part of the car, nothing will happen. However, the risk of an accidental short circuit is extremely high. It’s a dangerous habit, so always follow the “negative off first, positive off last” rule.
-
3. What is the white, powdery stuff on my battery terminals?
-
That is battery corrosion (dried sulfuric acid). It’s a poor conductor of electricity and can prevent your car from starting or charging properly. It should be cleaned off using the baking soda method described above.
-
4. Can I really use soda, like Coke, to clean battery terminals?
-
While the mild acid in soda can help break down some corrosion, it’s not the best method. It leaves behind a sticky, sugary residue that can attract dirt and cause more problems later. A simple baking soda and water paste is far more effective and cleaner.
-
5. How tight should the terminal nuts be?
-
They should be “snug.” Tighten them enough so that you cannot twist or move the terminal clamp by hand. Overtightening can strip the threads on the soft lead clamp, so don’t use excessive force.
-
6. Will disconnecting my battery erase my car’s computer?
-
It will reset some of the car’s “adaptive memory,” like your radio presets, clock, and sometimes idle and transmission shift points. The car will re-learn these things as you drive. Your car’s critical engine data is stored permanently and will not be erased.
-
7. How often should I check and clean my battery terminals?
-
A quick inspection every time you get an oil change is a great habit. If you see any corrosion starting to form, it’s a good time to clean it. Cleaning them once a year as preventative maintenance is a fantastic idea.
Conclusion: You’ve Got This!
Congratulations! You now know the genius, safe method for removing and reconnecting your car battery terminals. It’s not about being a master mechanic; it’s about knowing the right order of operations and prioritizing your safety. By always remembering to disconnect the negative terminal first and reconnect it last, you can tackle this job with total confidence, every single time.
You’ve just learned a fundamental car maintenance skill that will save you money and keep your vehicle running reliably. The next time you see a bit of corrosion or need to swap out a battery, you won’t have to hesitate. You have the knowledge and the steps to do it right. Be proud of what you’ve learned, and happy motoring!