How To Remove Car Decals Without Damaging Paint Safely
Dealing with old car decals can be a real headache. They look bad, and you want them gone. But the thought of peeling them off and ruining your car’s paint job makes you freeze.
It’s totally understandable. You worry about scratching the clear coat or leaving sticky residue behind. This guide is here to help you through it.
We’ll show you simple, safe ways to get those decals off.
Removing car decals without harming the paint involves careful preparation, using the right tools and heat, and gentle peeling techniques. Common methods include using a heat gun or hairdryer, a specialized decal remover, or even household items like rubbing alcohol or a gentle adhesive remover, followed by thorough cleaning.
Understanding Car Decals and Paint
Car decals are essentially stickers. They have a vinyl layer on top and an adhesive on the bottom. This adhesive sticks the decal to your car’s paint.
Over time, the sun and weather can bake this adhesive into the paint. This makes it harder to remove. It also makes the vinyl itself brittle.
Your car’s paint has layers. There’s the base coat, then the color coat, and finally, a clear coat. This clear coat is what protects the color.
It’s also the layer you’re most worried about damaging. Scratches or dull spots here really stand out. They can be expensive to fix.
Why Decals Need Careful Removal
Many people try to yank decals off quickly. They might use sharp tools or harsh chemicals. This is a fast track to paint damage.
You could end up with:
- Scratches that go through the clear coat.
- Paint discoloration where the decal was.
- Sticky, hard-to-remove adhesive residue.
- Dull spots in the paint finish.
It’s not just about getting the decal off. It’s about keeping your car looking great. Taking your time and using the right approach saves you trouble later.
My Own Decal Nightmare
I remember this one time, years ago, I bought a used truck. It had this huge, faded racing stripe sticker running down the hood. It was peeling at the edges and looked awful.
I thought, “Easy fix!” I grabbed a utility knife, planning to just score the edges and pull. That was a mistake.
The knife slipped. It made a long, shallow scratch right through the clear coat. Panic set in.
The rest of the stripe came off, but it left a ghostly outline and that ugly scratch. I spent hours trying to buff it out, then ended up having to get the hood repainted. It taught me a valuable lesson: never rush decal removal.
The Essential Decal Removal Toolkit
Before you start, gather these items. Having them ready makes the job smoother.
- Heat Source: A heat gun (low setting) or a powerful hairdryer.
- Plastic Scrapers: Avoid metal tools like razor blades near paint.
- Adhesive Remover: Products like Goo Gone or WD-40.
- Rubbing Alcohol: Isopropyl alcohol (70% or higher).
- Microfiber Towels: Lots of them, for cleaning and wiping.
- Car Wash Soap and Water: For a final clean.
- Car Wax or Sealant: To protect the paint afterward.
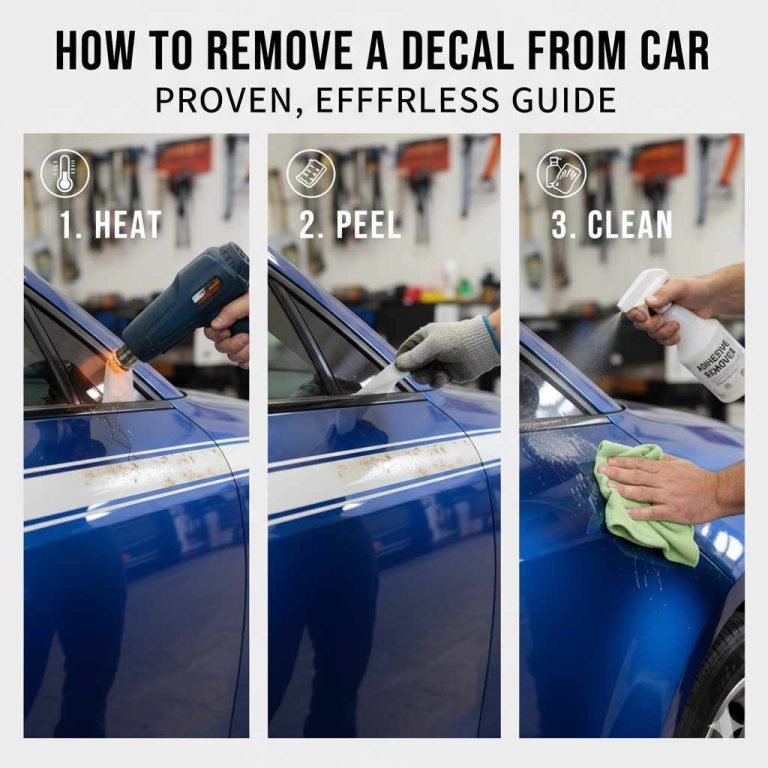
Method 1: The Gentle Heat Approach
Heat is your best friend for decal removal. It softens the adhesive, making it less sticky. This is often the safest and most effective method for most vinyl decals.
Preparing the Area
First, wash the area around the decal. Dirt and grit can scratch your paint when you’re scraping. Use car soap and water.
Rinse thoroughly and dry with a clean microfiber towel. Make sure the surface is completely dry.
Applying Heat
Now, grab your heat gun or hairdryer. Set it to a low or medium heat. Hold it about 6 inches away from the decal.
Move it back and forth constantly. Don’t focus the heat on one spot for too long. You just want to warm the vinyl and the adhesive underneath.
You’ll feel it get warm to the touch. The vinyl might look a little shinier.
Peeling Starts Here
Once the decal is warm, try to lift an edge. Use a plastic scraper or even your fingernail. Start at a corner where it’s already lifting.
Gently pull the decal away from the car. Keep the heat source nearby. You might need to reapply heat as you go.
This keeps the adhesive soft.
Pull slowly and steadily. Try to keep the angle of the decal low, almost parallel to the car’s surface. If you pull straight up, you risk stretching the vinyl or tearing it.
If it feels like it’s resisting, apply more heat. Don’t force it. Patience is key here.
Heat Application Tips
Constant Motion: Never let the heat stay in one place.
Test a Corner: Gently try to lift an edge before fully committing.
Slow and Steady: Resist the urge to yank the decal off.
Low Setting First: Always start with the lowest heat setting.
Dealing with Adhesive Residue
Even after the decal is off, you’ll likely have some sticky residue left behind. This is normal. It’s the old adhesive.
Don’t try to scrub it off with abrasive cleaners. This will damage your paint.
Using Adhesive Removers
There are many products designed for this. Goo Gone is a popular choice. WD-40 can also work well.
Spray the product directly onto the residue. Let it sit for a few minutes. This allows the product to break down the sticky stuff.
Then, use a clean microfiber towel to gently wipe away the residue. You might need to reapply the remover and wipe a few times. For stubborn spots, a plastic scraper can help lift the softened goo.
Be gentle.
Residue Removal Workflow
1. Apply Remover: Spray your chosen product onto the sticky area.
2. Let it Soak: Give it a few minutes to work.
3. Gently Wipe: Use a microfiber towel to lift the goo.
4. Repeat if Needed: Stubborn spots may need more treatment.
5. Plastic Scraper: Use carefully for tough bits.
Rubbing Alcohol Option
Isopropyl alcohol (rubbing alcohol) is another great option. It’s less aggressive than some chemical removers. It also evaporates quickly.
Apply it to a microfiber towel and rub the residue. It often works well on lighter adhesive layers.
For tougher residue, you might combine methods. Use a chemical remover first. Then, follow up with rubbing alcohol to clean up any remaining tackiness.
Always test any product on an inconspicuous area first.
Method 2: The Specialized Decal Remover
For very stubborn or old decals, commercial decal removers can be a lifesaver. These products are formulated to break down strong adhesives without harming automotive paint.
Choosing the Right Product
Look for removers specifically designed for car decals or automotive adhesive. Brands like 3M, Eagle One, or Meguiar’s offer such products. Read the instructions carefully.
Some might require heat, while others work best on their own.
Application and Removal
Usually, you apply the remover to the decal. Let it soak for the time recommended on the product label. This softens the vinyl and the adhesive.
Then, you can begin to peel or scrape it off. Follow the same gentle peeling techniques as with the heat method.
After the decal is gone, you’ll still need to clean up any residue. The specialized remover often helps with this too. But a final clean with an adhesive remover or rubbing alcohol is a good idea.
Always rinse the area thoroughly with water after using any chemical product.
When to Use Specialized Removers
- Old, Baked-on Decals: When heat alone isn’t enough.
- Very Tough Adhesives: Decals that leave heavy residue.
- Specific Decal Types: Some specialty vinyls might require them.
- Confidence in Product: Always choose reputable brands.
Method 3: DIY Solutions (Use with Caution)
Sometimes, you might not have specialized products on hand. Household items can sometimes work, but you need to be extra careful. Test these methods in a hidden spot first.
Vinegar and Water
A mixture of white vinegar and water can sometimes help break down adhesive. Mix equal parts. Apply it with a cloth or sponge.
Let it sit for a few minutes. Then, try to wipe or gently scrape the residue. This is best for lighter stickiness.
Cooking Oil
Believe it or not, cooking oil (like vegetable or olive oil) can sometimes loosen sticky residue. Apply a small amount of oil to the residue. Let it sit for about 15-20 minutes.
The oil can help break down the adhesive. Then, wipe it away with a microfiber cloth. You’ll need to wash the area thoroughly afterward to remove the oil.
These DIY methods are generally milder. They might take more time and effort. They are best for light residue rather than the decal itself.
Always follow up with a proper car wash to remove any oily or acidic traces.
Important Precautions for Paint Safety
No matter which method you choose, always prioritize your car’s paint. Here are some critical safety tips:
Never Use Metal Tools
A metal razor blade or scraper can easily scratch your paint. Stick to plastic scrapers, credit cards, or even your fingernail. If you absolutely must use a blade (like for very old, hardened glue), use a brand-new blade at a very low angle and with extreme caution, preferably with a lubricant.
But honestly, avoid it if you can.
Avoid Harsh Solvents
Some strong solvents like acetone or paint thinner can damage your car’s clear coat. Always read product labels. If it’s not specifically made for automotive paint, don’t use it.
Even some “automotive” cleaners can be too harsh if used incorrectly.
Work in the Shade
Direct sunlight can heat your car’s paint too quickly. This can cause products to dry out too fast or even damage the paint. Work in a shaded area or early in the morning or late in the evening when the car’s surface is cool.
Test First
Before applying any cleaner or remover to a large area, test it on a small, hidden spot. This could be an inside door jamb or a lower part of the fender. Wait a few minutes, then wipe it off.
Check for any signs of paint damage or discoloration.
Safety Checklist
- Plastic tools only.
- Avoid harsh chemicals.
- Work in cool, shaded areas.
- Test products first.
- Read all instructions.
Final Cleaning and Protection
Once the decal and all residue are gone, it’s time for the final steps. This is crucial for restoring the finish.
Wash the Area
Wash the entire area where the decal was with car wash soap and water. This removes any leftover cleaning product or residue. Rinse thoroughly.
Dry the area completely with a clean, soft microfiber towel.
Inspect for Imperfections
Look closely at the paint. You might notice some dullness where the decal was. This is because the decal blocked sunlight, and the surrounding paint oxidized.
You might also see minor swirl marks from your scraping, even with plastic tools.
Apply Polish or Compound (If Needed)
If the paint looks dull or has light scratches, you might need to polish it. Use a mild automotive polish with a foam applicator pad. Work in small sections.
Use light pressure. This will help restore the shine. For deeper scratches, a rubbing compound might be necessary, but use it very sparingly and with extreme caution, as it’s more abrasive.
Protect the Paint
This is the most important finishing step. Apply a coat of car wax or sealant to the area. This protects the clear coat and gives the paint a nice shine.
It also helps blend the area where the decal was into the rest of the car’s finish. A good quality wax will last for several weeks or months.
Post-Removal Care
Wash: Remove all traces of cleaners.
Dry: Use a clean microfiber.
Polish: Restore shine if needed.
Protect: Wax or seal the paint.
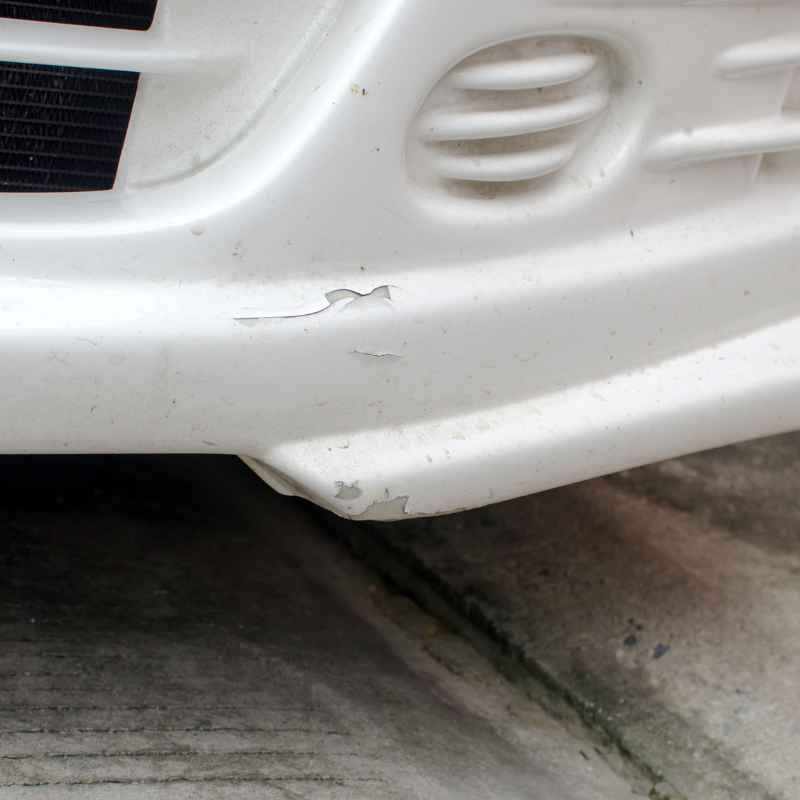
What If the Paint Is Already Damaged?
Sometimes, you discover the paint is already damaged under the decal. This could be from age, poor previous removal attempts, or the decal itself degrading the paint.
Faded Outline
If you see a faded outline, it means the area under the decal was protected from UV rays. The surrounding paint faded more. This often requires polishing or compounding to level the finish.
Sometimes, it’s permanent and might need professional paint correction or even repainting.
Scratches or Scuffs
If there are scratches, assess their depth. Minor ones can often be buffed out with polish. Deeper ones might require professional attention.
Never try to hide scratches with wax alone; it’s a temporary fix.
Paint Discoloration
Some decals can leave behind a chemical stain on the paint. These are tough. Try a clay bar treatment after washing.
If that doesn’t work, you might be looking at a professional detailer.
Common Decal Removal Mistakes to Avoid
We’ve touched on some, but let’s list the most common pitfalls people run into:
- Using Sharp Objects: Razor blades, knives, or abrasive scrubbers.
- Excessive Heat: Holding the heat source too close or too long.
- Forcing It: Trying to rip the decal off when it’s not ready.
- Skipping the Prep Work: Not washing the car first.
- Not Removing Residue: Leaving sticky stuff behind looks bad and attracts dirt.
- Using Harsh Chemicals: Acetone, paint thinner, or strong household cleaners.
- Working in Direct Sunlight: Can overheat and damage paint.
Avoiding these simple mistakes will save you a lot of heartache and potential repair costs.
When to Call a Professional
While most decals can be removed at home, there are times when professional help is best:
- High-Value or Classic Cars: If the car is very valuable, you might not want to risk it.
- Complex Decals or Wraps: Full vehicle wraps or intricate graphics need special techniques.
- Significant Paint Damage: If you suspect deep scratches or corrosion.
- Lack of Time or Tools: If you’re not comfortable or don’t have the right gear.
Professional detailers have the experience, tools, and products to remove decals safely and effectively. They can also repair any minor damage that might occur.
Frequently Asked Questions About Removing Car Decals
Can I use a pressure washer to remove car decals?
It is generally not recommended to use a pressure washer to remove decals. The high pressure can easily damage your car’s paint, especially around the edges of the decal, and can force water under the vinyl, making removal harder.
How long does it take to remove a car decal?
The time can vary greatly. A small sticker might take 15-30 minutes. Larger decals or those that are old and baked on can take 1-2 hours or even more, especially if you include residue removal and final polishing.
Will Goo Gone damage my car’s paint?
Goo Gone is generally safe for automotive paint when used as directed. It’s designed to break down adhesives. However, it’s always wise to test it on an inconspicuous area first and rinse the area thoroughly with soap and water afterward.
What’s the difference between a decal and a sticker?
In automotive terms, the words are often used interchangeably. However, “decal” often refers to graphics or designs applied to vehicles, while “sticker” might be more general. Both use adhesives and can be removed using similar methods.
Can I remove decals from car window tint?
Removing decals from window tint is tricky. The tint film itself can be delicate. Avoid heat, as it can damage the tint.
Gentle peeling and mild adhesive removers might work, but there’s a higher risk of damaging the tint. It’s often best to consult a tint specialist.
Is it safe to use a hairdryer instead of a heat gun?
Yes, a hairdryer can work, especially for smaller or less stubborn decals. You just need to be patient. You might need to hold it closer or for a bit longer than a heat gun.
Always use the highest heat setting on your hairdryer and keep it moving.
Conclusion: A Smooth Finish is Achievable
Taking off old car decals doesn’t have to be a stressful experience. With the right tools, a bit of patience, and a gentle approach, you can remove them cleanly. You can protect your car’s paint and make it look great again.
Remember to work in the shade, use plastic tools, and always finish with a good wash and wax.