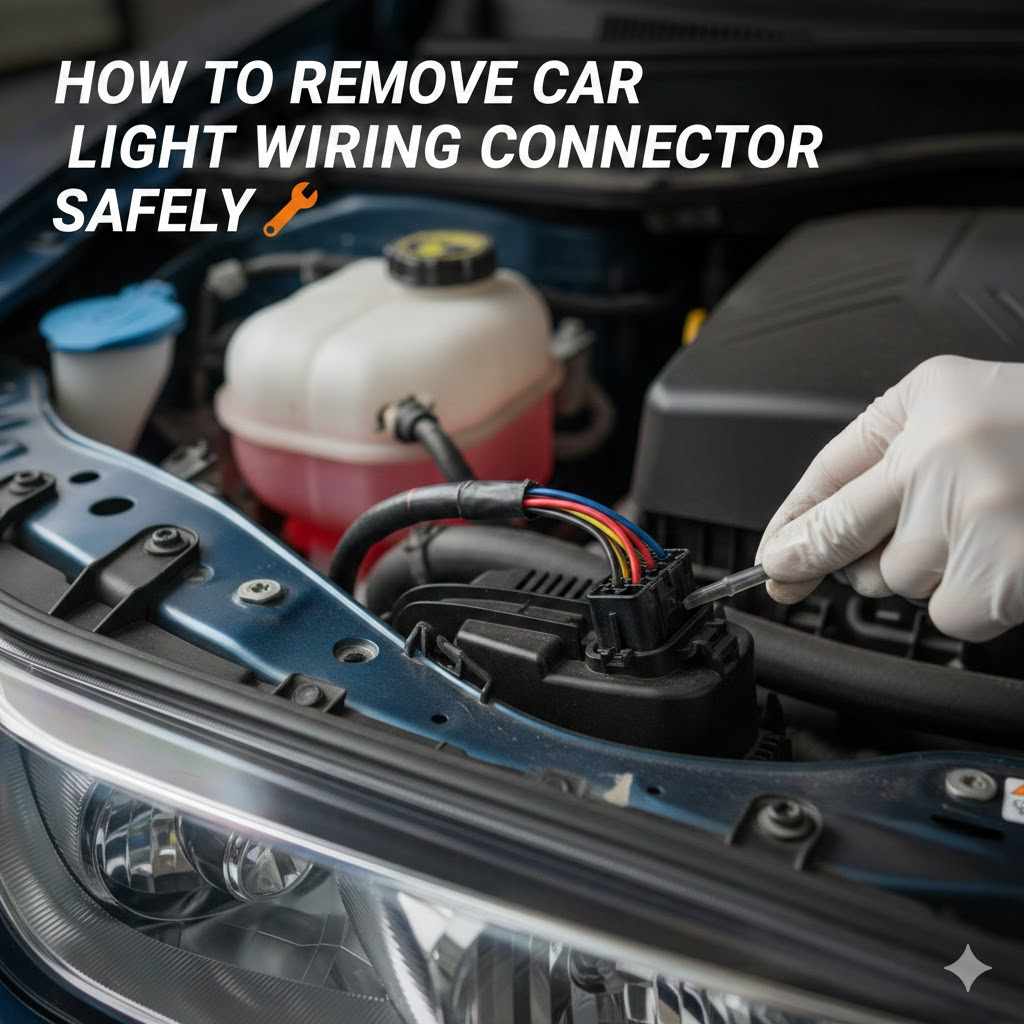
How to Remove Car Light Wiring Connector Safely
Sometimes, working on your car can seem tricky, especially when you’re new to it. Dealing with the wiring for your car lights can be one of those things that makes people a little nervous. You want to make sure you don’t break anything or cause more problems.
But don’t worry! It’s actually much simpler than it looks. This guide will show you exactly how to remove car light wiring connector safely, step by step.
We’ll break it down so it’s easy to follow along.
Understanding Car Light Wiring Connectors
Car light wiring connectors are the small plugs that connect your car’s lights to the rest of the electrical system. They are designed to be secure so the connection stays strong. These connectors are built to withstand vibrations and different weather conditions.
They usually have a plastic housing and metal pins or terminals inside that carry the electrical current. Safety is important when dealing with any part of your car’s electrical system. Knowing how these connectors work helps you handle them with care.
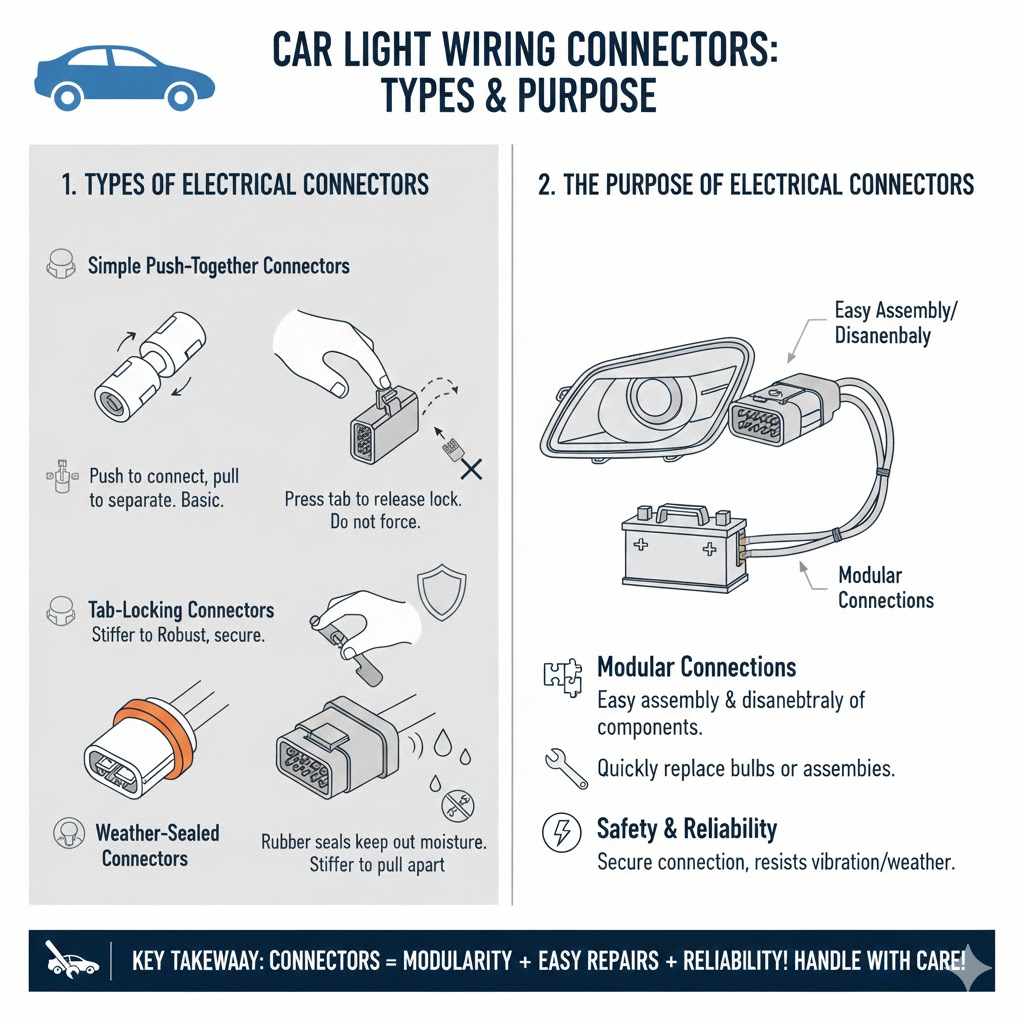
Types of Electrical Connectors
There are many kinds of electrical connectors used in cars. Some are simple push-in types, while others have locking tabs or clips to keep them firmly in place. You might see small, round connectors for bulb sockets or larger, multi-pin connectors for headlight assemblies.
The way they connect and disconnect often depends on their design. Knowing the specific type you are dealing with is the first step.
- Simple Push-Together Connectors These are the most basic types. You just push them together to make a connection. To separate them, you usually just pull them apart. They are often found in less critical areas or for very simple light setups.
- Tab-Locking Connectors These have a small plastic tab that you need to press or lift to release the lock. Once you press the tab, the connector will pull apart easily. If you try to force these without releasing the tab, you could damage the connector.
- Lever-Actuated Connectors Some connectors have a small lever or switch on them. You need to move this lever to unlock the connector before you can pull it apart. These are often used for more robust connections that need to be very secure.
- Weather-Sealed Connectors Many car connectors are designed to keep moisture and dirt out. They often have rubber seals around the wires or the connector body. These can sometimes be a bit stiffer to pull apart due to the tight seal.
The Purpose of Electrical Connectors
Electrical connectors in vehicles serve a vital role. They allow for the easy assembly and disassembly of electrical components. Instead of hardwiring every light, sensor, or module directly, connectors provide modular connections.
This makes manufacturing easier and repairs much simpler. If a light bulb burns out, you can disconnect the old bulb’s wiring easily and replace it. If a whole headlight unit needs replacing, the wiring harness plugs in and out.
This modularity saves a lot of time and effort for both car makers and mechanics.
Preparing to Remove a Car Light Wiring Connector
Before you even touch a connector, safety is your top priority. Working with car electrical systems requires a few simple precautions to keep you and your car safe. Taking a moment to prepare can prevent sparks, short circuits, or damage to delicate electrical parts.
It ensures that your attempt to remove the connector is as smooth and worry-free as possible.
Safety Precautions
Always start by ensuring the car is turned off. This is the most critical step. Turning off the engine and removing the key from the ignition prevents any accidental power from flowing through the wires you are working on.
This avoids electric shocks and prevents damage to the car’s computer or other sensitive electronics.
- Disconnect the Battery For added safety, especially if you are working on a larger assembly or are unsure about which circuit you are dealing with, it’s a good idea to disconnect the negative terminal of your car’s battery. This completely cuts off power to the entire vehicle. Remember which terminal is negative, and only loosen that one.
- Wear Safety Glasses Small clips or pieces of plastic can sometimes break off when working with connectors. Wearing safety glasses protects your eyes from any stray debris.
- Work in a Well-Lit Area Good lighting helps you see the connector clearly, its tabs, and any locking mechanisms. This reduces the chance of making a mistake and damaging the connector or wiring.
- Avoid Forcing Connectors Connectors are designed to release in a specific way. Forcing them can break the plastic tabs or bend the metal pins, leading to a bad connection or a repair that’s more complicated than it needed to be.
Gathering Necessary Tools
While many connectors can be removed by hand, having the right tools can make the job easier and safer. The tools you need will depend on the type of connector. Sometimes, simple hand pressure is all that’s needed, but other times, a small, specialized tool is required.
- Pliers (Needle-Nose) These are useful for getting a better grip on a connector if it’s stuck or in a tight spot. Be very careful not to squeeze too hard and damage the plastic housing.
- Small Flathead Screwdriver or Trim Tool A very small flathead screwdriver or a plastic trim removal tool can be handy for gently prying up locking tabs or separating slightly stuck connectors. Always use plastic tools when possible to avoid scratching or damaging surrounding parts.
- Connector Pick Set For some specific or stubborn connectors, a specialized connector pick set can be invaluable. These tools have small, shaped ends designed to reach into specific slots to release locking mechanisms without causing damage.
- Gloves Wearing work gloves can provide a better grip, protect your hands from sharp edges or grease, and keep your hands cleaner.
Identifying the Connector Type
The process for removing a connector depends entirely on its design. Before you try to pull anything, take a close look at it. Spend a minute or two examining how it is put together.
Look for any small tabs, clips, or levers. These are the keys to releasing the lock.
- Look for Release Tabs Most connectors have a tab that needs to be pressed down, squeezed, or lifted. These tabs are usually made of plastic and might be on the side, top, or bottom of the connector housing.
- Check for Locking Levers Some connectors use a small lever that you must push or pull to disengage the locking mechanism. This lever might slide sideways or flip up.
- Note the Shape and Size The shape and size can give clues about how it locks. Smaller, simpler connectors might just pull apart, while larger, more complex ones often have more robust locking systems.
How to Remove Car Light Wiring Connector Safely Step-by-Step
Now that you’re prepared, let’s get to the actual process of disconnecting the wiring. Following these steps carefully will ensure you can remove the connector without any issues. The main goal is to release the locking mechanism first, then gently pull the connector apart.
Step 1 Locate and Inspect the Connector
Find the wiring connector attached to the car light you need to access. This might be at the back of the headlight assembly, the taillight housing, or for a smaller interior light. Once you see it, take a good look at it.
- Carefully observe where the wires enter the connector.
- Look for any plastic tabs, clips, or levers that seem to hold the two parts of the connector together.
- Note the color of the plastic and if there are any markings on it.
Step 2 Identify the Release Mechanism
This is the most important part of learning how to remove car light wiring connector safely. You need to figure out how to unlock it.
- If you see a tab, determine if it needs to be pushed down, squeezed from the sides, or lifted up.
- If there’s a lever, see which direction it needs to be moved to unlock.
- Sometimes, the release mechanism is on the side of the connector that mates with the other half.
Step 3 Release the Locking Tab or Lever
Once you know what to do, carefully operate the release mechanism.
- Use your finger to press the tab firmly. If it’s stiff, you might need to use the tip of a small plastic trim tool or a small flathead screwdriver to gently help push it.
- If it’s a lever, gently push or pull it in the unlocking direction.
- Ensure the tab or lever is fully disengaged. You might hear or feel a slight click when it releases.
Step 4 Gently Pull the Connector Apart
With the lock released, you can now separate the connector.
- Grasp both halves of the connector firmly.
- Pull them straight apart without wiggling or twisting excessively.
- If it doesn’t come apart easily, double-check that the locking tab is fully released. Do not force it.
Step 5 Inspect for Damage
After you have successfully removed the connector, it’s wise to quickly inspect it.
- Check the plastic housing for any cracks or signs of damage.
- Ensure the metal pins or terminals inside are straight and not bent.
- Look at the rubber seals, if any, to make sure they are intact.
Common Challenges and How to Overcome Them
Even with clear instructions, sometimes working with car parts presents unexpected issues. Understanding common problems can help you solve them quickly and avoid frustration. The key is to stay calm and approach the situation methodically.
Stuck or Stubborn Connectors
Occasionally, a connector might be stuck due to dirt, corrosion, or simply being in place for a long time. Forcing it is never the answer.
- Apply a Small Amount of Penetrating Lubricant For very stubborn connectors, a tiny spray of electrical contact cleaner or a light penetrating oil (like WD-40, but be sure to clean it off later) can help loosen things up. Spray it near the seam where the two halves meet and let it sit for a few minutes.
- Wiggle Gently While Releasing Sometimes, a very slight back-and-forth wiggle while you’re pressing the release tab can help break the seal. Be gentle.
- Use the Right Tool If you can’t get enough leverage with your fingers, use a plastic trim tool to carefully pry at the seam while you press the release tab. This gives you a bit more force without risking damage to the plastic.
Broken Release Tabs
It’s unfortunate, but sometimes the plastic release tabs can become brittle with age and break off.
- Secure with Zip Ties or Electrical Tape If a tab breaks, you can often still secure the connector using a zip tie around the connector bodies or by wrapping it securely with good quality electrical tape. Ensure the connection remains firm.
- Consider Replacement If the connector is critical for safety or performance and the break compromises its ability to stay connected, you might need to replace the entire connector. This usually involves cutting off the old connector and splicing in a new one, which may require more advanced skills or professional help.
- Use a Zip Tie as a Temporary Lever In some cases, if the tab is just cracked, you might be able to use a small zip tie looped under the broken tab to help you pull it down and release the connector.
Corrosion and Dirt
Connectors exposed to the elements can accumulate dirt, salt, and corrosion. This can make them hard to separate and can also cause electrical issues.
- Clean Thoroughly Use an electrical contact cleaner spray. Spray it generously into the connector and around the connection point. Use a small brush or a clean cloth to wipe away any loose dirt or corrosion.
- Inspect Terminals After cleaning, look closely at the metal terminals inside the connector. If they are corroded, they might need to be gently cleaned with a small wire brush or fine-grit sandpaper. Be very careful not to damage them.
- Apply Dielectric Grease Once the connector is clean and dry, applying a small amount of dielectric grease can help prevent future corrosion and make it easier to disconnect next time. This grease doesn’t conduct electricity but seals out moisture.
What if the Connector Won’t Go Back Together?
Sometimes, after disconnecting, you might have trouble reconnecting the wiring.
- Check for Bent Pins The most common reason is that one or more of the metal pins inside the connector are bent. Ensure they are all aligned correctly before trying to push them together.
- Ensure Proper Seating Make sure the connector halves are aligned perfectly. They should only fit together in one way.
- Remove Obstructions Check for any debris, dirt, or plastic shavings that might be preventing a clean connection.
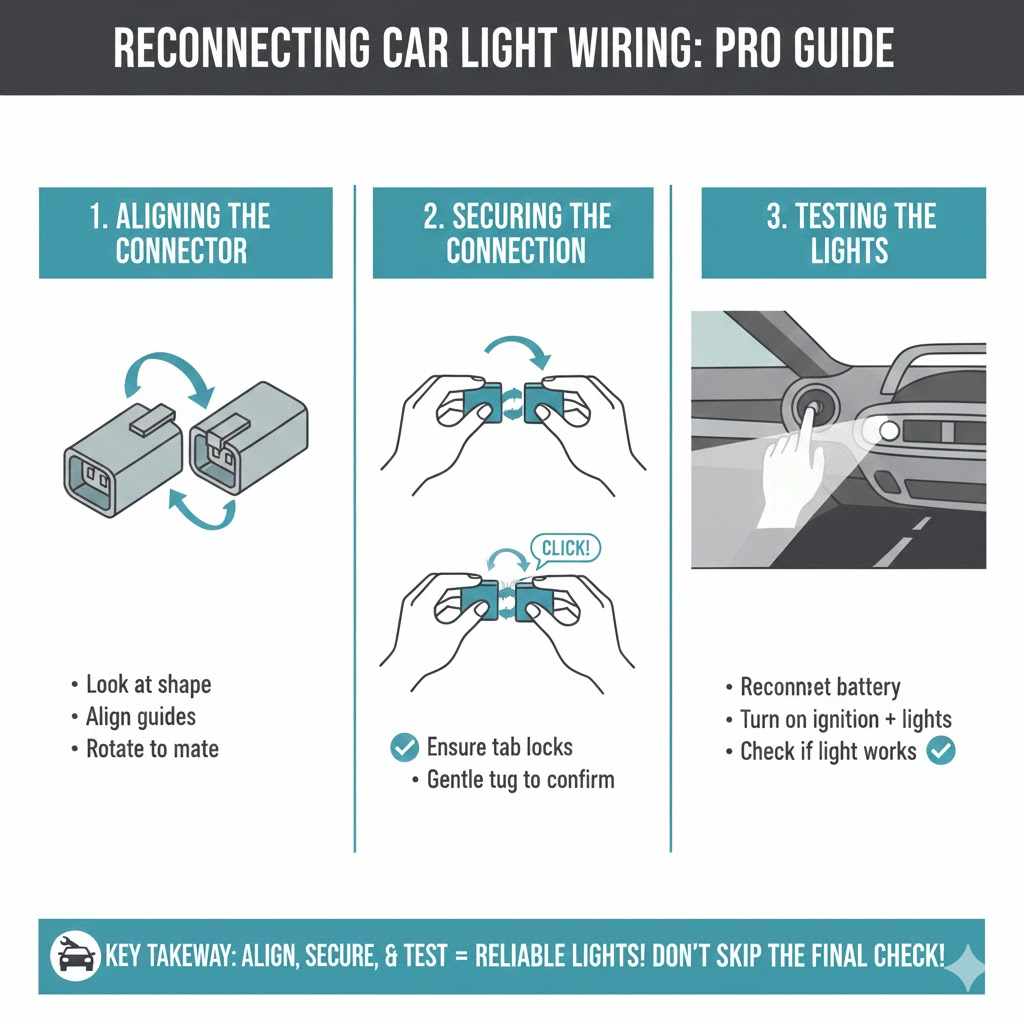
Reconnecting the Wiring Connector
After you have finished the work that required disconnecting the light wiring, you will need to reconnect it. This is just as important as safely disconnecting it. A secure connection ensures your lights work properly and prevents electrical issues.
Aligning the Connector
Before you push the connector together, take a moment to line it up properly. Most connectors are keyed, meaning they only fit together in one specific orientation.
- Look at the shape of both halves of the connector.
- Notice any guides or slots that help them align perfectly.
- Gently rotate one half until it mates correctly with the other.
Securing the Connection
Once aligned, push the two halves together firmly until you hear or feel a click. This click indicates that the locking tab or lever has engaged, securing the connection.
- Apply steady pressure.
- If there’s a locking tab, ensure it snaps back into its original position.
- Give the connector a gentle tug to confirm it is securely attached and won’t easily pull apart.
Testing the Lights
After reconnecting the wiring, it’s essential to test the lights to ensure they are working correctly.
- Reconnect the battery if you disconnected it.
- Turn on your car’s ignition and then activate the lights.
- Check if the light comes on as expected. Also, test any other lights that share the same connector or circuit, if applicable.
Frequently Asked Questions
Question: What should I do if I can’t find the release tab on the connector?
Answer: Look very closely at the connector, especially around the edges where the two halves meet. Many tabs are small and can be difficult to see. Sometimes, they are integrated into the body of the connector and don’t stick out much.
Gently running your finger along the edges might help you feel it.
Question: Can I use a metal screwdriver to pry open a stuck connector?
Answer: It is strongly advised not to use metal tools to pry connectors apart. Metal can easily damage the plastic housing, break off the release tabs, or even scratch the metal terminals inside, causing electrical problems or preventing a good connection. Plastic trim tools are a much safer alternative.
Question: Is it safe to leave the battery disconnected while I work on the light wiring?
Answer: Yes, disconnecting the negative battery terminal is a very safe practice. It ensures there’s no power going to any part of the car’s electrical system, preventing accidental shocks or short circuits while you are working.
Question: What if the connector is very dirty or corroded?
Answer: If the connector is dirty or corroded, clean it thoroughly with an electrical contact cleaner. You might need to use a small brush to remove stubborn corrosion. Once clean and dry, applying dielectric grease can help prevent future issues and make reconnection easier.
Question: My car light isn’t working after I reconnected the wiring. What could be wrong?
Answer: First, double-check that the connector is fully seated and clicked into place. Ensure the release tab is properly engaged. If the connection seems secure, the issue might be with the bulb itself, or there could be a fuse problem.
You may need to test the bulb separately or check the fuse box.
Summary
Successfully removing and reconnecting car light wiring connectors is straightforward when you know how. Always prioritize safety by turning off the car and potentially disconnecting the battery. Identify the connector type, find the release mechanism, and operate it gently.
With the right approach and tools, you can handle these tasks easily.