How to Remove Rusted Paint Chips: Proven Effortless Guide
Easily remove rusted paint chips from your car by gently scraping loose rust, cleaning the area, applying a rust converter, priming, and then repainting. This step-by-step guide makes DIY rust removal achievable and keeps your car looking its best.
Seeing those little flecks of orange rust peeking through your car’s paint is never fun. It’s like a tiny warning sign that something needs attention. But don’t worry, dealing with rusted paint chips doesn’t require a professional mechanic or a huge budget. As your trusted automotive guide, Md Meraj, I’m here to show you how to tackle this common car issue with simple, step-by-step methods. We’ll get your car looking great again, and you’ll feel confident knowing you handled it yourself!
This guide is designed for anyone, no matter your experience level. We’ll break down exactly what you need and how to use it, making the process feel less like a chore and more like a rewarding DIY project. Ready to say goodbye to those rust spots? Let’s get started!
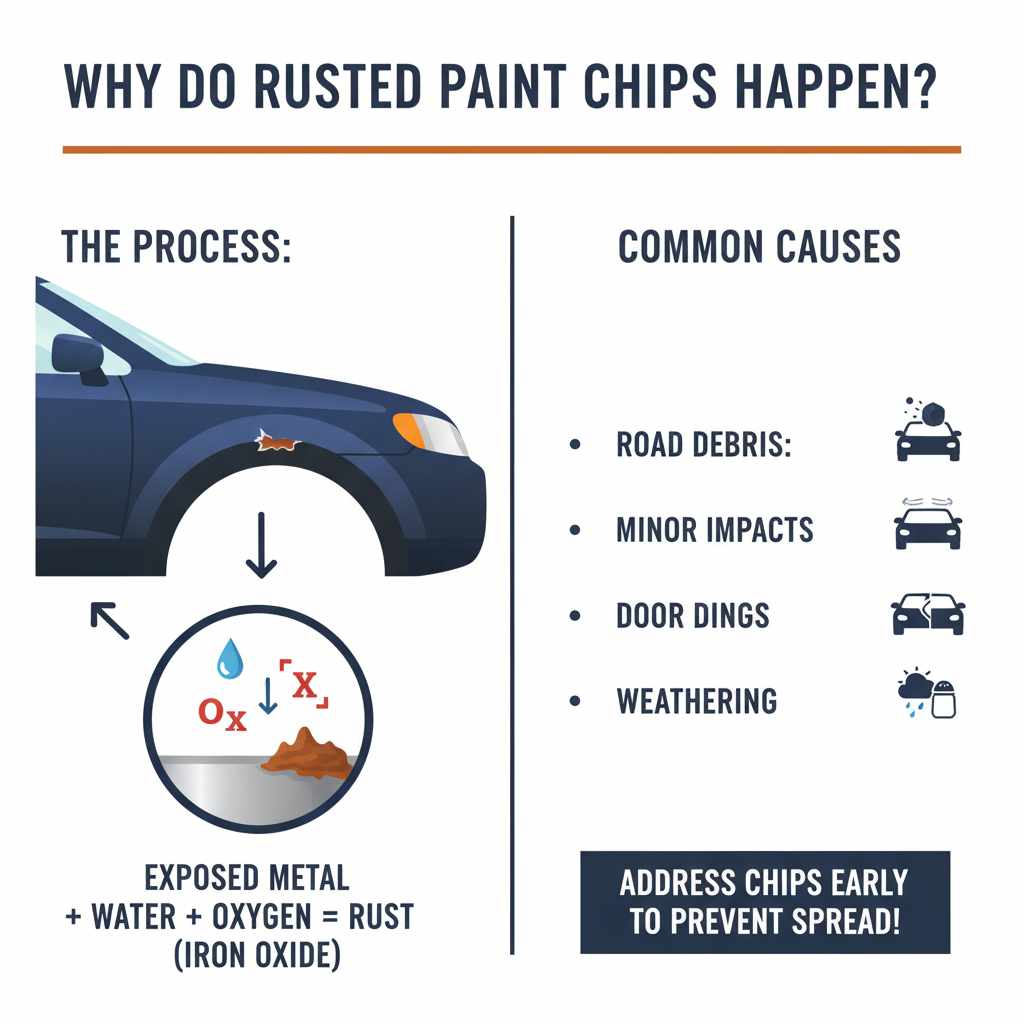
Why Do Rusted Paint Chips Happen?
Understanding why rust forms on your car can help you prevent it in the future. It all starts with a little scratch. When your car’s paint gets chipped, exposed metal is left vulnerable to the elements. Water and oxygen are the main culprits when it comes to rust (iron oxide). When they come into contact with bare metal, a chemical reaction begins, and slowly, rust starts to form.
Several things can cause paint chips:
- Road debris: Rocks, gravel, and other bits of road junk can hit your car and chip the paint.
- Minor impacts: Bumping into things, even lightly, can create chips.
- Door dings: When another car door opens into yours in a parking lot.
- Weathering: Over time, harsh sun, salt, and moisture can wear down paint protection.
The sooner you address these chips, the easier they are to fix and the less likely they are to spread.
What You’ll Need: Your Rust-Busting Toolkit
Before we dive into the steps, let’s gather your supplies. Don’t be intimidated by the list; most of these are readily available at any auto parts store or even your local hardware shop. Having the right tools makes all the difference in getting a smooth, professional-looking finish.
Essential Tools and Materials:
- Safety Gear: Safety glasses and gloves are a must.
- Scraping Tool: A plastic scraper, putty knife, or even an old credit card to gently remove loose rust. A wire brush is also very helpful for tougher spots.
- Cleaning Supplies: A clean cloth or sponge, degreaser or car soap, and fresh water.
- Rust Converter or Remover: These products are designed specifically to stop rust in its tracks.
- Primer: A good quality automotive primer, preferably one designed for use on metal or to seal rust.
- Touch-Up Paint: Find paint that matches your car’s color code. You can usually find this code on a sticker in your driver’s side doorjamb or the owner’s manual.
- Clear Coat: To match the factory finish.
- Fine-Grit Sandpaper: Around 220-grit for initial sanding and 400-grit or higher for smoothing.
- Rubbing Alcohol: For final cleaning.
- Applicators: Small paintbrushes (artist brushes work well for precision) or touch-up paint pens.
It’s always a good idea to check out reputable tool suppliers for quality items. For instance, brands like 3M offer great sandpaper and automotive finishing products that are widely trusted.
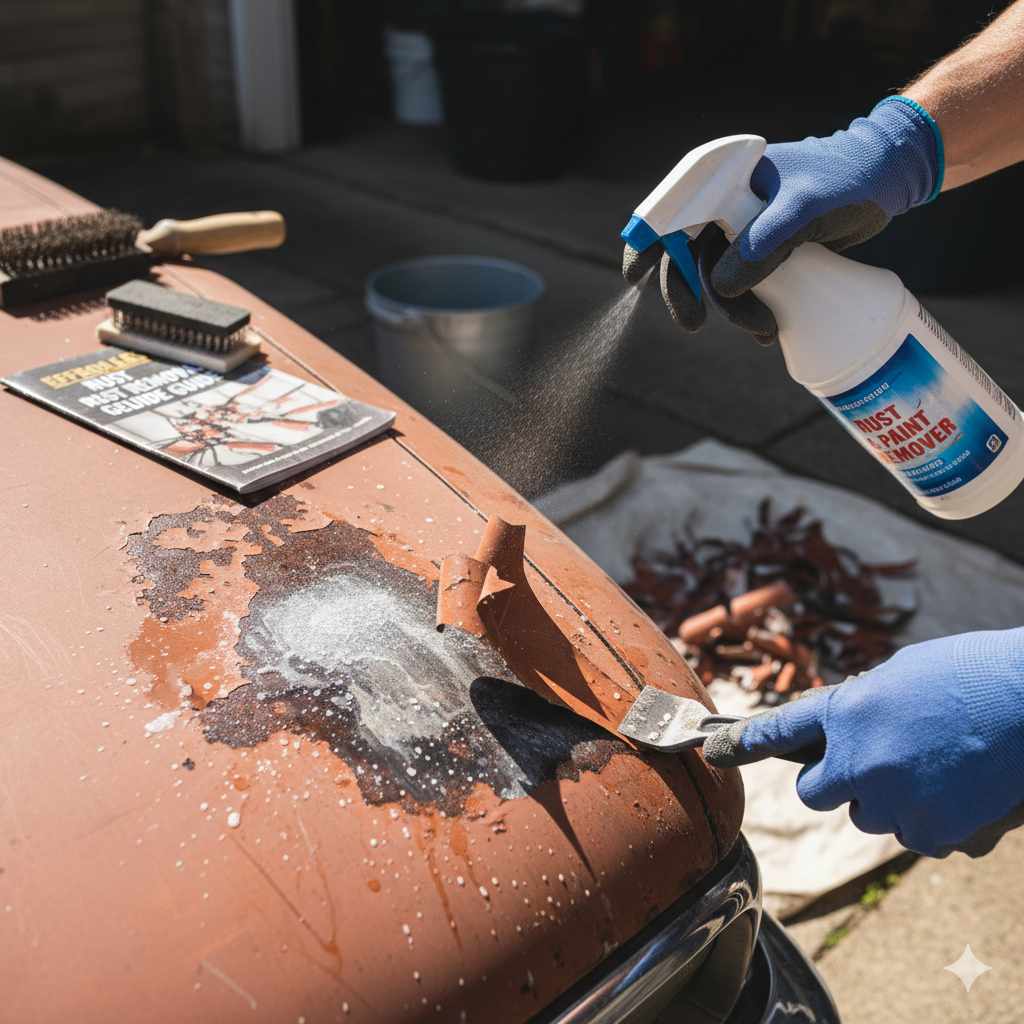
Step-by-Step: Your Effortless Rust Removal Process
Now, let’s get to work! Follow these steps carefully, and you’ll be amazed at how much better your car starts to look. Remember, patience is key here, especially when it comes to drying times between steps.
Step 1: Assess and Prepare the Area
First, locate all the rusted paint chips. Brush away any loose dirt or debris from the affected areas. Good lighting is essential so you can see the full extent of the rust. You want to work in a well-ventilated area, out of direct sunlight, and ideally when the temperature is mild.
Step 2: Gently Remove Loose Rust
This is where your scraping tool or wire brush comes in. The goal is to remove loose paint and rust. You don’t need to sand down to bare, shiny metal everywhere. Just get rid of anything that’s flaking off. If you have a wire brush, use it gently to scrub away the more stubborn rust deposits. Think of it as tidying up the area.
For very small, superficial rust spots, sometimes a good scrub with a fine-grit sandpaper (around 220-grit) is enough to get down to solid metal without damaging surrounding paint.
Step 3: Clean the Area Thoroughly
Once you’ve removed the loose stuff, it’s time to clean. Use a degreaser or car soap with water to wash the entire area you’ll be working on. Rinse it well and dry it completely with a clean cloth. Then, wipe down the area with rubbing alcohol on a clean cloth. This removes any lingering oils or contaminants that could prevent the new paint from adhering properly.
Step 4: Apply Rust Converter or Remover
This is a critical step for ensuring the rust doesn’t come back. A rust converter chemically changes rust into a stable, paintable surface. A rust remover will dissolve the rust, which you then wipe away. For most DIYers, a rust converter is often simpler and more effective at preventing future issues.
- Read the Product Instructions: Every product is a little different, so carefully follow the manufacturer’s directions.
- Application: Apply a thin, even coat of the rust converter to the bare metal and any remaining rust spots. You’ll usually see it change color as it works.
- Drying Time: Allow it to dry completely according to the product’s instructions. This can take anywhere from an hour to several hours. Some converters may require a second coat.
This step is crucial for long-term success. For more information on rust treatment, the Environmental Protection Agency (EPA) provides general guidelines on protecting surfaces from corrosion, which can be helpful background.
Step 5: Apply Primer
Once the rust converter is dry and stable, it’s time to prime. Primer helps the paint stick better and provides an extra layer of protection.
- Choose the Right Primer: Use an automotive primer designed for metal or that acts as a rust inhibitor.
- Application: Apply a thin, even coat of primer over the treated area, extending slightly beyond it onto the surrounding paint. You might need two thin coats for good coverage.
- Drying: Let the primer dry completely. Lightly wet-sand with very fine-grit sandpaper (like 400-grit or higher) if the surface feels rough, then clean and dry again.
Step 6: Apply Touch-Up Paint
Now for the color! If you have a touch-up paint pen or small bottle, use it to carefully apply paint to the primed area.
- Color Match: Ensure your paint color code is accurate.
- Thin Coats: Apply paint in very thin layers. It’s much better to apply 2-3 thin coats than one thick one. This prevents drips and ensures even coverage.
- Drying Between Coats: Allow each coat of paint to dry to the touch before applying the next.
You can find your car’s paint code by looking at the sticker on the driver’s side doorjamb, under the hood, or in your owner’s manual. Most auto parts stores can help you find the right paint based on this code.
Step 7: Apply Clear Coat
Once the color coat is dry (check product instructions, but usually at least 24 hours), you’ll apply a clear coat. This protects the color coat and matches your car’s glossy finish.
- Application: Apply thin, even coats of clear coat, just like the color paint.
- Multiple Coats: You might need 2-3 coats for good protection and shine.
- Curing Time: Clear coat needs time to cure. Avoid washing the area for at least a few days.
Step 8: Finishing Touches (Optional)
After the clear coat has fully cured (this can take several days to a week), you can further refine the finish if needed. Lightly wet-sand the area with ultra-fine grit sandpaper (2000-grit or higher) and then use a polishing compound. This will help blend the new paint into the old, making the repair nearly invisible. Always finish with a good wax to protect the area.
Troubleshooting Common Issues
Even with the best intentions, you might run into a snag. Here are a few common problems and how to fix them:
Problem: The rust is deeper than I thought.
Solution: If the rust has eaten through the metal or is very deep, it might require more than just paint. For minor holes, you might be able to use a metal filler after treating the rust. For severe damage, it’s best to consult a professional body shop. You can learn more about metal repair on resources from the Building Science Information website, which offers in-depth knowledge on material degradation.
Problem: The new paint doesn’t match.
Solution: This can happen! Sometimes, car paint fades over time, so even the exact color code might look slightly different. If the mismatch is noticeable, you might need to repaint a larger section or consult a professional for custom blending. Ensure you were using the exact paint code for your vehicle.
Problem: I have drips or uneven paint.
Solution: Don’t panic! Once the paint is dry, you can try to gently sand down the drips with very fine-grit sandpaper (start with 400-grit and move to higher grits if needed), then reapply multiple thin coats. For large imperfections, you might need to remove the paint and start the priming and painting steps again.
When to Call a Professional
While this guide covers many common situations, there are times when it’s wise to let the experts handle it. If the rust is:
- Extensive and covers a large area of your car.
- Located on structural components of the vehicle.
- Causing the metal to be significantly weakened or pitted.
In these cases, a professional autobody shop has the specialized tools and expertise to repair the damage safely and effectively, ensuring the integrity and appearance of your vehicle are restored.
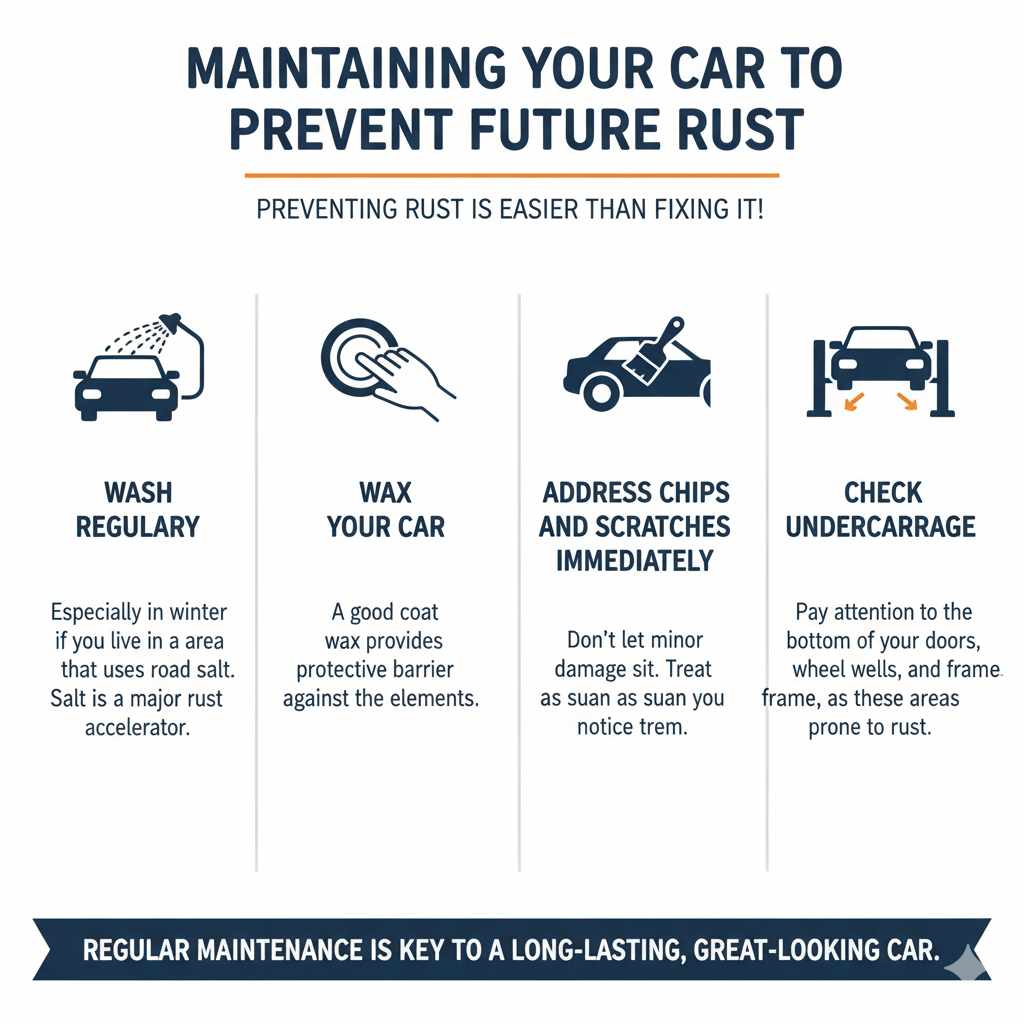
Maintaining Your Car to Prevent Future Rust
Preventing rust is always easier than fixing it. Here are some tips to keep your car looking its best and rust-free:
- Wash Regularly: Especially in winter if you live in an area that uses road salt. Salt is a major rust accelerator.
- Wax Your Car: A good coat of wax provides a protective barrier against the elements.
- Address Chips and Scratches Immediately: Don’t let minor damage sit. Treat them as soon as you notice them.
- Check Undercarriage: Pay attention to the bottom of your doors, wheel wells, and frame, as these areas are prone to rust.
Regular maintenance is key to a long-lasting, great-looking car.
Frequently Asked Questions (FAQ)
Q1: How long does it take to remove rusted paint chips?
A1: For minor chips, the entire process from cleaning to the final clear coat can take a few hours of active work, spread over 2-3 days to allow for drying and curing between steps. Larger areas or multiple chips will naturally take longer.
Q2: Can I just paint over the rust?
A2: No, you should never paint directly over rust. The rust will continue to spread underneath the new paint, and the repair won’t last. It’s essential to treat the rust first with a converter or remover.
Q3: What is the best way to remove rust from car paint?
A3: The best way is to gently scrape off loose rust, clean the area, apply a rust converter or remover, then prime, paint, and clear coat. This multi-step process ensures the rust is neutralized and protected.
Q4: Do I need special tools for this job?
A4: You’ll need basic tools like scrapers or wire brushes, sandpaper, cloths, and safety gear. The specialized products are rust converters, primers, touch-up paint, and clear coats, all readily available at auto parts stores.
Q5: How do I find the exact paint color for my car?
A5: Look for a sticker on your car, usually on the driver’s side doorjamb, inside the fuel filler door, or under the hood. This sticker contains your vehicle’s paint code. You can also find it in your owner’s manual. Auto parts stores can help match this code.
Q6: Can I use a regular household paint for touch-ups?
A6: It’s highly recommended to use automotive-specific touch-up paint. Household paints are formulated differently and may not adhere properly to car surfaces, match the finish, or hold up to the elements.
Q7: Will this repair last?
A7: If done correctly, with proper rust treatment, priming, and painting, the repair can last for a significant amount of time, especially if you maintain your vehicle and protect the area from further damage or moisture.
Conclusion
There you have it! Removing rusted paint chips from your car is a perfectly achievable DIY project. By following these clear, step-by-step instructions, you can protect your vehicle from further damage, maintain its appearance, and even boost its resale value. Remember to always prioritize safety by wearing your protective gear and working in a well-ventilated area.
Don’t let those little rust spots get you down. With the right approach and a little bit of patience, you can tackle this common car care issue with confidence. You’ve got this! Keep taking good care of your ride, and it’ll take good care of you for miles to come.